Tài liệu Teach Yourself VISUALLY Windows 7 (P2) pdf
Bạn đang xem bản rút gọn của tài liệu. Xem và tải ngay bản đầy đủ của tài liệu tại đây (5.76 MB, 20 trang )
6
B
y
Windows 7 is an operating system that contains a collection of tools, programs, and resources.
Here is a sampling of what you can do with them.
What You Can Do
with Windows 7
Create and Edit Pictures
Windows 7 comes with a lot of features that let you
work with images. You can create your own pictures
from scratch, import images from a scanner or digital
camera, or download images from the Internet. After
you create or acquire an image, you can edit it, print
it, or send it via e-mail. You learn about these and
other picture tasks in Chapter 4.
Get Work Done
With Windows 7, you can run programs that enable
you to get your work done more efficiently, such as
a
word processor for writing memos and letters, a
spreadsheet for making calculations, and a database
for storing information. Windows 7 comes with some
of these programs (such as the WordPad program you
learn about in Chapter 3), and you can purchase and
install others separately.
2009
2009
2009
2009
2009
2009
2009
2009
Declare a New State!
Get on the Internet
Windows 7 makes connecting to the Internet easy
(see Chapter 9). And after you are on the Net,
Windows 7 has all the tools you need to get the most
out of your experience. For example, you can use
Internet Explorer to surf the World Wide Web (see
Chapter 10) and Windows Live Mail to send and
receive e-mail (see Chapter 11).
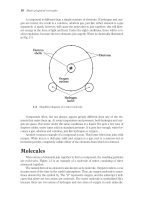
Play Music and Other Media
Windows 7 has treats for your ears as well as your
eyes. You can listen to audio CDs, play digital sound
and video clips, watch DVD movies, tune in to Internet
radio stations, and copy audio files to a recordable
CD. You learn about these multimedia tasks in
Chapter 5.
7
Getting Started with Windows 7
chapter
1
The Windows 7
Screen
Before getting to the specifics of working with Windows 7, take a few seconds to familiarize
yourself with the basic screen elements.
s.
Desktop Icon
An icon on the desktop
represents a program or
Windows 7 feature. A
program you install often
adds its own icon on the
desktop.
Mouse Pointer
When you move your
mouse, this pointer
moves along with it.
Desktop
This is the Windows 7
“work area,” meaning that
it is where you work with
your programs and
documents.
Time and Date
This is the current time
and date on your
computer. To see the full
date, position the mouse
over the time. To
change the date or time,
click the time.
Notification Area
This area displays small icons that
notify you about things that are
happening on your computer. For
example, you see notifications if
your printer runs out of paper or if
an update to Windows 7 is
available over the Internet.
Taskbar
The programs you have open
appear in the taskbar. You use this
area to switch between programs if
you have more than one running at
a time.
Taskbar Icons
You use these icons to launch
some Windows 7 features with just
a mouse click.
Start Button
You use this button to start
programs and launch many of
Windows 7’s features.
8
11
11
R
1
2
●
N
DOUBLE-CLICK THE MOUSE
1 Position the mouse over the
object you want to work with.
2 Click the left mouse button twice
in quick succession.
●
Windows 7 usually performs some
operation in response to the
double-click action (such as
displaying the Recycle Bin
window).
CLICK THE MOUSE
1 Position the mouse over the
object you want to work with.
2 Click the left mouse button.
●
Depending on the object,
Windows 7 either selects the
object or performs some
operation in response to the click
(such as displaying the Start
menu).
Using a Mouse with Windows 7
Windows 7 was built with the mouse in mind,
so it pays to learn the basic mouse techniques
early on because you will use them for as long
as you use Windows.
If you have never used a mouse before, remember to keep all
your movements slow and deliberate, and practice the techniques
in this section as much as you can.
Using a Mouse
with Windows 7
C
1
2
3
●
4
9
Getting Started with Windows 7
chapter
1
11
33
11
How can I set up
my mouse for a
left-hander?
Click Start, Control
Panel, Hardware and
Sound, and then
Mouse to open the
Mouse Properties
dialog box. Click the Buttons tab. Click
Switch primary and secondary
buttons (
changes to ).
Why does Windows 7 sometimes
not recognize my double-clicks?
Try to double-click as quickly as you
can, and be sure not to move the
mouse between clicks. If you continue
to have trouble, click Start, Control
Panel, Hardware and Sound, and
then Mouse to open the Mouse
Properties dialog box. Click the Buttons
tab. In the Double-click Speed group, click and drag the
slider to the left (toward Slow).
RIGHT-CLICK THE MOUSE
1 Position the mouse over the object you want to work
with.
2 Click the right mouse button.
●
Windows 7 displays a shortcut menu when you right-click
something.
Note: The contents of the shortcut menu depend on the object you right-clicked.
Click
Click
Click
Click
DragDrag
Drag
Drag
Click
Click
Click
Click
Click
Click
Click
Click
CLICK AND DRAG THE MOUSE
1 Position the mouse over the object you want to work
with.
2 Click and hold the left mouse button.
3 Move the mouse to drag the selected object.
●
In most cases, the object moves along with the mouse .
4 Release the mouse button when the selected object is
repositioned.
10
44
22
11
33
FAQs
FAQs
●
6
N
Su
un
●
●
5
N
su
of
The Table of Contents appears.
4 Click a category.
1 Click Start.
The Start menu appears.
2 Click Help and Support.
The Windows Help and Support
window appears.
3 Click the Browse Help
button ( ).
Get Help
You can find out more about Windows 7, learn
how to perform a task, or troubleshoot
problems by accessing the Help system.
Most of the Help system is arranged into various categories,
such as “Security and privacy” and “Files, folders, and
libraries.” Each category offers a number of subcategories, and
each category and subcategory contains a collection of related
topics.
Get
Help
11
Getting Started with Windows 7
chapter
1
55
How do I get help for a specific program?
Almost all Windows programs have their own Help features. You
can access Help in a specific program one of three main ways:
●
Click Help from the menu, and then click the command that
runs the Help features (it may be called Help Contents, Help
Topics, or Program Help, where Program is the name of the
program (for example, Microsoft Word Help).
●
Press .
●
In a dialog box or program window, click the Help button ( ).
●
The item you selected appears in
the Windows Help and Support
Center window.
6 Read the article.
Note: To return to a previous Windows Help and
Support Center screen, click the Back button (
)
until you get to the screen you want.
●
A list of Help topics appears for
the category you selected.
●
A list of subcategories appears for
the category you selected.
5 Click a topic.
Note: If the topic you want is part of a
subcategory, click the subcategory to display the list
of topics it contains, and then click the topic.
12
33
44
22
11
6
5
The System window appears.
Note: If the System window shows the Ask for
Genuine Microsoft Software logo in the Windows
Activation area, then you do not need to perform
the rest of the steps in this section. Click the Close
button (
) to close the System window.
4 Click the Activate Windows
now link.
1 Click Start.
The Start menu appears.
2 Right-click Computer.
3 Click Properties.
Activate Your Copy of Windows 7
To avoid piracy, Microsoft requires that each copy
of Windows 7 be activated. Otherwise, your copy
of Windows 7 will refuse to run after the
activation period has expired.
This section assumes that Windows 7 has not yet prompted you to
start the activation. If you see an icon in the notification area with
the message “Activate Windows now,” click that message and then
skip to Step 5.
Activate Your Copy
of Windows 7
13
Getting Started with Windows 7
chapter
1
55
66
Windows 7 confirms that it has
been activated.
6 Click Close.
The Windows Activation dialog
box appears.
5 Click Activate Windows online
now.
How can I activate my
copy of Windows 7 if I do
not have Internetaccess?
If you do not have Internet
access, perform Steps 1 to 5
anyway. After a few moments,
Windows Activation displays a
list of options. Click Show me
other ways to activate.
Ifyour computer has a
modem attached, click
Use
my modem to connect
directly to the activation service. If you do not have a
modem, click Use the automated phone system, instead.
Can I activate Windows 7 on more
than one computer?
No, not usually. The activation process
creates a special value unique to your
computer’s hardware configuration.
When you activate Windows 7, your copy
of the program is associated with this
unique hardware value, which means
your copy works only with that one
computer. However, if that computer
breaks down, you can telephone
Microsoft to let them know, and they
should allow you to activate Windows 7
on another computer.
14
3
●
1
N
pr
2
W
s
y
d
S
c
a
d
m
4
22
33
3 Click the power button
arrow ( ).
4 Click Restart.
Windows 7 shuts down and your
computer restarts.
1 Shut down all your running
programs.
Note: Be sure to save your work as you close your
programs.
2 Click Start.
The Start menu appears.
Restart Windows 7
You can restart Windows 7, which means it shuts
down and starts up again immediately. This is
useful if your computer is running slow or acting
funny. Sometimes a restart solves the problem.
Knowing how to restart Windows 7 also comes in handy when you
install a program or device that requires a restart to function
properly. If you are busy right now, you can always opt to restart
your computer yourself later, when it is more convenient.
Restart
Windows 7
15
Getting Started with Windows 7
chapter
1
22
33
Shutting down
Shutting down
for the day
for the day
Shutting down
for the day
3 Click Shut Down.
Windows 7 shuts down and turns
off your computer.
●
If you want Windows 7 to
automatically reopen all the
programs and documents
currently on your screen, click the
power button arrow ( ) and
then click Sleep, instead.
1 Shut down all your running
programs.
Note: Be sure to save your work as you close your
programs.
2 Click Start.
The Start menu appears.
Shut Down Windows 7
When you complete your work for the day, you should
shut down Windows 7. However, do not just shut off
your computer’s power. Follow the proper steps to avoid
damaging files on your system.
Shutting off the computer’s power without properly exiting Windows 7 can
cause two problems. First, if you have unsaved changes in some open
documents, you may lose those changes. Second, you could damage one or
more Windows 7 system files, which could make your system unstable.
Shut Down
Windows 7
2
chapter
COMPUTER
COMPUTER
COMPUTER
COMPUTER
1
2
3
4
5
6
7
8
9
1
2
3
4
5
6
7
8
9
1
2
3
4
5
6
7
8
9
0
0
0
.
.
.
=
=
=
+
+
+
-
-
-
*
*
*
/
/
/
3.150,0003.150,000
3.150,000
3.150,000
Launching and Working
with Programs
On its own, Windows 7 does
not do very much. To do
something useful with your
computer, you need to work
with a program, either one
that comes with Windows 7
or one that you install
yourself. In this chapter, you
learn how to install, launch,
and work with programs.
Install a Program 18
Change or Repair a Program Installation 20
Start a Program 22
Understanding Program Windows 23
Using Pull-Down Menus 24
Using Toolbars 25
Understanding Dialog Box Controls 26
Using Dialog Boxes 28
Work with Program Windows 30
Using Scrollbars 36
Switch Between Programs 38
Take Advantage of Program Jump Lists 40
Uninstall a Program 42
s
k
u
18
22
2 Click Run file, where file is the
name of the installation program
(usually SETUP.EXE).
3 Follow the installation instructions
the program provides.
Note: Installation steps vary from program to
program.
INSTALL FROM A CD OR DVD
1 Insert the program’s disc into your
computer’s CD or DVD drive.
●
The AutoPlay dialog box appears.
Install a Program
If Windows 7 does not come with a program
that you need, you can obtain the program
yourself and then install it on your computer.
How you start the installation process depends on whether the
program comes on a CD or DVD disc, or from the Internet.
Install a
Program
05 503867-ch02.indd 1805 503867-ch02.indd 18 8/15/09 12:03 AM8/15/09 12:03 AM
19
Launching and Working with Programs
chapter
2
00123 45600
33
22
11
44
How do I find my software’s product key or serial number?
The product key or serial number is crucial because many programs
do not install until you enter the number. Look for a sticker attached
to the back or inside of the CD case. Also look on the registration
card, the CD itself, or the back of the box. If you downloaded the
program, the number should appear on the download screen and on
the e-mail receipt you receive.
The Downloads folder appears.
4 Double-click the file.
The software’s installation
program begins.
Note: For compressed files, extract the files, and
then double-click the setup file. See the “Extract
Files from a Compressed Folder” section in
Chapter 6.
5 Follow the installation instructions
the program provides.
INSTALL FROM A FILE
DOWNLOADED FROM THE
INTERNET
1 Click Start.
2 Type downloads.
3 Click Downloads.
Note: If you saved the downloaded file in a folder
other than Downloads, use Windows Explorer to
find the downloaded file. To view a file with
Windows Explorer, see the “View Your Files” section
in Chapter 6.
20
33
22
11
5
N
Ch
●
6
●
4
The Control Panel window
appears.
3 Click Uninstall a program.
1 Click Start.
2 Click Control Panel.
Change or Repair a Program Installation
When you install a program, you can choose the
“custom” installation option to install only some of
the program’s components. If you decide later on to
install more components or remove installed
components, you can rerun the install program to
make these changes.
If an installed program does not start or is behaving erratically, it may
have one or more missing or corrupt files. Many programs come with a
repair option that can fix such problems.
Change or Repair a
Program Installation
21
Launching and Working with Programs
chapter
2
44
55
Is it dangerous to
repair a program?
Generally speaking, no
it is not dangerous
to repair a
program. In almost
all cases, what the
repair tool does is copy
fresh copies of the
program’s original files to
your hard disk. However, in
some rare cases repairing a
program could cause you to lose data that you
created using the program. For this reason, it is a
good idea to back up your data before repairing any
program. See Chapter 14 to learn how to perform
backups in Windows 7.
What is the difference
between a “typical”
and “custom”
installation?
A “typical”
installation
automatically installs
only those program
components that
people use most
often. In a “custom”
installation, you select
which components are installed, where they are
installed, and so on. The custom option is best
suited for experienced users, so you are usually
better off choosing the typical install.
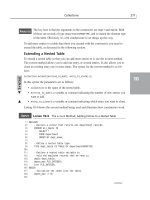
5 Click Change.
Note: For some programs, you click Uninstall/
Change, instead.
●
If you want to repair the program,
click Repair instead.
6 Follow the installation instructions
the program provides.
The Programs and Features
window appears.
●
Windows 7 displays a list of the
programs installed on your
computer.
4 Click the program you want to
work with.
Photo
Photo
Photo
Editor
Editor
Editor
Word
Word
Word
Processor
Processor
Custom
Custom
Layout
Layout
Layout
F
i
le
BACKUP
Y
th
22
22
33
11
The program appears on the
desktop.
●
Windows 7 adds a button for the
program to the taskbar.
Note: After you have used a program a few
times, it may appear on the main Start menu. If
so, you can launch the program by clicking its
Start menu icon.
1 Click Start.
●
If the program you want to use
has a taskbar button, you can click
the button to launch the program.
2 Click All Programs.
Note: When you click All Programs, the
command name changes to Back.
3 Click the icon for the program you
want to launch.
●
If your program icon is in a
submenu, click the submenu and
then click the program icon.
Start a Program
To work with any program, you must first
tell Windows 7 which program you want to
run. Windows 7 then launches the program
and displays it on the desktop.
Start a
Program
23
Launching and Working with Programs
chapter
2
Menu Bar
The menu bar contains the pull-
down menus for Windows 7 and
most Windows 7 software. In some
programs you must press
to
see the menu bar.
Understanding
Program Windows
You work with a program by manipulating
the various features of its window.
System Menu Icon
Clicking this icon or pressing +
displays a menu that
enables you to work with program
windows via the keyboard.
Title Bar
The title bar displays the name
of the program. In some programs,
the title bar also displays the name
of the open document. You can
also use the title bar to move the
window.
23
Toolbar
Buttons that offer
easy access to
common program
commands and
features appear in
the toolbar. Some
buttons are
commands and
some have lists
from which you can
make a choice.
Close Button
When you click the Close button
(
), the program shuts down.
Minimize Button
You click the Minimize button
( ) to remove the window from
the desktop and display only the
window’s taskbar button. The
window is still open, but not active.
Maximize Button
To enlarge the window either from
the taskbar or so that it takes up
the entire desktop, you click the
Maximize button (
).
E
1
N
af
an
fe
●
2
D
1
2
3
●
N
In
to
Y
u
to
c
c
24
Status Bar
Libraries
Extra Large Icons
Large Icons
Medium Icons
Small Icons
Details
Refresh
Go To
Choose Details
Stack By
Group By
Sort By
Name
Date Modified
Ty p e
Size
Ascending
Descending
More
11
11
22
22
RUN COMMANDS
1 Click the name of the menu you
want to display.
●
The program displays the menu.
You can also display a menu by
pressing and holding
and
pressing the underlined letter in
the menu name.
2 Click the command you want
to run.
The program runs the command.
●
If your command is in a submenu,
click the submenu and then click
the desired command.
TURN FEATURES ON AND OFF
1 Click the name of the menu you
want to display.
●
The program displays the menu.
2 Click the menu item.
Click a submenu if your command
is not on the main menu.
●
Toggle features are either turned
on (indicated by ) or off (no
check mark appears).
●
Click an option feature to turn it
on (indicated by ) and turn off
the previously activated item.
Using Pull-Down Menus
When you are ready to work with a program, use the
pull-down menus to access the program’s commands
and features.
The items in a pull-down menu are either commands that execute some
action in the program, or features that you turn on and off. If you do not see
any menus, you can often display them by pressing
.
Using Pull-Down
Menus
25
Launching and Working with Programs
chapter
2
S
TOP REFRESH HOME PRINT SEARCH FAVORITES HISTORY MAIL EDIT
V
ORITES TOOLS HELP
Document 1
Document 1
Floor
Plans
Floor
Plans
22
11
11
33
22
EXECUTE COMMANDS
1 Click the toolbar button that
represents the command or list.
Note: If the toolbar button remains “pressed”
after you click it, the button toggles a feature on
and off and the feature is now on. To turn the
feature off, click the button to “unpress” it.
●
The program executes the
command or, as shown here,
drops down the list.
2 If a list appears, click the list item
that represents the command.
The program runs the command.
DISPLAY AND HIDE TOOLBARS
1 Click View.
2 Click Toolbars.
3 Click a toolbar.
●
If the toolbar is currently
displayed (indicated by in the
View menu), the program hides
the toolbar.
If the toolbar is currently hidden,
the program displays the toolbar
(indicated by in the View
menu).
Note: Some programs have only a single toolbar.
In this case, you click View and then click Toolbar
to toggle the toolbar on and off.
Using Toolbars
You can use the toolbar to access commands faster than
using the menus. Most programs come with one or more
toolbars, which are collections of buttons that in most
cases give you one-click access to the program’s most
common features.
Using
Toolbars
25
chapter
2