Tài liệu Developing ASP Components P2 docx
Bạn đang xem bản rút gọn của tài liệu. Xem và tải ngay bản đầy đủ của tài liệu tại đây (161.34 KB, 10 trang )
20 Chapter 2: Setting Up the ASP Development Environment
This is the Title of the Book, eMatter Edition
Copyright © 2001 O’Reilly & Associates, Inc. All rights reserved.
To address this problem, Microsoft added the ability to IIS Version 4.0 to run an
ASP application in isolation in order to be able to unload a specific application.
Once the application was unloaded, the component accessed by the application
was unlocked and could then be recompiled.
With IIS Version 5.0, you have three options to control ASP application isolation:
• You can create a new web server that runs within the shared IIS process envi-
ronment (through Inetinfo.exe).
• You can set your application to run within a pooled environment (through
dllhost.exe).
• Your application can run as an isolated application (again, through dllhost.exe).
By default, the web server is set up to run within a pooled environment, but this
can be changed in the server’s Properties page. To change the setting for the new
development web server, right-click on the server in the Internet Information Ser-
vices console snap-in, and pick Properties from the menu that opens. Then, select
the Home Directory tab from the window that opens, as shown in Figure 2-1. The
program isolation setting is an option labeled Application Protection. Set this to
High (Isolated) to be able to unload the application and release any locks on com-
ponents without having to shut down either the web server or the web service.
You can change several other properties for the server, including performance tun-
ing and setting security for the site, from the Properties window. But first, time to
try out your test environment. To do this, you’ll need a test ASP component.
To test the environment, you’ll need an ASP component you can use to make sure
the application isolation is set correctly and you can unload the web site without
having to shut it down. Then you’ll need to create a simple ASP page that accesses
the component. For this example, we’ll create a component using Visual Basic.
If you aren’t using Visual Basic and are running this test using the
component copied from the code examples, you can still test out the
application isolation feature. Instead of trying to recompile the com-
ponent, try deleting it. Without unloading the server application first,
you should get a Sharing Violation error and a message about the
component being in use. Unload the server application and then try
again to delete the component—this time you shouldn’t have any
problems removing it.
The details of creating a Visual Basic ASP component are covered in Chapter 7,
Creating a Simple Visual Basic ASP Component, but for now create the compo-
nent project as an ActiveX DLL, and name the project asp0201 and the project file
,ch02.18096 Page 20 Thursday, February 22, 2001 1:27 PM
Configuring the IIS Environment 21
This is the Title of the Book, eMatter Edition
Copyright © 2001 O’Reilly & Associates, Inc. All rights reserved.
asp0201.vbp. A class is automatically created for a project such as this; rename this
class tstweb and the class file tstweb.cls. Accept all the defaults for the project and
the class.
The next step in creating the test component is to add in the class code, in this
example a very simple function that returns a very traditional message to the ASP
page, as shown in Example 2-1.
Once you’ve added the code to the class, compile the component by accessing the
File menu and clicking on the “Make asp0201.dll” menu item. A dialog box opens
Figure 2-1. Setting the isolation level for the new development web server using the server
Properties dialog box
Example 2-1. Simple Visual Basic Component to Return a “Hello, World!” Message
Option Explicit
' tests new Development Web
Function tstNewWeb() As String
tstNewWeb = "Hello, World!"
End Function
,ch02.18096 Page 21 Thursday, February 22, 2001 1:27 PM
22 Chapter 2: Setting Up the ASP Development Environment
This is the Title of the Book, eMatter Edition
Copyright © 2001 O’Reilly & Associates, Inc. All rights reserved.
that contains a default name for the component (the name of the project with a
DLL extension). In this dialog box, you can change the component’s name and
location and other application options, which we won’t go into until Chapter 7. For
now, accept everything at its default value and compile the component.
Visual Basic creates the component file and also registers it as a COM object acces-
sible from applications. If you don’t have Visual Basic, you can also copy the test
component from the downloadable code examples and register in on your
machine using the regsvr32 utility as follows:
regsvr32 asp0201.dll
Performance Issues with Application Isolation
As you’ll read in Chapter 3, ASP Components and COM, IIS applications require
a runtime executable in order to work. An ASP application running in the IIS
process environment operates within a shared-environment executable that
has been tuned to work efficiently in the IIS environment. Therefore it per-
forms better and has much less overhead then an application defined to be
pooled or isolated.
Pooled and isolated web servers use a standard COM/COM+ host, dllhost.exe,
which provides an individual executable environment, one for all pooled
applications and one for each isolated ASP application. However, dllhost.exe
is not the most efficient runtime environment to work in. In addition, each iso-
lated web server requires its own instance of dllhost.exe, which in turn requires
a completely separate desktop environment in order to run. This puts a burden
on the NT host supporting the IIS environment and requires special configura-
tion to support more than a small number of separate web servers.
You can see this for yourself if you add two web servers, each running as an
isolated application. If you access the processes for the system, you should see
two different instances of dllhost.exe running. Add another instance of an iso-
lated web server or virtual directory, which you’ll read about a little later, and
you’ll add another instance of dllhost.exe.
The isolated option is still the best approach to use for the ASP application
when developing ASP components. However, for a production environment,
you’ll want to use the shared or pooled environments for more efficient per-
formance.
Running the web server in isolation allows you to unload the server to recom-
pile components. An additional benefit to this type of web application is that
problems within the one application won’t impact other applications. Problems
within a shared or pooled environment can be propagated to other web servers.
,ch02.18096 Page 22 Thursday, February 22, 2001 1:27 PM
Configuring the IIS Environment 23
This is the Title of the Book, eMatter Edition
Copyright © 2001 O’Reilly & Associates, Inc. All rights reserved.
Next, create the ASP page that accesses the component, calling it asp0201.asp.
Without going into too much detail on what is happening, the ASP page creates an
instance of the component and invokes the component’s one and only method.
The text returned from the method is written out using one of the ASP built-in
objects, the Response object (discussed in Chapter 7 and detailed in Appendix A,
Quick ASP Built-In Object Reference).
<HTML>
<HEAD>
<TITLE>Developing ASP Components - Example 2-1</TITLE>
</HEAD>
<BODY>
<%
Dim obj
Set obj = Server.CreateObject("asp0201.tstweb")
Dim str
str = obj.tstNewWeb
Response.Write str
%>
</BODY>
</HTML>
When you access the ASP page through your web server, use syntax similar to the
following:
http://localhost/asp0201.asp
Or if you set up a new web server with a different port number, use this syntax
instead:
http://localhost:8000/asp0201.asp
If the web server is set up correctly, you should see the message, “Hello, World!”
To make sure that the application isolation feature is working properly, try recom-
piling the ASP component. You should get a Permission Denied error. To release
the component, access the Development Web Server Properties dialog box again,
go to the Home Directory page, and click the Unload button. Now try to recom-
pile—this time you shouldn’t have any problems.
At this point you’ve set up your development web server and have modified it to
run as an isolated application. What’s next? Well, in a development environment,
you might need to have different versions of an application accessible at any time,
or you might have more than one developer sharing the same environment. You
could create new web servers for every instance of the ASP application or for
every developer, but then you would have to find and assign different IPs and/or
port numbers for all of the servers.
An alternative approach to creating separate web servers for more than one ASP
application is to create the applications in their own virtual directory. This
,ch02.18096 Page 23 Thursday, February 22, 2001 1:27 PM
24 Chapter 2: Setting Up the ASP Development Environment
This is the Title of the Book, eMatter Edition
Copyright © 2001 O’Reilly & Associates, Inc. All rights reserved.
approach is used throughout the book for all of the code examples and is dis-
cussed next.
Creating Separate ASP Applications with
Virtual Directories
IIS virtual directories are used to add different directories to a web server, includ-
ing directories located on other machines. Virtual directories are also a terrific way
to create separate ASP applications, each of which lives in its own location, with-
out having to access different IP addresses and port numbers.
A limitation to virtual directories is that they cannot have their own
domain name and must be accessed using the domain of the web
server.
You’ll create a separate virtual directory for every chapter in this book, starting by
creating one for the Chapter 2 examples and naming it chap2. To create the vir-
tual directory, right-click on the development web server and select New, then Vir-
tual Directory. The Virtual Directory Creation Wizard pops up and guides you
through the directory creation process.
The first page the Wizard displays asks for the alias used for the directory; type in
chap2. Next, you’ll be asked for a physical location for the directory. For the book
examples, you’ll most likely want to create a subdirectory to the development web
site directory (created earlier) for each chapter. If you use this approach, create a
new subdirectory now and name it chap2. You’ll then specify this new subdirec-
tory as the physical location for the virtual directory.
The wizard then asks for the Access Permissions for the virtual directory—accept
the default of Read and Run Scripts (such as ASP Scripts) for now.
At this point, you’re done with creating the virtual directory. However, you still
have one more task in setting up your separate ASP application environment: you
need to change the application isolation for the directory, otherwise you’ll con-
tinue to have the component locking problem even if you’ve set the parent web
server to run as an isolated application.
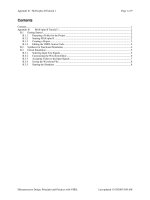
Change the application isolation for the virtual directory by right-clicking on the
virtual directory name and choosing Properties from the menu. Select the Virtual
Directory tab and change the Application Protection value from its default of
Medium (Pooled) to High (Isolated), as shown in Figure 2-2.
,ch02.18096 Page 24 Thursday, February 22, 2001 1:27 PM
Configuring the IIS Environment 25
This is the Title of the Book, eMatter Edition
Copyright © 2001 O’Reilly & Associates, Inc. All rights reserved.
Test the application isolation of the new virtual directory by copying asp0201.asp
from the web server main directory to the new chap2 subdirectory and running
the chap2 application using syntax similar to the following:
http://localhost/chap2/asp0201.asp
Again, the page should show as before, with the words “Hello, World!” displayed
in the upper-left corner. Also, as before, trying to recompile the component at this
point should result in a Permission Denied error. However, accessing the Proper-
ties for the chap2 virtual directory, then accessing the Virtual Directory tab and
clicking the Unload button should unload the ASP application; the component can
then be recompiled.
So now you have your development web server and your first ASP application vir-
tual directory and have had a chance to test both. The next step you’ll take is to
fine-tune the security settings for both.
Securing the Development Environment
You probably noticed that the Properties windows for both the development web
server and the Chapter 2 virtual directory had several pages, among them a page
Figure 2-2. Setting the application isolation to High in the directory’s properties
,ch02.18096 Page 25 Thursday, February 22, 2001 1:27 PM
26 Chapter 2: Setting Up the ASP Development Environment
This is the Title of the Book, eMatter Edition
Copyright © 2001 O’Reilly & Associates, Inc. All rights reserved.
labeled Directory Security. Clicking on this for both, you should see the same page
with three different control areas: one labeled “Anonymous access and authentica-
tion control,” one labeled “IP address and domain name restrictions,” and one
labeled “Secure Communications.” We won’t cover the latter two options, which
have to do with restricting access to certain domains and working with server cer-
tifications, but opening the “Anonymous access” option, you should see a win-
dow similar to that shown in Figure 2-3.
With anonymous access, a default user is created for the machine, consisting of
the prefix IUSR_ and appended with the name of the machine. My machine is
named flame, so my anonymous user is defined as IUSR_FLAME. With this user-
name, folks can access pages and content from my site without having to specify a
username and password.
One of the problems with the anonymous user, though, is that you can run into
inexplicable and unexpected permission problems when you move your ASP
application between machines.
For instance, if you develop on the same machine you test with (using localhost),
chances are you’re logged into the machine under a specific username and set of
permissions. When you test pages at your web site on this machine, you don’t
have any problems with access. However, when you move the pages and the
associated resources for the pages, such as ASP components, to a different
machine (such as your production box), you can run into permission problems.
The reason? Windows is using integrated authentication when you access the
Figure 2-3. Authentication Methods dialog box for the virtual directory
,ch02.18096 Page 26 Thursday, February 22, 2001 1:27 PM
Remote Administration of IIS 27
This is the Title of the Book, eMatter Edition
Copyright © 2001 O’Reilly & Associates, Inc. All rights reserved.
page, which means it’s using your username and permissions when you test pages
locally, and your permissions can be drastically different than those of the anony-
mous user.
To ensure consistent test results, you’ll want either to move your ASP application
to a separate test machine or create another user for your machine that has very
limited access—equivalent to an anonymous user.
If your development environment is accessible externally, make sure your web
server and virtual directories are secured if there is the possibility of access to the
site externally, such as through an intranet or through the Internet if you connect
to the Net through a modem. Remember that an IP connection is two-way: you
can access out, and others can access your machine through the assigned IP.
Finally, you have to ensure that the access permissions are also set for your com-
ponents. These can be set by accessing the Properties for the component or the
component’s subdirectory and setting the permissions to Read and Read & Exe-
cute for Everyone or for the IUSR account. If you set the permissions on the direc-
tory and check the option to allow inheritance of permissions from the parent for
all components within the directory, you can assign the same security settings to a
group of components in one location, and the permissions propagate to all of the
components, as shown in Figure 2-4.
Remote Administration of IIS
You can administer IIS using a variety of techniques. For example, all of the work
you’ve performed in setting up your development web server and the Chapter 2 vir-
tual directory has occurred through the console snap-in designed for IIS. You also
could have used the default Administration server installed with IIS on Windows
2000 Server. In addition, on Windows 2000 Professional, you have access to an
interface modeled on the interface provided with the Personal Web Server (PWS).
Managing ASP Applications with the Internet
Services Manager
You can administer an IIS installation in Windows 2000 servers using the HTML-
based Internet Services Manager. This manager is installed as the administration
web server within the IIS installation. Access the properties for this site to find the
IP address and port number necessary to access the manager, then use these as
the URL to pull the site up in a web browser.
For instance, if the IP address is 153.34.34.1, and the port number assigned to the
administration web server is 4990, you can access the site with the following URL:
http://153.34.34.1:4990
,ch02.18096 Page 27 Thursday, February 22, 2001 1:27 PM
28 Chapter 2: Setting Up the ASP Development Environment
This is the Title of the Book, eMatter Edition
Copyright © 2001 O’Reilly & Associates, Inc. All rights reserved.
You can also access the site using the name assigned through the DNS (Domain
Name Service) for the specific IP address. For instance, if the IP address were con-
figured with the alias myweb.com through DNS, you would access the site using
something such as the following URL:
:4990
Note that in either case you need to provide a username and valid password to
enter the site, and the username must be mapped to the Administrator role. If
you’ve logged in as Administrator, no username and password will be requested.
If more than one domain is mapped to a specific IIS server—if more than one web
server on separate IPs is hosted through one installation of IIS—you can adminis-
ter the site remotely if the IIS installation adds you to the Web Site Operator group
for the server. With this group membership, you can then access the administra-
tion for the site using an URL such as the following:
/>You can try this with your local installation by using the following URL:
http://localhost/iisadmin
This should open the administration pages for the default web server.
Figure 2-4. Setting the permissions to access the ASP components
,ch02.18096 Page 28 Thursday, February 22, 2001 1:27 PM
Using ADSI to Administer IIS Programmatically 29
This is the Title of the Book, eMatter Edition
Copyright © 2001 O’Reilly & Associates, Inc. All rights reserved.
You can also connect to your site for administration using the Terminal Service. If
you’re connected through an intranet and your client can support it, you can
remotely administer your site using the IIS Console snap-in. Note, though, that
your client needs to have Windows Console support through Windows 2000 or NT.
Finally, you can create your own administration programs using ASP pages and
ASP components. The tools to do this are your favorite programming and script-
ing languages, ADSI, and the IIS Admin and Base Admin objects, covered in the
next several sections.
Using ADSI to Administer IIS
Programmatically
Use a great deal of caution when altering IIS programmatically.
Incorrect settings can damage the Metabase and force a reinstalla-
tion of IIS.
There might be times when administrating IIS through the Windows Console IIS
snap-in or through the web interface provided by Microsoft does not work for
your needs. For instance, you and your organization may need to do a sequence
of activities rather than individual ones, and the only way to accomplish this is to
create an application that performs the entire sequence.
Microsoft has opened up IIS administration through two sets of objects: the IIS
Admin objects (which can be accessed through script using any of the automation
support languages or through Visual Basic and other COM-capable languages) and
the IIS Base Admin objects (which can be accessed only through C++).
Both sets of objects—the IIS Admin and the IIS Base Admin—are accessed through
ADSI, and both work with the IIS Metabase.
Working with the IIS Metabase
Prior to the release of IIS 4.0, administrative information for the web service was
stored in the Windows Registry, an online binary database containing name-value
pairs accessible via paths. Starting with IIS 4.0 and continuing with IIS 5.0,
Microsoft added the IIS Metabase, a memory-resident data store that is quickly
accessible and contains configuration and administration information for IIS.
As with the Registry, Metabase entries are found via paths, or keys, similar to those
used with file paths. These key paths, also referred to as ADsPaths, have the same
,ch02.18096 Page 29 Thursday, February 22, 2001 1:27 PM