Tài liệu Creating Your Own Command Bars doc
Bạn đang xem bản rút gọn của tài liệu. Xem và tải ngay bản đầy đủ của tài liệu tại đây (29.37 KB, 3 trang )
[ Team LiB ]
Creating Your Own Command Bars
One of the most powerful features in Office is the capability to customize your
workspace so that you can have the tools you need the most at your fingertips and remove
the tools you don't use.
Creating a Custom Toolbar
Creating a custom toolbar is as easy as opening the Customize dialog, selecting the
Toolbar tab, and choosing New. Enter a name for your toolbar in the New Toolbar dialog
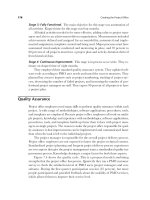
box that appears, click OK, and you've created a new toolbar (see Figure 16.11
). For the
toolbar to be useful, you must add tools to it, either by dragging tools from other toolbars
or by adding new tools to it.
Figure 16.11. Use the Toolbars tab to create or delete custom toolbars and to reset
the default toolbars to their original settings.
By default, a new toolbar floats on the screen; you'll have to move it to one of the edges
of the window if you want it docked. Custom toolbars are listed with the other toolbars
when you choose View, Toolbars or use a right-click to show the toolbar list. You can
use this menu to show or hide your toolbars.
Custom toolbars aren't just for the main Outlook window. You can
create them for any Outlook folder or form except note forms. When
you create folder-specific toolbars, only the tools that can be used in
that folder will display on your toolbar. For example, when you're in
the Notes folder, a custom Quick Flag toolbar will display without
buttons because Notes doesn't support Quick Flags.
Adding Tools to Custom Toolbars
After you've created a custom toolbar, it's time to add tools to it. Switch to the
Commands tab and browse the categories and commands to find the tools you want on
your new toolbar. For example, if you'd like to make a toolbar that contains just the tools
you use from the Standard and Advanced toolbars, you can drag tools from those two
toolbars to create a single custom toolbar.
When you're creating hyperlink buttons, drag any button from the
Commands list or choose one with an icon that will match your
hyperlink, such as a document icon if you're going to hyperlink to a
document or a folder icon for a hyperlink to a network folder.
Renaming and Deleting Custom Toolbars
If you discover the name you gave your custom toolbar isn't descriptive or is misspelled,
select the toolbar by name from the Tools, Customize, Toolbars tab list and choose the
Rename button, as shown in Figure 16.11
.
If you decide you really don't need your custom toolbar any longer, select it and click the
Delete button, and the toolbar is gone. After you delete a custom toolbar, you can't
restore it—you'll have to create a new one.
Task: Create a Custom Toolbar
When there are commands you use often, you might want to create custom toolbars so
that your frequently used commands are together on one toolbar.
One custom toolbar you'll probably find very useful is a toolbar containing buttons for
the different colored Quick Flags. You can label each flag color with a name, such as
Important, ASAP, Read Later, or another descriptive label:
1. Open the Customize dialog using the Tools, Customize menu selection.
2. Select the Toolbars tab, if it's not already selected, and choose the New button.
3. Enter a name for your toolbar. Because I'm making a custom toolbar for Quick
Flags, I'm calling my toolbar Flags. Click OK after entering a name. A new
toolbar is created next to the Customize dialog.
4. Choose the Commands tab.
5. In the Categories list, choose Actions.
6. Scroll down the Commands list and look for the flag commands.
7. Drag each of the flag color commands to the Flags toolbar.
8. Drag the Clear Flag and Add Reminder commands to the toolbar (see Figure
16.12). You don't need to add a Flag Complete button because one click on a flag
completes it.
Figure 16.12. Create a custom toolbar for Quick Flags.
9. Right-click on each flag button on the toolbar and change the Name field to the
description you want to use for the flag color. For example, I'm using Important
for the red flag. Add an ampersand (&) before the character you want to use as the
Alt+ shortcut, for example, Impor&tant.
10. Select Image and Text so that you can see the name and flag color on the button.
11. Close the Customize dialog when you're finished editing the toolbar.
Drag the toolbar to any edge of the window to dock it or let it float on the screen.
[ Team LiB ]