Tài liệu Creating Applications with Mozilla-Chapter 2. Getting Started- P1 doc
Bạn đang xem bản rút gọn của tài liệu. Xem và tải ngay bản đầy đủ của tài liệu tại đây (64.58 KB, 17 trang )
Chapter 2. Getting Started- P1
To help you start creating applications as quickly as possible, this chapter
presents two "Hello World" examples that demonstrate the beginning stages
of Mozilla application development.
The first example is a simple XUL file that is loaded into the browser
window. This example is then expanded on by adding additional features to
the XUL file, such as imported stylesheets and JavaScript functions. The
second "Hello World" example shows how to turn files like these into
packages, which are the modular, bundled sets of files that fit together to
make Mozilla applications or new modules for the Mozilla browser.
These examples provide a context for discussing the development of Mozilla
applications. The first example focuses on creating and editing the basic file
types, and the second focuses on the organization and distribution of
applications on the Mozilla platform.
2.1. Simple XUL Example
Like all good "Hello World" applications, Example 2-1
shows one of the
simplest possible examples of XUL. Although it is small, it demonstrates
some important aspects of XUL programming, including the use of event
handlers to add behavior and the use of a box to lay out elements properly
within the window. This example also provides a context for discussing
more general features of the language, such as the file format, the
namespace, and some XUL programming conventions.
Example 2-1. Hello xFly
<?xml version="1.0"?>
<! Sample XUL file >
<window
xmlns=" />there.is.only.xul">
<box align="center">
<button label="hello xFly" onclick="alert('Hello
World');" />
</box>
</window>
Use your text editor to save the code in Example 2-1
in a file called
hello.xul and then load the file in Mozilla (you can do this by using File
> Open File from the browser window and browsing to where you saved the
file). You should see a button in the upper-left corner of the browser window
that brings up an alert box when clicked. Figure 2-1
shows an example of the
alert pop-up window that appears.
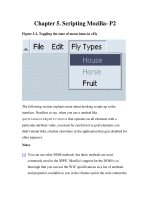
Figure 2-1. The first Hello xFly example
The next few sections describe this sample file in more detail. The covered
topics include the file itself, the syntax of the markup, XUL namespaces, and
the basic layout of a XUL file.
The xFly Examples
The best way to understand the possible uses of the Mozilla framework is to
look more closely at a number of various existing applications. This book
highlights several Mozilla development projects, such as ChatZilla and
JSLib, as examples of how some people have already started using Mozilla's
XPFE technologies.
Along with these applications, you'll note the use of the name "xFly" in
many examples in this chapter and elsewhere in this book. The xFly
examples are used throughout Chapter 2
to Chapter 6 to show how to create
and package a simple Mozilla application. An installable version of the
complete xFly application can be found at .
This simple application is useful because it provides a place to start
exploring the new information that you will learn about in this book. As you
read more about XUL, CSS, JavaScript, and the other parts of Mozilla's
development framework, you can create and edit the xFly files to see how
these technologies work in practice.
2.2. Basic XUL Concepts
You have already seen many of XUL's basic features at work. When you
load the example in the previous example, the browser identifies it as a XUL
file, parses the data, creates a new window and draws the button widget, and
executes the function you've defined when the button is clicked.
These activities are part of the basic and often transparent interaction
between your application files and Mozilla. However, the format of your
XUL files, their syntax and namespace, the XUL layout, and the windowing
system are all basic to successful XUL programming.
2.2.1. The XUL File Format
A XUL file is a simple text file that contains proper XML syntax and has a
.xul file extension. Mozilla expects to draw UI widgets when it encounters
a file with a .xul extension or when it encounters the XUL namespace in
other markup files that it recognizes, including HTML and XML.
The MIME type registered for XUL files is
application/vnd.mozilla.xul+xml. When editing and using
XUL files locally, you shouldn't need to worry about setting this on your
computer; however, sometimes you may need to set the MIME type, such as
when you host XUL files on a server. Chapter 12
provides additional
information about how you can set the correct file type for your system.
2.2.2. Conventions
XUL has to follow certain conventions (as does XHTML or any other XML-
based file) in order to be valid. Mozilla generates an error when it
encounters an invalid XUL file.
The first thing required in a XUL document is the XML declaration.
<?xml version="1.0"?>
Any comments used to introduce your file can begin on the line after the
declaration. Comments in XUL follow the same format used in HTML and
XML, delimited by <! and >.
All tag sets must be closed. Empty tags are allowed for some elements, such
as the <label> element, that are used without nested elements or content.
Note that a trailing slash at the end of the tag is required to denote an empty
element.
<label value="Getting Started" />
Another thing to remember is that XUL is case-sensitive. Closing a XUL
<window> tag with </Window> renders it invalid.
These conventions ensure that the rendering engine can parse the XUL file
successfully and display the elements defined there. Mozilla does not
validate XML files, such as XUL, and it does not resolve externally parsed
entities, but it does check for document well-formedness.
Following the XML specification, Mozilla ignores well-formed tags that it
does not recognize, which can give your applications extra flexibility,
particularly as you begin to use technologies such as XBL. But it can also
make debugging a little more difficult, as when you create an element named
<botton> and don't see why your XUL button doesn't have the typical
borders or three-dimensional style.
A good practice to follow when creating XUL files is to use comments,
copious whitespace, indentations (but not tabbed indentations where you can
avoid them), and XUL widgets you are familiar with.
2.2.3. The XUL Namespace
Like other markup vocabularies, XUL uses a namespace declaration to
define the particular elements that may be included in a valid file. Example
2-2 shows a sample of the required namespace declaration. The namespace
is an attribute of the root window element. The lack of any suffix on the
XML namespace declaration (i.e., xmlns:xul) indicates that XUL is the
default namespace for this file.
Example 2-2. The XUL namespace declaration
<window
xmlns=" />there.is.only.xul">
<description>Illustrating the XUL
namespace</description>
</window>
If you want to include XUL content in documents that use other types of
markup, you need to declare more than one namespace. Common namespace
declarations for getting other language elements into your code include
HTML and RDF, but you can invent your own as well. If you wanted to put
the button from Example 2-1
into a vanilla XML file, for example, you
could place it into an XML document by using the xmlns:xul attribute, as
shown in Example 2-3
.
Example 2-3. Mixed namespaces in an XML document
<flies:flies
xmlns:flies=" />xml#"
xmlns:html="
xmlns:xul=" />per/there.is.only.xul">
<flies:wings>
<xul:box align="center">
<xul:button label="hello xFly"
onclick="alert('hello.');" />
</xul:box>
<html:img src="wings.jpg" />
</flies:wings>
</flies:flies>
This file has three types of content: XUL, HTML, and customized markup
called flies. When you use mixed namespaces, you have to prefix the
XUL elements with xul: to distinguish them from markup in other
namespaces, as with the xul:box and xul:button shown in Example 2-
3.
2.2.4. Basic XUL Layout
Example 2-1
features some very common XUL elements. In this section,
each element is dissected to show what it does and how it interacts with
other elements. The <window> element is the root of individual primary
XUL documents (in contrast to dialogs that pop up from windows, which
can use <dialog> as the root, and XUL documents loaded within other
XUL containers, which can use <page>).
As in HTML, the root element defines the document into which all elements
are drawn, but in XUL, that document is a piece of an application interface
and not a web page. We'll have more to say about the window and some of
its features in the second example.
A <box> element that contains a <button> is inside the window in
Example 2-1
. Although you can use attributes on the window element to lay
out and position window children, it's never a bad idea to use the <box> as
a container, particularly when you add new layout to your document, such as
rows of buttons, grids, tabs, or other elements that need to be arranged
precisely within the space of the window. The box is the basic element for
layout in XUL.
The align attribute on the box specifies that the children do not stretch and
center themselves in the middle of the available space. If the box was
omitted and there were multiple children of the root window, they would be
laid out vertically by default, one under the other. This setting can be
overridden by adding the orient attribute to <window> and giving it a
value of "horizontal."
2.2.5. Using XUL Windows
The foundation of an XPFE application is a window. Each XUL document
has to have at least one XUL <window> element, and it must be the root of
the document the surrounding, outermost element in the XML document,
set apart from the XML declaration itself and other processing "preambles."
A basic window with no content looks like this:
<?xml version="1.0"?>
<!DOCTYPE window>
<window
xmlns:html="
xmlns=" />there.is.only.xul">
</window>
Commonly, an application has more than one window, with a number of
dialogs and secondary windows. Each window is also contained within a
<window> element (though recent additions to the XUL specification
include the dialog and page elements, which are derived from window
and can be used in its place as root elements in your XUL files).
As your application becomes more complex, you need a way to keep track
of the windows and ensure that they can communicate with one another. In
Mozilla, there is a way to do this by using the type attribute identifier,
which allows you to use special window-opening functions like
toOpenWindowByType( ) to manage particular window types.
As with any existing Mozilla functions referred to in this book, you can
look up toOpenWindowByType by using the LXR web-
b
ased source
code viewer, described in Appendix A
and available at
2.2.5.1. Window features
An id attribute is present on the <window> element. Using this attribute is
not necessary to run the windows system, but it is a good idea to give each
window a unique identifier because it makes nodes easier to find from script
(see the DOM method getElementByID in Chapter 5
for information
about how to get elements by identifier). This is how to set up an ID
attribute:
<window
xmlns:html="
xmlns=" />there.is.only.xul"
id="xflyMain">
Load event handlers such as onload and onunload are useful and
necessary if you want to add behavior to a window, pass input to it, or
manipulate its content depending on context:
<window
xmlns:html="
xmlns=" />there.is.only.xul"
id="xfly-main"
onload="startUp( )"
onunload="shutdown( )"
onclose="onClose( )">
When you load a XUL file that begins in this way, the event handler
attributes onload and onunload carry out the functions listed as values
(startUp( ) and shutdown( )). In addition, Mozilla provides an
onclose event handler that intercepts the upcoming window closure to
carry out any extra processing you need. The close event is fired before the
unload event, so you can stop the window from closing in the onclose
event handler if necessary. To stop window closure, the close event must
return false.
Additional handlers are available for dialog windows. They are listed and
their use is outlined in the section Section 3.2
in Chapter 3.
2.2.5.2. Window properties
The window declaration is expanding, but there is still plenty of room for
more features. In addition to the attributes the event handlers, the ID, and
the namespace that appear within the <window> tag itself a XUL
window also has all of the properties of the DOM window object from
HTML. These properties are listed below, along with additional properties
for application specific tasks.
Navigator Document window Parent
Top Scrollbars name ScrollX
ScrollY ScrollTo scrollBy GetSelection
ScrollByLine
s
ScrollByPages
Size
ToContent
Dump
SetTimeout SetInterval
Clear
Timeout
ClearInterval
SetResizable CaptureEvents
Release
Events
RouteEvent
Enable
External
Capture
DisableExterna
l
Capture
prompt Open
OpenDialog Frames find self
Navigator Document window Parent
Screen History content Sidebar
Menubar Toolbar
Locationba
r
Personalbar
Statusbar Directories closed Crypto
pkcs11 Controllers opener Status
defaultStatu
s
Location innerWidth InnerHeight
outerWidth OuterHeight screenX ScreenY
pageXOffset PageYOffset length FullScreen
alert Confirm focus Blur
back Forward home Stop
print MoveTo moveBy ResizeTo
resizeBy Scroll close
UpdateCommand
s
escape Unescape atob Btoa
AddEvent RemoveEvent Dispatch GetComputed
Navigator Document window Parent
Listener Listener Event Style
Special properties of the XUL window object include:
window.content
Using this property is a quick way to access the content area of your
window, if one exists. This property is useful only if your window
uses one of the content elements, namely <iframe>, <browser>,
and <editor>. Refer to the section Section 3.8
in Chapter 3 for a
more detailed discussion. The content property is linked only to the
frame you have explicitly declared as the primary area.
<browser type="content-primary" >
Subsequently, you can access and manipulate the content.
window.content.focus( );
window.sizeToContent( )
This property is used to ensure intrinsic sizing, which is important in
XUL application development, especially in dialog windows. Intrinsic
sizing ensures that the window adapts and morphs to fit the content.
This is preferable to constraining your window with a fixed width and
height when the onload handler anticipates changeable content,
depends on context, or takes input from another window. The
colorpicker in the Mozilla Editor, for example, uses this function to
make sure that the window displaying the chosen palette shrinks to fit
that palette:
function ChangePalette(palette)
{
gDialog.ColorPicker.setAttribute("palettename",
palette);
window.sizeToContent( );
}
2.2.5.3. Interaction between windows
The nsIWindowMediator XPCOM component provides several routines
for interacting with different windows. Though it's a little too early to
discuss using a component like this in the Hello World examples, these
routines include:
• Getting the most recent window of a particular type
• Enumerating all open windows
• Registering and unregistering the window
• Updating the window timestamp
• Updating the window title
• Setting the Z-order position
Chapter 8
provides full details of how to understand and use XPCOM
components.
2.2.5.4. Window behavior
Mozilla supports the standard window.open JavaScript function, which
has its origins in the world of browser scripting and the launching of new
browser windows. Mozilla extends the function to provide some features for
application development. It also provides the window.openDialog
function for opening windows in the XPFE scripting environment. The latter
function has become the more commonly used method to open a new XUL
window, although the two are interchangeable.
The usage of window.open is:
window.open (url, name, features);
window.openDialog extends this functionality with a new argument list
passed to it, which is optional and can be any number of arguments as
needed:
window.openDialog (url, type, features, argument1,
argument2);
Here is a list of some of the features of a XUL window opened using
window.openDialog:
close
The window can be created with or without a close widget.
chrome
The new window has to be treated as a window within the chrome
context, rather than in the browser context. It gets its own top-level
window. The window itself is the chrome URL passed to the function,
and is not to be loaded in a browser window.
dependent
The new window belongs to the calling window on operating systems
that support this behavior. It "floats" on top of the opening window,
and you can still access the parent window. It is minimized with its
parent.
modal
The window will be run modally. Control is not given back to the
parent window until this window has closed.
titlebar
The window can be created with or without a titlebar.
centerscreen
Open the window centered on screen.
A comma delimits the features list and the entire list must be in quotes. The
script that handles the new window accesses the arguments list:
window.openDialog("chrome://xfly/content/utils/prom
pt.xul",
"xFly_prompt",
"chrome,dialog,modal",
message);
The window created in this example will be modal and use the message that
was passed to it in the variable message. By default, Mozilla assumes that
the chrome feature is on when you use either window.open or
window.openDialog in a chrome environment, and creates a new
window in the window hierarchy.