Tài liệu Defining a Relationship Using Visual Studio .NET doc
Bạn đang xem bản rút gọn của tài liệu. Xem và tải ngay bản đầy đủ của tài liệu tại đây (36.57 KB, 5 trang )
Defining a Relationship Using Visual Studio .NET
In this section, you'll see how to create a Windows application in Visual Studio .NET
(VS .NET) with a DataSet containing two DataTable objects. These DataTable objects
will reference the Customers and Orders database tables. You'll then learn how to define
a relationship between the two DataTable objects in the XML schema.
Create the Windows Application
Perform the following steps to create the Windows application:
1. Open VS .NET and select File ➣ New ➣ Project and create a new Windows
Application. Enter the name of the project as DataRelation, as shown in Figure
12.2.
Figure 12.2: Creating the Windows application
2. Click the OK button to continue.
3. Open Server Explorer and connect to the Northwind database using the connection
you used in the previous chapters. You can open Server Explorer by selecting
View ➣ Server Explorer. Expand the Tables node in the tree and select both the
Customers and Orders tables by Ctrl +left-clicking each table, as shown in Figure
12.3.
Figure 12.3: Selecting both the Customers and Orders tables from Server Explorer
4. Drag the Customers and Orders tables to your form. VS .NET then creates three
objects in the tray beneath your form. These objects are named sqlConnection1
(used to access the Northwind database), sqlDataAdapter1 (used to handle access
to the Customers table), and sqlDataAdapter2 (used to handle access to the Orders
table). These objects are shown in Figure 12.4
.
Figure 12.4: The new objects in the tray beneath the form
5. Next, you need a DataSet object that contains DataTable objects to store the rows
from the Customers and Orders tables. To create a DataSet object, click your
blank form and then click the Generate Dataset link at the bottom of the Properties
window for the form shown earlier in Figure 12.4
.
This displays the Generate Dataset dialog box, as shown in Figure 12.5
. Leave all the
settings in this dialog in their default state.
Figure 12.5: The Generate Dataset dialog box
Notice that a new DataSet is to be created, and the Customers and Orders tables are used
in the new DataSet. The new DataSet will also be added to the designer, as indicated by
the check box in the dialog box. Click the OK button to continue.
A new DataSet named dataSet11 will be added to the tray beneath your form.
Adding a Relation to the XML Schema of the DataSet
Perform the following steps to add a relation to the XML schema of your DataSet:
1. Select your new DataSet in the tray and click the View Schema link in the
Properties window. This displays the Schema Editor, as shown in Figure 12.6
.
Figure 12.6: The Schema Editor
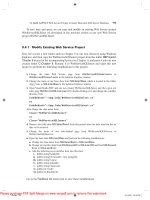
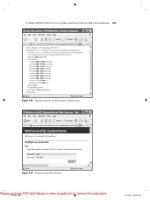
2. Drag a relation from the XML Schema tab in the Toolbox to the Orders table
entity. This opens the Edit Relation dialog box, as shown in Figure 12.7
.
Figure 12.7: The Edit Relation dialog box
As you can see from Figure 12.7
, you can set the parent and child tables, the primary key
and foreign keys, along with other details for the relation.
3. Leave the settings in the Edit Relation dialog box in their default state and click
the OK button to continue.
This adds the new relation to the Customers and Orders entities in the XML schema. You
can click the diamond between the Customers and Orders entities to view the properties
of the relation, as shown in Figure 12.8
.
Figure 12.8: The properties of the new relation
N
ote You can add a relation to a strongly typed DataSet in the same way as described in
this section.