Tài liệu MASTERING SQL SERVER 2000- P17 doc
Bạn đang xem bản rút gọn của tài liệu. Xem và tải ngay bản đầy đủ của tài liệu tại đây (1.16 MB, 50 trang )
CHAPTER 22 • DATA TRANSFORMATION SERVICES
820
Launching the Wizards
There are many ways to launch the DTS Wizards. To launch the DTS Wizards from
within SQL Server Enterprise Manager, follow these steps:
1. Select any node in the treeview at or below the level of a SQL Server.
2. Choose Tools ➢ Data Transformation Services ➢ Import Data to launch the DTS
Import Wizard or Tools ➢ Data Transformation Services ➢ Export Data to
launch the DTS Export Wizard.
Alternatively, you can launch the DTS Wizards from the Select Wizard dialog box
by following these steps:
1. Select any node in the treeview at or below the level of a SQL Server.
2. Choose Tools ➢ Wizards or click the Run a Wizard button on the toolbar. Either
of these actions will open the Select Wizard dialog box.
3. Expand the Data Transformation Services node in the dialog box.
4. Choose DTS Export Wizard or DTS Import Wizard.
5. Click OK to launch the Wizard you’ve chosen.
You can also launch the DTS Wizards from the Data Transformation Services node
in SQL Server Enterprise Manager:
1. Select the Data Transformation Services node under any server name in the
treeview.
2. Select Action ➢ All Tasks ➢ Import Data to launch the DTS Import Wizard or
Action ➢ All Tasks ➢ Export Data to launch the DTS Export Wizard. Alterna-
tively, you can right-click the Data Transformation Services node and choose All
Tasks ➢ Import Data to launch the DTS Import Wizard or All Tasks ➢ Export
Data to launch the DTS Export Wizard.
To launch the DTS Wizard from the Windows Start menu, choose Start ➢ Programs
➢ Microsoft SQL Server ➢ Import and Export Data.
Finally, you can launch the DTS Wizards directly from the Windows command
prompt. The simplest way to do so is just to type (or run from a batch file) the name
of the launcher program:
dtswiz
If entered with no options, this will have the same effect as choosing the Import
and Export Data menu item from the Start menu. Optionally, you can supply a num-
ber of arguments to the dtswiz program. Table 22.1 lists the command line switches
that you can use with dtswiz.
2627ch22.qxd 8/22/00 11:16 AM Page 820
Please purchase PDF Split-Merge on www.verypdf.com to remove this watermark.
821
TABLE 22.1: DTSWIZ ARGUMENTS
Argument Meaning
/? Display help for dtswiz
/n Use Windows NT integrated security (overrides the /u and /p arguments)
/f filename Save the package to the specified file
/i Run the DTS Import Wizard
/x Run the DTS Export Wizard
/s servername Import to or export from the specified SQL Server
/u username Username for SQL Server security
/p password Password for SQL Server security
/d database Import to or export from the specified database
/y Do not display the system databases in the Wizard interface
/m Force all DTS tasks to use one thread of execution
Running the Wizards
As you might guess from the options shown in Table 22.1, there’s really only one DTS
Wizard rather than three. The Import and Export Wizards are just the main DTS Wiz-
ard, launched by SQL Server Enterprise Manager with the /i or /x switch to set some
defaults. You’ll find that the panels and options in all three variants of the Wizard are
very similar. In this section, you’ll see the general format of the Wizard. Just remem-
ber that if you’ve launched it as an Import or Export Wizard, some of the settings will
be prepopulated for you.
The initial panel of the DTS Wizard explains the purpose of the Wizard. There’s
nothing to do on this panel except click the Next button. When you do that, you’ll
see the Choose a Data Source panel, shown in Figure 22.1.
DTS IN THE USER INTERFACE
Development with
SQL Server
PART
V
2627ch22.qxd 8/22/00 11:16 AM Page 821
Please purchase PDF Split-Merge on www.verypdf.com to remove this watermark.
CHAPTER 22 • DATA TRANSFORMATION SERVICES
822
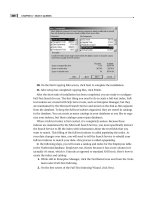
FIGURE 22.1
Choose a Data Source
panel in the DTS
Wizard
The Choose a Data Source panel consists of three parts. At the top, you can select
the source for the data. This combo box allows you to choose any OLE DB provider
that’s installed on your system as the data source. For example, you can choose to copy
data from a SQL Server database (the default), a Microsoft Access database, or an Oracle
database. Below this combo box, there is a section that prompts for driver-specific
information. At the bottom of the panel, there are the Wizard navigation buttons.
When you select a data source from the combo box, the middle frame changes to
prompt for the information required by that type of data source. For a SQL Server data
source, for example, you need to choose a server, supply authentication information,
and choose a database. There’s also an Advanced button in this case that lets you set
the more obscure OLE DB options for the SQL Server OLE DB driver. On the other
hand, if you choose to use a Microsoft Access data source, the frame’s controls change
to prompt you for only the filename, username, and password to use when opening
the Access database.
After you choose a data source and click Next, the Wizard will show the Choose a
Destination panel. This panel is an exact copy (except for the caption) of the Choose
a Data Source panel. Once again, you can choose any OLE DB database as the target
for your DTS operation. Because both the Data Source and Destination can be arbi-
trary data sources, there are three basic modes of operation of the DTS packages that
the Wizard can create:
• Import data from any data source to SQL Server
2627ch22.qxd 8/22/00 11:16 AM Page 822
Please purchase PDF Split-Merge on www.verypdf.com to remove this watermark.
823
• Export data from SQL Server to any data source
• Transfer data between two data sources, neither of which is SQL Server
No matter which mode you choose, when you click Next from the Choose a Desti-
nation panel, SQL Server will present the Specify Table Copy or Query panel, shown
in Figure 22.2.
FIGURE 22.2
Specify Table Copy or
Query panel in the DTS
Wizard
There are three choices on this panel. If you want to move entire tables from the
source to the destination, choose Copy Table(s) and View(s) from the Source Database.
Note that you can still use this option to copy a partial table if you’ve defined a view in
the source that includes only the data of interest. Alternatively, to define the data to be
copied using a SQL statement, choose Use a Query to Specify the Data to Transfer.
Finally, if the source and destination are both SQL Server databases, you can choose to
transfer SQL Server objects with all of their properties and data. This last choice will be
disabled if either the source or the destination is not a SQL Server database.
The next panel in the Wizard depends on your choice in the Specify Table Copy or
Query panel. If you choose to copy tables and views, you’ll see the Select Source
Tables and Views panel, shown in Figure 22.3.
DTS IN THE USER INTERFACE
Development with
SQL Server
PART
V
2627ch22.qxd 8/22/00 11:16 AM Page 823
Please purchase PDF Split-Merge on www.verypdf.com to remove this watermark.
CHAPTER 22 • DATA TRANSFORMATION SERVICES
824
FIGURE 22.3
Select Source Tables
and Views panel in the
DTS Wizard
This panel lets you perform a number of operations related to selecting the data:
• To include a table or view in the data to be transferred, check the checkbox to
the left of the table or view’s name.
• To specify a destination table for the data, select it from the drop-down list in
the Destination column. This list includes all of the tables in the destination
database. It will default to a table of the same name as any selected source table,
if possible.
• To see the data in a source table, select the table and click the Preview button.
SQL Server will display a dialog box containing up to 100 rows from this table.
• To customize the way that the data is transferred from the source to the destina-
tion, select the source and destination tables, and click the Browse button in the
Transform column. This will open the Column Mappings, Transformations, and
Constraints dialog box, shown in Figure 22.4.
2627ch22.qxd 8/22/00 11:16 AM Page 824
Please purchase PDF Split-Merge on www.verypdf.com to remove this watermark.
825
FIGURE 22.4
Column Mappings,
Transformations, and
Constraints dialog box
The Column Mappings, Transformations, and Constraints dialog box allows you to
customize the way that data is moved from the source database to the destination
database. For any table, you can use this dialog box to perform these actions:
• To decide whether to create the destination column from scratch, delete rows
from the destination table, or append rows to the destination table, choose the
appropriate option on the Column Mappings tab.
• To change which source column is mapped to which destination column,
choose a source column from the drop-down list in the Mappings section of the
Column Mappings tab.
• To perform calculations on the data as it’s moved from the source to the desti-
nation, choose the Transformations tab and write a VBScript or JScript proce-
dure. Figure 22.5 shows a sample of such a procedure.
• To create primary or foreign keys on the destination table, select Create Destina-
tion Table on the Column Mappings tab and then check the appropriate boxes
on the Constraints tab.
DTS IN THE USER INTERFACE
Development with
SQL Server
PART
V
2627ch22.qxd 8/22/00 11:16 AM Page 825
Please purchase PDF Split-Merge on www.verypdf.com to remove this watermark.
CHAPTER 22 • DATA TRANSFORMATION SERVICES
826
• To customize the CREATE TABLE statement used to create the destination table,
select Create Destination Table on the Column Mappings tab and then modify
the SQL statement on the Constraints tab.
FIGURE 22.5
Using VBScript to
transform a table
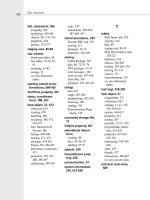
When you click Next on the Select Source Tables and Views panel, you’ll be taken
to the panel Save, Schedule, and Replicate Package. We’ll discuss this panel in a few
pages. First, though, we’ll back up and cover the other choices on the Specify Table
Copy or Query panel. If you choose the Use a Query to Specify the Data to Transfer
option on this panel and click Next, the Wizard will show the Type SQL Statement
panel. You can enter any SELECT statement that returns data from the source data-
base in this panel. If you prefer, you can click the Query Builder button. This will dis-
play the Select Columns panel, shown in Figure 22.6.
2627ch22.qxd 8/22/00 11:16 AM Page 826
Please purchase PDF Split-Merge on www.verypdf.com to remove this watermark.
827
FIGURE 22.6
Select Columns panel
in the DTS Wizard
The Select Columns panel is the start of a three-panel sequence that collects all the
information necessary to create a SELECT statement:
1. Select Columns
2. Specify Sort Order
3. Specify Query Criteria
WARNING Although the Query Builder panels allow you to select columns from
more than one table, the constructed SQL statement will not include any joins. You’ll need
to put in any JOIN clauses manually by editing the final SQL statement.
When you type or build a SQL statement and click Next, the Wizard proceeds to the
Select Source Tables and Views panel that we discussed above. From this point, the
flow of the Wizard is the same as it is in the case of copying tables.
If you choose Copy Objects and Data between SQL Server Databases on the Specify
Table Copy or Query panel and click Next, the Wizard will show the Select Objects to
Copy panel, shown in Figure 22.7.
DTS IN THE USER INTERFACE
Development with
SQL Server
PART
V
2627ch22.qxd 8/22/00 11:16 AM Page 827
Please purchase PDF Split-Merge on www.verypdf.com to remove this watermark.
CHAPTER 22 • DATA TRANSFORMATION SERVICES
828
FIGURE 22.7
Select Objects to Copy
panel in the DTS
Wizard
The Select Objects to Copy panel allows you to choose SQL Server objects that will
be moved from the source server to the destination server by scripting. You can set
the following options on this panel:
• To create objects in the destination database, check the Create Destination
Objects checkbox. You can also choose whether to drop any objects with the
same name before creation and whether to automatically create dependent
objects.
• To copy data from the source database to the destination database, check the
Copy Data checkbox. You can also choose whether to replace existing data or
append new data to the destination table.
• To transfer all objects, check the Copy All Objects checkbox.
• To transfer only some objects, uncheck the Copy All Objects checkbox and click
the Select Objects button. This will open the Select Objects dialog box, where
you can choose tables, views, stored procedures, defaults, rules, and user-
defined datatypes to be transferred.
• To set advanced options for the transfer, uncheck the Use Default Options check-
box and click the Options button. This will open the Advanced Transfer Options
dialog box. This dialog box lets you choose whether to transfer users, roles,
logins, permissions, indexes, triggers, full-text indexes, and primary and foreign
keys when transferring tables. You can also choose whether SQL Server should
use Unicode names for objects and whether it should use quoted identifiers.
2627ch22.qxd 8/22/00 11:16 AM Page 828
Please purchase PDF Split-Merge on www.verypdf.com to remove this watermark.
829
• To set the location for the script files that will be generated to perform the trans-
fer, type a location into the Script File Directory textbox or use the Browse but-
ton beside the textbox to choose a directory.
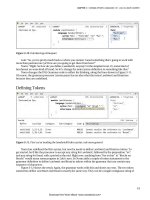
When you click Next in the Select Objects to Copy dialog box, the Wizard will dis-
play the Save, Schedule, and Replicate Package panel, shown in Figure 22.8. From this
panel forward, the sequence of the Wizard is the same no matter which option you
chose on the Specify Table Copy or Query panel.
FIGURE 22.8
Save, Schedule, and
Replicate Package
panel in the DTS
Wizard
The Save, Schedule, and Replicate Package panel lets you set these options:
• To run your DTS package at once, check the Run Immediately checkbox.
• To schedule the DTS package for later execution, check the Schedule DTS Pack-
age for Later Execution checkbox. The Browse button will let you set the sched-
ule time and frequency. You can schedule the job to run as often as once a
minute or as infrequently as once a month or less.
• To make the results of this DTS package available to replication subscribers,
check the Use Replication to Publish Destination Data checkbox. You’ll learn
more about replication in Chapter 27.
• To save the DTS package so that you can run it again in the future (either from
the user interface or according to a schedule), check the Save DTS Package
checkbox. We’ll discuss the options for saving DTS packages in the next section.
DTS IN THE USER INTERFACE
Development with
SQL Server
PART
V
2627ch22.qxd 8/22/00 11:16 AM Page 829
Please purchase PDF Split-Merge on www.verypdf.com to remove this watermark.
CHAPTER 22 • DATA TRANSFORMATION SERVICES
830
If you’ve opted to save your DTS package, the Next button from this panel will
take you to the Save DTS Package panel, where you can enter a name and description
for the package and choose the save location. Otherwise, the Wizard will display the
Completing the DTS Wizard panel, shown in Figure 22.9. This panel allows you to
review the options you chose in the other Wizard panels. When you click the Finish
button, the DTS Wizard will create the package, run it, and save it according to your
options.
FIGURE 22.9
Completing the DTS
Wizard panel in the
DTS Wizard
If you’ve chosen to run the DTS package immediately, SQL Server will display the
Executing DTS Package dialog box. This dialog box shows you each step in the pack-
age as it’s executed. If any step generates an error, you can get error information by
double-clicking that step in the dialog box. Figure 22.10 shows the progress of a DTS
package.
2627ch22.qxd 8/22/00 11:16 AM Page 830
Please purchase PDF Split-Merge on www.verypdf.com to remove this watermark.
831
FIGURE 22.10
An error during the
execution of a DTS
package
Saved Packages
The DTS Wizard offers four choices for saving a DTS package:
SQL Server: This option saves the package to any SQL Server for which you
have permissions. The package is stored in the sysdtspackages table in the msdb
database (the database that SQLServerAgent uses for its own work area). This is
usually the best way to store a DTS package.
SQL Server Meta Data Services: This option saves the package to a Meta
Data Services database. Meta Data Services is a specialized form of database
maintained by SQL Server that’s designed to help track metadata about objects.
Third-party tools can use this metadata to write utilities that manage objects.
SQL Server Meta Data Services also helps track data lineage, so that you can tell
where a particular piece of data originated. If you’re working with packages on
a single server, you usually won’t want to use Meta Data Services for storage. (SQL
Server Meta Data Services is an advanced topic beyond the scope of this book.)
Structured Storage File: This option saves the package to a COM struc-
tured storage file. This is a special type of file that’s been optimized for contain-
ing objects. You can save multiple packages, or multiple versions of the same
package, to a single file. Saving to a structured storage file is useful when you
want to send the package to someone via e-mail.
DTS IN THE USER INTERFACE
Development with
SQL Server
PART
V
2627ch22.qxd 8/22/00 11:16 AM Page 831
Please purchase PDF Split-Merge on www.verypdf.com to remove this watermark.
CHAPTER 22 • DATA TRANSFORMATION SERVICES
832
Visual Basic File: This option saves the package to a Visual Basic module
file with the extension .BAS. This file can be added to any Visual Basic or VBA
project. This gives you a fast way to use the DTS Wizard to design a data trans-
formation and then incorporate that transformation into your own applications.
Of course, once you’ve saved a package, you can open the package and run it. The
steps to do this vary depending on the location you’ve used to save the package. To
run a package saved to SQL Server, follow these steps:
1. Open SQL Server Enterprise Manager.
2. Expand the Data Transformation Services folder and click the Local Packages node.
3. Click the package and choose Action ➢ Execute Package, or right-click the pack-
age and choose Execute Package.
To run a package saved to the Microsoft Meta Data Services, follow these steps:
1. Open SQL Server Enterprise Manager.
2. Expand the Data Transformation Services folder and click the Repository Pack-
ages node.
3. Click the package and choose Action ➢ Execute Package, or right-click the pack-
age and choose Execute Package.
To run a package saved to a structured storage file, follow these steps:
1. Open SQL Server Enterprise Manager.
2. Right-click the Data Transformation Services folder and choose All Tasks ➢
Open Package.
3. Use the Select File dialog box to browse to the .DTS file containing the package
and click Open. This will open the package in the DTS Package Designer.
4. Select Package ➢ Execute from the DTS Package Designer menus, or click the
Execute button on the DTS Package Designer toolbar.
To run a package saved to a Visual Basic file:
1. Add the Visual Basic .BAS file to a Visual Basic or VBA project.
2. Execute the Sub Main procedure within the .BAS file.
The Designer
The DTS Wizard is useful for creating simple DTS packages that transfer data from a
single source to a single destination. However, the DTS Wizard taps only a portion of
the power of DTS. To go further with DTS, you need to learn to use the DTS Package
Designer. In this section, we’ll show you what the Package Designer can do and how
to get started with it.
2627ch22.qxd 8/22/00 11:16 AM Page 832
Please purchase PDF Split-Merge on www.verypdf.com to remove this watermark.
833
The Designer User Interface
To launch the DTS Package Designer, open SQL Server Enterprise Manager and
expand the Data Transformation Services node under any SQL Server. Then right-click
either the Local Packages or the Repository Packages node and choose New Package.
This will open the DTS Package Designer, shown in Figure 22.11.
FIGURE 22.11
DTS Package Designer
The DTS Package Designer’s user interface is broken up into five parts:
• The menu bar offers menu access to the designer commands.
• The toolbar offers single-click button access to important designer commands.
• The Task toolbar offers a variety of specialized tasks that can be added to a DTS
package.
• The Data toolbar offers data connections that can be added to a DTS package.
• The design surface (the blank area not covered by menus and toolbars) is where
you build your DTS package.
DTS IN THE USER INTERFACE
Development with
SQL Server
PART
V
2627ch22.qxd 8/22/00 11:16 AM Page 833
Please purchase PDF Split-Merge on www.verypdf.com to remove this watermark.
CHAPTER 22 • DATA TRANSFORMATION SERVICES
834
A Designer Example
To get a feel for the Package Designer, let’s work through an example of building a
package to transfer a single table from one SQL Server database to another. The first
step of building the package is to create the data connections that will be used for the
source and destination of the transfer.
To create a source data connection:
1. Click the Microsoft OLE DB Provider for SQL Server icon in the Data toolbar. If
you just click the icon, the designer will decide where to place the icon within
the design surface. If you’d prefer to place the icon yourself, you can click and
drag it to a particular location.
2. SQL Server will open the Connection Properties dialog box. For the SQL Server
OLE DB Provider, this dialog box lets you choose the server, database, and
authentication method to be used to connect. If you’ve previously placed a con-
nection on the design surface, you have the option to reuse that connection. Fill
in the properties to pick a server and database as the data source.
3. Click OK. SQL Server will place the SQL Server icon on the design surface.
To create a destination data connection, repeat the same three steps, but choose
the destination server instead of the source server.
Now that you’ve created the source and destination connections, the next step is
to build the transform between the two. To build a transform:
1. Select Workflow ➢ Add Transform or click the Transform Data button on the
toolbar.
2. When you move the cursor over the design surface, it will change to the Select
Source Connection cursor, as shown in Figure 22.12.
3. Click the icon for the source data connection. The cursor will change to the
Select Destination Connection cursor.
4. Click the icon for the destination data connection. The Package Designer will
draw an arrow from the source to the destination.
2627ch22.qxd 8/22/00 11:16 AM Page 834
Please purchase PDF Split-Merge on www.verypdf.com to remove this watermark.
835
FIGURE 22.12
Selecting the source
data connection
The next step is to tell the Package Designer what data you’d like to move from the
source to the destination. To do this, double-click the arrow from the source to the
destination, or right-click the arrow and choose Properties. Either action will open the
Data Transformation Properties dialog box. This dialog box has four tabs:
• On the Source tab, you can assign a name to this task and choose a source table
or query. Note that you can choose only a single source table. To move multiple
tables, you need to build multiple transforms. This tab will also let you preview
the source data or invoke the query builder.
• On the Destination tab, you can choose the destination table for this task.
• On the Transformations tab, you can choose the mapping between columns in
the source and destination. You can also choose from a variety of built-in trans-
formations on a column-by-column basis. Table 22.2 lists the available column
transformations.
• On the Advanced tab, you can set the maximum number of errors to allow
before aborting the task, the name of a file to receive an error log, and the num-
ber of rows that should be committed at one time. You can also add lookups to
use the data in another table to build part of the transform.
DTS IN THE USER INTERFACE
Development with
SQL Server
PART
V
2627ch22.qxd 8/22/00 11:16 AM Page 835
Please purchase PDF Split-Merge on www.verypdf.com to remove this watermark.
CHAPTER 22 • DATA TRANSFORMATION SERVICES
836
Once you’ve selected options from the Data Transformation Properties dialog box,
click OK to apply these options to the transform between the source and destination
data sources.
TABLE 22.2: COLUMN TRANSFORMATIONS
Transformation Effect
ActiveX Script Runs VBScript or JScript code to transform each row of data
Copy Column Copies the source data to the destination column—the default
transformation
Date Time String Changes the format of a date and time string
Lowercase String Converts data to lowercase
Middle of String Extracts a substring of the source data
Read File Uses the source as a filename and copies the contents of that file to
the destination
Trim String Removes leading, trailing, or embedded white space from the
source data
Uppercase String Converts data to uppercase
Write File Uses the destination as a filename and copies the contents of the
source column to that filename.
When you finish creating the source, destination, and any transforms between
them, you’ve done everything that the DTS Wizard does in building a package. At this
point you can execute the package by choosing Package ➢ Execute or clicking the
Execute button on the toolbar. You can save your package to any supported destina-
tion (local storage, Meta Data Services, structured storage file, or Visual Basic file) by
choosing Package ➢ Save or clicking the Save button on the toolbar.
Inserting Data Connections
A single DTS package can contain many data connections, not just the two that are
contained in packages created by the DTS Wizard. You can either clone an existing
connection or add a new connection. The same connection can be the source for
some transforms and the destination for others. Later in the chapter you’ll see the
workflow features that allow you to arrange multiple transforms into a sensible order.
To insert a new data connection using the menus, choose the type of connection
you’d like to insert from the Data menu. To insert a new data connection using the
2627ch22.qxd 8/22/00 11:16 AM Page 836
Please purchase PDF Split-Merge on www.verypdf.com to remove this watermark.
837
Data toolbar, click or click and drag the icon for the type of connection you’d like to
insert. Any of these operations will open the Connection Properties dialog box for
that type of connection. Table 22.3 lists the available data connection types.
TABLE 22.3: DATA CONNECTION TYPES SUPPORTED BY THE DTS PACKAGE DESIGNER
Type Comments
Microsoft OLE DB Provider for SQL Server The preferred connection type for SQL Server data
Microsoft Access Uses the Jet OLE DB Provider
Microsoft Excel 97-2000 Uses the Jet OLE DB Provider
dBase 5 Uses the Jet OLE DB Provider
HTML File (Source) Uses a Web page as the source for a transformation
Paradox 5.XX Uses the Jet OLE DB Provider
Text File (Source) Allows you to use delimited or fixed field data as the
source for a transformation
Text File (Destination) Allows you to use delimited or fixed field data as the
destination for a transformation
Microsoft ODBC Driver for Oracle The preferred connection type for Oracle data
Microsoft Data Link Allows you to save connection information to a disk file
Other Connection By default, will use the OLE DB Provider for ODBC
data sources, but you can select any other OLE DB
Provider that’s installed on your computer
To clone an existing data connection, you can do one of two things. The first way
is to start creating a new connection using either the menus or the toolbar, and then
select the Existing Connection button and choose the name of the existing connec-
tion. The second way to clone an existing connection is to right-click the connection
in the design surface and select Copy, then right-click a blank area of the design sur-
face and select Paste.
To view or change the properties of a connection, double-click the connection in
the design surface, or right-click the connection and choose Properties.
Inserting Tasks
One of the big differences between the DTS Wizard and the DTS Package Designer is
that the Package Designer allows you to add tasks to the DTS package. A task is a piece
DTS IN THE USER INTERFACE
Development with
SQL Server
PART
V
2627ch22.qxd 8/22/00 11:16 AM Page 837
Please purchase PDF Split-Merge on www.verypdf.com to remove this watermark.
CHAPTER 22 • DATA TRANSFORMATION SERVICES
838
of functionality that the server can perform. Tasks add immense flexibility to DTS
packages. There are 19 different task types provided with SQL Server 2000:
ActiveX Script task: The ActiveX Script task allows DTS to execute any
operation that can be expressed in VBScript or JScript.
Analysis Services Processing task: The Analysis Services Processing task
allows DTS to refresh the data in a Microsoft Analysis Server cube. See Chapter
28 for more information on Analysis Services.
Bulk Insert task: The Bulk Insert task uses the BULK INSERT facility of SQL
Server to quickly move external data into a table. This is the fastest way to load
data to SQL Server. However, you can’t do any data transformations or valida-
tion within a Bulk Insert task, which makes it unsuitable if the data isn’t
already in the exact correct format.
Copy SQL Server Objects task: The Transfer SQL Server Objects task uses
SQL-DMO to move entire objects from one SQL Server to another. This task can
move the same types of objects that the DTS Wizard can move when working
in native SQL Server mode.
Data Driven Query task: The Data Driven Query task provides a more
complex set of transformations than the regular data transforms used for most
DTS operations. Data driven queries can run queries or stored procedures that
depend on the data in the row being transferred, and they can select the query
type to run for each row based on the source data.
Data Mining Prediction task: The Data Mining Prediction task lets DTS
run a query to extract results from a Microsoft Analysis Server Data Mining
model.
Dynamic Properties task: The Dynamic Properties task allows you to alter
the properties of other tasks, based on INI files, data files, queries, global vari-
ables, or environment variables. For example, you could choose to alter the file-
name that an FTP task downloads based on the current date. This task offers a
powerful means for customizing a DTS package, but you need to remember
that self-modifying code of any sort can be very difficult to debug.
Execute Package task: The Execute Package task allows one DTS package
to call another DTS package as a subroutine. This task also allows you to treat
the called package as part of a transaction, so that you can commit or roll
back the results of multiple packages as a unit.
Execute Process task: The Execute Process task tells DTS to launch an
external program or batch file. You can also provide a timeout period and any
command line parameters that the external program requires.
2627ch22.qxd 8/22/00 11:16 AM Page 838
Please purchase PDF Split-Merge on www.verypdf.com to remove this watermark.
839
Execute SQL task: The Execute SQL task can send a SQL statement to any
connection in the DTS package for execution.
File Transfer Protocol task: The FTP task allows you to move a file or
group of files from one location to another. You can move files from either an
Internet FTP server or a directory, and post files to an FTP server or directory.
This task is most useful for bringing in files from outside your organization that
you want to include in a data warehouse.
Message Queue task: The Message Queue task allows a DTS package to
send a message via Microsoft Message Queue (MSMQ). MSMQ is an asynchro-
nous communications facility built into Windows 2000 and available for Win-
dows NT 4. This task is designed to allow different servers within an
organization to coordinate operations without needing to be constantly in
touch with one another.
Send Mail task: The Send Mail task sends e-mail as part of a DTS package.
You can use this, in conjunction with the workflow features of DTS, to notify
an operator of the success or failure of a package.
Transfer Databases task: The Transfer Databases task allows DTS to move
or copy entire databases from one SQL Server to another.
Transfer Error Messages task: The Transfer Error Messages task copies
error messages from one SQL Server to another. You can use this task to collect
all error messages generated in the course of executing a DTS package to a sin-
gle location.
Transfer Jobs task: The Transfer Jobs task transfers jobs from the msdb
database on one SQL Server to another SQL Server.
Transfer Logins task: The Transfer Logins task transfers logins from one
SQL Server to another.
Transfer Master Stored Procedures task: The Transfer Master Stored
Procedures task allows DTS to copy stored procedures from the master database
on one SQL Server to another.
Transform Data task: The Transform Data task is the default task that DTS
uses to move data from one connection to another.
In addition to the built-in tasks, DTS can also use custom tasks created by indepen-
dent developers. Creating a custom task is an advanced topic beyond the scope of this
book. If you’re familiar with C++ programming, you’ll find code for creating a sample
custom task located on your SQL Server 2000 CD-ROM in the devtools\samples\
SQLDTS folder. You can also create custom tasks with Visual Basic, but you’re on your
own there; the SQL Server team doesn’t provide any samples.
DTS IN THE USER INTERFACE
Development with
SQL Server
PART
V
2627ch22.qxd 8/22/00 11:16 AM Page 839
Please purchase PDF Split-Merge on www.verypdf.com to remove this watermark.
CHAPTER 22 • DATA TRANSFORMATION SERVICES
840
Although each type of task has its own properties, the general process of inserting
a task into a DTS package is the same in all cases. Either select the task from the Task
menu or locate the icon for the task in the Task toolbar and click it (or click and drag
it to the design surface). In any case, a Properties dialog box will pop up to prompt
you for the necessary information to complete the task. For example, Figure 22.13
shows the Properties dialog for an Execute SQL task.
FIGURE 22.13
Setting properties for
an Execute SQL task
Workflow in DTS
The DTS Package Designer supports three types of connections between tasks and
data sources:
• The On Completion connection causes the second task to run when the first
task has been completed.
• The On Success connection causes the second task to run only if the first task
has been completed successfully.
• The On Failure connection causes the second task to run only if the first task
fails to be completed successfully.
To define workflow relations, first select the objects in the designer that will partic-
ipate in the relations. You can select multiple objects by using Ctrl-click with the
2627ch22.qxd 8/22/00 11:16 AM Page 840
Please purchase PDF Split-Merge on www.verypdf.com to remove this watermark.
841
mouse or by using the mouse to draw a box around the objects. Then choose Work-
flow ➢ On Completion, Workflow ➢ On Success, or Workflow ➢ On Failure to create
the relation.
The objects that can participate in a workflow relation are all tasks and any con-
nection that is the destination for a data transformation.
To change the properties for a workflow relation, double-click the relation arrow,
or right-click the arrow and choose Properties. This will open the Workflow Properties
dialog box, shown in Figure 22.14. Here you can choose to add or remove constraints
and change the type relation.
FIGURE 22.14
Workflow Properties
On completion relations are displayed in blue; on success relations are displayed in
green; and on failure relations are displayed in red.
TIP If two tasks are not connected directly or indirectly by workflow relations, SQL
Server can choose to execute them in any order. For example, if Task C depends on both
Task A and Task B, but there’s no relation defined between Task A and Task B, there’s no
way to know whether Task A or Task B will be executed first. If the order of execution is
important, you must define a relation between the two tasks.
DTS IN THE USER INTERFACE
Development with
SQL Server
PART
V
2627ch22.qxd 8/22/00 11:16 AM Page 841
Please purchase PDF Split-Merge on www.verypdf.com to remove this watermark.
CHAPTER 22 • DATA TRANSFORMATION SERVICES
842
Miscellaneous DTS Package Designer Operations
The DTS Package Designer also offers a number of additional capabilities. The opera-
tions you can perform in the Package Designer include:
• To add explanatory text to a package, choose Package ➢ Add Annotation and
type the text you want to display. You can change the font of an annotation by
right-clicking in it and choosing Font.
• To arrange the icons in the design surface neatly, choose Package ➢ Auto Lay-
out. The Package Designer will arrange the icons in a neat grid, with the opera-
tions to be executed first at the bottom of the diagram.
• To change the position of an arrow in the diagram, click and drag any part of the
arrow. To change the position of an icon in the diagram, click and drag the icon.
• To display the package in greater or less detail, choose Package ➢ Zoom and pick
a zoom percentage.
• To execute an individual task or data transform, right-click the object and
choose Execute Step. This allows you to check whether one step is properly
defined without executing the entire package.
By combining the data, task, and workflow capabilities of the DTS Package
Designer, you can develop very complex packages. Figure 22.15 shows a relatively
simple package in the designer. This package includes three transform tasks among
three different SQL Servers and an export from one of the servers to a text file. An
Execute SQL task and a Send Mail task are also part of the workflow. Although it looks
complex, this package was built simply by repeating the steps we’ve already covered
multiple times. If you break a complex package down into individual steps, you
should have no trouble creating it.
2627ch22.qxd 8/22/00 11:16 AM Page 842
Please purchase PDF Split-Merge on www.verypdf.com to remove this watermark.
843
FIGURE 22.15
A DTS package in the
designer
Programming DTS
In addition to the user-interface tools for working with DTS, SQL Server 2000 includes
a full programmatic interface. This interface allows you to create, modify, and execute
DTS packages entirely in code from any COM client. In this section, we’ll introduce
you to the DTS programming interface. We’ll start with a simple example and then
briefly review the objects that are most commonly used in DTS operations within cus-
tom applications. The DTS object model, like some of the other object models we’ve
examined in previous chapters, is very complex. For full details, you’ll have to refer to
Books Online, but we’ll try to give you the general flavor of working with DTS objects
in your code.
PROGRAMMING DTS
Development with
SQL Server
PART
V
2627ch22.qxd 8/22/00 11:16 AM Page 843
Please purchase PDF Split-Merge on www.verypdf.com to remove this watermark.
CHAPTER 22 • DATA TRANSFORMATION SERVICES
844
A Programming Example
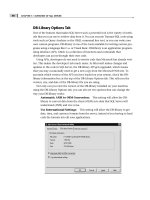
With SQL Server 2000, there’s no need to try to learn DTS programming entirely from
Books Online, because the DTS Wizard and DTS Package Designer can save DTS pack-
ages as Visual Basic files. This allows you to use the user-interface tools to create a
package and then use Visual Basic (or a VBA host) to examine the code created.
As an example, we used the DTS Package Designer to create a package that simply
transfers all the data in the authors table in the pubs database from a server named
HENHOUSE to a server named BIGREDBARN. We then saved this package as
MoveAuthors.bas. To execute this package using Visual Basic, follow these steps:
1. Launch Visual Basic.
2. Create a new Standard Exe project.
3. Choose Project ➢ References. Set references to the Microsoft DTSPackage Object
Library, the Microsoft DTS Custom Tasks Object Library, and the Microsoft DTS-
DataPump Scripting Object Library.
4. Choose Project ➢ Add File and add the MoveAuthors.bas file to the project.
5. Remove the default Form1 from the project.
6. Run the project.
You won’t see any visual evidence that the project is doing anything, but after it
executes, control will return to the Visual Basic interface.
In the remainder of this section, we’ll examine the code that DTS uses to create
and run this package, piece by piece. It starts by declaring two module-level variables:
Public goPackageOld As New DTS.Package
Public goPackage As DTS.Package2
Both of these variables represent the entire DTS package. Why two? The Package2
object is a superset of the Package object, encompassing methods and properties
added since the original release of DTS. We’d like to think there’s some good reason
for using both in this context, but we suspect it was just to keep from having to
rewrite the code when the new object was implemented.
The main part of the code starts by creating the Package object and setting some
properties:
Set goPackage = goPackageOld
goPackage.Name = “MoveAuthors”
goPackage.WriteCompletionStatusToNTEventLog = False
goPackage.FailOnError = False
goPackage.PackagePriorityClass = 2
2627ch22.qxd 8/22/00 11:16 AM Page 844
Please purchase PDF Split-Merge on www.verypdf.com to remove this watermark.