Tài liệu MASTERING SQL SERVER 2000- P18 pdf
Bạn đang xem bản rút gọn của tài liệu. Xem và tải ngay bản đầy đủ của tài liệu tại đây (1.16 MB, 50 trang )
CHAPTER 23 • THE WEB ASSISTANT WIZARD
870
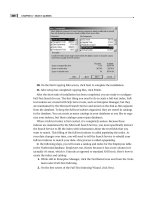
option seen in Figure 23.11 will instruct the Web Assistant Wizard to help format the
Web page.
The only real problem with using the Wizard to format the Web page is that it
turns out kind of bland, a white background with black text. If you want something a
little snazzier than that, you can select the option to use a predefined template. To
create this template, you will need to know how to program in HTML code and have
created the template beforehand. Once you have a template, you need to only point
the Web Assistant Wizard to the right file by selecting the second option. Because
HTML coding is out of the scope of this book, you are going to have the Web Assis-
tant Wizard format the Web page for you by selecting the first option on the screen.
FIGURE 23.11
The Web Assistant
Wizard can help you
format the Web page.
Specifying Titles
If you instructed the Web Assistant Wizard to use a template file, you would skip
ahead a few pages to limiting the number of rows returned, but because you decided
to ask for help, you need to tell the Wizard how you want your page to look. The
first question, as seen in Figure 23.12, asks what title you want on your Web page;
this will show up in the title bar at the top of the Web browser. The next question
asks what title you want to give the table that is used to display the data on the Web
page; this shows up just above the table at the top of the page. The final question
2627ch23.qxd 8/22/00 11:18 AM Page 870
Please purchase PDF Split-Merge on www.verypdf.com to remove this watermark.
871
asks what size the title should be just above the table; the default is H3 (heading 3),
and the size shown is actual. The checkbox at the bottom of the page will allow you
to place a time- and datestamp at the bottom of the Web page so that you will know
the last time it was updated. This is especially helpful if you have instructed the Wiz-
ard to automatically update your Web page.
For the purpose of demonstration, you will change the title of the Web page to
Northwind Employees and the title of the table to Employee Listing, then click Next.
FIGURE 23.12
The Wizard needs
some information to
help you format your
Web page.
Formatting the Table
The data from the tables in your database is displayed on the Web page as a table—a
table that needs to be formatted. Therefore, the next screen will allow you to change
the way the table looks on the Web page.
The first choice you see at the top of the screen (as shown in Figure 23.13) asks
whether the column names should be displayed at the top of the table. All columns
have a name that is assigned when the table is designed; if you want that name to be
displayed in the table on the Web page, select the Yes, Display Column Names option.
If you do not want these to be displayed, select the No, Display Data Only option.
PUBLISHING DATA WITH THE WEB ASSISTANT WIZARD
Development with
SQL Server
PART
V
2627ch23.qxd 8/22/00 11:18 AM Page 871
Please purchase PDF Split-Merge on www.verypdf.com to remove this watermark.
CHAPTER 23 • THE WEB ASSISTANT WIZARD
872
The next choice to make on this screen is the style of font that you want to use to
display the data in the table. The four choices are listed with an example of what the
text will look like in the table.
At the bottom of the screen, there is a checkbox that will turn on or off the border
lines around the table. If border lines are on, the data in each cell of the table will
have a box around it; if border lines are off, there will be no box around the data cells.
FIGURE 23.13
The table that is dis-
played on the page
can be formatted to
suit your needs.
For this example, you will choose to display column names, leave the font as fixed,
and leave the border-lines option checked, and then click Next.
Linking to Other Sites
Usually, when you open a Web page, you see text that is a different color and under-
lined. When you move your mouse over this special text, the cursor changes, and
when you click the text, you are transported to a different Web page. This special text
is called a hyperlink, and on the screen that you see in Figure 23.14, you can add
hyperlinks to your page.
If you select the first option on the page—No—you will not add any links to your
page. If you want to add a single link to the bottom of your page, enter the address of
the page and a label for the page by selecting the Yes, Add One Hyperlink option and
filling in the data. For example, if you want to add a hyperlink to your company’s main
Web page (called the home page), you could enter
2627ch23.qxd 8/22/00 11:18 AM Page 872
Please purchase PDF Split-Merge on www.verypdf.com to remove this watermark.
873
as the link and MyCompany Home Page as the label. Doing so would create a link at
the bottom of the Web page labeled MyCompany Home Page that would take users to
www.mycompany.com.
Just below that, there is a text box that will allow you to enter a Transact-SQL
SELECT query to pull hyperlink information out of a SQL Server table. The table
needs to be created and populated in advance, but this option can come in very
handy if you have a large number of links to add to the page or if your links are
always changing.
FIGURE 23.14
Adding hyperlinks to
your page can make
other company sites
easier to find.
If you’re following along, please select the option to add a single link, and enter
in the Hyperlink URL textbox and Sybex Books in the
Hyperlink Label textbox, then click Next.
Limiting the Rows Displayed
Even if you entered a WHERE clause (as seen in Figure 23.7 earlier in this chapter),
you may still get too many rows. For instance, if you work for a large company and
decide to display the records where the last name is Smith, you may see a large num-
ber of records. On the screen shown in Figure 23.15, you can limit the number of
rows displayed by SQL Server.
PUBLISHING DATA WITH THE WEB ASSISTANT WIZARD
Development with
SQL Server
PART
V
2627ch23.qxd 8/22/00 11:18 AM Page 873
Please purchase PDF Split-Merge on www.verypdf.com to remove this watermark.
CHAPTER 23 • THE WEB ASSISTANT WIZARD
874
The first option does just as it reads by displaying all the rows in the result set. If
you want to limit the number of rows, you should select the second option, labeled
Yes, and then enter the number of records to be displayed on the Web page.
Depending on the number of rows being displayed, you may want to split the data
across several Web pages, because readers do not want to have to scroll through a
large number of records at once (and larger pages take longer to download). To split
the data across several pages, simply select the option at the bottom of the page that
states Yes, Link the Successive Pages Together and then enter the number of records to
be displayed on each page in the Limit Each Page to x Rows of Data textbox.
FIGURE 23.15
You may not need to
display all rows of
data, but if you do,
you may want to split
them across multiple
Web pages.
In this example, you are going to leave the default of displaying all rows on a sin-
gle page and click Next.
The Final Page
On the final screen of the Web Assistant Wizard, you will see a list of all the choices
that you have made throughout the course of this Wizard; read through each choice
and make sure it agrees with you. At the bottom of that laundry list, there is a button
(as seen in Figure 23.16) labeled Write Transact-SQL to File, which will take all of your
hard work, transform it into Transact-SQL code, and store it in a text file on your hard
disk. This file can then be opened in Query Analyzer (a tool for running Transact-SQL
code) and executed to re-create your Web Assistant Wizard job if the job gets damaged
2627ch23.qxd 8/22/00 11:18 AM Page 874
Please purchase PDF Split-Merge on www.verypdf.com to remove this watermark.
875
or deleted for some reason. This makes recovery much easier and therefore is highly
recommended.
FIGURE 23.16
On the last screen, you
are given the option to
review and save your
changes.
For this example, click the Write Transact-SQL to File button and save the text as
nwind_emp.sql. When that is done, click Finish to create the Web page.
The Steps to Create the Northwind Employees Web Page
As promised, here are all of the steps used to create the Northwind Employees Web
page (just in case you wanted to wait until the end):
1. Open Enterprise Manager by selecting it from the SQL Server 2000 group under
Programs on the Start menu.
2. From the Tools menu, select Wizards.
3. Expand Management and double-click the Web Assistant Wizard.
4. On the welcome screen, click Next.
5. Select Northwind as the database from which to publish.
6. Name the job Northwind Employees and select Data from the Tables and
Columns That I Select.
7. Select Employees as the table from the drop-down list and click the Add All but-
ton to publish data from all columns, then click Next.
PUBLISHING DATA WITH THE WEB ASSISTANT WIZARD
Development with
SQL Server
PART
V
2627ch23.qxd 8/22/00 11:18 AM Page 875
Please purchase PDF Split-Merge on www.verypdf.com to remove this watermark.
CHAPTER 23 • THE WEB ASSISTANT WIZARD
876
8. Select the All of the Rows option to publish all rows of data and click Next.
9. Select the At Regularly Scheduled Intervals choice and click Next.
10. Change the schedule for the job to every 2 minutes and click Next.
11. Select the default directory to place the Web page in and click Next.
12. Select the Yes, Help Me Format the Web Page option and click Next.
13. On the next page, change the title of the Web page to Northwind Employees,
change the title of the table to Employee Listing, and click Next, leaving the rest
of the choices as the default settings.
14. On the next page, instruct the Web Assistant Wizard to display the column
names and use a fixed font, then click Next.
15. On the next page, add a single hyperlink to labeled
Sybex Books and click Next.
16. On the next screen, you will instruct SQL Server to display all of the rows from
the result set and leave them on the same page, then click Next.
17. On the final screen, you will save all of the code to a text file by clicking the
Write Transact-SQL to File button, then entering nwind_emp.sql as the file-
name and clicking Save.
18. Finally, click Finish to create the Web Assistant Wizard job and Web page.
Now you are ready to verify that everything was done correctly and view your
Web page.
Viewing the Page
If you have followed along though this chapter, you should have a Web publishing
job ready to go at this point. To verify this, you can do the following:
1. In Enterprise Manager (which should still be open), expand your server, then
Management.
2. Under Management, select Web Publishing.
3. In the contents pane (on the right), double-click the Northwind Employees job.
4. On the Properties page, read the code to see exactly what SELECT statement is
used to generate the result set being displayed on your Web page.
2627ch23.qxd 8/22/00 11:18 AM Page 876
Please purchase PDF Split-Merge on www.verypdf.com to remove this watermark.
877
Not only do you have an entry in the Web Publishing section of Management, you
have a new job scheduled. Let’s view the job that the Web Assistant Wizard created
for you:
1. In Enterprise Manager, expand the SQLServerAgent under Management and
select Jobs (if you are a master job server, as discussed in Chapter 17, you need
to select Local Jobs under Jobs).
2. In the contents pane, double-click the job named Northwind Employees.
3. Select the Steps tab and double-click step number 1 to view the code that creates
the Web page. Notice that this is a special system stored procedure named
sp_runwebtask.
PUBLISHING DATA WITH THE WEB ASSISTANT WIZARD
Development with
SQL Server
PART
V
2627ch23.qxd 8/22/00 11:18 AM Page 877
Please purchase PDF Split-Merge on www.verypdf.com to remove this watermark.
CHAPTER 23 • THE WEB ASSISTANT WIZARD
878
4. Click Cancel and select the Schedules tab.
5. Double-click the schedule to see when the job will activate.
6. Click Cancel, then click Cancel again to return to Enterprise Manager.
TIP If you want to change how often the Web page is created, you may do so from the
Schedules tab of the job that creates the Web page. If you want to stop updating the Web
page, you can disable the job altogether by unchecking the Enabled checkbox on the Gen-
eral tab of the job’s properties.
2627ch23.qxd 8/22/00 11:18 AM Page 878
Please purchase PDF Split-Merge on www.verypdf.com to remove this watermark.
879
You probably want to see the fruits of your labors by viewing the Web page itself.
Let’s do that now by opening it right from the directory it is stored in on your hard disk:
1. Click the Start button and select Run.
2. In the Open text box, type C:\Program Files\Microsoft SQL Server\
80\Tools\HTML\WebPage1.htm (if you have installed SQL Server to a dif-
ferent drive, please replace the C with your drive letter).
3. This will open your Web browser and display the Web page. Notice the title bar
at the top, the table title just above the table, the boxes around the data (the
table border), and, at the bottom, the link to Sybex Books.
4. At the top of the Web page, you will see a timestamp; wait for 2 minutes and
click the Refresh button on your browser—the timestamp should be updated,
indicating that the job is running every 2 minutes just as instructed.
5. Close your Web browser.
Armed with this knowledge, you are now able to publish your data on the Web
quickly and easily.
PUBLISHING DATA WITH THE WEB ASSISTANT WIZARD
Development with
SQL Server
PART
V
2627ch23.qxd 8/22/00 11:18 AM Page 879
Please purchase PDF Split-Merge on www.verypdf.com to remove this watermark.
CHAPTER 23 • THE WEB ASSISTANT WIZARD
880
Summary
The Web Assistant Wizard is a simple Wizard, but is very useful, which is why we ded-
icated an entire chapter to its use. The first topic we discussed was why you would
even want your data on the Web. We gave some scenarios of a store catalog, a phone
list, and event schedules on the Web. All of these scenarios definitely benefit from
being on the Web, and there are many, many more scenarios that you will be able to
add to that list.
After discussing the need to put your data on the Web, we went through each and
every screen in the Web Assistant Wizard and discussed each one in detail, describing
each choice and when each option would be most helpful.
The Web Assistant Wizard, useful as it is, is somewhat limited when you look at all
that you can do with SQL Server on the Web. In the next chapter, we will look into
some more powerful methods of putting your data on the Web by integrating SQL
Server 2000 with Internet Information Server.
2627ch23.qxd 8/22/00 11:18 AM Page 880
Please purchase PDF Split-Merge on www.verypdf.com to remove this watermark.
CHAPTER 24
Integrating SQL
Server with
Internet
Information
Server
FEATURING:
What Is Internet Information Server? 882
Active Server Pages 884
Remote Data Service 900
Returning Results as XML 910
Querying SQL Server through HTTP 912
Summary 919
2627ch24.qxd 8/22/00 11:19 AM Page 881
Please purchase PDF Split-Merge on www.verypdf.com to remove this watermark.
I
n the last chapter, you saw that the Web Assistant Wizard makes it easy to gen-
erate HTML pages from data stored in a SQL Server database. However, the con-
nections between SQL Server and the Internet go much deeper than just
generating HTML pages. In this chapter, we’ll explore some of the ways in
which you can use SQL Server together with Microsoft’s Web server offering, Internet
Information Server. You’ll learn about using ADO in Web pages, Remote Data Ser-
vices, HTTP queries, and SQL Server’s new XML features. Some of these features
depend on Microsoft Internet Information Server, and some do not, but they all
require you to be running a Web server of one variety or another. We’ll concentrate
on IIS because it’s closely integrated with Windows and should be available to most
SQL Server installations.
What Is Internet Information Server?
Internet Information Server (IIS) is a Web server application. In particular, it’s the Web
server application designed by Microsoft for high-volume use on Windows NT plat-
forms. A Web server is a program that responds to requests from Internet or intranet
clients (typically Web browsers) by sending back files. These files might be HTML
pages or other documents.
When you type a URL into a Web browser, such as ,
you’re telling your browser to send a Hypertext Transfer Protocol request to that address
(that’s where the http prefix comes from). The server at that address (presumably IIS,
in the case of microsoft.com) looks at the request, decides which file it refers to, and
sends the file back to the user.
Originally, Web servers such as IIS could return only static pages containing infor-
mation placed there for users. However, over time the job of Web servers has expanded
to include dynamic content. In particular, IIS offers several ways to merge data from
SQL Server with a Web page. In this chapter, we’ll cover three of those options:
• ADO code in Active Server Pages
• Remote Data Services
• XML data
Installing IIS
There are two versions of IIS that you’re likely to run across as you’re working with
SQL Server 2000: IIS 4 and IIS 5.
2627ch24.qxd 8/22/00 11:19 AM Page 882
Please purchase PDF Split-Merge on www.verypdf.com to remove this watermark.
883
IIS 4 is an optional program for Windows NT 4. It’s not included as a part of the
Windows NT operating system. To install IIS 4, you need to install the Windows NT
Option Pack. The Option Pack is available as part of MSDN or TechNet subscrip-
tions, or you may download it from />downloads.asp. Some other products, such as Microsoft Visual Studio, also ship
with copies of the Option Pack.
With Windows 2000, Microsoft has made IIS part of the core operating system. If
you install Windows 2000 Server or Advanced Server, you get the chance to include
IIS 5 as part of the installation.
Although the interface for managing IIS differs slightly between IIS 4 and IIS 5,
either version will work perfectly well with SQL Server 2000. You can use the tech-
niques in this chapter with both versions of IIS.
NOTE For details on managing and setting up IIS, refer to the Windows NT Option Pack
or Windows 2000 documentation.
A Few Words about Security
There’s something about a Web server that’s irresistibly attractive to crackers, script
kiddies, and other Internet lowlifes. Over the past few years, unfortunately, there have
been a number of fairly high-profile security holes found in Internet Information
Server. Some of these have allowed outsiders to cause your server to crash just by
sending particular HTTP requests to it. Others have exposed sensitive data, bypassing
SQL Server and IIS security entirely. If you’re going to hook up your SQL Server via IIS
to the public Internet, you must be concerned with security, unless all of your data
should be open to everyone in the world.
We’d like to offer complete instructions for securing your server to prevent intru-
sions and data loss. However, this is a quickly changing area, and any advice we could
give would be out of date by the time you read it. Rather than provide you with a
false sense of security, we’ll suggest a few resources that you should use to keep up
with the ins and outs of Web security.
Your first line of defense is the Microsoft Security Advisor Web site at http://www
.microsoft.com/security/default.asp. Microsoft has been diligent about publiciz-
ing security problems and providing patches to eliminate such problems. Consider
visiting this Web site on a weekly basis to check for new problems that affect your
installation. You should also check out their Product Security Notification Service,
which will send you e-mail when new problems are discovered.
WHAT IS INTERNET INFORMATION SERVER?
Development with
SQL Server
PART
V
2627ch24.qxd 8/22/00 11:19 AM Page 883
Please purchase PDF Split-Merge on www.verypdf.com to remove this watermark.
CHAPTER 24 • INTEGRATING SQL SERVER WITH INTERNET INFORMATION SERVER
884
If you’re running IIS 4, you should refer to the IIS 4 security checklist at http://www
.microsoft.com/technet/security/iischk.asp. This page covers all the steps neces-
sary to make an IIS 4 installation as secure as possible, with links to relevant articles and
recommendations.
If you’re running IIS 5, you should download the Windows 2000 Internet Server
Security Configuration Tool from />.asp?ReleaseID=19889. This tool, released in March 2000, will help you develop and
apply a security policy for Windows 2000–based Web servers.
Finally, if you get seriously interested in this topic, or if you’re responsible for very
sensitive data, we recommend subscribing to the NTBugTraq mailing list. This is a
moderated mailing list that’s independent of Microsoft, on which many developers
and system administrators discuss all aspects of Windows NT security. You can get
signed up or read the list archives at />Active Server Pages
The simplest way to display data from SQL Server on a Web page is to use an Active
Server Page that makes use of ADO. In this section, we’ll review the general design of
Active Server Pages (ASP pages) and then see how you can use them in conjunction
with SQL Server and IIS to display SQL Server data in a Web page.
NOTE Because ASP stands for Active Server Pages, it would make sense to speak of AS
pages as shorthand. However, perhaps by analogy with HTML pages, nearly all developers
refer to ASP pages. So don’t blame us if this doesn’t make any sense.
What Are Active Server Pages?
To understand Active Server Pages, let’s start with regular HTML (Hypertext Markup
Language) pages. Here’s what a very simple HTML page looks like when opened in a
text editor on the server:
<HTML>
<HEAD>
<TITLE>HTML Example</TITLE>
</HEAD>
<BODY>
2627ch24.qxd 8/22/00 11:19 AM Page 884
Please purchase PDF Split-Merge on www.verypdf.com to remove this watermark.
885
This is a simple HTML page.
</BODY>
</HTML>
As you can see, there are two types of information intermingled in the source file
for an HTML page. First, there is actual content to be displayed to the user, such as
“This is a simple HTML page.” Second, there is markup information that tells the
browser how to display the content. For example, the text between <TITLE> and
</TITLE> defines the title of the page. <TITLE> and </TITLE> are examples of HTML
tags, instructions for display of content. Note that each tag is matched by a corre-
sponding tag beginning with a / character to indicate the end of a particular process-
ing directive. Table 24.1 lists some common HTML tags.
NOTE We won’t try to teach you all the ins and outs of HTML in this book. Instead,
we’ll show simple examples that make use of only a few HTML tags. For an in-depth tutor-
ial on HTML, see Mastering HTML 4.0 (by Deborah S. Ray and Eric J. Ray, Sybex Inc. 1997).
TABLE 24.1: COMMON HTML TAGS
Tags Meaning
<!— and —> Comment
<B> and </B> Bold
<BODY> and </BODY> Body of page
<BR> Line break
<FORM> and </FORM> Data input form
<HEAD> and </HEAD> Header information
<HTML> and </HTML> HTML page
<H1> and </H1> Heading, size 1
<I> and </I> Italics
<INPUT> Data input control
<P> and </P> Paragraph
<TABLE> and </TABLE> Table
<TD> and </TD> Table cell
ACTIVE SERVER PAGES
Development with
SQL Server
PART
V
2627ch24.qxd 8/22/00 11:19 AM Page 885
Please purchase PDF Split-Merge on www.verypdf.com to remove this watermark.
CHAPTER 24 • INTEGRATING SQL SERVER WITH INTERNET INFORMATION SERVER
886
TABLE 24.1: COMMON HTML TAGS (CONTINUED)
Tags Meaning
<TR> and </TR> Table row
<TITLE> and </TITLE> Page title
<U> and </U> Underline
Suppose this file is saved on your Web server under the name HTMLExample.htm. In
this case, when a user browses to HTMLExample.htm, these steps take place:
1. The user’s browser sends a Hypertext Transfer Protocol (HTTP) request to the
Web server for the particular page.
2. Internet Information Server locates the file and sends its contents back to the
browser.
3. The browser interprets the HTML tags and displays the resulting text on-screen.
Figure 24.1 shows the end result of this sequence. Note that the address bar in the
browser contains the HTTP request that was used to locate the page.
FIGURE 24.1
HTML page in the
browser
When working with HTML pages, IIS functions as a sort of file clerk. Its job is just
to look at the incoming HTTP request, locate the appropriate file, and send the file
back to the browser. HTML pages are static Web pages whose content is always the
same (at least until the developer edits the page).
Active Server Pages, by contrast, are dynamic Web pages. The file that’s stored on
the server is not precisely the file that is sent out to the browser. Instead, the file on
2627ch24.qxd 8/22/00 11:19 AM Page 886
Please purchase PDF Split-Merge on www.verypdf.com to remove this watermark.
887
the server contains additional instructions that are executed on the server, with the
results being sent to the browser. For example, here’s a simple ASP file:
<HTML>
<HEAD>
<TITLE>ASP Example</TITLE>
<% @Language = “VBScript” %>
</HEAD>
<BODY>
This is a simple ASP page.
<%
Dim i
For i = 1 To 5
Response.Write i %><BR>
<%
Next
%>
</BODY>
</HTML>
As with the HTML file, the ASP file includes both content (“This is a simple ASP
page.”) and tags (<TITLE>). It also contains a third type of information: code to be
executed on the server. Everything between the <% and %> tokens is executed by IIS
before the file is sent to the browser. You can see that there’s a small program embed-
ded in this file between sets of those tokens. It starts by telling IIS that the program-
ming language is VBScript. It then declares a variable i and uses it in a For…Next
loop. The body of the loop uses the Write method of the Response object (an object
supplied by IIS) to output text to the Web page. When a user browses to this page,
these steps take place:
1. The user’s browser sends a Hypertext Transfer Protocol (HTTP) request to the
Web server for the particular page.
2. Internet Information Server locates the file and notes that it’s an ASP page.
3. IIS creates an HTML file by combining the static text and tags on the page with
the results of the code on the page.
4. IIS sends the resulting HTML file to the browser.
5. The browser interprets the HTML tags and displays the resulting text on-screen.
The result of this sequence is shown in Figure 24.2.
ACTIVE SERVER PAGES
Development with
SQL Server
PART
V
2627ch24.qxd 8/22/00 11:19 AM Page 887
Please purchase PDF Split-Merge on www.verypdf.com to remove this watermark.
CHAPTER 24 • INTEGRATING SQL SERVER WITH INTERNET INFORMATION SERVER
888
FIGURE 24.2
Simple ASP page in a
browser
To prove that the file seen by the browser is different from the original ASP file,
you can use the browser’s View ➣ Source command. In this case, the HTML source
looks like this:
<HTML>
<HEAD>
<TITLE>ASP Example</TITLE>
</HEAD>
<BODY>
This is a simple ASP page.
1<BR>
2<BR>
3<BR>
4<BR>
5<BR>
</BODY>
</HTML>
As you can see, all of the programming content has been removed from the page
by IIS and replaced by its results.
You’re not limited to VBScript in developing ASP pages. IIS supports VBScript,
JScript, Perl, and REXX programming languages. For example, here’s the same ASP
page rewritten using JScript (the scripting variant of the Java programming language):
<HTML>
<HEAD>
2627ch24.qxd 8/22/00 11:19 AM Page 888
Please purchase PDF Split-Merge on www.verypdf.com to remove this watermark.
889
<TITLE>ASP Example</TITLE>
<% @Language = “JScript” %>
</HEAD>
<BODY>
This is a simple ASP page.
<%
var i
for (i=1; i<=5; i++)
{
Response.write(i);%><BR>
<% } %><BR>
</BODY>
</HTML>
We’ll use VBScript for the remaining examples in this chapter because we think it’s
easier to read for most developers.
Creating ASP Pages with ADO
Of course, just running code in ASP pages on the server won’t deliver data to the
browser. You need to somehow tie the code from IIS to your SQL Server. The easiest
way to do this is to use ADO objects with your ASP pages. You can use the Server.Cre-
ateObject method in ASP code to create arbitrary objects, and IIS can then use those
objects.
Displaying a Table
We’ll start with an extremely simple example. This ASP page will display the contents
of two fields from the authors table in the pubs database:
<HTML>
<HEAD>
<TITLE>ASP Example</TITLE>
<% @Language = “VBScript” %>
</HEAD>
<BODY>
<H1>Authors:</H1>
<P><%
Dim strConnection
Dim objConnection
Dim rstAuthors
ACTIVE SERVER PAGES
Development with
SQL Server
PART
V
2627ch24.qxd 8/22/00 11:19 AM Page 889
Please purchase PDF Split-Merge on www.verypdf.com to remove this watermark.
CHAPTER 24 • INTEGRATING SQL SERVER WITH INTERNET INFORMATION SERVER
890
strConnection = “Provider=SQLOLEDB;Data Source=HENHOUSE; ➥
Database=pubs;Integrated Security=SSPI”
Set objConnection = Server.CreateObject(“ADODB.Connection”)
objConnection.Open strConnection
Set rstAuthors = objConnection.Execute(“SELECT au_id, ➥
au_lname FROM authors ORDER BY au_id”)
Do Until rstAuthors.EOF %>
<%= rstAuthors(“au_id”) %> ➥
<%= rstAuthors(“au_lname”) %><BR>
<%
rstAuthors.MoveNext
Loop
rstAuthors.Close
Set rstAuthors = Nothing
Set objConnection = Nothing
%></P>
</BODY>
</HTML>
As you can see, this is a mix of HTML and ADO. Although it can be tough to disen-
tangle the two on first inspection, if you work through it carefully, it’s fairly easy to
see what’s going on here. The code starts by declaring the objects that it’s going to use
and assigning an ADO connection string to one variable. The code then uses the
Server.CreateObject method to make an ADODB Connection object. Once it’s created,
this object functions like any other Connection object. In particular, you can use its
Open method to connect to the server and its Execute method to execute a SQL string
and create a recordset.
After the recordset is open, the code uses a Do Until loop to walk through all the
records the recordset contains with the MoveNext method. Within this loop, you’ll
find a line with some syntax that’s new:
<%= rstAuthors(“au_id”) %> ➥
<%= rstAuthors(“au_lname”) %><BR>
The <%= fieldname %> syntax tells IIS to retrieve the current contents of the speci-
fied field and output it to the HTML at that point. The portion of the line is
HTML’s syntax for a nonbreaking space character. So this line outputs the au_id field
followed by a space followed by the au_lname field. Because this line of code is inside
the loop, it does this once for each row in the recordset.
2627ch24.qxd 8/22/00 11:19 AM Page 890
Please purchase PDF Split-Merge on www.verypdf.com to remove this watermark.
891
At the end of the code, IIS closes and cleans up the object variables that were used
to retrieve the data. The result of opening this page in a browser is shown in Figure 24.3.
FIGURE 24.3
Retrieving data with
ASP code
Putting Results in a Table
For a nicer presentation, you’ll probably want to display SQL Server data in HTML
tables. You can easily accomplish this by inserting the markup tags for a table in the
correct spots in the ASP code. For example, this version of the authors example dis-
plays the results in a table:
<HTML>
<HEAD>
<TITLE>ASP Example</TITLE>
<% @Language = “VBScript” %>
</HEAD>
<BODY>
<H1>Authors:</H1>
<P><%
Dim strConnection
Dim objConnection
Dim rstAuthors
strConnection = “Provider=SQLOLEDB;Data Source=HENHOUSE;➥
Database=pubs;Integrated Security=SSPI”
ACTIVE SERVER PAGES
Development with
SQL Server
PART
V
2627ch24.qxd 8/22/00 11:19 AM Page 891
Please purchase PDF Split-Merge on www.verypdf.com to remove this watermark.
CHAPTER 24 • INTEGRATING SQL SERVER WITH INTERNET INFORMATION SERVER
892
Set objConnection = Server.CreateObject(“ADODB.Connection”)
objConnection.Open strConnection
Set rstAuthors = objConnection.Execute(“SELECT au_id, ➥
au_lname FROM authors ORDER BY au_id”)
%>
<TABLE BORDER=1 CELLPADDING=5>
<TR>
<TD><B>Author ID</B></TD>
<TD><B>Last Name</B></TD>
</TR>
<%Do Until rstAuthors.EOF %>
<TR>
<TD><%= rstAuthors(“au_id”) %></TD>
<TD><%= rstAuthors(“au_lname”) %></TD>
</TR>
<%
rstAuthors.MoveNext
Loop
rstAuthors.Close
Set rstAuthors = Nothing
Set objConnection = Nothing
%></TABLE></P>
</BODY>
</HTML>
To create the table, this example adds the <TABLE> tag around all of the data, and
<TR> and <TD> tags to create the rows and cells of data. Note that the column head-
ings are outside of the loop that fetches data, because you want those headings to dis-
play only once in the table. Figure 24.4 shows the resulting page in a Web browser. It’s
the same information that you saw in the previous example, but the additional
markup tags make it a bit easier to follow.
2627ch24.qxd 8/22/00 11:19 AM Page 892
Please purchase PDF Split-Merge on www.verypdf.com to remove this watermark.
893
FIGURE 24.4
SQL Server data in an
HTML table
Retrieving Specific Results
You may also want to present a truly dynamic method of retrieving data based on
user input. There are several ways to accomplish this with ADO and ASP pages. We’ll
demonstrate a technique using an HTML form to collect the data.
HTML forms use special tags to define a data-entry section on a Web page. Our
example page uses these tags to define the form:
<FORM METHOD=”Get” ACTION=”DisplayAuthors3.asp”>
<INPUT TYPE=”Text” NAME=”State” VALUE=➥
“<% =Request.QueryString(“State”) %>”>
<INPUT TYPE=”Submit” VALUE=”Find”>
</FORM>
This results in the display shown in Figure 24.5. The only part of this that might be
unclear is the use of <% =Request.QueryString(“State”) %>. That’s a bit of VBScript
code that retrieves the value of the State option from the page’s URL. When you first
load the page, this option (along with all others) will be empty, so that the textbox is
empty.
ACTIVE SERVER PAGES
Development with
SQL Server
PART
V
2627ch24.qxd 8/22/00 11:19 AM Page 893
Please purchase PDF Split-Merge on www.verypdf.com to remove this watermark.
CHAPTER 24 • INTEGRATING SQL SERVER WITH INTERNET INFORMATION SERVER
894
FIGURE 24.5
A form for data
retrieval
When you click the Find button, the form loads the DisplayAuthors3.asp file
with a special URL that includes the value typed into the textbox. This value then
becomes available from the Request object. In this case, the form and the display are
the same ASP page, but that doesn’t need to be the case, because the value is passed
in the URL regardless of the new page loaded by the form.
The VBScript code for retrieving records makes use of the Request object to build a
WHERE clause from this same value:
strSQL = “SELECT au_id, au_lname, state FROM authors “
strSQL = strSQL & “WHERE state =’” & Request.QueryString(“State”) & “‘ “
strSQL = strSQL & “ORDER BY au_id”
Set rstAuthors = objConnection.Execute(strSQL)
Thus, the information entered by the user is used to construct a SQL statement
with a WHERE clause derived from that information. The result is a final page that
shows only the records in which the user is interested. Figure 24.6 shows the page
after the user has entered a value and clicked Find.
2627ch24.qxd 8/22/00 11:19 AM Page 894
Please purchase PDF Split-Merge on www.verypdf.com to remove this watermark.