Tài liệu MySQL High Availability- P2 pptx
Bạn đang xem bản rút gọn của tài liệu. Xem và tải ngay bản đầy đủ của tài liệu tại đây (605.23 KB, 50 trang )
ssh_user
A combination of user and password that can be used for connecting to the
machine that is running the server. Use this to execute administrative com-
mands such as starting and stopping the server and reading and writing the
configuration file.
sql_user
A combination of user and password for connecting to the server as a MySQL
user account to execute SQL commands.
machine
An object that holds operating system–specific primitives. We chose the name
to avoid a name conflict with the standard library os module. This parameter
lets you use different techniques for starting and stopping the server as well as
other tasks and operating system–specific parameters. The parameters will be
covered later.
server_id
An optional parameter to hold the server’s ID, as defined in each server’s con-
figuration file. If this option is omitted, the server ID will be read from the
configuration file of the server. If there is no server ID in the configuration file
either, the server is a vagabond and does not participate in replication as master
or slave.
config_manager
An optional parameter to hold a reference to a configuration manager that can
be queried for information about the configuration for the server.
Server.connect() and Server.disconnect()
Use the connect and disconnect methods to establish a connection to the server
before executing commands in a session and disconnect from the server after fin-
ishing the session, respectively.
These methods are useful because in some situations it is critical to keep the con-
nection to the server open even after an SQL command has been executed. Oth-
erwise, for example, when doing a FLUSH TABLES WITH READ LOCK, the lock will
automatically be released when the connection is dropped.
Server.ssh(command) and Server.sql(command, args)
Use these to execute a shell command or an SQL command on the server.
The ssh and sql methods both return an iterable. ssh returns a list of the lines of
output from the executed command, whereas sql returns a list of objects of an
internal class named Row. The Row class defines the __iter__ and next methods so
that you iterate over the returned lines or rows, for example:
for row in server.sql("SHOW DATABASES"):
print row["Database"]
A Brief Introduction to the Binary Log | 27
Please purchase PDF Split-Merge on www.verypdf.com to remove this watermark.
To handle statements that return a single row, the class also defines a
__getitem__ method, which will fetch a field from the single row or raise an
exception if there is no row. This means that when you know your return value
has only one row (which is guaranteed for many SQL statements), you can avoid
the loop shown in the previous example and write something like:
print server.sql("SHOW MASTER STATUS")["Position"]
Server.fetch_config() and Server.replace_config()
The methods fetch_config and replace_config fetch the configuration file into
memory from the remote server to allow the user to add or remove options as well
as change the values of some options. For example, to add a value to the log-bin
and log-bin-index options, you can use the module as follows:
config = master.fetch_config()
config.set('log-bin', 'capulet-bin')
config.set('log-bin-index', 'capulet-bin.index')
master.replace_config(config)
Server.start() and Server.stop()
The methods start and stop forward information to the machine object to do their
jobs, which depend on the operating system the server is using. The methods will
either start the server or shut down the server, respectively.
Server Roles
Servers work slightly differently depending on their roles. For example, masters require
a replication user for slaves to use when connecting, but slaves don’t require that user
account unless they act as a master and have other slaves connecting. To capture the
configuration of the servers in a flexible manner, classes are introduced for representing
different roles.
When you use the imbue method on a server, the appropriate commands are sent to the
server to configure it correctly for that role. Note that a server might change roles in
the lifetime of a deployment, so the roles given here just serve to configure the initial
deployment. However, a server always has a designated role in the deployment and
therefore also has an associated role.
When a server changes roles, it might be necessary to remove some of the configuration
information from the server, so therefore an unimbue method is also defined for a role
and used when switching roles for a server.
In this example, only three roles are defined. Later in the book you will see more roles
defined.
Role
This is the base class of all the roles. Each derived class needs to define the methods
imbue and (optionally) unimbue to accept a single server to imbue with the role. To
28 | Chapter 2: MySQL Replication Fundamentals
Please purchase PDF Split-Merge on www.verypdf.com to remove this watermark.
aid derived classes with some common tasks, the Role class defines a number of
helper functions.
Role.imbue(server)
This method imbues the server with the new role by executing the appropriate
code.
Role.unimbue(server)
This method allows a role to perform cleanup actions before another role is
imbued.
Role._set_server_id(server, config)
If there is no server ID in the configuration, this method sets it to
server.server_id. If the configuration has a server ID, it will be used to set the
value of server.server_id.
Role._create_repl_user(server, user)
This method creates a replication user on the server and grants it the necessary
rights to act as a replication slave.
Role._enable_binlog(server, config)
This method enables the binary log on the server by setting the log-bin and
log-bin-index options to appropriate values. If the server already has a value
for log-bin, this method does nothing.
Role._disable_binlog(server, config)
This method disables the binary log by clearing the log-bin and log-bin-
index options in the configuration file.
Vagabond
This is the default role assigned to any server that does not participate in the rep-
lication deployment. As such, the server is a “vagabond” and does not have any
responsibilities whatsoever.
Master
This role is for a server that acts as a master. The role will set the server ID, enable
the binary log, and create a replication user for the slaves. The name and password
of the replication user will be stored in the server so that when slaves are connected,
the class can look up the replication username.
Final
This is the role for a (final) slave—that is, a slave that does not have a binary log
of its own. When a server is imbued with this role, it will be given a server ID, the
binary log will be disabled, and a CHANGE MASTER command will be issued to connect
the slave to a master.
Note that we stop the server before we write the configuration file back to it, and restart
the server after we have written the configuration file. The configuration file is read
only when starting the server and closed after the reading is done, but we play it safe
and stop the server before modifying the file.
A Brief Introduction to the Binary Log | 29
Please purchase PDF Split-Merge on www.verypdf.com to remove this watermark.
One of the critical design decisions here is to not store any state information about the
servers that roles apply to. It might be tempting to keep a list of all the masters by adding
them to the role object, but since roles of the servers change over the lifetime of the
deployment, the roles are used only to set up the system. Because we allow a role to
contain parameters, you can use them to configure several servers with the same
information.
slave_role = Final(master=MyDeployment.master)
for slave in MyDeployment.slaves:
slave_role.imbue(slave)
Creating New Slaves
Now that you know a little about the binary log, we are ready to tackle one of the basic
problems with the way we created a slave earlier. When we configured the slave, we
provided no information about where to start replication, so the slave will start reading
the binary logs on the master from the beginning. That’s clearly not a very good idea
if the master has been running for some time: in addition to making the slave replay
quite a lot of events just to ramp up, you might not be able to obtain the necessary logs,
because they might have been stored somewhere else for safekeeping and removed from
the master (we’ll discuss that more in Chapter 12 when we talk about backups and
PITR). So we need another way to create new slaves—called bootstrapping a slave—
without starting replication from the beginning.
The CHANGE MASTER TO command has two parameters that will help us here:
MASTER_LOG_FILE and MASTER_LOG_POS. You can use these to specify the binlog position
at which the master should start sending events instead of starting from the beginning.
Using these parameters to CHANGE MASTER TO, we can bootstrap a slave using the fol-
lowing steps:
1. Configure the new slave.
2. Make a backup of the master (or of a slave that has been replicating the master).
See Chapter 12 for common backup techniques.
3. Write down the binlog position that corresponds to this backup (in other words,
the position following the last event leading up to the master’s current state).
4. Restore the backup on the new slave. See Chapter 12 for common restore
techniques.
5. Configure the slave to start replication from this position.
Depending on whether you use the master or a slave as a baseline in step 2, the proce-
dure differs slightly, so we will start by describing how to bootstrap a new slave when
you only have a single server running that you want to use as master—this is called
cloning the master.
30 | Chapter 2: MySQL Replication Fundamentals
Please purchase PDF Split-Merge on www.verypdf.com to remove this watermark.
Cloning a master means taking a snapshot of the server, which is usually accomplished
by creating a backup. There are various techniques for backing up the server, but in
this chapter, we have decided to use one of the simpler techniques: running mysql
dump to create a logical backup. Other options are to create a physical backup by copying
the database files, online backup techniques such as InnoDB Hot Backup, or even
volume snapshots using Linux LVM (Logical Volume Manager). The various techni-
ques will be described fully in Chapter 12, along with a discussion of their relative
merits.
Cloning the Master
The mysqldump utility has options that allow you to perform all the steps in this section
in a single step, but to explain the necessary operations, we will perform all the steps
here individually. You will see a more compact version later in this section.
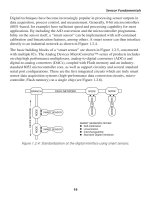
To clone the master, as shown in Figure 2-5, start by creating a backup of the master.
Since the master is probably running and has a lot of tables in the cache, it is necessary
to flush all tables and lock the database to prevent changes before checking the binlog
position. You can do this using the FLUSH TABLES WITH READ LOCK command:
master> FLUSH TABLES WITH READ LOCK;
Query OK, 0 rows affected (0.02 sec)
Figure 2-5. Cloning a master to create a new slave
Once the database
is locked, you are ready to create a backup and note the binlog
position. Since no changes are occurring on the master, the SHOW MASTER STATUS com-
mand will correctly reveal the current file and position in the binary log. We will go
through the details of the SHOW MASTER STATUS and the SHOW MASTER LOGS commands in
Chapter 6.
master> SHOW MASTER STATUS\G
*************************** 1. row ***************************
File: master-bin.000042
Position: 456552
Binlog_Do_DB:
A Brief Introduction to the Binary Log | 31
Please purchase PDF Split-Merge on www.verypdf.com to remove this watermark.
Binlog_Ignore_DB:
1 row in set (0.00 sec)
The position of
the next event to write is master-bin.000042, 456552, which is where
replication should start, since everything before this point will be in the backup. Once
you have jotted down the binlog position, you can create your backup. The easiest way
to create a backup of the database is to use mysqldump:
$ mysqldump all-databases host=master-1 >backup.sql
Since you now have a faithful copy of the master, you can unlock the tables of the
database on the master and allow it to continue processing queries.
master> UNLOCK TABLES;
Query OK, 0 rows affected (0.23 sec)
Next, restore the backup on the slave using the mysql utility:
$ mysql host=slave-1 <backup.sql
You have now restored the backup of the master on the slave and can start the slave.
Recalling the binlog position of the master that you wrote down previously, configure
the slave using CHANGE MASTER TO and start the slave:
slave> CHANGE MASTER TO
-> MASTER_HOST = 'master-1',
-> MASTER_PORT = 3306,
-> MASTER_USER = 'slave-1',
-> MASTER_PASSWORD = 'xyzzy',
-> MASTER_LOG_FILE = 'master-bin.000042',
-> MASTER_LOG_POS = 456552;
Query OK, 0 rows affected (0.00 sec)
slave> START SLAVE;
Query OK, 0 rows affected (0.25 sec)
It is possible to have mysqldump perform many of the previous steps au-
tomatically. To make
a logical backup of all databases on a server called
master, enter:
$ mysqldump host=master -all-databases \
> master-data=1 >backup-source.sql
The master-data=1 option makes mysqldump write a CHANGE MASTER
TO statement with the file and position in the binary log, as given by SHOW
MASTER STATUS.
You can then restore the backup on a slave using:
$ mysql host=slave-1 <backup-source.sql
Note that you can only use master-data=1 to get a CHANGE MASTER TO
statement for the master. When cloning the slave later, it is necessary
to perform all the steps given in the following section.
32 | Chapter 2: MySQL Replication Fundamentals
Please purchase PDF Split-Merge on www.verypdf.com to remove this watermark.
Congratulations! You have now cloned the master and have a new slave up and running.
Depending on the load of the master, you might need to allow the slave to catch up
from the position you jotted down, but that requires far less effort than starting from
the beginning.
Depending on how long the backup took, there might be a lot of data to catch up to,
so before bringing the slave online, you might want to read through “Managing Con-
sistency of Data” on page 184.
Cloning the Slave
Once you have a slave connected to the master, you can use the slave instead of the
master to create new slaves. That way, you can create a new slave without bringing the
master offline. If you have a large or high-traffic database, the downtime could be con-
siderable, considering both the time to create the backup and the time for the slaves to
catch up.
The process of cloning a slave is illustrated in Figure 2-6 and is basically the same as
for a master, but it differs in how you find the binlog position. You also need to take
into consideration that the slave you are cloning from is replicating a master.
Figure 2-6. Cloning a slave to create a new slave
The first thing
you have to do before starting a backup is to stop the slave so that no
more changes occur on it. If replication is running while you create the backup, you
will have an inconsistent backup image if changes are made to the database while it is
being backed up. The exception is if you use some form of online backup method—
such as InnoDB Hot Backup—in which case you do not need to stop the slave before
creating the backup.
original-slave> STOP SLAVE;
Query OK, 0 rows affected (0.20 sec)
A Brief Introduction to the Binary Log | 33
Please purchase PDF Split-Merge on www.verypdf.com to remove this watermark.
After the slave is stopped, you can flush the tables as before and create the backup.
Since you created a backup of the slave (not the master), use the SHOW SLAVE STATUS
command instead of SHOW MASTER STATUS to determine where to start replication. The
output from this command is considerable, and it will be covered in detail in Chap-
ter 6, but to get the position of the next event in the binary log of the master that the
slave will execute, note the value of the fields Relay_Master_Log_File and Exec_Mas
ter_Log_Pos.
original-slave> SHOW SLAVE STATUS\G
Relay_Master_Log_File: master-bin.000042
Exec_Master_Log_Pos: 546632
After creating the backup and restoring it on the new slave, configure replication to
start from this position and start the new slave:
new-slave> CHANGE MASTER TO
-> MASTER_HOST = 'master-1',
-> MASTER_PORT = 3306,
-> MASTER_USER = 'slave-1',
-> MASTER_PASSWORD = 'xyzzy',
-> MASTER_LOG_FILE = 'master-bin.000042',
-> MASTER_LOG_POS = 546632;
Query OK, 0 rows affected (0.19 sec)
new-slave> START SLAVE;
Query OK, 0 rows affected (0.24 sec)
Cloning the master and cloning the slave differ only on some minor points, which
means that our Python library will be able to combine the two into a single procedure
for creating new slaves by creating the backup at a source server and connecting the
new slave to a master.
A common technique for making backups is to call FLUSH TABLES WITH
READ LOCK and then
to create an archive of the database files. This is
usually much faster, but FLUSH TABLES WITH READ LOCK is not safe for use
with InnoDB!
FLUSH TABLES WITH READ LOCK does lock the tables, preventing any new
transactions from starting, but there are several activities going on in the
background that FLUSH TABLES WITH READ LOCK does not prevent.
Use the following to create a backup of InnoDB tables safely:
1. Shut down the server and copy the files. This can be an advantage
if the database is big, as restoring data with mysqldump can be slow.
2. Use mysqldump after performing FLUSH TABLES WITH READ LOCK (as
we did earlier).
3. Use a snapshot solution such as LVM (on Linux) or ZFS (Zettabyte
File System) snapshots (on Solaris) after using FLUSH TABLES WITH
READ LOCK.
34 | Chapter 2: MySQL Replication Fundamentals
Please purchase PDF Split-Merge on www.verypdf.com to remove this watermark.
Scripting the Clone Operation
The Python library clones a master simply by copying the database from the master
using the Server object that represents the master. To do this, it uses a clone function,
which you will see in Example 2-7.
Cloning a slave is similar, but the backup is taken from one server, while the new slave
connects to another server to perform replication. It is easy to support cloning both a
master and a slave by using two different parameters: a source parameter that specifies
where the backup should be created and a use_master parameter that indicates where
the slave should connect after the backup is restored. A call to the clone method looks
like:
clone(slave = slave[1], source = slave[0], use_master = master)
The next step is to write some utility functions to implement the cloning function,
which will also come in handy for other activities. Example 2-6 shows the following
functions:
fetch_master_pos
Fetches the binlog position from a master (that is, the position of the next event
the master will write to the binary log).
fetch_slave_pos
Fetches the binlog position from a slave (that is, the position of the next event to
read from the master).
replicate_from
Accepts as arguments a slave, a master, and a binlog position, and directs the slave
to replicate from the master starting with the given position.
The replicate_from function reads the field repl_user from the master to get the name
and password of the replication user. If you look at the definition of the Server class,
you’ll find that there is no such field. It is added by the Master role when the server is
imbued.
Example 2-6. Utility functions to fetch the master and slave positions of a server
_CHANGE_MASTER_TO = """CHANGE MASTER TO
MASTER_HOST=%s, MASTER_PORT=%s,
MASTER_USER=%s, MASTER_PASSWORD=%s,
MASTER_LOG_FILE=%s, MASTER_LOG_POS=%s"""
def replicate_from(slave, master, position):
slave.sql(_CHANGE_MASTER_TO, (master.host, master.port,
master.repl_user.name,
master.repl_user.passwd,
position.file, position.pos))
def fetch_master_pos(server):
result = server.sql("SHOW MASTER STATUS")
return mysqlrep.Position(server.server_id, result["File"], result["Position"])
A Brief Introduction to the Binary Log | 35
Please purchase PDF Split-Merge on www.verypdf.com to remove this watermark.
def fetch_slave_pos(server):
result = server.sql("SHOW SLAVE STATUS")
return mysqlrep.Position(server.server_id, result["Relay_Master_Log_File"],
result["Exec_Master_Log_Pos"])
These
are all
the functions needed to create the clone function. To clone a slave, the
calling application passes a separate use_master argument, causing clone to direct the
new slave to that master for replication. To clone a master, the calling application omits
the separate use_master argument, causing the function to use the “source” server as a
master.
Since there are many ways to create a backup of a server, Example 2-7 restricts the
method to one choice, using mysqldump to create a logical backup of the server. Later,
we will demonstrate how to generalize the backup procedure so that you can use the
same basic code to bootstrap new slaves using arbitrary backup methods.
Example 2-7. Function to clone either the master or the slave
def clone(slave, source, use_master = None):
from subprocess import call
backup_file = open(server.host + "-backup.sql", "w+")
if master is not None:
stop_slave(source)
lock_database(source)
if master is None:
position = fetch_master_position(source)
else:
position = fetch_slave_position(source)
call(["mysqldump", " all-databases", " host='%s'" % source.host],
stdout=backup_file)
if master is not None:
start_slave(source)
backup_file.seek() # Rewind to beginning
call(["mysql", " host='%s'" % slave.host], stdin=backup_file)
if master is None:
replicate_from(slave, source, position)
else:
replicate_from(slave, master, position)
start_slave(slave)
Performing Common Tasks with Replication
Each of the common scale-out strategies—hot standbys and so forth—involve their
own implementation details and possible pitfalls. We’ll show you how to perform some
of these tasks and how to enhance the Python library to support them.
36 | Chapter 2: MySQL Replication Fundamentals
Please purchase PDF Split-Merge on www.verypdf.com to remove this watermark.
Passwords are omitted from the examples in this section. When con-
figuring the accounts to control the servers, you can either allow access
only from certain hosts that control the deployment (by creating ac-
counts such as mats@'192.168.2.136'), or you can supply passwords to
the commands.
Reporting
Most businesses need a lot of routine reports: weekly reports on the items sold, monthly
reports on expenses and revenues, and various kinds of heavy data mining to spot trends
or identify focus groups for the marketing department.
Running these queries on the master can prove to be troublesome. Data-mining queries
can require a lot of computing resources and can slow down normal operations only
to find out that, say, a focus group for left-handed scissors might not be worthwhile to
conduct. In addition, these reports are typically not very urgent (compared to process-
ing normal transactions), so there is no need to create them as quickly as possible. In
other words, because these reports are not time-critical, it does not matter much if they
take two hours to complete instead of one.
Reporting often needs to cover a precise interval, such as a summary of all sales for the
day, so it is necessary to stop replication at the right moment so you don’t get any sales
for the following day in the report. Since there is no way to stop the slave when it sees
an event with a certain date or time, it has to be done some other way.
A better idea is to dust off a spare server (or two, if you have enough reporting require-
ments) and set it up to replicate from the master. When you need to do the reporting,
you can stop replication, run your reporting applications, then start replication again,
all without disturbing the master.
Let’s pretend that reports are needed once each day, and that all transactions from
midnight to midnight shall be included. It is necessary to stop the reporting slave at
midnight so that no events from after midnight are executed on the slave and all events
from before midnight are executed on the slave. The intention is not to do this manually,
so let’s consider how we can automate the procedure. The following steps will accom-
plish what we want:
1. Just before midnight, perhaps five minutes before midnight, stop the reporting
slave so that no events come from the master.
2. After midnight, check the binary log on the master and find the last event that was
recorded before midnight. Obviously, if you do this before midnight, you might
not have seen all events for the day yet.
3. Record the binlog position of this event and start the slave to run until this position.
4. Wait until the slave has reached this position and stopped.
Performing Common Tasks with Replication | 37
Please purchase PDF Split-Merge on www.verypdf.com to remove this watermark.
The first issue is how to schedule the jobs correctly. There are different ways to do this,
depending on the operating system. While we won’t go into all the details here, you
can see how to schedule tasks for Unix-like operating systems, such as Linux, in
“Scheduling tasks on Unix” on page 42.
Stopping the slave is as simple as executing STOP SLAVE and noting the binlog position
after the slave is stopped.
slave> STOP SLAVE;
Query OK, 0 rows affected (0.25 sec)
slave> SHOW SLAVE STATUS\G
Relay_Master_Log_File: capulet-bin.000004
Exec_Master_Log_Pos: 2456
1 row in set (0.00 sec)
The remaining three steps are executed before the actual reporting starts and usually
as part of the script that does the actual reporting. Before outlining the script, let’s
consider how to perform each step.
To read the contents of the binary log, invoke a utility called mysqlbinlog. This will be
introduced in detail later, but this utility is used in the second step. The mysqlbinlog
utility has the two handy options start-datetime and stop-datetime, which you
can use to read only a portion of the binary log. So, to get all events from the time that
you stopped the slave to just before midnight, use the following command:
$ mysqlbinlog force read-from-remote-server host=reporting.bigcorp.com \
> start-datetime='2009-09-25 23:55:00' stop-datetime='2009-09-25 23:59:59' \
> binlog files
The timestamp stored in each event is the timestamp when the state-
ment started executing, not the timestamp when it was written to the
binary log.
Since the stop-datetime option will stop emitting events on the first
timestamp after the date/time supplied, it is possible that there is an
event that started executing before the date/time but was written to the
binary log after the date/time and is not included in the range given.
Since the master is writing to the binary logs at this time, it is necessary to supply the
force option. Otherwise, mysqlbinlog will refuse to read the open binary log. To
execute this command, it is necessary to supply a set of binlog files to read. Since the
names of these files are dependent on configuration options, the names of these files
have to be fetched from the server. After that, it is necessary to figure out the range of
binlog files that needs to be supplied to the mysqlbinlog command. Getting the list of
binlog filenames is easy to do with the SHOW BINARY LOGS command:
38 | Chapter 2: MySQL Replication Fundamentals
Please purchase PDF Split-Merge on www.verypdf.com to remove this watermark.
master> SHOW BINARY LOGS;
+ + +
| Log_name | File_size |
+ + +
| capulet-bin.000001 | 24316 |
| capulet-bin.000002 | 1565 |
| capulet-bin.000003 | 125 |
| capulet-bin.000004 | 2749 |
+ + +
4 rows in set (0.00 sec)
In
this case,
there are only four files, but there could potentially be quite a lot more.
Scanning a large list of files that were written before the slave was stopped is just a waste
of time, so it is a good idea to try to reduce the number of files to read in order to find
the correct position to stop at. Since you recorded the binlog position in the first step,
when the slave was stopped, it is an easy matter to find the name of the file where the
slave stopped and then take that name and all the following names as input to the
mysqlbinlog utility. Typically, this will only be one file (or two in the event that the
binary log was rotated between stopping the slave and starting the reporting).
When executing the mysqlbinlog command with just a few binlog files, you will get a
textual output for each with some information about the event.
$ mysqlbinlog force read-from-remote-server host=reporting.bigcorp.com \
> start-datetime='2009-09-25 23:55:00' stop-datetime='2009-09-25 23:59:59' \
> capulet-bin.000004
/*!40019 SET @@session.max_insert_delayed_threads=0*/;
/*!50003 SET @OLD_COMPLETION_TYPE=@@COMPLETION_TYPE,COMPLETION_TYPE=0*/;
DELIMITER /*!*/;
# at 4
#090909 22:16:25 server id 1 end_log_pos 106 Start: binlog v 4, server v
ROLLBACK/*!*/;
.
.
.
# at 2495
#090929 23:58:36 server id 1 end_log_pos 2650 Query thread_id=27 exe
SET TIMESTAMP=1254213690/*!*/;
SET /*!*/;
INSERT INTO message_board(user, message)
VALUES ('', 'Midnight, and I'm bored')
/*!*/;
The interesting part here is the end_log_pos of the last event in the sequence—in this
case, 2650—since this is where the next event after midnight will be written.
If you were paying attention to the output from the previous command, you saw that
there is no information about which binlog file this byte position is referring to, and it
is necessary to have a file to find the event. If a single file is supplied to the mysqlbin
log command, the filename is obvious, but if two files are supplied, it is necessary to
figure out if the last event for the day is in the first or the second file.
Performing Common Tasks with Replication | 39
Please purchase PDF Split-Merge on www.verypdf.com to remove this watermark.
If you look at the line containing the end_log_pos, you will also see that the event type
is there. Since every binlog file starts with a format description event—a line for such
an event appears in the previous output—you can check these events to determine the
location of the event you want. If there are two format description events in the output,
the event is in the second file, and if there is just one, it is in the first file.
The final step before starting the reporting work is to start replication and stop it at
exactly the position where the event after midnight will be written (or has already been
written, should that be the case). To do this, you can use the little-known command
START SLAVE UNTIL. This command accepts a master logfile and a master log position
where the slave should stop, and then starts the slave. When the slave reaches the given
position, it will automatically stop.
report> START SLAVE UNTIL
-> MASTER_LOG_POS='capulet-bin.000004',
-> MASTER_LOG_POS=2650;
Query OK, 0 rows affected (0.18 sec)
Like the STOP SLAVE command (without the UNTIL), the START SLAVE UNTIL command
will return immediately—not, as could be expected, when the slave has reached the
position where it should stop. So, commands issued after STOP SLAVE UNTIL continue
to be executed as long as the slave is running. To wait for the slave to reach the position
you want it to stop at, use the MASTER_POS_WAIT function. This function will block while
waiting for the slave to reach the given position.
report> SELECT MASTER_POS_WAIT('capulet-bin.000004', 2650);
Query OK, 0 rows affected (231.15 sec)
At this point, the slave has stopped at the last event for the day, and the reporting
process can start analyzing the data and generating reports.
Handling reporting in Python
Automating this in Python is quite straightforward.
Example 2-8 shows the code for stopping reporting at the right time.
The fetch_remote_binlog function reads a binary log from a remote server using the
mysqlbinlog command. The contents of the file(s) will be returned as an iterator over
the lines of the file. To optimize the fetches, you can optionally provide a list of files to
scan. You can also pass a start date/time and a stop date/time to limit the date/time
range of the result. These will be passed to the mysqlbinlog program.
The find_datetime_position function does the work of scanning the binlog lines to find
the last end_log_pos as well as keeping track of how many start events have been ob-
served. It also contacts the reporting server to find out where it stopped reading the
binlog file and then contacts the master to get the binlog files and find the right one to
start the scan from.
40 | Chapter 2: MySQL Replication Fundamentals
Please purchase PDF Split-Merge on www.verypdf.com to remove this watermark.
Example 2-8. Python code for running replication to a datetime
def fetch_remote_binlog(server, binlog_files=None,
start_datetime=None, stop_datetime=None):
from subprocess import Popen, PIPE
if not binlog_files:
binlog_files = [
row["Log_name"] for row in server.sql("SHOW BINARY LOGS")]
command = ["mysqlbinlog",
" read-from-remote-server",
" force",
" host=%s" % (server.host),
" user=%s" % (server.sql_user.name)]
if server.sql_user.passwd:
command.append(" password=%s" % (server.sql_user.passwd))
if start_datetime:
command.append(" start-datetime=%s" % (start_datetime))
if stop_datetime:
command.append(" stop-datetime=%s" % (stop_datetime))
return iter(Popen(command + binlog_files, stdout=PIPE).stdout)
def find_datetime_position(master, report, start_datetime, stop_datetime):
from itertools import dropwhile
from mysqlrep import Position
import re
all_files = [row["Log_name"] for row in master.sql("SHOW BINARY LOGS")]
stop_file = report.sql("SHOW SLAVE STATUS")["Relay_Master_Log_File"]
files = list(dropwhile(lambda file: file != stop_file, all_files))
lines = fetch_remote_binlog(server, binlog_files=files,
start_datetime=start_datetime,
stop_datetime=stop_datetime)
binlog_files = 0
last_epos = None
for line in lines:
m = re.match(r"#\d{6}\s+\d?\d:\d\d:\d\d\s+"
r"server id\s+(?P<sid>\d+)\s+"
r"end_log_pos\s+(?P<epos>\d+)\s+"
r"(?P<type>\w+)", line)
if m:
if m.group("type") == "Start":
binlog_files += 1
if m.group("type") == "Query":
last_epos = m.group("epos")
return Position(files[binlog_files-1], last_epos)
You
can now use these functions to synchronize the reporting server before the actual
reporting job:
master.connect()
report.connect()
pos = find_datetime_position(master, report,
start_datetime="2009-09-14 23:55:00",
stop_datetime="2009-09-14 23:59:59")
report.sql("START SLAVE UNTIL MASTER_LOG_FILE=%s, MASTER_LOG_POS=%s",
Performing Common Tasks with Replication | 41
Please purchase PDF Split-Merge on www.verypdf.com to remove this watermark.
(pos.file, pos.pos))
report.sql("DO MASTER_POS_WAIT(%s,%s)", (pos.file, pos.pos))
.
.
code for reporting
.
.
As
you can
see, working with replication is pretty straightforward. This particular ex-
ample introduces several of the critical concepts that we will be using later when talking
about scale-out: how to start and stop the slave at the right time, how to get information
about binlog positions or figure it out using the standard tools, and how to integrate it
all into an automated solution for your particular needs.
Scheduling tasks on Unix
To easiest way ensure the slave is stopped just before midnight and the reporting is
started after midnight is to set up a job for cron(8) that sends a stop slave command to
the slave and starts the reporting script.
For example, the following crontab(5) entries would ensure that the slave is stopped
before midnight, and that the reporting script to roll the slave forward is executed, say,
five minutes after midnight. Here we assume that the stop_slave script will stop the
slave, and the daily_report will run the daily report (starting with the synchronization
described above).
# stop reporting slave five minutes before midnight, every day
55 23 * * * $HOME/mysql_control/stop_slave
# Run reporting script five minutes after midnight, every day
5 0 * * * $HOME/mysql_control/daily_report
Assuming that you put this in a crontab file, reporttab, you can install the crontab file
using the command:
$ crontab reporttab
Scheduling tasks on Windows Vista
Scheduling tasks is much easier on Windows Vista than on previous versions of Win-
dows. There have been several major and welcome enhancements to the Task Sched-
uler. The Task Scheduler is now a Microsoft Management Console snap-in and is
integrated with the Event Viewer, which gives you the ability to use events as triggers
for starting tasks. There are also more scheduling and triggering options.
To start the Task Scheduler in Windows Vista, open the Event Scheduler using the
Control Panel, via the Administrator’s Folder on the Start Menu, or by using the run
feature (Windows key + R) and enter taskschd.msc. You will need to respond to the
User Account Control (UAC) dialog box to continue.
42 | Chapter 2: MySQL Replication Fundamentals
Please purchase PDF Split-Merge on www.verypdf.com to remove this watermark.
To create a new task trigger by time, choose Create Basic Task from the Action pane.
This opens the Create Basic Task Wizard, which will guide you through the steps to
create a simple task.
On the first pane of the wizard, name the task and provide an optional description,
then click Next.
The second pane allows you to specify the frequency of the firing of the task. There are
many options here for controlling when the task runs: a single run, daily, weekly, and
even when you log on or when a specific event occurs. Click Next once you’ve made
your choice.
Depending on the frequency you chose, the third pane will allow you to specify the
details (for example, date and time) of when the task fires. Click Next once you have
configured the trigger timing options.
The fourth pane is where you specify the task or action to occur when the task event
occurs (when the task fires). You can choose to start a program, send an email message,
or display a message to the user. Make your selection and click Next to move to the
next pane.
Depending on the action you chose on the previous pane, here you can specify what
happens when the task fires. For example, if you chose to run an application, you enter
the name of the application or script, any arguments, and which folder the task starts in.
Once you have entered all of this information, click Next to review the task on the final
pane. If you’re satisfied all is set correctly, click Finish to schedule the task. You can
click Back to return to any of the previous screens and make changes. Finally, you have
the option to open the properties page after you click Finish; this allows you to make
additional changes to the task.
Conclusion
In this chapter, we have presented an introduction to MySQL replication, including a
look at why replication is used and how to set it up. We also took a quick look into the
binary log. In the next chapter, we examine the binary log in greater detail.
Joel finished giving Mr. Summerson his report on how he was going to balance the load
across four new slaves, along with plans for how the topology could be expanded to
handle future needs.
“That’s fine work, Joel. Now explain to me again what this slave thing is.”
Joel suppressed a sigh and said, “A slave is a copy of the data on the database server
that gets its changes from the original database server called the master….”
Conclusion | 43
Please purchase PDF Split-Merge on www.verypdf.com to remove this watermark.
Please purchase PDF Split-Merge on www.verypdf.com to remove this watermark.
CHAPTER 3
The Binary Log
“Joel?”
Joel jumped, nearly banging his head as he crawled out from under his desk. “I was
just rerouting a few cables,” he said by way of an explanation.
Mr. Summerson merely nodded and said in a very authoritative manner, “I need you
to look into a problem the marketing people are having with the new server. They need
to roll back the data to a certain point.”
“Well, that depends…,” Joel started, worried about whether he had snapshots of old
states of the system.
“I told them you’d be right down.”
With that, Mr. Summerson turned and walked away. A moment later one of the de-
velopers, a woman Joel found very attractive, stopped in front of his door and said,
“He’s always like that. Don’t take it personally. Most of us call it a drive-by tasking.”
She laughed and introduced herself. “My name’s Amy.”
Joel walked around his desk and met her at the door. “I’m Joel.”
After a moment of awkward silence Joel said, “I, er, better get on that thing.”
Amy smiled and said, “See you around.”
“Just focus on what you have to do to succeed,” Joel thought as he returned to his desk
to search for that MySQL book he bought last week.
The previous chapter included a very brief introduction to the binary log. In this chap-
ter, we will
fill in more details and give a more thorough description of the binary log
structure, the replication event format, and how to use the mysqlbinlog tool to inves-
tigate and work with the contents of binary logs.
The binary log records changes made to the database so that the same changes can be
made on any of the slaves as well. Since the binary log normally keeps a record of all
changes, you can also use it for auditing purposes to see what happened in the database,
45
Please purchase PDF Split-Merge on www.verypdf.com to remove this watermark.
and for PITR by playing back the binary log to a server, repeating changes that were
recorded in the binary log.
The binary log contains only statements that could change the database. Note that
statements that do not change the database but that could potentially change the da-
tabase are logged. The most notable statements are those that optionally make a change,
such as DROP TABLE IF EXISTS or CREATE TABLE IF NOT EXISTS, along with statements
such as DELETE and UPDATE that have WHERE conditions that don’t happen to match any
rows.
SELECT statements are not normally logged, since they do not make any changes to any
database. There are, however, exceptions.
Transactions on a server are not normally executed in sequence, one after the other,
but are rather interleaved and executed in parallel. To ensure that two transactions do
not conflict and generate an inconsistent result, the server ensures the transaction ex-
ecution is serializable, meaning the transactions are executed in such a way that the
execution yields the same result as if they were executed in a serial order—that is, in a
fixed order, one transaction after another.
The binary log records each transaction in the order that the commit took place on the
master. Although transactions may be interleaved on the master, each appears as an
uninterrupted sequence in the binary log, the order determined by the time of the
commit.
Structure of the Binary Log
Conceptually, the binary log is a sequence of binary log events (also called binlog
events or even just events when there is no risk of confusion). As you saw in Chap-
ter 2, the binary log actually consists of several files, as shown in Figure 3-1, that together
form the binary log.
Figure 3-1. The structure of the binary log
46 | Chapter 3: The Binary Log
Please purchase PDF Split-Merge on www.verypdf.com to remove this watermark.
The actual events are stored in a series of files called binlog files with names in the form
host-bin.000001, accompanied by a binlog index file that is usually named
host-bin.index and keeps track of the existing binlog files. The binlog file that is cur-
rently being written to by the server is called the active binlog file. If all the slaves have
caught up with the master, this is also the file that is being read by the slaves. The names
of the binlog files and the binlog index file can be controlled using the options log-
bin and log-bin-index, which are covered later in the chapter.
The index file keeps track of all the binlog files used by the server so that the server can
correctly create new binlog files when necessary, even after server restarts. Each line in
the index file contains the full name of a binlog file that is part of the binary log. Com-
mands that affect the binlog files, such as PURGE BINARY LOGS, RESET MASTER, and FLUSH
LOGS, also affect the index file by adding or removing lines to match the files that were
added or removed by the command.
As shown in Figure 3-2, each binlog file is made up of binlog events, with the
Format_description event serving as the file’s header and the Rotate event as its footer.
Note that a binlog file might not end with a rotate event if the server was stopped or
crashed.
Figure 3-2. A single binlog file with groups of events
The Format_description event contains
information about the server that wrote the
binlog file as well as some critical information about the file’s status. If the server is
stopped and restarted, a new binlog file is created and a new Format_description event
is written to it. This is necessary since changes can potentially occur between bringing
a server down and bringing it up again. For example, the server could be upgraded, in
which case a new Format_description event would have to be written.
Structure of the Binary Log | 47
Please purchase PDF Split-Merge on www.verypdf.com to remove this watermark.
When the server has finished writing a binlog file, a Rotate event is added to end the
file. The event points to the next binlog file in sequence by giving the name of the file
as well as the position to start reading from.
The Format_description event and the Rotate event will be described in detail in the
next section.
With the exception of the Format_description and Rotate events, the events of a binlog
file are grouped into units called groups. In transactional storage engines, each group
is roughly equivalent to a transaction, but for nontransactional storage engines or
statements that cannot be part of a transaction, such as CREATE or ALTER statements,
each statement is a group by itself. In short, each group of events in the binlog file
contains either a single statement not in a transaction or a transaction consisting of
several statements.
Normally, each group is executed entirely or not at all. If, for some reason, the slave
stops in the middle of a group, replication will start from the beginning of the group
and not from the last statement executed. Chapter 6 describes in detail how the slave
executes events.
Binlog Event Structure
In MySQL 5.0, a new binlog format—binlog format 4—was introduced. The preceding
formats were not easy to extend with additional fields if the need should arise, so binlog
format 4 was designed specifically to be extensible. This is still the event format used
in every server version since 5.0, even though each version of the server has extended
the binlog format with new events and some events with new fields. Binlog format 4 is
the event format described in this chapter.
Each binlog event consists of three parts:
Common header
The common header is—as the name suggests—common to all events in the binlog
file.
The common header contains basic information about the event, the most impor-
tant fields being the event type and the size of the event.
Post header
The post header is specific to each event type; in other words, each event type stores
different information in this field. But the size of this header, just as with the com-
mon header, is the same throughout a given binlog file. The size of each event type
is given by the Format_description event.
Event body
Last in each event comes the event body, which is the variable-sized part of the
event. The size is listed in the common header for the event. The event body stores
the main data of the event, which is different for different event types. For the
48 | Chapter 3: The Binary Log
Please purchase PDF Split-Merge on www.verypdf.com to remove this watermark.
Query event, for instance, the body stores the query, and for the User_var event, the
body stores the name and value of a user variable that was just set by a statement.
A complete listing of the formats of all events is beyond the scope of this book, but
since the Format_description and Rotate events are critical to how the other events are
interpreted, we will briefly cover them here.
As already noted, the Format_description event starts every binlog file and contains
common information about the events in the file. The result is that the
Format_description event can be different between different files; this typically occurs
when a server is upgraded and restarted.
Binlog file format version
This is the version of the binlog file, which should not be confused with the version
of the server. MySQL versions 3.23, 4.0, and 4.1 use version 3 of the binary log,
while MySQL versions 5.0 and later use version 4 of the binary log.
The binlog file format version changes when developers make significant changes
in the overall structure of the file or the events. In version 5.0, the start event for a
binlog file was changed to use a different format and the common headers for all
events were also changed, which prompted the change in the binlog file format
version.
Server version
This is a version string denoting the server that created the file. This includes the
version of the server as well as additional information if special builds are made.
The format is normally the three-position version number, followed by a hyphen
and any additional build options. For example, “5.1.40-debug-log” means debug
build version 5.1.40 of the server.
Common header length
This field stores the length of the common header. Since it’s here in the
Format_description, this length can be different for different binlog files. This holds
for all events except the Format_description and Rotate events, which cannot vary.
The length of Format_description is fixed because a server has to read the event
regardless of which version of the server produced it. The reason the Rotate event
has a fixed common header is that the event is used when the slave connects to the
master, before any events from the binlog file have been seen. So for these two
events, the size of the common header is fixed and will never change between server
versions.
Post-header lengths
The post-header length for each event is fixed within a binlog file, and this field
stores an array of the post-header length for each event that can occur in the binlog
file. Since the number of events can vary between servers, the number of events
that the server can produce is stored before this field.
Structure of the Binary Log | 49
Please purchase PDF Split-Merge on www.verypdf.com to remove this watermark.
Since both the size of the common header and the size of the post header for each event
type are given in the Format_description event, extending the format with new events
or even increasing the size of the post headers by adding new fields will not affect the
high-level format of the binlog file.
With each extension, particular care is taken to ensure that the extension does not affect
interpretation of earlier-version events. For example, the common header can be ex-
tended with an additional field to indicate that the event is compressed and the type of
compression used, but if this field is missing—which would be the case if a slave is
reading events from an old master—the server should still be able to fall back on its
old behavior.
Logging Statements
MySQL has traditionally employed statement-based replication and just recently im-
plemented row-based replication, which we will cover in Chapter 6.
In statement-based replication, the actual executed statement is written to the binary
log together with some execution information, and the statement is reexecuted on the
slave. Since not all statements can be logged as statements, there are some exceptions
that you should be aware of. This section will describe the process of logging statements
as well as the important caveats.
Since the binary log is a common resource—all threads write statements to it—it is
critical to prevent two threads from updating the binary log at the same time. To handle
this, a lock for the binary log—the LOCK_log mutex—is acquired just before the event
is written to the binary log and released just after the event has been written. Because
all session threads for the server log statements to the binary log, it is quite common
for several session threads to block on this lock.
Logging Data Manipulation Language Statements
Data Manipulation Language (DML) statements are usually DELETE, INSERT, and
UPDATE statements. To support safe logging, MySQL writes the binary log while trans-
action-level locks are held, and releases them after the binary log has been written.
To ensure the binary log is updated consistently with the tables that the statement
modifies, the statement is logged to the binary log at the same time that the statement
is being committed, just before the table locks are released. If the logging were not made
as part of the statement, another statement could be “injected” between the changes
that the statement introduces to the database and the logging of the statement to the
binary log. This would mean that the statements would be logged in a different order
than the one in which they took effect in the database, which clearly could lead to
inconsistencies between master and slave. For instance, an UPDATE statement with a
50 | Chapter 3: The Binary Log
Please purchase PDF Split-Merge on www.verypdf.com to remove this watermark.
WHERE clause could update different rows on the slave because the values in those rows
could change if the statement order changed.
Logging Data Definition Language Statements
Data Definition Language (DDL) statements affect a schema, such as CREATE TABLE and
ALTER TABLE statements. These create or change objects in the filesystem—for example,
table definitions are stored in .frm files and databases are represented as filesystem
directories—so the server keeps information about these available in data structures
internally. To protect the update of the internal data structure, it is necessary to acquire
a lock before altering the table definition.
Since a single lock is used to protect these data structures, the creation, alteration, and
destruction of database objects can be a considerable source of performance problems.
This includes the creation and destruction of temporary tables, which is quite common
as a technique to create an intermediate result set to perform computations on.
If you are creating and destroying a lot of temporary tables, it is often possible to boost
performance by reducing the creation (and subsequent destruction) of temporary
tables.
Logging Queries
For statement-based replication, the most common binlog event is the Query event,
which is used to hold a statement executed on the master. In addition to the actual
statement executed, the event contains some additional information necessary for ex-
ecution of the statement.
Recall that the binary log can be used for many purposes and contains statements in a
potentially different order than that in which they were executed on the master. In some
cases, part of the binary log may be played back to a server to perform PITR, and in
some cases, replication may start in the middle of a sequence of events because a backup
has been restored on a slave before starting replication. Furthermore, a database ad-
ministrator (DBA) might manually tweak the binary log to fix a problem.
In all these cases, the events are executing in different contexts. That is, there is infor-
mation that is implicit when the server executes the statement but that has to be known
to execute the statement correctly. Examples include:
Current database
If the statement refers to a table, function, or procedure without qualifying it with
the database, the current database is implicit for the statement.
Value of user-defined variable
If a statement refers to a user-defined variable, the value of the variable is implicit
for the statement.
Logging Statements | 51
Please purchase PDF Split-Merge on www.verypdf.com to remove this watermark.