Tài liệu Customize Photoshop for Your Projects- P3 doc
Bạn đang xem bản rút gọn của tài liệu. Xem và tải ngay bản đầy đủ của tài liệu tại đây (7.58 MB, 50 trang )
89
Chapter 4: Retouch Portraits
@@
!!
00
Did You Know?
The default gradient always uses the current foreground and
background colors in the toolbar. Set the foreground color before
you select the Gradient tool and then press G to quickly select
the Gradient tool. You can also access the other tools in the
Tools panel by pressing a specific letter, such as V for the Move
tool or Z for the Zoom tool. When multiple tools are grouped
together, like the Spot Healing Brush, the Healing Brush, the
Patch tool, and the Red Eye tool, you can press the one-letter
keyboard shortcut to access the first tool and then repeatedly
Shift+press the letter to cycle through all the grouped tools.
The bright white spots blend into
and lighten the irises.
! Click Opacity and drag to the left
to reduce the layer opacity until
the eye color appears lighter but
still natural.
The irises of the eyes are now
brighter.
@ Click the Eye icon for Layer 1
to turn it off and compare the
before and after views.
0 Click here to change
the layer blend mode
to Overlay.
06_612651-ch04.indd 8906_612651-ch04.indd 89 6/2/10 3:17 PM6/2/10 3:17 PM
Please purchase PDF Split-Merge on www.verypdf.com to remove this watermark.
90
77
55
44
33
11
22
66
The panel changes to the Hue/
Saturation panel, and a Hue/
Saturation layer appears in the
Layers panel with the layer mask
selected.
3 Click and drag the Saturation
slider to the left to reduce the
discoloration in whites of the eyes.
Note: The whole image turns gray.
4 With the layer mask selected,
click Edit.
5 Click Fill.
The Fill dialog box appears.
6 Click here and select Black.
7 Click OK.
1 Click the Zoom tool and zoom in
on the eye area.
2 Click the Hue/Saturation button
to create a new adjustment layer.
You can quickly enhance any portrait by lightening
the whites of the eyes. The eyes are the most
important feature of the face and the key to a
person’s individuality. Whether the whites of the eyes
are bloodshot or just appear dull, lightening them can
enhance the whole face. Lightening and removing red
or yellow areas in the white area brightens the
subject’s eyes.
Lightening the whites of the eyes is a multistep and
multilayer process and can be done in various ways.
You can paint directly on the whites of the eyes or start
by selecting the whites. You can remove the redness or
yellow areas using a Hue/Saturation adjustment layer
and a layer mask. Then you can lighten the eyes by
duplicating the Hue/Saturation adjustment layer and
layer mask, adjusting the lightness, and changing the
blend mode. You can reduce the adjustment layer
opacity to give a more natural look.
The whites of people’s eyes are not completely white,
so you need to zoom in and out to view the entire
photo as you apply the changes. Using adjustment
layers, you can easily go back and modify the
changes to keep the subject looking natural.
BRIGHTEN THE EYES
by lightening the whites
06_612651-ch04.indd 9006_612651-ch04.indd 90 6/2/10 3:17 PM6/2/10 3:17 PM
Please purchase PDF Split-Merge on www.verypdf.com to remove this watermark.
91
Chapter 4: Retouch Portraits
88
##
00
99
$$
!!
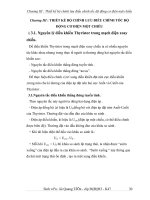
@ Press Ô+0 (Ctrl+0) to zoom out
and view the whole face.
# Click here and change the blend
mode for the top adjustment
layer to Soft Light.
$ Click Opacity and drag to the left
to reduce the effect until the eyes
look brighter but still natural.
● The layer mask turns
black and hides the
Saturation adjustment.
8 Click the Brush tool.
9 With white as the
foreground color,
carefully paint over the
whites of the eyes to
remove the discoloration.
0 Press Ô+J (Ctrl+J) to
duplicate the Hue/
Saturation layer and
layer mask.
! Click and drag the
Lightness slider for this
adjustment layer to the
right and the Saturation
slider to 0.
More Options!
Instead of painting directly over the whites of the eyes on
the mask, you can apply the same technique to a selection
of the eye whites. Start by selecting the white areas with a
selection tool such as the Quick Select tool as in task #21.
With the selection tool still active, Control+click (right-click)
the selection area. A contextual menu appears, listing
options such as Feather and Select Inverse. Click Feather,
and then apply the first Hue/Saturation adjustment layer as
in step 2. The selected area appears on the layer mask
automatically.
Try This!
Press Shift as you select
with a selection tool to
add to a selected area or
add a separate selection.
Press Option (Alt) as you
drag over a selected area
to remove areas from
that selection.
06_612651-ch04.indd 9106_612651-ch04.indd 91 6/2/10 3:17 PM6/2/10 3:17 PM
Please purchase PDF Split-Merge on www.verypdf.com to remove this watermark.
92
66
55
33
44
11
22
4 Click the Default Colors icon
to reset the foreground and
background colors to the
defaults.
5 Click the Switch Colors icon
to reverse the foreground and
background colors and set the
foreground to white.
6 Click the Brush tool.
1 Click the New Layer button.
2 Double-click in the Opacity field
and type 10 to view a more
realistic adjustment as you work.
Note: You can increase or decrease
the opacity before saving the file.
3 Click the Zoom tool and click and
drag across both eyes to zoom in.
Removing red eye and lightening the whites of the
eyes improves any portrait photograph. You can also
make your subject more interesting by adding other
adjustments that emphasize the eyes. You can add
more contrast to the iris by lightening some areas
and darkening others. You can add depth to the eyes
by darkening the eyelashes and the natural outline of
the eyes. This digital technique is similar to dodging
and burning in the darkroom.
Instead of using Photoshop’s Dodge and Burn tools on
the image, however, you can use the Brush tool on
separate empty layers and vary the opacity of each
layer to control the adjustments. Painting with white
lightens areas. Painting with black darkens areas,
lengthens the eyelashes, and adds definition to the
eyes. Using the Opacity setting in the Layers panel,
you can fine-tune the adjustments before you finalize
the image.
Making the eyes sparkle by using a variation of digital
dodging and burning in Photoshop helps draw the
viewers’ attention to the eyes and engages them in
the photo.
ADD DEPTH TO THE EYES
to emphasize them
06_612651-ch04.indd 9206_612651-ch04.indd 92 6/2/10 3:18 PM6/2/10 3:18 PM
Please purchase PDF Split-Merge on www.verypdf.com to remove this watermark.
93
Chapter 4: Retouch Portraits
##
77
!!
00
##
$$
88
%%
^^
Did You Know?
You can save and reuse an
eyelash brush. With the
settings that you create for
Brush Tip Shape (see steps
18 to 21), click the panel
menu button (
) on the
right in the Brushes panel.
Click New Brush Preset.
Type a name in the dialog
box and click OK.
Try This!
Press D to set the
foreground and
background colors to the
default black and white.
Press X to quickly switch
the foreground and
background colors as you
digitally dodge and burn.
Try This!
To lighten dark brown
eyes, try setting the
foreground color to a
dark red or burgundy
color instead of white.
Paint in the irises on a
separate layer and adjust
the opacity. Adding red to
dark brown eyes softens
the look.
@ Press the left bracket key to
reduce the brush size.
# Paint with black around the
edges of the irises and in the
pupils.
$ Click the New Layer button to
add a second empty layer.
% Double-click in the Opacity field
and type 20 to view a more
realistic adjustment on this layer
as you work.
^ Click the Brushes button, or press
F5 to open the Brushes panel.
7 Click here to open the
Brush picker.
8 Click a soft-edged
brush.
9 Click the left or right
bracket keys to find a
brush size that fits inside
the iris.
0 Paint over the center
of each iris.
! Click the Switch
Colors icon to reverse
the foreground and
background colors and
set the foreground to
black.
06_612651-ch04.indd 9306_612651-ch04.indd 93 6/2/10 3:18 PM6/2/10 3:18 PM
Please purchase PDF Split-Merge on www.verypdf.com to remove this watermark.
94
))
**
ww
((
yy
& Press Ô+spacebar (Ctrl+spacebar)
and then click in the image to
zoom in to see the eyelashes.
* Click Brush Tip Shape.
( Select a very small brush to
match the size of the eyelashes.
) Click and drag the Hardness
slider to 100% to build a
completely hard-edged brush.
q Drag the brush angle and the
dots on the roundness icon to
conform the brush shape to the
eyelashes of one eye.
w Paint over the eyelashes one at a
time to darken them.
e Repeat steps 21 and 22 to adjust
the brush for different-angled
eyelashes.
r Press the spacebar and click and
drag in the image to move to the
other eye.
t Repeat steps 21 to 23, adjusting
the brush to fit the shape of the
lashes of the other eye.
y Click the Brushes button to close
the Brushes panel.
u Press Option+spacebar (Alt+
spacebar) and click in the
image to zoom out to see the
whole face.
Retouching portraits is always tricky. You want to
improve the image and still preserve the person’s
character. Because the eyes can define personality,
enhancing the eyes almost always helps the overall
portrait and helps the viewer focus on the subject.
When you work on any portrait and especially when
you work on the eyes, you need to make small
changes. Large changes are too often obvious, and
your subjects want to see themselves and be seen at
their best, not different. Make small changes and
repeat these on several layers. You can easily adjust
the opacity of each layer independently, creating
more variations in brush strokes and colors. With
adjustments on multiple layers, it is also easier to
change or delete enhancements that do not seem
natural.
Using a pressure-sensitive pen tablet also gives more
variety to brush strokes. Use light brush strokes
instead of heavy ones. Many of the brush options can
be set to respond to pressure or tilt, allowing you to
alter brush styles with fewer trips to the Brushes
panel.
ADD DEPTH TO THE EYES
to emphasize them
06_612651-ch04.indd 9406_612651-ch04.indd 94 6/2/10 3:18 PM6/2/10 3:18 PM
Please purchase PDF Split-Merge on www.verypdf.com to remove this watermark.
95
Chapter 4: Retouch Portraits
ii
WW
RR
oo
More Options!
You can add eyeliner to the eyes in a
photograph. First add another layer. Click
Opacity and drag to the left to lower the
opacity to about 18%. Paint with black at
the edge of the eyelashes on each eye.
Click in the Opacity field and use the
keyboard up and down arrows to increase
or reduce the opacity of the layer until the
eyeliner looks natural.
Did You Know?
You can use the same technique shown
in this task to enhance light eyebrows.
Add a layer and reduce the opacity to 8%.
Open the Brushes panel and click Brush
Tip Shape. Set the hardness to 0% and
change the size, angle, and roundness to
match the shape of the eyebrows. Paint a
few smooth strokes over both eyebrows
using black. Change the layer’s opacity
as needed.
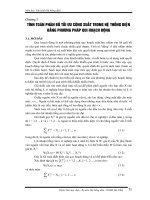
Q Click Layer 2 to highlight it.
W Click in the Opacity data field.
E Press the keyboard up or down
arrows to increase or decrease
the opacity until the eyelashes
look darker but still natural.
The eyes now appear stronger
and still natural and help focus
the viewer’s eyes.
R Click the panel menu button and
select Flatten Image from the
menu to finalize the photo.
i Click Layer 1 to
highlight it.
o Click in the Opacity
data field.
p Press the keyboard
up or down arrows
to increase or
decrease the layer
opacity until the
irises look natural.
06_612651-ch04.indd 9506_612651-ch04.indd 95 6/2/10 3:18 PM6/2/10 3:18 PM
Please purchase PDF Split-Merge on www.verypdf.com to remove this watermark.
96
66
11
@@ 88
00
99
!!
99
44
33
1 Click the Zoom tool and zoom in
on the eye area.
2 Click the Brush tool ( ).
3 Click the Brush picker and select
a soft-edged brush, with the
Hardness slider at 0%.
4 Click Opacity in the Options bar
and drag to the left to reduce the
brush opacity to 40%.
5 Press D to reset the foreground
and background colors.
6 Press X to reverse the colors,
making white the foreground
color.
7 Press the left or right bracket keys
to adjust the brush size to be
slightly larger than the final
catchlight.
8 Click the New Layer button to
add a new empty layer.
9 Click once in each eye to create
the catchlights.
0 Click the Brush picker to change
to a hard-edged brush.
! Click Opacity in the Options bar
and drag to the right to 100%.
@ Click the Layer Mask button to
add a layer mask.
When the light source — whether it comes from a
camera flash, side lighting, or a natural light source —
reflects in the subject’s eyes, it forms a catchlight. A
catchlight, also called a specular highlight, in a
subject’s eyes adds life and sparkle to the subject and
brightens the overall photograph. More importantly, it
draws attention to the subject’s eyes and engages the
viewer.
If the subject in a photograph does not have any
specular highlights in the eyes or if the subject’s eyes
appear somewhat dull, you can use Photoshop to add
catchlights. The trick is to make them look real.
Jane Conner-ziser, one of the most experienced and
well-respected portrait retouching masters, teaches
this technique in her classes and instructional videos.
Jane creates catchlights with diffused edges and
emphasizes the use of two separate layers, one for
the glow and the other for the sparkle of catchlights.
By placing them on separate layers, you can adjust
the catchlights to achieve a natural, realistic look.
ADD A CATCHLIGHT
to make the eyes come alive
06_612651-ch04.indd 9606_612651-ch04.indd 96 6/2/10 3:18 PM6/2/10 3:18 PM
Please purchase PDF Split-Merge on www.verypdf.com to remove this watermark.
97
Chapter 4: Retouch Portraits
ee
ww
))
&&
##
rr
$$
$$
((
^^
%%
More Options!
You can refine the
catchlights more by viewing
the whole face at once.
Press Option+spacebar
(Alt+spacebar) and click to
zoom out. Click and drag the
Layer Opacity slider for each
of the catchlight layers until
you see a bright sparkle with
a natural diffused edge.
Important!
The catchlights must
correspond to the natural
direction of the light to
appear natural. If the light is
coming from the right, the
catchlights should be on the
right side of the pupils, just
slightly above the center.
Did You Know?
Studio portrait lighting
is often arranged to
intentionally create
catchlights to help draw
attention to the eyes.
Different types of
photographic lighting
produce different styles
of catchlights.
& Press X to make white the foreground
color.
* Press the left bracket key multiple times to
reduce the brush size to about half the
previous size.
( Click once in the center of each catchlight.
) Click Filter.
q Click Blur.
w Click Gaussian Blur.
The Gaussian Blur dialog box appears.
e Click and drag the Radius slider to soften
the edges.
r Click OK.
A soft-edged catchlight with a sparkle in
the center appears in each eye.
# Click the Switch
Colors icon to make
black the foreground
color.
$ Paint over the top of
the catchlight so that
it conforms to the
upper eyelid.
% Click Opacity and
drag to the left to
reduce the layer
opacity to about 70%
to slightly better
blend the effect.
^ Click the New Layer
button.
06_612651-ch04.indd 9706_612651-ch04.indd 97 6/2/10 3:18 PM6/2/10 3:18 PM
Please purchase PDF Split-Merge on www.verypdf.com to remove this watermark.
98
!!
##
99
55
66
77
22
33
@@
00
88
The Smart Sharpen dialog box
appears.
8 Click in the Preview window and
drag to see the eyes area.
9 Click here and select Lens Blur.
0 Click and drag the Radius slider
to 1.5 to increase the area to be
sharpened.
! Click and drag the Amount slider
to sharpen the eye, generally
between 80 and 115 percent.
@ Click More Accurate ( changes
to
).
# Click OK to apply the sharpening.
1 Arrange the workspace panels to
see both the Layers panel and the
History panel.
2 Press Ô+J (Ctrl+J) to duplicate the
Background layer.
3 Double-click the Zoom tool to
view the image at 100%.
4 Press the spacebar, click in the
image, and move it to see the
eyes.
5 Click Filter.
6 Click Sharpen.
7 Click Smart Sharpen.
The final step to enhancing the eyes in a photograph
is to sharpen the eye area. You want to add focus and
draw the viewer into the photo, but you may not want
to sharpen the rest of the face or the skin. You can
selectively sharpen the eyes by using a Sharpen filter
and then applying the filter with the History panel and
History Brush.
You can use not only the Unsharp Mask filter for
sharpening, but also the Smart Sharpen filter. This
filter is not only easier to use, but it also has added
features including a much larger preview.
After sharpening the entire portrait, you hide the
effect using the History panel to go back to a version
of the photo before the sharpening was applied. Then,
using the History Brush, you can paint the sharpening
effect specifically on the eye area where you want to
draw the focus.
SELECTIVELY SHARPEN JUST
THE EYES
to add focus
06_612651-ch04.indd 9806_612651-ch04.indd 98 6/2/10 3:18 PM6/2/10 3:18 PM
Please purchase PDF Split-Merge on www.verypdf.com to remove this watermark.
99
Chapter 4: Retouch Portraits
))
))
%%
^^
$$
&&
**
))
Attention!
The Smart Sharpen filter applies only
to one layer. If you have made other
adjustment layers, you must merge
them before applying the sharpening.
Press Ô+Option+Shift+E (Ctrl+Alt+
Shift+E). The adjustment layers and
the Background layers merge in the
new layer. All the adjustment layers,
Background copy or Layer 1, and original
Background layers remain unchanged.
Did You Know?
Always view the image at 100%
magnification when you use a
sharpening filter to get the most accurate
view on-screen of your changes. Still, the
amount of detail visible in a print may
be slightly different than what you see
on the screen. The amount of detail can
vary depending on the type of printer
and paper used.
& Click the Brush picker.
* Click to select a soft-edged
brush (0%).
( Press the left or right bracket keys
to adjust the brush size to be
large enough to cover the edge
of the eyes.
) Paint over the eyes, eyelashes,
and eyebrows with the History
Brush to apply the sharpening.
q Click the Eye icon for Layer 1 on
and off to compare before and
after sharpening.
The sharpening is applied only to
the eye areas.
The sharpening is
applied to Layer 1.
$ In the History panel,
click the box to the left
of the Smart Sharpen
step to set the source
for the History Brush.
% In the History panel,
click the previous state
named Layer Via Copy.
^ Click the History Brush
tool.
06_612651-ch04.indd 9906_612651-ch04.indd 99 6/2/10 3:18 PM6/2/10 3:18 PM
Please purchase PDF Split-Merge on www.verypdf.com to remove this watermark.
100
66
77
11
22
33
44
99
11
55
Note: Arrange the panels to
see both the Layers and the
Adjustments panels.
1 Zoom in and make a selection of
the teeth using the Quick Mask
mode or the Quick Selection tool.
Note: To use the Quick Mask
mode, see task #23. To use the
Quick Selection tool, see task #21.
2 Click Select.
3 Click Modify.
4 Click Feather.
The Feather Selection dialog box
appears.
5 Type 1 in the Feather Radius field
to slightly soften the edge of the
selection.
6 Click OK.
7 Click the Zoom tool and zoom
out to see the whole image.
8 Press Ô+H (Ctrl+H) to hide the
selection marquee.
The selection marquee is no
longer visible, but the teeth are
still selected.
9 Click the Hue/Saturation button
to create a new adjustment layer.
You can greatly improve every portrait in which the
subject is smiling by applying a little digital tooth-
whitening. Yellow teeth always dull a smile as well as
the overall look of the photo.
You first select the teeth and soften the selection, to
avoid a visible line between the lightened areas and
the rest of the image. Although you can make a
selection in Photoshop in many ways, using the Quick
Mask mode or the Quick Selection tool as described in
Chapter 2 works well when making a detailed
selection such as selecting a person’s teeth.
After the teeth are selected, whitening is a two-step
process. You have to remove the yellow and then
brighten the teeth by adjusting the saturation. As in
previous tasks, zoom in to make the detailed
selection, and then zoom out to see the whole image
before adjusting the color. Digital tooth-whitening
should be a subtle adjustment to keep the smile and
the person looking natural.
WHITEN TEETH
to improve a smile
06_612651-ch04.indd 10006_612651-ch04.indd 100 6/2/10 3:18 PM6/2/10 3:18 PM
Please purchase PDF Split-Merge on www.verypdf.com to remove this watermark.
101
Chapter 4: Retouch Portraits
!!
00
@@
##
Try This!
When zooming in on an image,
press and hold the spacebar; the
pointer temporarily changes to the
Hand tool. You can click and drag
around your image with the Hand
tool and easily move to the area that
needs to be adjusted. When you
release the spacebar, you change
back to the tool that was previously
selected.
Did You Know?
Feathering softens the edge of
a selection and smoothes the
transition between two distinct
areas. You can also click Select
and click Refine Edge to feather
the selection edge. The default
settings of the Refine Edge dialog
box include a one-pixel feather. Click
OK in the dialog box and continue
lightening the teeth as shown here.
@ Click here and select Master.
# Click and drag the Lightness
slider slowly to the right to
brighten the teeth.
$ Press Ô+D (Ctrl+D) to deselect
the teeth.
% Press Ô+Shift+E (Ctrl+Shift+E) to
merge all the visible layers into
one layer.
The Hue/Saturation
pane appears in the
Adjustments panel,
and a Hue/Saturation
layer is created in the
Layers panel.
0 Click here and select
Yellows.
! Click and drag the
Saturation slider slowly
to the left to remove
the yellow.
06_612651-ch04.indd 10106_612651-ch04.indd 101 6/2/10 3:18 PM6/2/10 3:18 PM
Please purchase PDF Split-Merge on www.verypdf.com to remove this watermark.
Enhance Colors, Tone, and
Sharpness in Photos
Color is the heart of Photoshop. Whether you
work on a design or a photograph, you often
adjust the hue, saturation, and brightness of an
image. Using Photoshop, you can fine-tune
shadows and highlights or completely alter the
overall tone of a photograph. You can transform
a color photograph into a grayscale image,
colorize an old grayscale image, or make a color
image look like an antique colorized
photograph. You can also tone a photo as
photographers used to do in the darkroom by
digitally dodging and burning. And you can
create these effects in many different ways.
Because some pixel information is discarded
whenever you make color and tonal adjustments,
you should apply corrections on a duplicate layer,
on separate layers, or on a Smart Object layer.
Photoshop CS5’s adjustment layers and the new
Adjustments panel also help you make some
changes without permanently altering pixel
values. In addition, opening or converting an
image or a layer to a new Smart Object enables
you to apply most filters as Smart Filters, making
them continuously editable and nondestructive.
Even when you sharpen a photograph to remove
the softness created by the camera’s processor,
you can use a Smart Filter, so you can reedit the
changes without altering pixels until you flatten
the image.
Whenever you make color or tonal adjustments,
start by calibrating and profiling your monitor
as discussed in task #13. Otherwise, you may
be changing colors that are not really in the
image, and what you see on your monitor can
look very different when it is printed.
07_612651-ch05.indd 10207_612651-ch05.indd 102 6/2/10 3:19 PM6/2/10 3:19 PM
Please purchase PDF Split-Merge on www.verypdf.com to remove this watermark.
Improve an Underexposed Photo in Two Steps . . . . . . . . . . 104
Improve an Overexposed Photo in Three Steps . . . . . . . . . . 105
Remove a Colorcast to Improve the Overall Color . . . . . . . . 106
Colorize a Black-and-White Photograph . . . . . . . . . . . . . . . 108
Change a Color Photo into a Custom Grayscale Photo . . . . 110
Add a Creative Touch with a Little Color . . . . . . . . . . . . . . . 112
Dodge and Burn with a Special Layer . . . . . . . . . . . . . . . . . 114
Increase Saturation Subtly Using a Vibrance
Adjustment Layer . . . . . . . . . . . . . . . . . . . . . . . . . . . . . . . . 116
Sharpen the Photo to Correct Digital Softening . . . . . . . . . 118
Apply High Pass Sharpening to Increase Edge Sharpness . . . 120
07_612651-ch05.indd 10307_612651-ch05.indd 103 6/2/10 3:19 PM6/2/10 3:19 PM
Please purchase PDF Split-Merge on www.verypdf.com to remove this watermark.
104
11
22
44
33
● An Exposure adjustment layer is
added and the photo appears
lighter.
Note: The photo may look fine this
way, or you can continue to vary
the adjustment as in steps 3 and 4.
3 Click here and change the layer
blend mode to Screen.
The photo appears even lighter.
4 With the adjustment layer
selected, click Opacity and drag
to the left until the underexposed
image is improved.
● You can optionally click and drag
the Exposure slider slowly to the
right to increase the adjustment.
1 With an underexposed photo
open in Photoshop, click the
disclosure triangle in the
Adjustments panel to open
the Exposure Presets.
2 Click Plus 1.0.
You may find a photograph that is perfect for your
project or has the subject just the way you want, but
the picture is underexposed. Although most of the
details of a digital photograph are in the highlights, and
as a rule it is better to overexpose than underexpose,
you can still improve an underexposed photograph
using a variety of tools in Photoshop. Sometimes you
can make a quick correction using a duplicated layer
and altering the layer blend mode as in task #16. You
can also use Photoshop CS5’s Adjustments panel and
quickly try an Exposure adjustment
preset before you work with more
complicated methods.
Depending on the photo, the exposure may appear
corrected when you apply the Plus 1.0 or Plus 2.0
presets. For other images, you may need to add a bit
more or less exposure using the sliders. You can even
change the blend mode of the adjustment layer to
increase the exposure and then dial it down and reduce
the effect by changing the Opacity slider of the layer.
Improve an underexposed photo in
TWO STEPS
07_612651-ch05.indd 10407_612651-ch05.indd 104 6/2/10 3:19 PM6/2/10 3:19 PM
Please purchase PDF Split-Merge on www.verypdf.com to remove this watermark.
105
Chapter 5
44
22
55
88
66
77
11
33
The Shadows/Highlights dialog
box appears.
6 Click and drag the Shadows slider
to the left to 0%.
7 Click and drag the Highlights
slider to the right until the image
looks the way you want.
● You can optionally click Show
More Options (
changes to )
to refine the adjustment using
the other sliders.
8 Click OK.
The image exposure is improved.
1 Open an overexposed photo.
2 Click Layer, Smart Objects, and
Convert to Smart Object from
the menu.
● The Background layer is converted
to a Smart Object as in task #24.
3 Click Image.
4 Click Adjustments.
5 Click Shadows/Highlights.
An overexposed photograph is impossible to salvage
with traditional darkroom techniques. Too much light
means that there is nothing in the film to print.
However, the image sensor in a digital camera sees
more of the lighter values, and it records more tonal
differences in the brighter areas, or the right side of the
histogram. As long as the highlights are not completely
blown out or showing no information, you can improve
an overly bright photograph with Photoshop CS5.
You can use the Shadows/Highlights command in the
basic mode to effectively reduce the highlights.
With most dialog boxes in
Photoshop, when you move the
slider to the right you increase the
amount. When you use the
Shadows/Highlights adjustment to reduce the
highlights, it works in the opposite fashion. By
applying the Shadows/Highlights command on a Smart
Object layer, you can continue to adjust the exposure
nondestructively. This three-step technique for reducing
the highlights and improving an overexposed photo is
always worth testing before spending time with other
methods or discarding the photo.
Improve an overexposed photo in
THREE STEPS
07_612651-ch05.indd 10507_612651-ch05.indd 105 6/2/10 3:19 PM6/2/10 3:19 PM
Please purchase PDF Split-Merge on www.verypdf.com to remove this watermark.
106
33
44
11
66
22
55
The Match Color dialog box
appears.
5 Click Preview ( changes to ).
6 Click Neutralize to remove the
colorcast ( changes to ).
1 Press Ô+J (Ctrl+J) to duplicate the
Background layer.
2 Click Image.
3 Click Adjustments.
4 Click Match Color.
Whether you have a scanned image or one from a
digital camera, your image may show a colorcast due
to improper lighting, white balance settings, or other
factors. A colorcast often appears as a reddish, bluish,
or greenish tint over the whole image. Photoshop has
many tools that you can use to remove colorcasts,
including the White Balance setting in Camera Raw,
and sometimes you may need to try different ones,
depending on the photograph. Using the Match Color
command as shown here to remove a colorcast is
simple and often works well.
Intended for matching the colors between two images,
the Match Color command uses advanced algorithms to
adjust the brightness, color saturation, and color balance
in an image. Because you can adjust the controls in
different combinations, using this command on just one
image gives you better control over the color and
luminance of the image than many other tools.
When using the Match Color command on a
duplicated layer, you can use the layer’s Opacity
slider to blend the results with the Background layer
to achieve the best color for your image, as well as
compare the before and after images.
REMOVE A COLORCAST
to improve the overall color
07_612651-ch05.indd 10607_612651-ch05.indd 106 6/2/10 3:19 PM6/2/10 3:19 PM
Please purchase PDF Split-Merge on www.verypdf.com to remove this watermark.
107
Chapter 5: Enhance Colors, Tone, and Sharpness in Photos
99
88
77
00
!!
! Click Opacity and drag to the left
to adjust the overall effect, if
necessary.
The colorcast is removed and the
colors appear more natural.
The overall colorcast is
removed.
7 Click and drag the Fade
slider slowly to the right
to reduce the effect, if
necessary.
8 Click and drag the
Color Intensity slider to
the right to increase the
color range, if
necessary.
9 Click and drag the
Luminance slider to the
right to increase the
luminance, if necessary.
0 Click OK to apply the
change.
Did You Know?
You can view the floating
Histogram panel and see the
color changes as they are
made. Click Window and click
Histogram to display the
Histogram panel. Click and
drag the Histogram panel so
that you can keep it open and
still see the image and your
other panels.
More Options!
If there is an area in the image that is normally
neutral gray, you can also correct a colorcast
using the Levels command. Click the Levels
button (
) in the Adjustments panel to create
a new adjustment layer. Click the Gray Point
eyedropper, the middle eyedropper in the Levels
pane. Click in the part of the image that should
be neutral gray to neutralize the colorcast. If
necessary, click another area until the colors
appear natural.
07_612651-ch05.indd 10707_612651-ch05.indd 107 6/2/10 3:19 PM6/2/10 3:19 PM
Please purchase PDF Split-Merge on www.verypdf.com to remove this watermark.
108
22
33
@@
88
00
66
99
44
11
77
!!
55
1 Click Image.
2 Click Mode.
3 Click RGB Color.
The color mode changes, but the
image on the screen does not.
4 Click the New Layer button in the
Layers panel.
5 Click here and select Soft Light.
6 Click the Quick Selection tool.
7 Click Sample All Layers in the
Options bar ( changes to ).
8 Click in an area to make a
selection.
Note: You can optionally use any
of the other selection tools to
complete the selection.
9 Click the foreground color in the
Tools panel.
The Color Picker appears.
0 Click and drag the Color slider to
select a color range.
! Click in the Color Preview box to
select a color.
@ Click OK to close the dialog box.
Hand-coloring a photograph can be a difficult process
using traditional paints and traditional film photos.
With Photoshop, hand-coloring an old black-and-white
image is much easier. You can use any black-and-
white photo, called a grayscale image, and paint
areas using any colors that you choose.
You can start with larger areas and then focus in on
specific parts to colorize individually and on additional
layers. By making selections of detailed areas and
then applying the colors, you can be as precise as
necessary to achieve the effect. Zoom in to select and
paint detailed areas and then zoom out to see the
overall effect. Continue making different selections
and choosing other colors until the whole image is
colorized. After the entire image is painted, you can
lower the opacity of each colored layer as a final
touch.
You can vary the size of the Brush tool as you paint
using the left and right bracket keys. If you are using
a pressure-sensitive stylus and tablet, open the
Brushes panel, click Shape Dynamics, and set the
Control to Pen Pressure.
COLORIZE
a black-and-white photograph
07_612651-ch05.indd 10807_612651-ch05.indd 108 6/2/10 3:19 PM6/2/10 3:19 PM
Please purchase PDF Split-Merge on www.verypdf.com to remove this watermark.
109
Chapter 5: Enhance Colors, Tone, and Sharpness in Photos
$$
%%
&&
**
Try This!
Instead of clicking the foreground color,
simply click in the Set Foreground Color
box in the Color panel to open the
Color Picker without changing tools.
You can also position the cursor over
the Color panel and click in the color
ramp to select a color — all without
changing tools. Click and drag the RGB
sliders to adjust the colors.
More Options!
You can select realistic colors for a
grayscale image by sampling the colors
from a color image that has similar
subjects. Keep the other image open on
the screen while you are colorizing the
grayscale photo. With the Color Picker
open, position the cursor outside the
dialog box to sample real colors from
the color image. Then paint in the
grayscale image with those colors.
* Click Opacity and drag to the left
to adjust the color for the layer.
( Repeat steps 4 to 17 until the
entire image is painted.
The black-and-white photo now
appears in color.
# Press B to select the
Brush tool.
$ Click here to open the
Brush picker.
% Click the soft-edged
brush.
^ Press the left or right
bracket keys to adjust
the brush size.
& Paint over the selected
areas to apply the color.
07_612651-ch05.indd 10907_612651-ch05.indd 109 6/2/10 3:19 PM6/2/10 3:19 PM
Please purchase PDF Split-Merge on www.verypdf.com to remove this watermark.
110
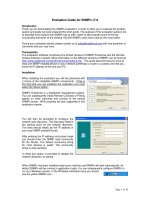
11
22
44
55
33
The image converts to a default
grayscale image.
4 Click Auto to see the changes.
The grays in the image change.
Note: The Auto function in the
Black and White Adjustments pane
maps the colors to grays differently
from the Default setting.
5 Click and drag any of the sliders
to vary the grays according to the
colors in the image.
1 Click Window and Adjustments
to make sure the Adjustments
panel is open.
2 Open an image to convert to
grayscale.
3 Click the Black and White
adjustment layer button.
You can convert a color image to black and white
using many different tools and techniques in
Photoshop, and because there are no fixed rules on
which colors in an image should match specific levels
of gray, you can create a variety of different
grayscale images from just one color photograph.
The Black and White adjustment in Photoshop CS5
offers a powerful conversion method with complete
visual control. You interactively determine what shade
of gray is applied to any particular color range in the
image by moving the sliders in the Adjustments
panel. And because you are editing using a
nondestructive adjustment layer, the original image
data is preserved.
Although you can access the Black and White
adjustment layer from the menu, using the
Adjustments panel in Photoshop CS5 is faster. In
addition, the Black and White pane of the
Adjustments panel includes a number of presets that
you can use or modify, or you can create and save
your own preset.
Change a color photo into a
CUSTOM GRAYSCALE PHOTO
07_612651-ch05.indd 11007_612651-ch05.indd 110 6/2/10 3:19 PM6/2/10 3:19 PM
Please purchase PDF Split-Merge on www.verypdf.com to remove this watermark.
111
Chapter 5: Enhance Colors, Tone, and Sharpness in Photos
88
66
77
Important!
Converting a color image to grayscale
is not the same as changing the
mode to grayscale, which in effect
throws away image data. When you
convert a color image to grayscale,
you map individual colors to different
shades of gray, preserving the same
complete tonal range that exists in
the color image. The image remains
in RGB mode.
The grayscale image changes
accordingly.
7 Click and hold the View Previous
State button to temporarily view
the previous black-and-white
conversion.
8 Click and drag any of the sliders
to customize the preset settings.
The gray tones change.
6 Click here and select
one of the presets, such
as Infrared.
Change It!
You can select a color to tone
the grayscale image. Click the
Tint check box in the Black &
White pane (
changes to ).
The color box next to the check
box fills with a color. Click the
color box to open the Select
Target Color dialog box. Click
any color and theimage
updates dynamically.
More Options!
You can also convert a color
image to a grayscale image using
the LAB Black & White Technique
action in the Actions panel. Click
Window and click Actions to
open the panel. Then click the
LAB Black & White Technique
and click the start button on the
Actions panel to automatically
convert your image.
07_612651-ch05.indd 11107_612651-ch05.indd 111 6/2/10 3:19 PM6/2/10 3:19 PM
Please purchase PDF Split-Merge on www.verypdf.com to remove this watermark.
112
66
11
44
77
33
22
The photo appears in grayscale.
● The color photo is the
Background layer. The Black &
White adjustment layer with a
white mask appears as the
second layer.
3 Click the mask thumbnail in the
Layers panel to select it.
4 Click the Default Colors icon to
reset the foreground to black and
background to white.
5 Click the Brush tool ( ).
6 Click here to open the Brush
picker.
7 Click the soft-edged brush.
1 Open a color photo.
2 Follow steps 3 to 5 of task #50 to
apply a black-and-white
adjustment layer.
You can hand-color an old grayscale photograph with
Photoshop to create an antique look. You can also
start with a color image, convert it to grayscale as in
task #50, and then colorize it to get a very different
look; this type of colorization is much easier to
accomplish. You can colorize the entire photo or just
one area for effect. You can brush the color into
specific areas and even create a more or less muted
colorized effect by changing the opacity of the brush
as you paint. Start with a low opacity setting and
bring the original color back gradually.
If you have already saved a grayscale version of the
photo without the original layers, you can still use the
method shown here. First open both the original color
image and the converted grayscale photo. Using the
Move tool, press and hold Shift as you click and drag
the grayscale version onto the original color photo.
Then follow steps 4 to 14 of this task using the Eraser
tool instead of the Brush tool to paint a very creative
image.
ADD A CREATIVE TOUCH
with a little color
07_612651-ch05.indd 11207_612651-ch05.indd 112 6/2/10 3:19 PM6/2/10 3:19 PM
Please purchase PDF Split-Merge on www.verypdf.com to remove this watermark.
113
Chapter 5: Enhance Colors, Tone, and Sharpness in Photos
00
##
88
99
!!
Keyboard Shortcut!
You can change the size of the Brush
tool by pressing the right bracket key to
increase the size and the left bracket
key to reduce the size. With a Wacom
pen tablet, you can click the Tablet
Pressure Controls Size and the Tablet
Pressure Controls Opacity buttons in
the Options panel (
and ). You
can then press harder for more opacity
and a larger size brush and vice versa.
! Double-click here again and type
40 to increase the opacity.
@ Press the left bracket key several
times to reduce the brush size.
# Paint over parts of the colored
area to increase the color.
The image is selectively colorized
and the viewer’s attention is
drawn to the perfect spot.
8 Click the Airbrush
button.
9 Double-click here and
type 20 to lower the
opacity.
0 Paint over the area to
be colorized.
Did You Know?
You can also vary the hardness
or softness of the Eraser or
Brush tools using the keyboard
instead of the Brush picker.
Click the Eraser or Brush tool to
select it. Press and hold Shift as
you repeatedly press the right
bracket key to increase the
hardness or the left bracket key
to increase the softness.
07_612651-ch05.indd 11307_612651-ch05.indd 113 6/2/10 3:19 PM6/2/10 3:19 PM
Please purchase PDF Split-Merge on www.verypdf.com to remove this watermark.