Tài liệu Oracle CRM On Demand Dashboards- P6 docx
Bạn đang xem bản rút gọn của tài liệu. Xem và tải ngay bản đầy đủ của tài liệu tại đây (388.42 KB, 20 trang )
/ Oracle CRM On Demand Dashboards / Michael D. Lairson / 174 534-3
Oracle CRM On Demand Dashboards
/ Oracle CRM On Demand Dashboards / Michael D. Lairson / 174 534-3
Chapter 5: Dashboard Objects
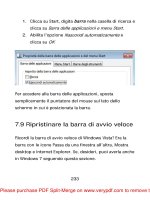
Once you have located the correct URL and have copied it to your Clipboard,
you can go back to your Dashboard Editor screen and add the Link or Image object
to your layout and paste in the URL. Be sure to provide a caption in the Caption
field and select the New Window target.
One thing that you will inevitably notice, and will wonder how to change, is the
border that always appears around the link or image on the dashboard.
Unfortunately, there seems to be no way to remove this border as of this writing.
Even with the column and section borders removed, the border around the Link or
Image object remains. There are no options offered for formatting the border within
the Link or Image properties, so it would seem that we must learn to live with this
border for now. The only option that I have found here is to add a background color
to the section containing the Link or Image object, but this is probably less desirable
than the border.
Click the Rename button on the Link or Image object on your dashboard layout to
open the Rename window. This Rename window, shown in Figure 5-15, is
different from the Rename window on the Section object. Notice that there is no
option here to display the heading on the dashboard. In fact, renaming the Link
or Image object only changes the object name shown on the Dashboard Editor
screen. The name does not appear anywhere else.
The final option on the Link or Image Object window is the Delete button. If you
click the Delete button on the Link or Image object, the object is immediately
removed from the dashboard layout. You do not receive a confirmation dialog,
so take care that you do not accidentally delete your Link or Image object with
a stray click.
Rename window (Link or Image object)
Please purchase PDF Split-Merge on www.verypdf.com to remove this watermark.
/ Oracle CRM On Demand Dashboards / Michael D. Lairson / 174 534-3
Oracle CRM On Demand Dashboards
/ Oracle CRM On Demand Dashboards / Michael D. Lairson / 174 534-3
Chapter 5: Dashboard Objects
There is nothing surprising about the Text object. It is as simple as you would expect
it to be, but is a useful object nonetheless. Any time you are building out a
dashboard and want to offer some instructions to the users, provide some
information about the contents of the dashboard, or just put some boilerplate text on
the dashboard, the Text object is just what you need. Add the Text object to the
dashboard in the same way you would add any other object: drag it from the
Dashboard Objects list to a section on the dashboard layout.
Click the Properties button on the text object to open the Text Properties window
shown in Figure 5-16. Enter your text into the top portion of this window. This text
field is not an HTML text field—HTML tags are not recognized here. If you desire
bold, italic, or underlined text, you must use the tags provided by the buttons above
the text field.
The formatting buttons above the text field allow you to add formatting tags to
your text. The B button inserts the start and end tags for bold text. These tags are
similar to, but are not standard, HTML tags. The formatting tags work like HTML tags
in that there is a start tag and an end tag, and any text between the tags is formatted
according to the tag type. The exception to this is the Line Break tag, which does not
require an opening tag. Table 5-1 shows the available text-formatting tags.
Text Properties window
Please purchase PDF Split-Merge on www.verypdf.com to remove this watermark.
/ Oracle CRM On Demand Dashboards / Michael D. Lairson / 174 534-3
Oracle CRM On Demand Dashboards
/ Oracle CRM On Demand Dashboards / Michael D. Lairson / 174 534-3
Chapter 5: Dashboard Objects
There are two ways to enter these format tags into the text field. You can type
them in directly, or use the buttons. If you use the buttons, you should first highlight
the text you want to format, and then click the button to add the tags. The opening
tag will be inserted before the highlighted text, and the closing tag will be inserted
after the highlighted text.
You can apply multiple tags and nested tags to format text that is bold and italic;
bold and underlined; italic and underlined; bold and underlined; or bold, italic, and
underlined. Consider the example shown in Figure 5-17 where all of the tags are
being used. Compare the text entry field with the preview below it.
Bold [b] [/b]
Italic [i] [/i]
Underline [u] [/u]
Line Break [br/]
Text Object Format Tags
Sample Text object formatting
Please purchase PDF Split-Merge on www.verypdf.com to remove this watermark.
/ Oracle CRM On Demand Dashboards / Michael D. Lairson / 174 534-3
Oracle CRM On Demand Dashboards
/ Oracle CRM On Demand Dashboards / Michael D. Lairson / 174 534-3
Chapter 5: Dashboard Objects
Click the Rename button on the Text object on your dashboard layout to open the
Rename window. This Rename window, shown in Figure 5-18, is different from the
Rename window on the Section object, and exactly like the Rename window on the
Link or Image object. There is no option here to display the heading on the
dashboard; renaming the Text object only changes the object name shown on the
Dashboard Editor screen. The name does not appear anywhere else.
The Delete button on the Text object, like the Delete buttons on the other objects we
have examined, immediately and without confirmation, removes the Text object
from your dashboard layout. You do not receive a confirmation dialog, so take care
that you do not accidentally delete your Text object unintentionally.
The Folder object lets you place a report folder on your dashboard, providing access
to all of the reports in that folder from the dashboard. Users do not need to navigate
to the Reports tab to access reports. With a Folder object on your dashboard, you can
embed some or all of the reports from the CRM On Demand report library into your
dashboard as links. The reports are presented in folders that may be opened and
closed on the dashboard screen. Add the Folder object to your dashboard by dragging
it from the Dashboard Objects list to a section on the Dashboard Editor screen.
The Folder Properties window (see Figure 5-19) that opens when you click the
Properties button on the Folder object is quite simple. To set up a folder link on your
dashboard, you first need to identify the report folder that you are interested in
displaying. Do this by clicking the Browse button to open the Choose Folder
window. This window displays the Shared Folders, which includes the Company
Wide Shared Folder and the Pre-Built Analysis Folder. You can select one of these
top-level folders or drill down deeper into the folder structure and select a subfolder.
You will not find individual reports listed here, only the folders, and you must select
a folder in order to display anything in the Folder object on the dashboard.
Rename window (Text object)
Please purchase PDF Split-Merge on www.verypdf.com to remove this watermark.
/ Oracle CRM On Demand Dashboards / Michael D. Lairson / 174 534-3
Oracle CRM On Demand Dashboards
/ Oracle CRM On Demand Dashboards / Michael D. Lairson / 174 534-3
Chapter 5: Dashboard Objects
The folder you select to display on your dashboard will include all subfolders
and reports in the folder. If you select a folder that contains no subfolders, then only
reports appear in the folder on the dashboard, just as you would expect. When you
click a folder displayed in the dashboard, the section expands so you can see the
subfolders and reports within that folder. You can continue to drill down into folders,
and the section will continue to expand.
You can choose to present the report folder collapsed (the default) or already
expanded in the dashboard. Make this selection using the Expand check box on the
Folder Properties window.
If you add multiple Folder objects to the same section of the dashboard, the folders
appear stacked on top of one another in a single cohesive folder structure. This
permits you to present a custom order of the folders if you like, or have a series of
report folders, some expanded by default and others collapsed by default.
One interesting thing that I have discovered with Folder objects is that the
Arrange Horizontally option on the Section object does not have any effect when a
Folder object is included in the section. If you want to include objects in your
dashboard that appear beside a Folder object, you will need to split the column and
use separate sections in multiple columns.
Click the Rename button on the Folder object on your dashboard layout to open the
Rename window. This Rename window, shown in Figure 5-20, is different from the
Folder Properties window
Rename window (Folder object)
Please purchase PDF Split-Merge on www.verypdf.com to remove this watermark.
/ Oracle CRM On Demand Dashboards / Michael D. Lairson / 174 534-3
Oracle CRM On Demand Dashboards
/ Oracle CRM On Demand Dashboards / Michael D. Lairson / 174 534-3
Chapter 5: Dashboard Objects
Rename window on the Section object. Notice that there is no option here to
display the heading on the dashboard. In fact, renaming the Folder object only
changes the object name shown on the Dashboard Editor screen. The name does not
appear anywhere else.
The final option on the Folder object is the Delete button. If you click the Delete
button on the Folder object, the object is immediately removed from the dashboard
layout. This does not affect the actual report folders—it only affects the dashboard.
You do not receive a confirmation dialog, so take care that you do not accidentally
delete your Folder object with a stray click.
Similar to the Guided Navigation property, Guided Navigation links add a bit of
logic to the dashboard by controlling whether or not a hyperlink appears on the
layout. This is implemented in exactly the same way as the section property in that a
report request is used to determine if a link appears or does not appear on the
dashboard. Begin by adding the Guided Navigation Link object to the layout by
dragging it from the Dashboard Objects list to a section on the dashboard.
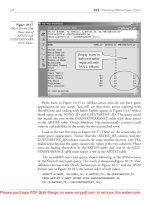
In Figure 5-21 you see the Guided Navigation Link Properties window that opens
when you click the Properties button on the Guided Navigation Link object. The
instruction at the top of this window indicates that you should “specify a Source
Request to create a conditional Guided Navigation link. The link will always appear
if no Source Request is referenced.” This means that if you just fill out the Link
Properties section of this screen, it is no different from using the Link or Image
object to create the navigation link.
The first field on this window is a radio button selector indicating if a source
request should or should not be referenced. The default setting here is No. That
means any link identified further down this window will always appear in the
dashboard, as it is not referencing another source request. If this is what you want,
you probably would have selected the Link or Image object rather than the Guided
Navigation Link object.
If a source request is referenced by the Guided Navigation link, the link will
only display if the specified criteria are met. Select a source request in the Source
Request field by clicking the Browse button and selecting a report from the Shared
Folders. Next, determine when the navigation link should appear on the dashboard.
Your choice is to make it appear either when the source request returns rows or
when the source request returns nothing.
Please purchase PDF Split-Merge on www.verypdf.com to remove this watermark.
/ Oracle CRM On Demand Dashboards / Michael D. Lairson / 174 534-3
Oracle CRM On Demand Dashboards
/ Oracle CRM On Demand Dashboards / Michael D. Lairson / 174 534-3
Chapter 5: Dashboard Objects
So when would you use something like a Guided Navigation link? Perhaps you
have a Sales Performance dashboard that includes a link to a report of active
opportunities that are due for follow-up when opportunities exist with past due
activities. If there are no past due activities on opportunities, the link accesses a list
of new leads ready for attention. Essentially, with something like this, you are
helping direct users to the type of activity that they should be doing. If they have
past due activities, those should be addressed before they pick up new leads.
Setting up the Guided Navigation link requires a simple report that will return
rows or not return rows based on the filters that you set up in the report. This report
does not need to be designed for viewing if its only purpose is to drive the result of a
Guided Navigation link decision. This report can be a simple report that includes
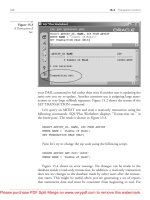
only a single column and the necessary filters. Look back to Figure 5-3 for an
example of this type of simple analysis. In that example, I am determining if large
open opportunities exist, so I have added the # of Opportunities metric column and
two filters. One filter eliminates all opportunities that are closed, and the other filter
eliminates all opportunities that are less than one million dollars in revenue. The
result is either no results or a single row with the number of open opportunities with
more than one million in revenue.
Guided Navigation Link Properties window
Please purchase PDF Split-Merge on www.verypdf.com to remove this watermark.
/ Oracle CRM On Demand Dashboards / Michael D. Lairson / 174 534-3
Oracle CRM On Demand Dashboards
/ Oracle CRM On Demand Dashboards / Michael D. Lairson / 174 534-3
Chapter 5: Dashboard Objects
On the Guided Navigation Links Properties window, select the Source Request
report that performs the check for records meeting your criteria. If you want the link
to appear when the source report returns rows, you will select the If Request Returns
Rows radio button. If you want the link to appear when the source report returns no
rows, you will select the If Request Returns Nothing radio button.
Next, you need to provide the link that will display, or not display, based on the
source request results. In the Link Properties section of the Guided Navigation
Links Properties window, you have two radio buttons. These are used to identify
the type of destination that your link is going to take dashboard users to when they
click it.
Your first option is Request. This is referring to a report request in Oracle CRM
On Demand. Select the Request radio button and rather than enter a URL in the
field to the right of the button, you will browse for the desired report. Click the
Browse button, and the Choose Request window opens with the Company Wide
Shared Folder and Pre-built Analysis Folder listed. Drill down into the folders and
select a report. Notice that your personal report folder is not an available option.
When you click OK, the URL for the selected report appears in the field.
The second option is URL. This option allows you to access any webpage as
long as you know the URL for it. For instance, if you want to provide a link to your
company home page from the dashboard, you would select the URL option and
enter the full URL in the field. The http:// portion of the URL is required. For a link to
the Oracle website, for instance, as demonstrated in an earlier section, you would
select URL and enter in the URL field.
You can also use a mailto URL here to create a link that initiates a new e-mail
message. Enter a URL, such as mailto:?subject=Dashboard, and the
resulting hyperlink in the dashboard, when clicked, will open the user’s default
e-mail application and create a new message addressed to with a
subject of Dashboard.
As mentioned previously, if you are familiar with JavaScript, you could also enter
some inline JavaScript here.
Next, we need to indicate what text should appear as our link in the dashboard.
If you select another report as the target, the report name will appear as hyperlinked
text by default, with the full URL. You can change this by clicking the Use
Dashboard Object Name As Link Text check box. With this check box selected, the
text that appears in the dashboard as your link will be the name of the Guided
Navigation Link object.
You might assume that the Caption field content will appear as the link text, but
unlike the Link or Image object, this Caption field is used to display some static text
above the link. This gives you the ability to offer some instruction or explanation for
the link. There is no real practical limit to how much text you can include as your
caption. I have never hit a hard limit here either, but it would be rather unusual to
include much more than a sentence or two.
Please purchase PDF Split-Merge on www.verypdf.com to remove this watermark.
/ Oracle CRM On Demand Dashboards / Michael D. Lairson / 174 534-3
Oracle CRM On Demand Dashboards
/ Oracle CRM On Demand Dashboards / Michael D. Lairson / 174 534-3
Chapter 5: Dashboard Objects
Also different from the Link or Image object is the lack of an ability to specify a
target for your link. The results of your link will always be opened in the current
window, replacing the dashboard. If your destination is a report request, a hyperlink
is positioned at the bottom of the resulting window that returns you to the
dashboard. Click the Return link, and you are taken back to the previous dashboard.
A Return link is not provided for the results of links from the dashboard to a URL.
Click OK to close the Guided Navigation Link Properties window and return to
the Dashboard Editor screen.
If you want to provide a link to a report, you can use the Request option and browse
for the report to select the correct link. There is no browse function for selecting a
dashboard, so if you want to provide a Guided Navigation link to another dashboard,
you will need to use the URL option and provide the link to the dashboard.
To locate the link for the target dashboard, open the desired dashboard on the
Dashboard tab. It is important that you open the dashboard on the Dashboard tab
and not the preview window that appears when you save the dashboard. Once the
dashboard is loaded on the Dashboard tab, and before you click anything else,
right-click the blue bar below the Select Dashboard field. Refer back to Figure 5-14
for an example of where to right-click the dashboard to open the menu. If your
dashboard contains multiple pages, right-click the blue bar to the right of the tabs.
Do not navigate to any of the other pages in the dashboard before right-clicking the
blue bar on the dashboard page.
When you right-click the dashboard, the context menu appears. Select
Properties if you are using Internet Explorer; select This Frame and then View Frame
Info if you are using Firefox. On the resulting window, highlight and copy the
contents of the Address field to your Clipboard. This is the address for the dashboard
content inside the dashboard frame, and is the link you will add to your dashboard
to break it out of the frame and open it in a new browser window.
Be sure that the address URL is similar to the following example, and don’t let
the URL encoding confuse you. Some characters may be URL-encoded, so a / may
be represented as %2f:
.dll?Dashboard&PortalPath=/shared/Company_123456-1ABC2_Shared_Folder/
_portal/Marketing+Quarterly+Initiatives.
Once you have located the correct URL and have copied it to your Clipboard,
you can go back to the Dashboard Editor screen for the dashboard you are adding
the link to and add the Guided Navigation Link object to your layout and paste in
the URL. If you want to display the link based on the result of another request,
complete the top half of the screen. If you do not base the link on a source request,
it will always appear on the dashboard.
Please purchase PDF Split-Merge on www.verypdf.com to remove this watermark.
/ Oracle CRM On Demand Dashboards / Michael D. Lairson / 174 534-3
Oracle CRM On Demand Dashboards
/ Oracle CRM On Demand Dashboards / Michael D. Lairson / 174 534-3
Chapter 5: Dashboard Objects
By using Guided Navigation links that use the same report as the Source Request
report and the link target, if the link appears, you can quite effectively build a report
menu that only includes reports that return results. This is useful if you have a
number of reports that will often show no results.
Unfortunately, as you can see in Figure 5-22, there will be borders around each
link. There are no formatting options on the Guided Navigation Link object to
remove or change the format of the links. Additional formatting capabilities may be
introduced in future releases of Oracle CRM On Demand, but as of this writing, we
must live with the default formats on our links.
The risk of using Guided Navigation links on your dashboard is that your users
might naturally conclude that the dashboard is not functioning properly because
links appear and disappear from time to time. I recommend including some
explanatory text in a section that will always appear on the dashboard using the
Text object.
Click the Rename button on the Guided Navigation Link object on your dashboard
layout to open the Rename window. This Rename window is exactly like the
Rename window on the Link or Image object. There is no option here to display the
heading on the dashboard, but if you have selected the Use Dashboard Object
Name As Link Text check box on the Guided Navigation Links Properties window,
then the name that you provide here on the Rename window will be the text
displayed as the link for the Guided Navigation link on the dashboard.
The Delete button on the Guided Navigation Link object, like the Delete buttons on
the other objects we have examined, immediately and without confirmation,
removes the Guided Navigation Link object from your dashboard layout. You do not
receive a confirmation dialog, so take care that you do not accidentally delete your
Guided Navigation Link unintentionally.
Multiple Guided Navigation links on a dashboard
Please purchase PDF Split-Merge on www.verypdf.com to remove this watermark.
/ Oracle CRM On Demand Dashboards / Michael D. Lairson / 174 534-3
Oracle CRM On Demand Dashboards
/ Oracle CRM On Demand Dashboards / Michael D. Lairson / 174 534-3
Chapter 5: Dashboard Objects
At this point we have reviewed nearly everything that you can put on a dashboard
besides reports and filter prompts. Clearly, it is possible to do more with a
dashboard than just display reports. I encourage you to consider that dashboards are
more than just a report delivery mechanism. With the guided navigation options on
sections and links you can add quite a bit of logic, and with the various ways to add
links and the Folders object, you can provide navigation options to other webpages
and reports.
Later in this book I describe the process of embedding dashboards inside of
web tabs and other reports, making it possible to present dashboards on screens
other than the Dashboard tab. This increases the range of possibilities quite a lot,
and coupled with the range of possible report designs that can be used in your
dashboards, the mind begins to spin with the potential uses of the dashboard in
Oracle CRM On Demand.
Please purchase PDF Split-Merge on www.verypdf.com to remove this watermark.
This page intentionally left blank
Please purchase PDF Split-Merge on www.verypdf.com to remove this watermark.
/ Oracle CRM On Demand Dashboards / Michael D. Lairson / 174 534-3 / Blind folio:
Chapter
6
Displaying Reports
on the Dashboard
89
Please purchase PDF Split-Merge on www.verypdf.com to remove this watermark.
/ Oracle CRM On Demand Dashboards / Michael D. Lairson / 174 534-3
Oracle CRM On Demand Dashboards
/ Oracle CRM On Demand Dashboards / Michael D. Lairson / 174 534-3
Chapter 6: Displaying Reports on the Dashboard
inally we come to the chapter discussing the use of dashboards to
display reports. Hopefully it strikes you as interesting that the first real
description of adding reports to your dashboard comes so late in the
book. My intent is that you come to realize how much more a
dashboard can be and how the other objects available to your
dashboard make the display of your reports on it all the more effective and targeted to
your users.
In this chapter we will examine the process of adding and arranging reports on the
dashboard layout. Many options are available for how those reports are displayed or
linked. You will find that some of the objects discussed in the previous chapter can
be replicated using the report properties, perhaps with a few more desirable options.
Also in this chapter is a brief look at Answers On Demand, the report
development tool used to create your reports. This will certainly not be as complete a
look at Answers On Demand as you will find in my book Oracle CRM On Demand
Reports (McGraw-Hill, 2008), but it will offer enough of an overview for the
developer who is tasked not with building reports, but with modifying a report layout
for a dashboard. This will be a bit of a primer for the next chapters as well, since you
will be using Answers On Demand to develop your dashboard filter prompts, and for
a particularly crafty method for deploying a dashboard covered in Chapter 8.
Adding a report to your dashboard is quite similar to adding any of the other
objects. Locate and drag the report you want to add to your dashboard from the
Shared Content section to a Section object on the dashboard layout. If you drop the
report onto the layout outside of a section, the Section object is automatically added
to the dashboard as well as the report. The primary difference between adding other
objects and reports is that reports are listed in the Saved Content section of the
Dashboard Editor screen. In the Saved Content section you will find the Shared
Folders folder with the Company Wide Shared Folder and Pre-built Analysis Folder
within. Clicking one of these folders expands the selected folder to expose the
subfolders and reports inside of it.
Oddly, and I am without an explanation as to why, there is a slight difference in
how the folders react when you click the folder icon and when you click the folder
name. You can open and close individual folders by clicking the icon, as you might
expect. Clicking the folder name, however, opens the folder and tends to force other
folders at the same level to close. Thus, if you only ever click folder names, you will
only ever have one folder at each level opened at one time. Clicking the name of an
open folder does not close the open folder, but may close other folders at the same
level. The reaction of the folders appears to differ across browsers as well.
F
Please purchase PDF Split-Merge on www.verypdf.com to remove this watermark.
/ Oracle CRM On Demand Dashboards / Michael D. Lairson / 174 534-3
Oracle CRM On Demand Dashboards
/ Oracle CRM On Demand Dashboards / Michael D. Lairson / 174 534-3
Chapter 6: Displaying Reports on the Dashboard
Reports are listed within each folder in alphabetical order by report name. If you
hover your mouse pointer over a report name, a tooltip appears with a description
of the report, if one was given when the report was saved. If no description text was
provided by the report developer, the name of the report appears in the tooltip.
You may also have noticed that your My Folders folder is not included in the
Saved Content section. Personal reports are not permitted on dashboards. The concept
of a personal dashboard does not exist in Oracle CRM On Demand. Any dashboard is
available to all users with dashboard access, so exposing a personal report on a public
dashboard would only cause an error, if it were possible. If you have a personal report
that you want to include on your dashboard, you will need to open that report in
Answers On Demand and save it into a shared folder. It is possible to include reports
that are in a shared folder, even if that folder has access controls associated with it to
block its content to all but certain roles in Oracle CRM On Demand.
If a user opens a dashboard that contains a report that he or she does not have
access to due to report folder access controls, the report will simply not appear on
the dashboard. No error message appears, so from the user’s perspective, the
dashboard is not broken. Anything located on the dashboard below such a report
will simply slide up the dashboard as if the restricted report was never there.
Each page in your dashboard is limited to a total of six reports. Many people have
incorrectly reported this limitation as a limit on the number of reports that a
dashboard can include. Your dashboard can include as many reports as you like; you
just need to spread them out over multiple pages with six or fewer reports per page.
Every report object on the dashboard layout has three buttons in the upper-right
corner. The Properties button, the Rename button, and the Delete button are used to
configure the report on the dashboard. Next I describe each of the configuration
options in detail. We will start with the Properties menu. When you click Properties
you are presented with four options: Display Results, Report Links, Show View, and
Modify Request. The Rename and Delete options are presented in their own buttons,
and are also described next. Figure 6-1 shows the Properties menu opened on a
Report object in the Dashboard Editor screen.
Report Object Properties menu
Please purchase PDF Split-Merge on www.verypdf.com to remove this watermark.
/ Oracle CRM On Demand Dashboards / Michael D. Lairson / 174 534-3
Oracle CRM On Demand Dashboards
/ Oracle CRM On Demand Dashboards / Michael D. Lairson / 174 534-3
Chapter 6: Displaying Reports on the Dashboard
The first option in the Properties menu on the Report object contains three different
ways to display a report in a dashboard. The default, and most common, method is
to embed the report in the section so that the report displays as part of the
dashboard. You can also set your reports to display as links that, when clicked, open
the report in the dashboard window or in a separate window. When you click the
Display Results item on the Properties menu, the Display Results submenu opens, as
shown in Figure 6-2.
For a report embedded in the dashboard section, click the Properties button on the
Report object and open the Display Results submenu. The Embedded In Section
option is likely already selected, as this is the default. If it is not selected, click
Embedded In Section to select that display option.
If you make no additional adjustments on the Properties menu, as described next,
the report will display in its entirety. There are different strategies for adjusting how
reports display in the dashboard. The most common strategy, which I hope to change
with the explanations in this book, is to duplicate a report that you want in your
dashboard so that you have one version of the report that your users typically access
from the Reports tab and another version, or many versions, of the report that include
only the elements you want displayed in the dashboard. For instance, I often see
companies with a report containing several views that they generally access via the
Reports tab. This report will usually have a table, pivot table, and a couple of charts,
along with a title view. Now, if they want just the pivot table or just a chart on the
dashboard, they replicate the same report and only include the desired view in the
report. This is the report that is added to the dashboard. This is a valid method, and
works perfectly well, but read on for some ideas on other strategies and their benefits.
The Link – Within The Dashboard option is really very much the same as adding a
Link or Image object that directs the user to a report in Oracle CRM On Demand.
Display Results submenu
Please purchase PDF Split-Merge on www.verypdf.com to remove this watermark.
/ Oracle CRM On Demand Dashboards / Michael D. Lairson / 174 534-3
Oracle CRM On Demand Dashboards
/ Oracle CRM On Demand Dashboards / Michael D. Lairson / 174 534-3
Chapter 6: Displaying Reports on the Dashboard
Adding a report to your dashboard and setting the Display Results property to Link –
Within The Dashboard displays a link to the report, just like the link you would get
from adding the Link or Image object or the Guided Navigation Link object.
Clicking the link in the dashboard replaces the contents of the dashboard window
with the report results. Adding a report to your dashboard and displaying the
dashboard as a link still counts as a report and, therefore, uses one of the six
available spots for reports on the dashboard page. If you are pushing up against the
six-report limit on your dashboard page, you might consider using one of the other
Link objects rather than a report. Of course, as you will read next, there are some
additional benefits to the Report object that you must consider as well.
The Link – In A Separate Window option is also similar to adding a Link or Image
object that directs the user to a report in Oracle CRM On Demand, and is set to
open in a new window. Adding a report to your dashboard and setting the
Display Results property to Link – In A Separate Window displays a link to the
report that looks exactly like the link you would get from adding the Link or
Image object. Clicking the link in the dashboard opens a new window populated
with the report results.
Three links appear at the bottom of every report that you run from the Reports tab.
You will always see the Refresh, Printer Friendly, and Download links at the end of
your reports. Reports displayed on a dashboard, however, do not automatically
include these three links at the end of the report. If you want any of these links on
the individual reports, you must enable them on the Report object. Do this by
clicking the Properties button and selecting the Report Links option. The Report
Links window, shown in Figure 6-3, opens displaying a check box for each of the
report link options.
Report Links window
Please purchase PDF Split-Merge on www.verypdf.com to remove this watermark.
/ Oracle CRM On Demand Dashboards / Michael D. Lairson / 174 534-3
Oracle CRM On Demand Dashboards
/ Oracle CRM On Demand Dashboards / Michael D. Lairson / 174 534-3
Chapter 6: Displaying Reports on the Dashboard
Clicking the Refresh check box on the Report Links window enables the Refresh link
on the report within the dashboard. This is in addition to the dashboard’s Refresh
link that appears at the bottom of the dashboard.
Clicking the report’s Refresh link will resubmit the report query, and the report
will execute again within the dashboard. This is particularly useful when your
dashboard includes real-time reports with data that changes frequently. Reports will
often populate from cached data for increased performance. If the report has been
executed recently, it may be cached. This cached version of the report could contain
stale data in an environment where data changes frequently. Clicking Refresh will
run the report again, punching through the cache, so that the data in the report is
current as of the moment it is run—assuming that the report is built on a reporting
subject area. A report built on one of the Analytics subject areas is pulling data from
the data warehouse, which updates nightly, so the Refresh link is not likely to cause
any change in the data included in the report.
Clicking the Printer Friendly check box on the Report Links window enables the
Printer Friendly link on the report within the dashboard. This link will appear at the
bottom of the report. Clicking it opens a small submenu offering you two choices.
You can select HTML to open the report in a new browser window that contains
only the report and none of the other dashboard content or CRM On Demand user
interface elements. Similarly, selecting the PDF option from this submenu opens just
the report in a new browser window. This window, however, is formatted as a PDF
document that can be sent directly to the printer or saved to your computer’s hard
drive as a PDF file.
The report’s Printer Friendly link is different from the Printer Friendly link that
appears at the bottom of the dashboard. The dashboard’s Printer Friendly link
operates in the same way as the report’s Printer Friendly link in that it offers the same
HTML and PDF options. The dashboard’s Printer Friendly link, however, opens the
entire dashboard in a new browser window for printing.
Clicking the Download Link check box on the Report Links window enables the
Download link on the report within the dashboard. This link will appear at the
bottom of the report within the dashboard. When clicked, it offers a submenu with
five download options. Download To Excel and Download To Excel 2000 both open
the report in a Microsoft Excel file. When downloading to Excel, the report is
essentially copied and pasted into an Excel file with most of the formatting in place.
Charts are included in the Excel file as images. Interactivity is obviously stripped
from the report in Excel since the report is outside of Oracle CRM On Demand and
Please purchase PDF Split-Merge on www.verypdf.com to remove this watermark.
/ Oracle CRM On Demand Dashboards / Michael D. Lairson / 174 534-3
Oracle CRM On Demand Dashboards
/ Oracle CRM On Demand Dashboards / Michael D. Lairson / 174 534-3
Chapter 6: Displaying Reports on the Dashboard
maintaining links back into a secure CRM system in a hosted environment would be
difficult.
There are two Download Data options as well. Download Data (.csv) and
Download Data (.txt) both open up a new file with just the data table behind the
report. If the report contains a chart, these download options will not replicate the
chart. The .csv option will open the data table in your default application for
comma-separated values. If this application happens to be Excel or another
spreadsheet program, the values will be placed into separate columns. If this
application is a text reader, the commas that separate the values will be present in
the downloaded data. The .txt option opens your default text reader with the data
from the report. The values are separated by spaces or tabs rather than commas.
The final download option is Download Web Page (MHTML). This option
generates a .mht file, which opens in a Microsoft Explorer web browser and is an
archived webpage. When you save a webpage as a web archive in Internet Explorer,
the webpage saves the report information in Multipurpose Internet Mail Extension
HTML (MHTML) format with an .mht file extension. All links in the report are
disabled. Charts and other embedded content are included in the .mht file.
When using dashboards to display reports, you have a number of options for how to
set up your reports and how they will be viewed. The most common approach that I
have seen among my customers is to create a separate report specifically for the
dashboard. This could be a report developed just for the dashboard or a copy of
another report that you strip down for the dashboard. Typically, when you add a
report to a dashboard, the intent is to include just one view—a table or a chart.
Most people will create a report and remove any unnecessary views like the default
title and table views.
What many dashboard developers do not realize is that copying and stripping
down reports for dashboards is completely unnecessary because of the Show View
option on the report’s Properties menu. When you click the Show View option in the
Properties menu, you are presented with a submenu that contains a list of every
view in the report—even views that you have removed from the report. When you
remove a view from the report, you see, the view is not deleted.
The Show View option allows you to select a single view to display in the
dashboard. This means that you do not need to re-create a stripped-down version of
a report in order to display only a single part of that report in the dashboard. This is
great news for administrators who are concerned about the reports library becoming
overrun with a lot of reports. This is even better news for the report developer, who
can accomplish many things and fill multiple requirements with a single report.
The default selection in the Show View menu is Default Compound View. The
Default Compound View selection indicates that all visible views in the report
should be included in the dashboard. In other words, the report appears in the
Please purchase PDF Split-Merge on www.verypdf.com to remove this watermark.
/ Oracle CRM On Demand Dashboards / Michael D. Lairson / 174 534-3
Oracle CRM On Demand Dashboards
/ Oracle CRM On Demand Dashboards / Michael D. Lairson / 174 534-3
Chapter 6: Displaying Reports on the Dashboard
dashboard exactly as it would if you ran the report from the Reports tab. Because all
reports have a Title view and Table view by default, the Show View menu also will
always contain the Title 1 and Table 1 options in addition to the Default Compound
View. In addition, the Show View menu contains all of the views that have been
added to a report; thus, even if they were subsequently removed, it is possible for a
report to appear one way when run from the Reports tab, and display a view that
does not appear in the report on a dashboard.
The final option on the Properties menu is Modify Request. Clicking Modify Request
takes you out of the Dashboard Editor to the Build and View Analysis screen. The
report from the dashboard is opened in the editor, ready for you to make
modifications. This is a nice shortcut to Answers On Demand for editing your
reports. The Build and View Analysis screen opens up on the Define Criteria step.
Here you can modify the columns, filters, and column formats. Moving to Step 2
permits you to modify and add views in the report.
If you are not familiar with basic report design and development, the “Designing
Reports for Dashboards” section helps you with this task by describing the basics of
Answers On Demand and providing some thoughts on particular report configuration
options that are most important for the dashboard developer. Of course, if you need
a more in-depth study of Answers On Demand, my earlier book, Oracle CRM On
Demand Reporting (McGraw-Hill, 2008), is a great resource and covers the topic in
great detail.
The Rename button on the Report object in the dashboard opens a small Rename
window, as shown in Figure 6-4. The name of the report is the default value in this
screen, but you can overwrite that name here. The name of the report as listed here
only appears on the Dashboard Editor window, unless you have added the report as a
link and have selected the Use Dashboard Object Name As Link Text check box. With
this check box selected, the text you enter on the Rename window will appear as the
linked text on the dashboard. This text does not affect the link target in any way.
Rename window
Please purchase PDF Split-Merge on www.verypdf.com to remove this watermark.