Manual for installing NS2.29 under window XP
Bạn đang xem bản rút gọn của tài liệu. Xem và tải ngay bản đầy đủ của tài liệu tại đây (495.54 KB, 21 trang )
1
Manual for installing NS2.29 under Window XP
Dali Wei and Rashid Limbada
Department of Electrical Engineering, University of Cape Town
;
Considering that the refresh rate of the monitor under Linux system is lower (60) compared
with Windows XP (you may improve it to 85). This low rate is harmful for your eyes. Also,
many guys can not install NS2 under Window XP successfully. We are very happy to share
our experience on how to install NS2 under Window XP system. In this short manual, all
steps are shown with detail figures.
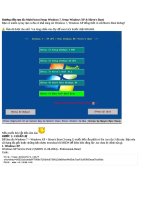
Before you start to install NS2, please make sure to check the name of your computer first.
In my special scenario as shown in the above figures, the name is “dlwei77” (there is no
space in the name). If you find that there is a space in your computer name like “??? ??”,
NS2 will complain it and can not run properly even it is installed. Therefore, please change
the name of your computer first in this situation (Thanks to Engelbert Linus Chuwa to help
me sort out this issue). The detail steps on how to change the name of your computer are
described as following:
2
1. Begin by first clicking on the Start Button.
2. Then click on the Run Icon, which will open up the Run Menu for you.
3. Type the word “Regedit” into the white area and then click on the OK button.
4. Click on the plus sign [+] next to HKEY_LOCAL_MACHINE to expand that section.
5. Then click on the plus sign [+] next to “Software” to expand that section.
6. Then click on the plus sign [+] next to “Microsoft” to expand that section.
7. Then click on the plus sign [+] next to “Windows NT” to expand that section.
8. Then click on the yellow folder entitled “Current Version”. Do not click on its plus sign
[+].
9. Now move over to the right side of the screen and scroll down until you see “Registered
Owner”.
10. Double click directly onto the words Registered Owner and input your new name,
make sure no space there.
11. You need to reboot your computer for the changes to take effect for Windows XP.
3
1. Install CYGWIN
1) Download zip file of ns2.29 (allinone) from:
2) Download cygwin setup.exe from www.cygwin.com
3)
Click on “cygwin.exe”.
4) Select “install local directory”
4
5) Select browse for “cygwin” file (I selected as default).
6) Install
“C:\NS2\NS-2.29 Install files\Cygwin files
\ftp%3a%2f%2fftp.mirror.ac.uk%2fsites%2fsources.redhat.com%2fftp%2fcygwin”
5
7) Select to install all
You can select “install”, “default”, “uninstall”, “install”, and “reinstall” behind the first line
“all”. If we select “install”, then all sub items will be automatically selected. Otherwise
you may lose some items.
8) Installing
6
9) Finish in installing
“
ftp%3a%2f%2fftp.mirror.ac.uk%2fsites%2fsources.redhat.com%2fftp%2fcygwin”
10)
Install “
Install
“C:\NS2\NS-2.29 Install files\Cygwin files \
ftp%3a%2f%2fftp.is.co.za%2fmirrors%2fcygwin”.
7
11) Select to install all.
8
12)
Finish in stalling “ftp%3a%2f%2fftp.is.co.za%2fmirrors%2fcygwin”