Tài liệu Safety Instructions P1 pptx
Bạn đang xem bản rút gọn của tài liệu. Xem và tải ngay bản đầy đủ của tài liệu tại đây (398.59 KB, 20 trang )
5-3
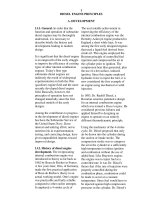
5.3 Moving to other groups
l There are 4 different parameter groups in SV- iG5A series as shown below.
Drive group Basic parameters necessary for the inverter to run. Parameters
such as Target frequency, Accel/Decel time settable.
Function group 1 Basic function parameters to adjust output frequency and
voltage.
Function group 2 Advanced function parameters to set parameters for such as
PID Operation and second motor operation.
I/O (Input/Output)
group
Parameters necessary to make up a sequence using Multi-
function input/output terminal.
l Moving to other parameter groups is only available in the first code of each group as the
figure shown below.
Moving to other groups using the Right (u)
key
Moving to other groups using the Left (t) key
Function
group 1
Function
group 2
I/O group
Drive group
*
Function
group 1
Function
group 2
I/O group
Drive group
*
* Target frequency can be set at 0.0 (the 1
st
code of drive group). Even though the preset value is 0.0, it is
user-settable. The changed frequency will be displayed after it is changed.
I/O group
FU group 2
FU group 1
Drive group
5-4
l How to move to other groups at the 1st code of each group
1
The 1
st
code in Drive group “0.00” will be displayed when AC input
power is applied.
Press the right arrow (u) key once to go to Function group 1.
2
The 1
st
code in Function group 1 “F 0” will be displayed.
Press the right arrow (u) key once to go to Function group 2.
3
The 1
st
code in Function group 2 “H 0” will be displayed.
Press the right arrow (u) key once to go to I/O group.
4
The 1st code in I/O group “I 0” will be displayed.
Press the right arrow (u) key once again to return to Drive group.
5
Return to the 1
st
code in Drive group “0.00”.
♣ If the left arrow key (t) is used, the above will be executed in the reverse order.
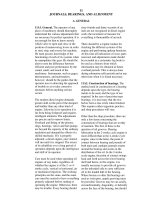
l How to move to other groups from any codes other than the 1
st
code
To move from the F 15 to function group 2
1
In F 15, press the Left (t) or Right arrow (u) key. Pressing the key goes to
the first code of the group.
2
The 1
st
code in function group 1 “F 0” is displayed.
Press the right arrow (u) key.
3
The 1
st
code in function group 2 “H 0” will be displayed.
Pressing left or
right arrow key in
any code will
return to first
code of each
group.
FU group 1
FU group 2
Drive group
5-5
5.4 How to change the codes in a group
l Code change in Drive group
1
In the 1
st
code in Drive group “0.00”,
press the Up (p) key once.
2
The 2
nd
code in Drive group “ACC” is
displayed.
Press the Up (p) key once.
3
The 3
rd
code “dEC” in Drive group is
displayed.
Keep pressing the Up (p) key until the
last code appears.
4
The last code in Drive group “drC” is
displayed.
Press the Up (p) key again.
5
Return to the first code of Drive group.
Drive group
♣ Use Down (q) key for the opposite order.
l Code jump
When moving from the “F 0” to the “F 15” directly
1
Press the Ent (˜) key in “F 0”.
2
1 (the code number of F1) is displayed.
Use the Up (p) key to set to 5.
3
“05” is displayed by pressing the Left
(t) key once to move the cursor to the
left. The numeral having a cursor is
displayed brighter. In this case, 0 is active.
Use the Up (p) key to set to 1.
4
15 is set.
Press the Ent (˜) key once.
FU group 1
5
Moving to F 15 has been complete.
♣ Function group 2 and I/O group are settable with the same setting.
5-6
l Navigating codes in a group
When moving from F 1 to F 15 in Function group 1
1
In F 1, continue pressing the Up (p)
key until F15 is displayed.
2
Moving to F15 has been complete.
♣ The same applies to Function group 2 and I/O group.
♣Note: Some codes will be skipped in the middle of increment (p)/decrement (q) for code
change. That is because it is programmed that some codes are intentionally left blank for
future use or the codes user does not use are invisible.
For example, when F24 [High/low frequency limit select] is set to “O (No) ”, F25 [High
frequency limit] and F26 [Low frequency limit] are not displayed during code change. But
When F24 is set to “1(Yes)”, F25 and F26 will appear on the display.
5-7
5.5 Parameter setting
l Changing parameter values in Drive Group
When changing ACC time from 5.0 sec to 16.0 sec
Drive group
1
In the first code “0.00”, press the Up (p) key once to go to the second
code.
2
ACC [Accel time] is displayed.
Press the Ent key (˜) once.
3
Preset value is 5.0, and the cursor is in the digit 0.
Press the Left (t) key once to move the cursor to the left.
4
The digit 5 in 5.0 is active. Then press the Up (p) key once.
5
The value is increased to 6.0
Press the Left (t) key to move the cursor to the left.
6
0.60 is displayed. The first 0 in 0.60 is active.
Press the Up (p) key once.
7
16.0 is set.
Press the Ent (˜) key once.
16.0 is blinking.
Press the Ent (˜) key once again to return to the parameter name.
8
ACC is displayed. Accel time is changed from 5.0 to 16.0 sec.
♣ In step 7, pressing the Left (t) or Right (u) key while 16.0 is blinking will disable the
setting.
Note 1) Pressing the Left (t)/ Right (u) /Up (p) /Down (q) key while cursor is blinking will cancel
the parameter value change. Pressing the Enter key (˜) in this status will enter the value into
memory.
5-8
l Frequency setting
When changing run frequency to 30.05 Hz in Drive group
Drive group
1
In “0.00”, press the Ent (˜) key once.
2
The second decimal 0 becomes active.
Press the UP (p) key until 5 is displayed.
3
Press the Left (t) key once.
4
The first decimal 0 becomes active.
Press the Left (t) key once.
5
Press the Left (t) key once.
6
Set 3 using UP (p) key.
7
Press the Ent (˜) key.
30.05 is blinking.
Press the Ent (˜) key.
8
30.05 is entered into memory.
♣ SV-iG5A display can be extended to 5 digits using left (t)/right (u) keys.
♣ Parameter setting is disabled when pressing other than Enter Key in step 7.
5-9
l Changing parameter value in Input/Output group
When changing the parameter value of F28 from 2 to 5
FU group 1
1
In F0, press the Ent (˜) key once.
2
Check the present code number.
Increase the value to 8 by pressing the Up (p) key.
3
When 8 is set, press the Left (t) key once.
4
0 in 08 is active.
Increase the value to 2 by pressing the Up (p) key.
5
28 is displayed
Press the Ent (˜) key once.
6
The parameter number F28 is displayed.
Press the Ent (˜) key once to check the set value.
7
The preset value 2 is displayed.
Increase the value to 5 using UP key (p).
8
Press the Ent (˜) key.
9
Code number will appear after 5 is blinking. Parameter change is
complete.
Press either Left (t) or Right (u) keys.
10
Moving to first code of Function group 1 is complete.
♣ The above setting is also applied to change parameter values in function group 2 and I/O
group.
5-
10
5.6 Monitoring of operation status
l Output current display
Monitoring output current in Drive group
Drive group
1
In [0.0], continue pressing the Up (p) or Down (q) key until [CUr] is
displayed.
2
Monitoring output current is provided in this parameter.
Press the Enter (˜) key once to check the current.
3
Present output current is 5 A.
Press the Enter (˜) key once to return to the parameter name.
4
Return to the output current monitoring code.
♣ Other parameters in Drive group such as dCL (Inverter DC link current) or vOL (Inverter
output voltage) can be monitored via the same method.
5-11
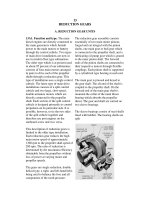
l Fault display
How to monitor fault condition in Drive group
Frequency
Current
During
Accel
Drive group
STOP
RESET
Over-
current
trip
1
This message appears when an Overcurrent fault occurs.
Press the Enter (˜) key or UP/Down key once.
2
The run frequency at the time of fault (30.0) is displayed.
Press the Up (p) key once.
3
The output current at the time of fault is displayed.
Press the Up (p) key once.
4
Operating status is displayed. A fault occurred during acceleration.
Press the STOP/RST key once.
5
A fault condition is cleared and “nOn” is displayed.
When more than one fault occurs at the same time
Drive group
Over
current
Over
voltage
Motor
overheat
Maximum three faults information is
displayed as shown left.
5-
12
l Parameter initialize
How to initialize parameters of all four groups in H93
FU group 2
1
In H0, press the Enter (˜) key once.
2
Code number of H0 is displayed.
Increase the value to 3 by pressing the Up (p) key.
3
In 3, press the Left (t) key once to move the cursor to the left.
4
03 is displayed. 0 in 03 is active.
Increase the value to 9 by pressing the Up (p) key.
5
93 is set.
Press the Enter (˜) key once.
6
The parameter number is displayed.
Press the Enter (˜) key once.
7
Present setting is 0.
Press the Up (p) key once to set to 1 to activate parameter initialize.
8
Press the Enter (˜) key once.
9
Return to the parameter number after blinking. Parameter initialize has
been complete.
Press the either Left (t) or Right (u) key.
10
Return to H0.
6-1
CHAPTER 6 - BASIC OPERATION
6.1 Frequency Setting and Basic Operation
☞ Caution : The following instructions are given based on the fact that all parameters are set to
factory defaults. Results could be different if parameter values are changed. In this case, initialize
parameter values (see page 10-21) back to factory defaults and follow the instructions below.
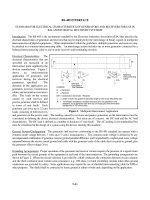
l Frequency Setting via keypad & operating via terminals
1
Apply AC input power to the inverter.
2
When 0.00 appears, press the Ent (˜) key once.
3
The second digit in 0.00 is lit as shown left.
Press the Left (t) key three times.
4
00.00 is displayed and the first 0 is lit.
Press the Up (p) key.
5
10.00 is set. Press the Ent (˜) key once.
10.00 is blinking. Press the Ent (˜) key once.
6
Run frequency is set to 10.00 Hz when the blinking stops.
Turn on the switch between P1 (FX) and CM terminals.
7
RUN lamp begins to blink with FWD (Forward Run) lit and accelerating
frequency is displayed on the LED.
When target run frequency 10Hz is reached, 10.00 is displayed.
Turn off the switch between P1 (FX) and CM terminals.
8
RUN lamp begins to blink and decelerating frequency is displayed on the
LED.
When run frequency is reached to 0Hz, Run and FWD lamp turn off and 10.00
is displayed.
3P
AC
Input
R
S
G
P1(FX)
CM
U
V
W
Motor
T
Freq.
P1(FX)-CM
ON
OFF
10 Hz
Wiring Operating pattern
6-2
l Frequency Setting via potentiometer & operating via terminals
1
Apply AC input power to the inverter.
2
When 0.00 appears Press the Up (p) key four times.
3
Frq is displayed. Frequency setting mode is selectable.
Press the Ent (˜) key once.
4
Present setting method is set to 0 (frequency setting via keypad).
Press the Up (p) key three times.
5
After 3 (Frequency setting via potentiometer) is set, press the Ent (˜) key once.
6
Frq is redisplayed after 3 stops blinking.
Turn the potentiometer to set to 10.00 Hz in either Max or Min direction.
7
Turn on the switch between P1 (FX) and CM (See Wiring below).
RUN lamp begins to blink with FWD lamp lit and the accelerating frequency is
displayed on the LED.
When run frequency 10Hz is reached, the value is displayed as shown left.
Turn off the switch between P1 (FX) and CM terminals.
8
RUN lamp begins to blink and decelerating frequency is displayed on the LED.
When run frequency is reached to 0Hz, Run and FWD lamp turn off and 10.00
is displayed.
3P AC
input
R
S
G
P1(FX)
CM
U
V
W
Motor
T
VR
V1
CM
Freq.
P1(FX)-CM
ON
OFF
10 Hz
Wiring Operating pattern
6-3
l Frequency setting via potentiometer & operating via the Run key
1 Apply AC input power to the inverter.
2
When 0.00 is displayed, press the Up (p) key three times.
3
“drv” is displayed. Operating method is selectable.
Press the Ent (˜) key.
4
Check the present operating method (“1”: Run via control terminal).
Press the Ent (˜) key and then Down (q) key once.
5
After setting “0”, press the Ent (˜) key. When 0 is blinking, press the Ent
again.
6
“drv” is displayed after “0” is blinking. Operation method is set via the Run key
on the keypad. Press the Up (p) key once.
7
Different frequency setting method is selectable.
Press the Ent (˜) key.
8
Check the present frequency setting method (“0” is run via keypad).
Press the Up (p) key three times.
9
After checking “3” (frequency setting via potentiometer), press the Ent (˜) key.
10
“Frq” is displayed after “3” is blinking. Frequency setting is set via the
potentiometer on the keypad.
Turn the potentiometer to set to 10.0 Hz in either Max or Min direction.
11
Press the Run key on the keypad.
RUN lamp begins to blink with FWD lamp lit and accelerating frequency is
displayed on the LED.
When run frequency 10Hz is reached, 10.00 is displayed as shown left.
Press the STOP/RST key.
12
RUN lamp begins to blink and decelerating frequency is displayed on the
LED.
When run frequency is reached to 0Hz, Run and FWD lamp turn off and 10.00
is displayed.
R
S
G
U
V
W
T
Keypad
Motor
VR
V1
CM
Freq.
Run key
10 Hz
STOP/RST key
Wiring Operating pattern
6-4
Notes:
7-1
CHAPTER 7 - FUNCTION LIST
l Drive Group
LED
display
Parameter
name
Min/Max
range
Description
Factory
defaults
Adj.
during
run
Page
0.00
[Frequency
command]
0 ~ 400
[Hz]
This parameter sets the frequency
that the inverter is commanded to
output.
During Stop: Frequency Command
During Run: Output Frequency
During Multi-step operation:
Multi-step frequency 0.
It cannot be set greater than F21-
[Max frequency].
0.00 O 9-1
ACC [Accel time] 5.0 O 9-12
dEC [Decel time]
0 ~ 6000
[Sec]
During Multi-Accel/Decel operation,
this parameter serves as
Accel/Decel time 0.
10.0 O 9-12
0
Run/Stop via Run/Stop key on
the keypad
9-8
1
FX: Motor forward
run
RX: Motor reverse
run
2
Terminal
operation
FX: Run/Stop
enable
RX: Reverse
rotation select
9-8
drv [Drive
mode]
0 ~ 3
3
RS485 communication
1 X
9-9
0 Keypad setting 1 9-1
1
Digital
Keypad setting 2 9-1
2 V1 1: -10 ~ +10 [V]
9-2
3 V1 2: 0 ~ +10 [V] 9-4
4
Terminal I: 0 ~ 20
[mA]
9-4
5
Terminal V1 setting
1 + Terminal I
9-5
6
Terminal V1 setting
2+ Terminal I
9-6
Frq [Frequency
setting
method]
0 ~ 7
7
Analog
RS485
0 X
9-6
St1 [Multi-Step
frequency 1]
Sets Multi-Step frequency 1 during
Multi-step operation.
10.00 O 9-7
St2 [Multi-Step
frequency 2]
Sets Multi-Step frequency 2 during
Multi-step operation.
20.00 O 9-7
St3 [Multi-Step
frequency 3]
0 ~ 400
[Hz]
Sets Multi-Step frequency 3 during
Multi-step operation.
30.00 O 9-7
CUr [Output
current]
Displays the output current to the
motor.
- - 11-1
7-2
l Drive Group
LED
display
Parameter
name
Min/Max
range
Description
Factory
defaults
Adj.
during
run
Page
rPM [Motor
RPM]
Displays the number of Motor RPM.
- - 11-1
dCL [Inverter DC
link voltage]
Displays DC link voltage inside the
inverter.
- - 11-1
This parameter displays the item
selected at H73- [Monitoring item
select].
vOL Output voltage
POr Output power
vOL [User
display
select]
tOr Torque
vOL - 11-2
nOn [Fault
Display]
Displays the types of faults,
frequency and operating status at
the time of the fault
- - 11-4
Sets the direction of motor rotation
when drv - [Drive mode] is set to
either 0 or 1.
F Forward
drC [Direction of
motor
rotation
select]
F, r
r Reverse
F O 9-8
0
Run/Stop via Run/Stop key on
the keypad
1
FX: Motor forward
run
RX: Motor reverse
run
drv2
1
[Drive mode
2]
0 ~ 2
2
Terminal
operation
FX: Run/Stop
enable
RX: Reverse
rotation select
1 X 10-19
0 Keypad setting 1
1
Digital
Keypad setting 2
2 V1 1: -10 ~ +10 [V]
3 V1 2: 0 ~ +10 [V]
4
Terminal I: 0 ~ 20
[mA]
5
Terminal V1 setting
1 + Terminal I
Frq2
[Frequency
setting
method 2]
0 ~ 6
6
Analog
Terminal V1 setting
2+ Terminal I
0 X 10-19
1
Only displayed when one of the Multi-function input terminals 1-8 [I17~I24] is set to “22”.
7-3
l Function group 1
LED
display
Parameter
name
Min/Max
range
Description
Factory
defaults
Adj.
during
run
Page
F 0 [Jump code] 0 ~ 60 Sets the parameter code number
to jump.
1 O 5-5
0 Fwd and rev run enable
1 Forward run disable
F 1
[Forward/
Reverse run
disable]
0 ~ 2
2 Reverse run disable
0 X 9-10
F 2 [Accel
pattern]
0
Linear
F 3 [Decel
pattern]
0 ~ 1
1
S-curve
0 X 9-15
0
Decelerate to stop
1 DC brake to stop
F 4 [Stop mode
select]
0 ~ 2
2 Free run to stop
0 X 9-20
F 8
1)
[DC Brake
start
frequency]
0.1 ~ 60
[Hz]
This parameter sets DC brake
start frequency.
It cannot be set below F23 - [Start
frequency].
5.00 X 10⁻¹
F 9
[DC Brake
wait time]
0 ~ 60
[sec]
When DC brake frequency is
reached, the inverter holds the
output for the setting time before
starting DC brake.
0.1 X 10⁻¹
F10
[DC Brake
voltage]
0 ~ 200
[%]
This parameter sets the amount
of DC voltage applied to a motor.
It is set in percent of H33 –
[Motor rated current].
50 X 10-1
F11
[DC Brake
time]
0 ~ 60
[sec]
This parameter sets the time
taken to apply DC current to a
motor while motor is at a stop.
1.0 X 10⁻¹
F12 [DC Brake
start voltage]
0 ~ 200
[%]
This parameter sets the amount
of DC voltage before a motor
starts to run.
It is set in percent of H33 –
[Motor rated current].
50 X 10-2
F13 [DC Brake
start time]
0 ~ 60
[sec]
DC voltage is applied to the
motor for DC Brake start time
before motor accelerates.
0 X 10-2
F14 [Time for
magnetizing
a motor]
0 ~ 60
[sec]
This parameter applies the
current to a motor for the set time
before motor accelerates during
Sensorless vector control.
1.0 X 10⁻¹¹
F20 [Jog
frequency]
0 ~ 400
[Hz]
This parameter sets the
frequency for Jog operation.
It cannot be set above F21 –
[Max frequency].
10.00 O 10-3
1)
: Only displayed when F 4 is set to 1 (DC brake to stop).
7-4
l Function group 1
LED
display
Parameter
name
Min/Max
range
Description
Factory
defaults
Adj.
during
run
Page
This parameter sets the highest
frequency the inverter can output.
It is frequency reference for
Accel/Decel (See H70)
F21
1)
[Max
frequency]
40 ~ 400
[Hz]
Caution: Any frequency cannot be
set above Max frequency except
Base frequency.
60.00 X 9-21
F22 [Base
frequency]
30 ~ 400
[Hz]
The inverter outputs its rated
voltage to the motor at this
frequency (see motor nameplate).
60.00 X 9-17
F23 [Start
frequency]
0 ~ 10
[Hz]
The inverter starts to output its
voltage at this frequency.
It is the frequency low limit.
0.50 X 9-21
F24 [Frequency
high/low limit
select]
0 ~ 1 This parameter sets high and low
limit of run frequency.
0 X
F25
2)
[Frequency
high limit]
0 ~ 400
[Hz]
This parameter sets high limit of
the run frequency.
It cannot be set above F21 –
[Max frequency].
60.00 X
9-21
F26
[Frequency
low limit]
0.1 ~ 400
[Hz]
This parameter sets low limit of
the run frequency.
It cannot be set above F25 -
[Frequency high limit] and below
F23 – [Start frequency].
0.50 X
0 Manual torque boost F27 [Torque
Boost select]
0 ~ 1
1 Auto torque boost
0 X 9-19
F28 [Torque boost
in forward
direction]
This parameter sets the amount
of torque boost applied to a motor
during forward run.
It is set in percent of Max output
voltage.
2 X 9-19
F29 [Torque boost
in reverse
direction]
0 ~ 15
[%]
This parameter sets the amount
of torque boost applied to a motor
during reverse run.
It is set as a percent of Max
output voltage
2 X 9-19
1)
: If H40 is set to 3 (Sensorless vector), Max. frequency is settable up to 300Hz.
2)
: Only displayed when F24 (Frequency high/low limit select) is set to 1.
7-5
l Function group 1
LED
display
Parameter
name
Min/Max
range
Description
Factory
defaults
Adj.
during
run
Page
0 {Linear} 9-17
1 {Square} 9-17
F30 [V/F pattern] 0 ~ 2
2 {User V/F}
0 X
9-18
F31
1)
[User V/F
frequency 1]
0 ~ 400
[Hz]
15.00 X
F32
[User V/F
voltage 1]
0 ~ 100
[%]
25 X
F33
[User V/F
frequency 2]
0 ~ 400
[Hz]
30.00 X
F34
[User V/F
voltage 2]
0 ~ 100
[%]
50 X
F35
[User V/F
frequency 3]
0 ~ 400
[Hz]
45.00 X
F36
[User V/F
voltage 3]
0 ~ 100
[%]
75 X
F37
[User V/F
frequency 4]
0 ~ 400
[Hz]
60.00 X
F38
[User V/F
voltage 4]
0 ~ 100
[%]
It cannot be set above F21 –
[Max frequency].
The value of voltage is set in
percent of H70 – [Motor rated
voltage].
The values of the lower-
numbered parameters cannot be
set above those of higher-
numbered.
100 X
9-18
F39 [Output
voltage
adjustment]
40 ~ 110
[%]
This parameter adjusts the
amount of output voltage.
The set value is the percentage of
input voltage.
100 X 9-18
F40 [Energy-
saving level]
0 ~ 30
[%]
This parameter decreases output
voltage according to load status.
0 0 10-12
F50 [Electronic
thermal
select]
0 ~ 1
This parameter is activated when
the motor is overheated (time-
inverse).
0 0 12-1
1)
: Set F30 to 2(User V/F) to display this parameter.
7-6
l Function group 1
LED
display
Parameter
name
Min/Max
range
Description
Factory
defaults
Adj.
during
run
Page
F51
1)
[Electronic
thermal level
for 1 minute]
This parameter sets max current
capable of flowing to the motor
continuously for 1 minute.
The set value is the percentage
of H33 – [Motor rated current].
It cannot be set below F52 –
[Electronic thermal level for
continuous].
150 0
F52
[Electronic
thermal level
for
continuous]
50 ~ 200
[%]
This parameter sets the amount
of current to keep the motor
running continuously.
It cannot be set higher than F51 –
[Electronic thermal level for 1
minute].
100 0
0 Standard motor having
cooling fan directly
connected to the shaft
F53
[Motor
cooling
method]
0 ~ 1
1 A motor using a separate
motor to power a cooling
fan.
0 0
12-1
F54 [Overload
warning level]
30 ~ 150
[%]
This parameter sets the amount
of current to issue an alarm signal
at a relay or multi-function output
terminal (see I54, I55).
The set value is the percentage
of H33- [Motor rated current].
150 0
F55 [Overload
warning time]
0 ~ 30
[Sec]
This parameter issues an alarm
signal when the current greater
than F54- [Overload warning
level] flows to the motor for F55-
[Overload warning time].
10 0
12-2
F56 [Overload trip
select]
0 ~ 1 This parameter turns off the
inverter output when motor is
overloaded.
1 0
F57 [Overload trip
level]
30 ~ 200
[%]
This parameter sets the amount
of overload current.
The value is the percentage of
H33- [Motor rated current].
180 0
F58 [Overload trip
time]
0 ~ 60
[Sec]
This parameter turns off the
inverter output when the F57-
[Overload trip level] of current
flows to the motor for F58-
[Overload trip time].
60 0
12-3
1)
: Set F50 to 1 to display this parameter.