Shoot Like a Pro! DIGITAL PHOTOGRAPHY TECHNIQUES ppt
Bạn đang xem bản rút gọn của tài liệu. Xem và tải ngay bản đầy đủ của tài liệu tại đây (8.17 MB, 256 trang )
Shoot Like a Pro!
DIGITAL PHOTOGRAPHY TECHNIQUES
DigPhoto / Shoot Like a Pro! Digital Photography/ King/ 2949-7/ Blind Folio i
P:\010Comp\VirClass\949-7\fm.vp
Thursday, June 26, 2003 2:02:18 PM
Color profile: Generic CMYK printer profile
Composite Default screen
About the Author
Photographer Julie Adair King is the author of several popular books about digital
photography and photo editing. Her most recent titles include Digital Photography For
Dummies, Photo Retouching and Restoration For Dummies, Easy Web Graphics, and
Adobe PhotoDeluxe For Dummies. A graduate of Purdue University, King established
her own company, Julie King Creative, in 1988, in Indianapolis, Indiana.
DigPhoto / Shoot Like a Pro! Digital Photography/ King/ 2949-7 / Blind Folio ii
P:\010Comp\VirClass\949-7\fm.vp
Thursday, June 26, 2003 2:02:18 PM
Color profile: Generic CMYK printer profile
Composite Default screen
Shoot Like a Pro!
DIGITAL PHOTOGRAPHY TECHNIQUES
Julie Adair King
McGraw-Hill/Osborne
New York Chicago San Francisco Lisbon London Madrid Mexico City
Milan New Delhi San Juan Seoul Singapore Sydney Toronto
DigPhoto / Shoot Like a Pro! Digital Photography/ King/ 2949-7 / Blind Folio iii
P:\010Comp\VirClass\949-7\fm.vp
Thursday, June 26, 2003 2:02:18 PM
Color profile: Generic CMYK printer profile
Composite Default screen
DigPhoto / Shoot Like a Pro! Digital Photography/ King/ 2949-7 / Blind Folio iv
McGraw-Hill/Osborne
2100 Powell Street, 10
th
Floor
Emeryville, California 94608
U.S.A.
To arrange bulk purchase discounts for sales promotions, premiums, or fund-raisers, please contact
McGraw-Hill/Osborne at the above address. For information on translations or book distributors
outside the U.S.A., please see the International Contact Information page immediately following the
index of this book.
Shoot Like a Pro! Digital Photography Techniques
Copyright © 2003 by The McGraw-Hill Companies. All rights reserved. Printed in the United States of
America. Except as permitted under the Copyright Act of 1976, no part of this publication may be reproduced
or distributed in any form or by any means, or stored in a database or retrieval system, without the prior
written permission of publisher, with the exception that the program listings may be entered, stored, and
executed in a computer system, but they may not be reproduced for publication.
Unless otherwise noted, photographs throughout the book appear courtesy of the Author, Julie Adair King.
Copyright © 2003.
1234567890 QPD QPD 019876543
ISBN 0-07-222949-7
Publisher
Brandon A. Nordin
Vice President &
Associate Publisher
Scott Rogers
Executive Acquisitions Editor
Jane K. Brownlow
Senior Project Editor
LeeAnn Pickrell
Acquisitions Coordinator
Tana Allen
Technical Editor
Alfred DeBat
Copy Editor
Lisa Theobald
Proofreader
Marian Selig
Indexer
Karin Arrigoni
Illustrators
Lyssa Wald, Kathleen Edwards,
Melinda Lytle, Will Voss
Series Designer
Jean Butterfield
Cover Design
Pattie Lee, Jeff Weeks
Cover Photograph
© Albert Normandin/Masterfile
This book was composed with Corel VENTURA™ Publisher.
Information has been obtained by McGraw-Hill/Osborne from sources believed to be reliable. However, because of the possibility of human
or mechanical error by our sources, McGraw-Hill/Osborne, or others, McGraw-Hill/Osborne does not guarantee the accuracy, adequacy, or
completeness of any information and is not responsible for any errors or omissions or the results obtained from the use of such information.
P:\010Comp\VirClass\949-7\fm.vp
Thursday, June 26, 2003 4:26:18 PM
Color profile: Generic CMYK printer profile
Composite Default screen
Contents at a Glance
I Gearing Up for Great Pictures
1 Getting the Right Gear . . . . . . . . . . . . . . . . . . 3
2 Exploring Creative Controls . . . . . . . . . . . . . . . 25
II Discovering the Secrets of the Pros
3 Taking Memorable Portraits . . . . . . . . . . . . . . . 47
4 Exploring Product Photography and Other
Still-Life Adventures . . . . . . . . . . . . . . . . . . . 71
5 Capturing Close-ups . . . . . . . . . . . . . . . . . . . 89
6 Getting the Tough Shot: Low-Light
and Action Photography . . . . . . . . . . . . . . . . . 105
7 Creating Panoramic Images . . . . . . . . . . . . . . . 123
8 Manipulating Color . . . . . . . . . . . . . . . . . . . . 139
III Printing and Sharing Your Photos
9 Becoming a Master Printer . . . . . . . . . . . . . . . . 161
10 Putting Pictures on the Screen . . . . . . . . . . . . . . 185
IV Appendixes
A Glossary . . . . . . . . . . . . . . . . . . . . . . . . . 207
B Online Resources for Digital Photographers . . . . . . . 219
Index . . . . . . . . . . . . . . . . . . . . . . . . . . . . 223
v
DigPhoto / Shoot Like a Pro! Digital Photography/ King/ 2949-7 / Blind Folio v
P:\010Comp\VirClass\949-7\fm.vp
Thursday, June 26, 2003 2:02:18 PM
Color profile: Generic CMYK printer profile
Composite Default screen
DigPhoto / Shoot Like a Pro! Digital Photography/ King/ 2949-7 / Blind Folio vi
P:\010Comp\VirClass\949-7\fm.vp
Thursday, June 26, 2003 2:02:19 PM
Color profile: Generic CMYK printer profile
Composite Default screen
This page intentionally left blank
vii
DigPhoto / Shoot Like a Pro! Digital Photography/ King/ 2949-7 / Blind Folio vii
Contents
Acknowledgments. . . . . . . . . . . . . . . . . . . . . . . . . . . . . . . . xiii
Introduction . . . . . . . . . . . . . . . . . . . . . . . . . . . . . . . . . . . . xv
I Gearing Up for Great Pictures
1
Getting the Right Gear . . . . . . . . . . . . . . . . . . . . . . . . . . . . . . . 3
How Much Camera Do You Need? . . . . . . . . . . . . . . . . . 4
Manual Exposure Controls . . . . . . . . . . . . . . . . . . . 4
Focal Length: With Digital, It’s Different . . . . . . . . . 5
Manual Focusing Mechanisms . . . . . . . . . . . . . . . . . 7
Control Accessibility . . . . . . . . . . . . . . . . . . . . . . . . 8
Traditional vs. Electronic Viewfinder . . . . . . . . . . . . 8
Filter and Converter Compatibility . . . . . . . . . . . . . . 9
Tripod Mount . . . . . . . . . . . . . . . . . . . . . . . . . . . . . 11
Lighting Solutions . . . . . . . . . . . . . . . . . . . . . . . . . . . . . . . 11
Built-in Flash . . . . . . . . . . . . . . . . . . . . . . . . . . . . . . 11
Reflectors . . . . . . . . . . . . . . . . . . . . . . . . . . . . . . . . . 12
Auxiliary Flash Units . . . . . . . . . . . . . . . . . . . . . . . . 13
”Hot” Lights . . . . . . . . . . . . . . . . . . . . . . . . . . . . . . 15
Setting Up the Digital Darkroom . . . . . . . . . . . . . . . . . . . 17
Computer Central: Is Your System Fit for Duty? . . . 18
Software . . . . . . . . . . . . . . . . . . . . . . . . . . . . . . . . . . 21
2 Exploring Creative Controls . . . . . . . . . . . . . . . . . . . . . . . . . . 25
Image Resolution . . . . . . . . . . . . . . . . . . . . . . . . . . . . . . . 26
Creative Impact . . . . . . . . . . . . . . . . . . . . . . . . . . . . 26
Recommended Setting . . . . . . . . . . . . . . . . . . . . . . . 28
Compression . . . . . . . . . . . . . . . . . . . . . . . . . . . . . . . . . . . 31
Creative Impact . . . . . . . . . . . . . . . . . . . . . . . . . . . . 31
Recommended Setting . . . . . . . . . . . . . . . . . . . . . . . 33
P:\010Comp\VirClass\949-7\fm.vp
Thursday, June 26, 2003 2:02:19 PM
Color profile: Generic CMYK printer profile
Composite Default screen
viii
Shoot Like a Pro!
DigPhoto / Shoot Like a Pro! Digital Photography/ King/ 2949-7 /
Image File Format . . . . . . . . . . . . . . . . . . . . . . . . . . . . . . . 33
Creative Impact . . . . . . . . . . . . . . . . . . . . . . . . . . . . 34
Recommended Setting . . . . . . . . . . . . . . . . . . . . . . . 34
Exposure Modes . . . . . . . . . . . . . . . . . . . . . . . . . . . . . . . . 35
Creative Impact . . . . . . . . . . . . . . . . . . . . . . . . . . . . 35
Recommended Setting . . . . . . . . . . . . . . . . . . . . . . . 36
ISO . . . . . . . . . . . . . . . . . . . . . . . . . . . . . . . . . . . . . . . . . . 38
Creative Impact . . . . . . . . . . . . . . . . . . . . . . . . . . . . 39
Recommended Setting . . . . . . . . . . . . . . . . . . . . . . . 39
Flash Modes . . . . . . . . . . . . . . . . . . . . . . . . . . . . . . . . . . . 39
Focus Modes . . . . . . . . . . . . . . . . . . . . . . . . . . . . . . . . . . . 40
Creative Impact . . . . . . . . . . . . . . . . . . . . . . . . . . . . 40
Recommendations . . . . . . . . . . . . . . . . . . . . . . . . . . 41
White Balance . . . . . . . . . . . . . . . . . . . . . . . . . . . . . . . . . . 41
Creative Impact . . . . . . . . . . . . . . . . . . . . . . . . . . . . 41
Recommended Setting . . . . . . . . . . . . . . . . . . . . . . . 41
Features to Ignore (or Turn Off) . . . . . . . . . . . . . . . . . . . . 42
Creative Scene Modes . . . . . . . . . . . . . . . . . . . . . . . . 42
Correction and Color Filters . . . . . . . . . . . . . . . . . . 42
Digital Zoom . . . . . . . . . . . . . . . . . . . . . . . . . . . . . . 43
II Discovering the Secrets of the Pros
3
Taking Memorable Portraits . . . . . . . . . . . . . . . . . . . . . . . . . . 47
Basics of Digital Portrait Photography . . . . . . . . . . . . . . . 48
Composing for Traditional Frame Sizes . . . . . . . . . . 48
Choosing Aperture and Shutter Speed . . . . . . . . . . . 49
Taking Advantage of Portrait Mode . . . . . . . . . . . . . 50
Finding a Flattering Camera Angle . . . . . . . . . . . . . . . . . . 51
Avoiding Focal Length and Distance Distortions . . . . . . . . 52
Casual Indoor Portraits . . . . . . . . . . . . . . . . . . . . . . . . . . . 54
Using Flash . . . . . . . . . . . . . . . . . . . . . . . . . . . . . . . . 55
Boosting Exposure Through EV Compensation . . . . 56
Adding Reflected Light . . . . . . . . . . . . . . . . . . . . . . . 57
Quick-Snap Portraits . . . . . . . . . . . . . . . . . . . . . . . . 59
Professional Head Shots . . . . . . . . . . . . . . . . . . . . . . . . . . 63
Outdoor Portraits . . . . . . . . . . . . . . . . . . . . . . . . . . . . . . . 68
P:\010Comp\VirClass\949-7\fm.vp
Thursday, June 26, 2003 2:02:19 PM
Color profile: Generic CMYK printer profile
Composite Default screen
Contents ix
DigPhoto / Shoot Like a Pro! Digital Photography/ King/ 2949-7 /
4 Exploring Product Photography and Other
Still-Life Adventures . . . . . . . . . . . . . . . . . . . . . . . . . . . . . . . . 71
Creating a Still-Life Staging Area . . . . . . . . . . . . . . . . . . . 72
Choosing a Backdrop . . . . . . . . . . . . . . . . . . . . . . . . . . . . 73
Avoiding Moiré Patterns . . . . . . . . . . . . . . . . . . . . . . . . . . 74
Taming Reflections . . . . . . . . . . . . . . . . . . . . . . . . . . . . . . 76
Using a Polarizer to Reduce Reflections . . . . . . . . . . . . . . 79
Photographing Glass . . . . . . . . . . . . . . . . . . . . . . . . . . . . . 82
Shooting Framed Art Under Glass . . . . . . . . . . . . . . 82
Photographing Art Glass . . . . . . . . . . . . . . . . . . . . . 83
Shooting Architectural Subjects . . . . . . . . . . . . . . . . . . . . . 84
5 Capturing Close-ups . . . . . . . . . . . . . . . . . . . . . . . . . . . . . . . 89
Zooming vs. Moving . . . . . . . . . . . . . . . . . . . . . . . . . . . . . 90
Snubbing Digital Zoom . . . . . . . . . . . . . . . . . . . . . . . . . . . 92
Tweaking Camera Settings for Close-up Work . . . . . . . . . 93
Choosing Resolution and Compression . . . . . . . . . . 93
Focusing at Close Distances . . . . . . . . . . . . . . . . . . . 93
Previewing Your Shots . . . . . . . . . . . . . . . . . . . . . . . 95
Sharpening Without Sandpaper . . . . . . . . . . . . . . . . 95
Lighting at Close Range . . . . . . . . . . . . . . . . . . . . . . . . . . 99
Exploring Macro Photography . . . . . . . . . . . . . . . . . . . . . 101
6 Getting the Tough Shot: Low-Light
and Action Photography . . . . . . . . . . . . . . . . . . . . . . . . . . . . 105
Helping Your Camera Cut Through Darkness . . . . . . . . . 106
Adjusting Light Sensitivity (ISO) . . . . . . . . . . . . . . . 106
Shooting Long Exposures . . . . . . . . . . . . . . . . . . . . . 112
Using Slow-Sync Flash . . . . . . . . . . . . . . . . . . . . . . . . . . . 115
Capturing Motion . . . . . . . . . . . . . . . . . . . . . . . . . . . . . . . 117
Using Blur to Emphasize Motion . . . . . . . . . . . . . . . 117
Freezing Action with a Fast Shutter . . . . . . . . . . . . . 119
Speeding Up Your Camera’s Response Time . . . . . . . 120
7 Creating Panoramic Images . . . . . . . . . . . . . . . . . . . . . . . . . . 123
Setting Up for Panoramic Photography . . . . . . . . . . . . . . . 124
Rotating Around the Nodal Point . . . . . . . . . . . . . . 125
Shooting the Pieces of Your Panorama . . . . . . . . . . . 129
P:\010Comp\VirClass\949-7\fm.vp
Thursday, June 26, 2003 2:02:19 PM
Color profile: Generic CMYK printer profile
Composite Default screen
x
Shoot Like a Pro!
DigPhoto / Shoot Like a Pro! Digital Photography/ King/ 2949-7 /
Stitching Your Panorama . . . . . . . . . . . . . . . . . . . . . . . . . 134
Stitching Software . . . . . . . . . . . . . . . . . . . . . . . . . . 134
Preparing Your Images (and Computer) . . . . . . . . . . 136
Stitching the Seams . . . . . . . . . . . . . . . . . . . . . . . . . . 137
Choosing a Panorama Format . . . . . . . . . . . . . . . . . 138
8 Manipulating Color . . . . . . . . . . . . . . . . . . . . . . . . . . . . . . . . 139
Tweaking Colors with White Balance . . . . . . . . . . . . . . . . 140
Warming Image Colors . . . . . . . . . . . . . . . . . . . . . . . . . . . 142
Making Gray Skies Blue: Using a Polarizing Filter . . . . . . 144
Strengthening Saturation . . . . . . . . . . . . . . . . . . . . . . . . . . 149
Converting from Color to Black-and-White . . . . . . . . . . . 151
Creating Color Effects . . . . . . . . . . . . . . . . . . . . . . . . . . . . 156
III Printing and Sharing Your Photos
9
Becoming a Master Printer . . . . . . . . . . . . . . . . . . . . . . . . . . 161
Buying Your Next Photo Printer . . . . . . . . . . . . . . . . . . . . 162
Picking a Printer Type: Inkjet, Dye-Sub, or Laser? . . 162
Sorting Through Printer Specs . . . . . . . . . . . . . . . . . 165
Inkjet Printing for the Long Haul: Archival Solutions . . . . 168
Preparing Your Picture for Printing . . . . . . . . . . . . . . . . . . 169
Balancing Output Resolution, Print Size,
and Photo Quality . . . . . . . . . . . . . . . . . . . . . . . . 170
Adjusting Output Resolution by Resampling . . . . . . 171
Choosing Printer Properties and Other Printing Tips . . . . 174
Solving Color-Matching Problems . . . . . . . . . . . . . . . . . . . 174
Understanding the Limits of Color Matching . . . . . . 175
Calibrating and Profiling Your Monitor . . . . . . . . . . 175
Fine-Tuning Printer and Monitor Colors . . . . . . . . . 178
Diving into Color Management . . . . . . . . . . . . . . . . 179
Printing Black-and-White Inkjet Photos . . . . . . . . . . . . . . 182
Working with a Lab . . . . . . . . . . . . . . . . . . . . . . . . . . . . . 183
10 Putting Pictures on the Screen . . . . . . . . . . . . . . . . . . . . . . . 185
Setting the Image Display Size . . . . . . . . . . . . . . . . . . . . . . 186
Screen Pictures and ppi . . . . . . . . . . . . . . . . . . . . . . . 186
How Screen Resolution Affects Display Size . . . . . . . 187
Establishing the Image Display Size . . . . . . . . . . . . . 189
P:\010Comp\VirClass\949-7\fm.vp
Thursday, June 26, 2003 2:02:19 PM
Color profile: Generic CMYK printer profile
Composite Default screen
Saving Your Image in a Screen File Format . . . . . . . . . . . . 193
Using JPEG Wisely . . . . . . . . . . . . . . . . . . . . . . . . . . 194
Creating a JPEG Copy of Your Photo . . . . . . . . . . . . 195
256-Color Grayscales: GIF or JPEG? . . . . . . . . . . . . 200
Exploring New Ways to Share Photos . . . . . . . . . . . . . . . . 201
Online Photo Albums . . . . . . . . . . . . . . . . . . . . . . . . 201
Web-Based Image Galleries . . . . . . . . . . . . . . . . . . . . 201
Multimedia Slide Shows . . . . . . . . . . . . . . . . . . . . . . 202
Camera to TV Displays . . . . . . . . . . . . . . . . . . . . . . 204
IV Appendixes
A
Glossary . . . . . . . . . . . . . . . . . . . . . . . . . . . . . . . . . . . . . . . . . 207
B Online Resources for Digital
Photographers . . . . . . . . . . . . . . . . . . . . . . . . . . . . . . . . . . . . 219
Additional Resources . . . . . . . . . . . . . . . . . . . . . . . . . . . . 221
Index . . . . . . . . . . . . . . . . . . . . . . . . . . . . . . . . . . . . . . . . . . . . 223
DigPhoto / Shoot Like a Pro! Digital Photography/ King/ 2949-7 /
Contents xi
P:\010Comp\VirClass\949-7\fm.vp
Thursday, June 26, 2003 2:02:19 PM
Color profile: Generic CMYK printer profile
Composite Default screen
DigPhoto / Shoot Like a Pro! Digital Photography/ King/ 2949-7 / Blind Folio vi
P:\010Comp\VirClass\949-7\fm.vp
Thursday, June 26, 2003 2:02:19 PM
Color profile: Generic CMYK printer profile
Composite Default screen
This page intentionally left blank
Acknowledgments
I am deeply indebted to many people who helped make this book a reality,
starting with Jane Brownlow, Tana Allen, LeeAnn Pickrell, Lisa Theobald,
Dodie Shoemaker, Jean Butterfield, Lyssa Wald, and everyone else at
McGraw-Hill/Osborne who lent their talents to the project. I also want to
express my thanks to my wonderful agent, Danielle Jatlow, for everything
she does on my behalf, and to Will Voss for bringing his design skills to the
color insert.
In addition, I was blessed to have photography guru Alfred DeBat on board
as technical editor. Al, your generosity in sharing your knowledge is truly
appreciated.
I’m also grateful to all the companies that provided information and product
loans for this book, especially the following:
ACDSystems Adobe Systems Bogen Photo/Manfrotto
Canon USA Cokin Epson America
Fuji Photo Film Hewlett-Packard Lowel
Minolta Monaco Systems nik multimedia
Nikon Olympus America Tiffen
Last, but absolutely not least, a huge thank you to the people who let me
photograph them for this book: Terry and Mary Beth Ingram; Barbara and
Dale King; Lana, Lisa, and Newton Kinney; Betsy Kranz; and Laura and
Brandon Wright. I love you all for being such good sports—not to mention
the immeasurable other ways you make my world a little brighter.
xiii
DigPhoto / Shoot Like a Pro! Digital Photography/ King/ 2949-7 / Blind Folio xiii
P:\010Comp\VirClass\949-7\fm.vp
Thursday, June 26, 2003 2:02:19 PM
Color profile: Generic CMYK printer profile
Composite Default screen
DigPhoto / Shoot Like a Pro! Digital Photography/ King/ 2949-7 / Blind Folio vi
P:\010Comp\VirClass\949-7\fm.vp
Thursday, June 26, 2003 2:02:19 PM
Color profile: Generic CMYK printer profile
Composite Default screen
This page intentionally left blank
Introduction
As someone who writes photography books, I often get calls from friends
and colleagues who are unhappy with their current cameras and want me to
recommend something that “takes better pictures.” Nine times out of ten,
further discussion reveals that a new camera isn’t the answer. All most people
need to turn out terrific photos is simply a little technical guidance and some
help with their photographic technique.
To get good results from a digital camera, you need to understand traditional
photography controls, such as exposure and focus options. That’s only half
the story, however. You also have to master digital-only features such as white
balance, resolution, and image file formats.
Professional photographers go to school for years to study these subjects and
refine their craft. Just because you have neither the time nor the inclination
to get a degree in photography doesn’t mean that you, too, can’t take
professional-looking pictures, however. With this book, you can get stellar
results from your digital camera without setting foot inside a classroom.
Shoot Like a Pro! Digital Photography Techniques condenses the most important
lessons of photography school into one, easy-to-digest package. You’ll not only
get the information you need to decipher the jargon associated with digital
photography, but also learn techniques that enable you to take full advantage
of all the creative controls your camera offers.
Each chapter shows you secrets that the pros use every day to get perfect
pictures, no matter how challenging the subject. Whatever you want to do
with your digital camera, from taking product shots for your business to
capturing a family celebration, this book will help you look like a pro.
xv
DigPhoto / Shoot Like a Pro! Digital Photography/ King/ 2949-7 / Blind Folio xv
P:\010Comp\VirClass\949-7\fm.vp
Thursday, June 26, 2003 2:02:20 PM
Color profile: Generic CMYK printer profile
Composite Default screen
Better Photography:
It’s Easier (and Cheaper) Than You Think
If you’re just beginning to explore photography or if you’re new to the digital side of
things—or both—you may be intimidated by all the new lingo that you encounter. Thumb
through the color insert in this book, for example, and you’ll probably see at least a few
terms that are completely foreign to you.
Unfortunately, both the photography and computer industries are infatuated with
technical jargon. Bring the two together, and you get twice the technospeak. As a result,
concepts that are actually quite simple seem incredibly complex. Rest assured that you
don’t need photography or computer experience to successfully use the techniques featured
in this book. I’ll give you all the background information you need to understand each
concept.
Nor do you need expensive, studio-level equipment. Some techniques that I discuss do
involve features that aren’t found on low-cost, entry-level digital cameras—things like
manual exposure control, for example. Don’t fret if your camera doesn’t offer all the
bells and whistles; I’ll show you ways to achieve similar results with even a basic, fully
automatic camera.
As for the techniques themselves, I’ve concentrated on tricks that make a big impact
without being complicated. In fact, most people are surprised to find out just how easily
they can improve their pictures by incorporating these techniques into their shooting
routine. I think you will be, too.
Pixels to Portraits to Panoramas:
All You Need to Know
This book emphasizes simple, practical ways to get pro-quality results with your digital
camera. Among other things, you’ll find out how to
•
Take better advantage of all the options on your digital camera—from resolution
to ISO to exposure metering mode.
•
Shoot flattering formal portraits and memorable family snapshots.
•
Take dynamic product shots for your company’s ads or web site.
•
Exploit your camera’s macro-focusing capabilities to capture the intricate details
of a subject.
•
Create seamless wide-format panoramas and 360-degree virtual reality images.
•
Manipulate colors using traditional and digital filters.
xvi
Shoot Like a Pro!
DigPhoto / Shoot Like a Pro! Digital Photography/ King/ 2949-7 /
P:\010Comp\VirClass\949-7\fm.vp
Thursday, June 26, 2003 2:02:20 PM
Color profile: Generic CMYK printer profile
Composite Default screen
•
Solve common photo problems, such as eliminating reflections in glass objects,
wiping out red-eye, and working in dim lighting.
•
Produce stunning, long-lasting prints of your favorite pictures.
•
Prepare image files for use on the web or in a multimedia presentation.
Along the way, I’ll introduce you to camera accessories that can enhance your
photography as well as computer hardware and software that make photo retouching
and file management a breeze. Most of these products are very affordable—you may
even be able to find a no-cost solution just by looking around your home or office.
A few products, such as tripod heads for shooting panoramas and special macro flash
units, are on the expensive side. But if you specialize in the type of projects that call for
these accessories, you’ll find that they’ll quickly pay for themselves by saving you time
and frustration.
Margin Icons, Featured Software,
and Other Details
To help you quickly locate the information that’s of most interest to you, this book uses
little graphics—known as icons in tech talk. Here’s your icon decoder ring:
•
Pro Tip This icon highlights a trick that professionals use to achieve a particular
creative goal more easily.
•
Cost-cutter Look to paragraphs marked with this icon for tips on ways to stretch
your photography budget.
•
Cool Tools This label points you toward camera features and accessories that I
find especially useful, fun, or both.
•
Troubleshooter Information marked with this icon has two purposes: to help
you avoid problems in the future and to help you get out of jams that you didn’t
see coming.
•
Technical Aside This icon flags background details that give you a better
understanding of a technical issue or term.
•
How To Sections that carry the How-To logo walk you step-by-step through
a digital-darkroom process, such as removing red-eye and setting the print
dimensions for a picture.
Speaking of the How-To sections, you’ll notice that they all feature one particular
software product, Adobe Photoshop Elements 2.0. I selected this software because it’s
DigPhoto / Shoot Like a Pro! Digital Photography/ King/ 2949-7 /
P:\010Comp\VirClass\949-7\fm.vp
Thursday, June 26, 2003 2:02:20 PM
Color profile: Generic CMYK printer profile
Composite Default screen
reasonably priced (under $100), offers all the tools most digital photographers need, and is
available for both Macintosh and Windows-based computers. Moreover, you can download
a trial copy from the Adobe web site (www.adobe.com) for free.
If you use Photoshop Elements 1.0 or Adobe Photoshop, you’ll find that most
instructions mesh with your software exactly. You can easily adapt the steps in the
How-To sections to other programs as well.
One final bit of instruction about the instructions: This book uses a vertical line
to indicate a chain of menu commands. For example, when you see the instruction
“Choose File | Print,” click File on the menu bar (at the top of the program window)
to open the File menu. Then click the Print command on that menu.
Experiment, Be Patient, and Enjoy!
As I mentioned earlier, you may feel a little overwhelmed when you first start exploring
this book. Instead of trying to absorb everything all at once, try incorporating one new
technique each time you use your camera. The best way to improve your photography
technique is bit by bit, just as you would learn any other skill. To make the learning
process more fun, practice with subjects you enjoy, whether that’s the great outdoors,
a family member or pet, or downtown streets.
Remember that with your digital camera, experimentation is free. If you don’t like
the outcome of a shot, just delete the image and try again. Before long, you won’t be
pressing that Delete button nearly so much. And for every picture that doesn’t turn
out, you’ll take ten that make you stop and say, “Wow, that’s a great picture!”
xviii
Shoot Like a Pro!
DigPhoto / Shoot Like a Pro! Digital Photography/ King/ 2949-7 /
P:\010Comp\VirClass\949-7\fm.vp
Thursday, June 26, 2003 2:02:20 PM
Color profile: Generic CMYK printer profile
Composite Default screen
PART
I
Gearing Up for
Great Pictures
DigPhoto / Shoot Like a Pro! Digital Photography/ King/ 2949-7 / Blind Folio 1
P:\010Comp\VirClass\949-7\ch01.vp
Tuesday, June 24, 2003 4:49:39 PM
Color profile: Generic CMYK printer profile
Composite Default screen
DigPhoto / Shoot Like a Pro! Digital Photography/ King/ 2949-7 / Blind Folio vi
P:\010Comp\VirClass\949-7\fm.vp
Thursday, June 26, 2003 2:02:19 PM
Color profile: Generic CMYK printer profile
Composite Default screen
This page intentionally left blank
1
Getting the Right Gear
You’ve probably heard the axiom, “It’s a poor car
-
penter who blames his tools.” The same can be
said for photographers. If a picture turns out
poorly, the fault rarely lies with the camera, con
-
trary to what those of us who pursue photography
for a living would like to have you believe. In skilled
hands, a cheap point-and-shoot camera can turn
out images that are every bit as captivating as
those that come from a studio camera costing
thousands of dollars.
That said, having equipment that’s geared to the
type of photography you want to do makes a big
difference in how easily you can capture a scene. If
you need to shoot employee portraits for your
company’s annual report, for example, a camera
that accepts an external flash will cut down on the
number of pictures that you have to redo (or re
-
touch) because of red-eye problems. And if you’re
passionate about wildlife photography, working
with a powerful zoom lens will enable you to get
close-up shots of skittish creatures without actually
having to
be
up close.
This chapter introduces you to some products
that can save you time, expand your creative op
-
tions, and generally help you get better results. In
case your budget is limited—and whose isn’t?—
I’ve bypassed ultra-expensive, high-end studio tools
and instead focused on products that enhance your
photography at affordable prices.
3
DigPhoto / Shoot Like a Pro! Digital Photography/ King/ 2949-7 / Blind Folio 3
P:\010Comp\VirClass\949-7\ch01.vp
Tuesday, June 24, 2003 4:49:39 PM
Color profile: Generic CMYK printer profile
Composite Default screen
DigPhoto / Shoot Like a Pro! Digital Photography/ King/ 2949-7 / Chapter 1
4
Shoot Like a Pro!
How Much Camera Do You Need?
My goal in writing this book is to show you how to get better results from any digital
camera, even an entry-level, fully automatic model. For every technique that features
an option found only on more advanced cameras, I try to present a workaround that
you can use if you own a simpler model.
There’s no denying, though, that cameras that offer advanced photographic options
enable you to fine-tune focus, exposure, and color with more precision than a basic-
features camera. The good news is that if you feel limited by your current equipment,
there’s never been a better time to upgrade.
For less than $500, you can get a camera with all the features a photographic control
freak could want, with the exception of the ability to use interchangeable lenses. For that,
you need a digital SLR (single-lens reflex) camera, just as you do for film photography,
and you’ll have to pay $1000 and up for the camera body, plus more for the lenses. If
you’re in the market for a digital SLR, enjoy! If not, rest assured that lower priced
point-and- shoot models offer the same advanced imaging features found on an SLR,
just without the lens flexibility.
Before you start shopping, you may want to review Chapter 2, which discusses critical
digital-camera options and the best settings to use for a variety of photographic projects.
Having that background will give you a better idea of which features you want your new
camera to have and which ones you can live without.
I also want to bring to your attention a few issues that don’t occur to most people
when they’re shopping but play a big role in their long-term satisfaction with a camera.
The next few sections discuss these important and often overlooked factors.
Although I’ve done my best to keep the technical jargon to a minimum, you may
encounter some unfamiliar terms as you read this chapter. The glossary at the back
of the book provides a quick decoder if you need help; upcoming chapters explain
the important stuff in more detail.
Manual Exposure Controls
When you take a picture, three camera components affect exposure:
•
Aperture The aperture is an iris in the lens that can be adjusted in size to control
how much light enters through the lens. Aperture size is represented by f-numbers
and written with the letter f followed by a slash and the f-number—for example,
P:\010Comp\VirClass\949-7\ch01.vp
Tuesday, June 24, 2003 4:49:40 PM
Color profile: Generic CMYK printer profile
Composite Default screen
f/2.8. The higher the f-number, the smaller the aperture size. The aperture settings
themselves are referred to as f-stops.
•
Shutter speed The shutter is like a window shade behind the camera lens. When
you take a picture, the shutter opens briefly to allow light to enter through the lens
and strike the camera’s image sensor. Shutter speed refers to how long the shutter
remains open. The slower the shutter speed, the more light the sensor soaks up.
•
ISO rating ISO ratings are used to indicate the light sensitivity of the image
sensor. The higher the ISO number, the greater the light sensitivity and the less
light is required to expose the image.
If you’re used to working with autoexposure cameras, you may not be aware that
being able to set aperture and shutter speed manually gives you creative control over
more than just how light or dark your picture appears. Aperture affects depth of field,
which is the range of distance in the picture that’s in sharp focus. Shutter speed
determines whether a moving subject appears frozen in time or blurred.
Advanced cameras offer you the option of working in either autoexposure (AE) mode,
in which the camera chooses the aperture size and shutter speed, or in manual mode, in
which you make these decisions. As an alternative, many cameras offer semiautomatic
modes called aperture-priority autoexposure and shutter-priority exposure. In these modes,
you set one control (aperture or shutter speed) and the camera selects the other.
Although you can sometimes persuade the autoexposure mechanism to select a
particular f-stop or shutter speed—upcoming chapters share the tricks you use to do
so—working with a camera that offers the option of manual exposure control makes
it easier for you to implement your creative decisions. At the least, your next camera
should offer one of the semi-automatic modes.
Focal Length: With Digital, It’s Different
When you compose a picture, your creative choices are in part controlled by the focal
length of the camera’s lens. Focal length, which is measured in millimeters, is the distance
between the optical center of the lens and the element that records the image—in a film
camera, the negative; in a digital camera, the image sensor.
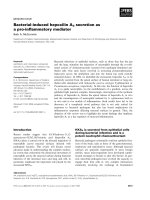
Focal length affects the angle of view and the size at which your subjects appear. At
a short focal length, you can capture a wide area, but objects appear smaller and farther
away. At a long focal length, the opposite is true—you can capture a narrow area, and
objects appear larger and closer. As an example, see Figure 1.1. I took both pictures
from the same position, but I doubled the focal length for the second image.
CHAPTER 1: Getting the Right Gear
5
DigPhoto / Shoot Like a Pro! Digital Photography/ King/ 2949-7 / Chapter 1
P:\010Comp\VirClass\949-7\ch01.vp
Tuesday, June 24, 2003 4:49:40 PM
Color profile: Generic CMYK printer profile
Composite Default screen
Experienced photographers
pay close attention to
focal length when camera
shopping because of the
impact of this feature.
Many people, though,
aren’t aware that you
can’t evaluate digital
camera focal lengths on
the same scale you use for
a traditional camera lens.
To explain this fully
requires a lengthy lesson
in camera optics, but here’s
the short story: The size
of the recording element
affects what the camera sees at a particular focal length, and image sensors are much
smaller than film negatives. To capture the same image as a film camera, a digital
camera needs a focal length about one-sixth as long.
Further complicating the matter, digital camera manufacturers use a variety of sensor
sizes, so there’s no reliable formula for translating traditional focal lengths to digital.
Instead, the digital industry has adopted the practice of stating camera focal lengths
as 35mm film equivalents.
Camera specs may read something like this: “Focal length: 7.5mm, equivalent to 50mm
with 35mm film.” In photographic magazines, the abbreviation efl (for equivalent focal
length) is sometimes used—50mm (efl), for example. Other resources, including this
book, use the abbreviation equiv. However it’s stated, this information tells you that
the digital camera lens produces the same image you would get with a 50mm lens if
you were shooting 35mm film—the most widely used negative size in film photography.
To sum up, if you’re accustomed to judging lenses based on focal length, just ignore
the digital focal lengths and look for the 35mm equivalency numbers. If you’re new to
the whole focal length thing, the following list offers a few guidelines:
•
A lens with a focal length equivalency of less than 35mm is considered a wide-angle
lens. Wide-angle lenses enable you to cram a large area into the frame at close
distance. They’re perfect for shooting groups of people in a living room, for
example, and for landscape photography.
DigPhoto / Shoot Like a Pro! Digital Photography/ King/ 2949-7 / Chapter 1
6
Shoot Like a Pro!
FIGURE 1.1 A short focal length captures a wide view of a scene (left); a long
focal length makes subjects appear larger and closer (right).
P:\010Comp\VirClass\949-7\ch01.vp
Tuesday, June 24, 2003 4:49:41 PM
Color profile: Generic CMYK printer profile
Composite Default screen