Work Smart: Using Windows Internet Explorer 10 pdf
Bạn đang xem bản rút gọn của tài liệu. Xem và tải ngay bản đầy đủ của tài liệu tại đây (670.12 KB, 8 trang )
More Work Smart Content:
This guide is for informational purposes only. MICROSOFT MAKES NO WARRANTIES, EXPRESS, IMPLIED, OR STATUTORY, AS TO THE INFORMATION IN THIS
DOCUMENT. © 2012 Microsoft Corporation. All rights reserved.
Page 1 of 8
Work Smart: Using Windows Internet Explorer 10
Get Started
About Windows Internet Explorer 10
Windows
®
8 includes Internet Explorer
®
10, which offers two browser
experiences:
Internet Explorer 10, the touch-optimized, modern-style experience
(default)
Internet Explorer 10 for the desktop, a web-browsing experience
similar to Internet Explorer 9
This guide provides detailed instructions for using the Internet Explorer 10
modern experience and also provides tips for working across both
experiences.
Topics in this guide include:
Internet Explorer 10 Modern Experience
Working with Both Experiences
Protecting Security and Privacy
Customization note: This document contains guidance and/or step-by-step
installation instructions that can be reused, customized, or deleted entirely if
they do not apply to your organization’s environment or installation
scenarios. The text marked in red indicates either customization guidance or
organization-specific variables. All of the red text in this document should
either be deleted or replaced prior to distribution.
Internet Explorer 10 Modern Experience
The Internet Explorer 10 modern experience works on both touch devices and
non-touch devices, and uses the full screen by default to display websites. In
Internet Explorer 10, websites participate in Windows 8 features, including the
Start screen, charms, and Snap.
Using the Navigation Bar
The navigation bar for Internet Explorer 10 looks different than earlier
versions of Internet Explorer. The navigation bar is located at the bottom of
the screen instead of the top, and includes the following controls:
More Work Smart Content:
This guide is for informational purposes only. MICROSOFT MAKES NO WARRANTIES, EXPRESS, IMPLIED, OR STATUTORY, AS TO THE INFORMATION IN THIS
DOCUMENT. © 2012 Microsoft Corporation. All rights reserved.
Page 2 of 8
Work Smart: Using Windows Internet Explorer 10
Get Started
Open a Website
1 In the Start screen, tap or click the Internet Explorer tile.
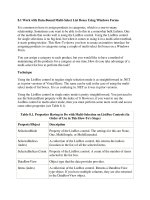
2 Tap or click the address bar at the bottom of the screen.
When you tap or click the address bar, Internet Explorer displays tiles
for Frequent and Pinned sites, as shown in the following illustration:
3 Enter the url in the address bar, and then tap or click the right arrow
button, or tap or click one of the frequent or pinned sites.
Tips
• To see thumbnails of recently visited websites, swipe up from the
bottom of the screen. With the mouse, right-click the browser window.
With the keyboard, press +Z.
• For websites that you visit often, you might want to pin the website to
the Start screen for fast access. For more information, see “Pinning a
Website to the Start Screen” later in this document.
Find Text on a Webpage
1 Tap or click the Page tools button, and then tap or click Find on
page (or press CTRL+F).
2 Enter the text you want to find into the Find field, and then press
ENTER. Found text is highlighted within the context of the page.
3 Tap or click the Previous and Next buttons to navigate through the
selections.
Pinning a Website to the Start Screen
If you often visit a particular website, you can pin it to the Start screen by
using a navigation tile. Navigation tiles are designed to help you find and
navigate to sites by using the site’s icon and color. With Internet Explorer 10,
sites can also provide background notifications to display new messages and
other account activity without opening the site. Pinning a website to the Start
screen is the equivalent of adding a website to Favorites in Internet Explorer
10 for the desktop and earlier versions of Internet Explorer.
More Work Smart Content:
This guide is for informational purposes only. MICROSOFT MAKES NO WARRANTIES, EXPRESS, IMPLIED, OR STATUTORY, AS TO THE INFORMATION IN THIS
DOCUMENT. © 2012 Microsoft Corporation. All rights reserved.
Page 3 of 8
Work Smart: Using Windows Internet Explorer 10
Get Started
To search for a pinned site from the Start screen, just start typing the name of
the pinned site. You don’t need to place your cursor in a Search field.
Windows launches the Search app as soon as you begin to type, and
automatically shows relevant results by number and kind as you type.
Pin a Site
You can pin any site to the Start screen to personalize your Internet Explorer
experience.
1 Open the site you want to pin.
2 In the navigation bar, tap or click the Pin to Start button.
The tile for the site is displayed.
3 Rename the tile if you want, and then click Pin to Start.
Tip
When you use Windows 8 roaming and connected accounts, your browsing
history and pinned sites roam with you so that you can access recent websites
across all of your PCs and devices. For more information about using
Windows 8 to connect your accounts, see the Connect a Microsoft Account
(Windows Live ID) to Your Domain Account Work Smart Guide at
http://itweb/v7/Work%20Smart/12IN_0017_WLID_Windows8.xps.
Using Tabs
Internet Explorer 10 supports tabs, but the way you access them is different
from the desktop version or from earlier versions of Internet Explorer.
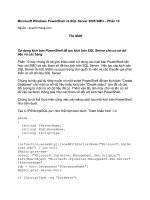
Open a New Tab
1 Swipe up from the bottom of the screen. With the mouse, right-click
the browser window. With the keyboard, press +Z.
Any recent tabs are displayed at the top of the screen.
2 Tap or click the New Tab button in the upper-right corner of the
screen (or press CTRL+T).
More Work Smart Content:
This guide is for informational purposes only. MICROSOFT MAKES NO WARRANTIES, EXPRESS, IMPLIED, OR STATUTORY, AS TO THE INFORMATION IN THIS
DOCUMENT. © 2012 Microsoft Corporation. All rights reserved.
Page 4 of 8
Work Smart: Using Windows Internet Explorer 10
Get Started
A list of Frequent and Pinned sites is displayed above a blank address
bar at the bottom of the window.
3 Type a new url in the address bar, and then tap or click the arrow
button, or tap or click a frequent or pinned site.
Internet Explorer adds the site as a tab at the top of the screen. To
see the new tab, swipe up from the bottom of the screen. With the
mouse, right-click the browser window. With the keyboard, press
+Z.
Switch Between Multiple Tabs
1 Swipe up from the bottom of the screen. With the mouse, right-click
the browser window. With the keyboard, press +Z.
Recent tabs are displayed at the top of the screen.
2 Tap or click the tab you want to view.
Close a Tab
1 Swipe up from the bottom of the screen. With the mouse, right-click
the browser window. With the keyboard, press +Z.
2 Tap or click the Close Tab button to close a tab.
Important
The Internet Explorer 10 modern experience supports a maximum of 10 open
tabs at one time. If you open an eleventh tab, Internet Explorer replaces the
oldest tab with the new tab.
Using Charms
Internet Explorer 10 is integrated as part of the modern-style experience of
Windows 8, which means you can use charms to provide a consistent way to
perform common actions, such as searching and sharing across applications.
Internet Explorer 10 supports the Search, Share, Devices, and Settings
charms.
Display the Charms
Use one of the following methods to display the charms:
• Touch. Swipe in from the right edge of the screen.
• Mouse. Point to the top-right or bottom-right corner of the screen.
• Keyboard. Press +C.
More Work Smart Content:
This guide is for informational purposes only. MICROSOFT MAKES NO WARRANTIES, EXPRESS, IMPLIED, OR STATUTORY, AS TO THE INFORMATION IN THIS
DOCUMENT. © 2012 Microsoft Corporation. All rights reserved.
Page 5 of 8
Work Smart: Using Windows Internet Explorer 10
Get Started
The following table describes each charm’s function in Internet Explorer 10.
Charm
Description
Search
Initiate a search using the default search engine,
which you can set to your preference. Search results
are filtered and displayed as you type.
Share
Access any application that supports sharing (like
Mail). This enables you to send a rich link preview with
image, description, and hyperlink.
Devices
Select a printer, projector, or other device.
Settings
Access the most frequently used Internet Explorer 10
configuration settings. For example, you can change
settings for browsing history and control whether sites
can ask for your location.
Using Snap
Snap in Windows 8 enables you to use your device for more than one action
or application at a time. In Internet Explorer 10, the default full-size window
automatically adapts to the more narrow “snap” size to align with the second
application. The Internet Explorer 10 window also automatically undocks from
its snapped location when necessary for user interaction. All of the core
browsing capabilities are available when a browser window is snapped.
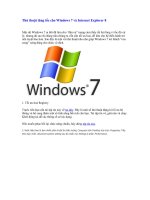
Snap a Window to the Right or Left
1 Move the mouse pointer to the top of the screen until it changes from
an arrow to a hand.
2 Drag the border of the window left or right until a second pane is
displayed.
3 Release the mouse. The browser window automatically snaps into the
second pane. You can use another application from the Start screen in
the larger pane.
Changing Internet Options
There are two ways to change Internet option settings in Internet Explorer 10.
Use the Settings Charm
Use the Settings charm to access configuration settings for the Internet
Explorer 10 modern-style experience.
1 Swipe in from the right edge of the screen, and then click the
Settings charm.
2 Tap or click Internet Options.
Switch to Internet Explorer 10 for the Desktop
1 Click the Page Tools button in the navigation bar, and then tap
or click View on the desktop. Internet Explorer for the desktop is
displayed.
2 In the upper-right corner of the Internet Explorer for the desktop
window, tap or click Tools , and then tap or click Internet
options.
More Work Smart Content:
This guide is for informational purposes only. MICROSOFT MAKES NO WARRANTIES, EXPRESS, IMPLIED, OR STATUTORY, AS TO THE INFORMATION IN THIS
DOCUMENT. © 2012 Microsoft Corporation. All rights reserved.
Page 6 of 8
Work Smart: Using Windows Internet Explorer 10
Get Started
Touch and Non-Touch Devices
In Internet Explorer 10, you can use the same touch gestures that you use
with Windows 8, including double-tapping the screen to zoom in/out and
swiping to move forward/back. If you’re using a device that doesn’t support
touch, you can use the keyboard shortcuts in the following table.
Keyboard Shortcut
Description
+ C
Reveal the charms
+ F
Start a search.
+ H
Display the Share charm
+ I
Display the Settings charm
+ K
Display the Devices charm
+ PLUS SIGN
Zoom in
+ MINUS SIGN
Zoom out
For more information about keyboard shortcuts you can use in Windows 8,
see the Windows 8 Shortcut Keys Work Smart Guide:
<< Insert Work Smart Guide file location or URL>>
Working with Both Experiences
The modern-style experience is the default Internet Explorer 10 experience in
Windows 8, so any time a browser is needed by the operating system, a
Windows Store app, or a desktop application, the modern experience is
invoked. There may be times when you want to work with Internet Explorer
for the desktop instead. For example, with the modern experience, you can
open a maximum of 10 tabs at one time. If you typically browse with more
than 10 tabs open, you may want to use Internet Explorer for the desktop
instead.
Switch to Internet Explorer 10 for the Desktop
3 Click the Page Tools button in the navigation bar.
4 Tap or click View on the desktop.
Internet Explorer for the desktop is displayed.
Important
<<Organization >> strongly recommends that you make Internet Explorer 10
your default browser. When you set Internet Explorer 10 as the default
browser, both modern and desktop experiences are available. If you set a
different browser as your device’s default browser, the modern experience will
be unavailable. Starting Internet Explorer, even from a tile, will launch Internet
Explorer for the desktop.
More Work Smart Content:
This guide is for informational purposes only. MICROSOFT MAKES NO WARRANTIES, EXPRESS, IMPLIED, OR STATUTORY, AS TO THE INFORMATION IN THIS
DOCUMENT. © 2012 Microsoft Corporation. All rights reserved.
Page 7 of 8
Work Smart: Using Windows Internet Explorer 10
Get Started
Make Internet Explorer 10 the Default Browser
1 In the Start screen, type Default.
2 On the left side of the screen, tap or click the Default Programs app.
3 The Default Programs Control Panel item is displayed.
4 Under Choose the programs that Windows uses by default, tap or
click Set your default programs.
5
6 Under Set your default programs, tap or click Internet Explorer.
7 Tap or click Set this program as default, and then tap or click OK.
This sets Internet Explorer 10 as the default browser on Windows 8 and
enables the modern-style experience.
Specify the Modern or Desktop Experience as Default
You can configure Internet Explorer 10 to always open in the modern
experience (default) or in Internet Explorer for the desktop.
1 In Internet Explorer 10, tap or click the Page Tools button in the
navigation bar, and then tap or click View on the desktop.
2 This opens Internet Explorer 10 for the desktop.
3 In the upper-right corner of the Internet Explorer for the desktop
window, tap or click Tools , and then tap or click Internet
options.
4 Tap or click the Programs tab.
5 Under Opening Internet Explorer:
• To make Internet Explorer 10 (modern experience) the default,
tap or click Always in Internet Explorer.
• To make Internet Explorer for the desktop the default, tap or click
Always in Internet Explorer on the desktop.
Note
If you want the Internet Explorer tile on the Start screen (and any
pinned apps) to open Internet Explorer for the desktop, select the
Open Internet Explorer tiles on the desktop check box.
6 Tap or click OK.
More Work Smart Content:
This guide is for informational purposes only. MICROSOFT MAKES NO WARRANTIES, EXPRESS, IMPLIED, OR STATUTORY, AS TO THE INFORMATION IN THIS
DOCUMENT. © 2012 Microsoft Corporation. All rights reserved.
Page 8 of 8
Work Smart: Using Windows Internet Explorer 10
Get Started
Important
If Internet Explorer 10 is not set as your default browser, the Choose how you
open links option is disabled; you cannot change the launch settings.
Protecting Security and Privacy
Internet Explorer 10 provides enhanced security and privacy features to keep
your browsing experience safe.
Tracking Protection
Internet Explorer 10 continues the Tracking Protection feature introduced in
Internet Explorer 9. Tracking Protection is an opt-in mechanism that you can
use to identify and block many forms of undesired tracking. You can use a
Tracking Protection List to exercise control over how third-party content sites
track your browsing information. By default, the Tracking Protection List is
empty, because automatically restricting content from external sites can cause
some functionality to stop working and may interfere with other web
mechanisms (cookies, web beacons, etc.) that may be essential to how sites
operate. You can control this aspect of your browser’s behavior and add
third-party tracking protection lists.
Enhanced Protected Mode
Internet Explorer 10 includes an enhanced version of Protected Mode.
Protected Mode blocks parts of your computer to limit access in case you are
the victim of a virus or cybercriminal attack.
Enhanced Protected Mode in Internet Explorer 10:
• Builds upon the new AppContainer technology in Windows 8
• Blocks both write and read for most of the system
• Protects your credentials
• Isolates cookies/cache
• Uses 64-bit processes
Enhanced Protected Mode is enabled by default for Internet/Restricted Zones
in the Internet Explorer 10 modern experience. It’s not enabled by default for
the desktop experience, but can be enabled manually or through Group
Policy.
Note
To print this Work Smart Guide, press CTRL+P.
For More Information
Beauty of the Web (Internet Explorer)
Exploring IE: A Blog for Internet Explorer Customers
TechNet for Internet Explorer
Windows 8