Motor Vehicle Bodywork And Paint Repair manual pot
Bạn đang xem bản rút gọn của tài liệu. Xem và tải ngay bản đầy đủ của tài liệu tại đây (480.12 KB, 21 trang )
Motor Vehicle Bodywork
And
Paint Repair manual
Printable version of material available at WWW.CARSPRAYS.CO.UK
All materials Copyright © KC@ Carsprays
Email:
Since operating conditions and individual abilities are beyond our control, please ensure you
have the ability to carry out the operations described, as no responsibility is taken or implied for
the finished result or any damage caused during the process.
Carsprays
co.uk
. . . . the online body and paint repair manual.
PDF created with FinePrint pdfFactory Pro trial version
This printable version of our U.K. website is intended as a guide for
both amateur and serious d.i.y car body repairers who need to carry
out bodywork and paint repairs on their own vehicles. There are no
quick fixes or magic tools, just the full details of everyday repair
processes carried out in bodyshops all over the country.
It is quite common to face an invoice for hundreds of pounds for a
relatively minor repair which the average d.i.y motorist could rectify at
home with the minimum of outlay.
The website covers a large variety of repairs which are possible without expensive workshop
equipment. All the basic bodywork and paint repair processes are covered, from minor touch–in
work, to damage and panel repairs plus full and part resprays. If particular repairs need either extra
equipment or specialised knowledge this is indicated where appropriate.
The on-line workshop manual is principally text, with illustrations where required for clarity– just click on [Pic] to
open pictures in a pop-up window
The website is intended as a general purpose guide for amateur and serious d.i.y car body repairers who have
access to fairly basic tools. The most expensive item which may be needed for larger repairs is a good
spraygun and an air compressor to run it, which will be uneconomic for a “one-off” repair, but perhaps feasible
for a keen DIY’er. Small repairs can be painted satisfactorily using aerosol paints, which are usually cellulose
paint which has been thinned a little more to work properly at the pressure provided by the canister.
The other alternative to consider is paying a suitably equipped bodyshop to apply the paint after the preparation
work has been completed. As most of the cost of a professional repair will be labour charges, quite a large
amount of money can be saved this way, because preparation can easily account for 75% of the time involved.
Remember, though, that faulty preparation will not be hidden by coats of paint!
Professional bodyshops use power tools which speed up the repair process, but most stages of a repair can still
be completed by good old fashioned hard work – it just takes longer! Many bodyshops and coachbuilders will
finish all flatting by hand to guarantee a perfect finish.
Finally, for individual advice on problems or particular aspects of processes covered in this guide, please feel
free to use the email service provided on the website. Your comments, good or otherwise, are also appreciated,
but nothing obscene please!
Introduction
Dont Forget! - Check back to WWW.CARSPRAYS.CO.UK on a regular basis for updates!!
PDF created with FinePrint pdfFactory Pro trial version
Contents
1/ First Steps
Things to check before you start
2/ Scratches and Stonechips
How to handle minor paint repairs
3/ Repair ing Dents
Get that metal back into shape
4/ Using Bodyfillers and Stopper
How to make an invisible repair
5/ Rust Repairs
When your cars past it’s sell-by date
6/ Bolt-on Panels
Replacing easy parts such as wings and doors
7/ Welded Panels
What to look for and where to weld
8/ Doorskins
A practical alternative to replacing the door
9/ Masking for Primer or Paint
Avoid those tell-tale edges
10/ Applying Primers and Surfacers
Choose the right materials for the job
11/ Final Preparation before Spraying
Once tha paint’s on it’s too late
12/ Finishing Coats – Solid Colours
Go for your (spray)guns
13/ Finishing Coats – Metallics
How to ensure a perfect match
14/ Compounding and Polishing
Removing paint defects without respraying
15/ Colour Matching
How to avoid bad colour matches
Notepad
co.uk
. . . . the online body and paint repair manual
Carsprays
PDF created with FinePrint pdfFactory Pro trial version
Scratches and stonechips, although insignificant in terms of physical damage, can greatly detract from the
overall looks and the value of almost any car. With a little time and attention to detail most damage of this type
can be repaired with the minimum of cost.
Check that the damage is confined to the paint/primer layer itself, i.e. there is not a shallow dent beneath the
paintwork damage!
Smooth out the scratched/chipped area with wet/dry abrasive paper 180 grit, finishing with 320 grit until a level
surface is achieved, with a visible "contour" at least 1cm wide showing on all separate primer and paint layers.
Use a sanding block at all times to prevent ripples being visible in the finished repair.
Dry the surface, especially bare metal, immediately with a clean cloth. Avoid touching areas to be primed or
painted with bare hands to minimise future problems caused by oil, grease etc . If no further damage is evident ,
move on to the primer stage.
Scratches and StoneChips 1 of 1
Check that you have the correct tools and materials to carry out your intended repair. Apart from the usual
spanners, screwdrivers and sockets, hexagon and `Torx' (star) drive fasteners are now in common use.
If possible wash the repair area with a good detergent or a washing soda solution to remove any traces of wax
or silicone polishes/trim dressings. Silicone products in particular will have serious effects at most stages of the
repair, some immediately obvious such as masking tape not sticking and silicone spotting in paintwork, others
long term such as poor adhesion of fillers, primer and paint.
Remove mouldings and other body fittings such as lamps, mirrors and bumpers if they are in danger of being
accidentally caught during sanding or painting. This makes sanding, etc. much easier and also removes the
risk of leaving paint edges on or around the item concerned. Some degree of discretion should be used in
deciding which parts to remove, i.e., if it will become a major dismantling task simply to remove a headlamp
which could reasonably be protected with a few layers of masking tape, then many hours of work can be saved
by masking and careful sanding.
Obviously all different makes and models of cars use varying methods and locations for fixing bolts or screws
for lights, bumpers etc., but with a little examination of the items concerned most mainstream models can be
dismantled without too much trouble, rusted and hidden fastenings notwithstanding.
Body side mouldings can be fastened by either press-on clips, nuts and screws from the inside of the panel,
double-sided adhesive tape, or occasionally a combination of these.
Glass and windscreen mouldings are best left in place unless the operator has experience in their removal.
Try not to get carried away and remove too many parts! and if in doubt about anything, either don’t do it or get
professional advice.
First Steps 1 of 1 co.uk
. . . . the online body and paint repair manual
Carsprays
PDF created with FinePrint pdfFactory Pro trial version
Dented panels add some extra stages to the repair process, basically;
(1) Restoring the metal to as near its original shape as possible,
(2) Levelling the repaired area with polyester bodyfiller,
(2) Providing a smooth surface to the filler to continue with primer.
If the dent is very small or shallow, it may well be easier to simply carry out the repair with only bodyfiller without
restoring the metal surface. Remember, bodyfiller applied in thick layers is not as flexible as the metalwork,
leading to cracks and other problems especially near panel edges or on unsupported areas. Avoid deep filling
on flexible panels.
Assess the extent of metal damage first to make sure it really is repairable, otherwise consider panel
replacement or professional help. Some panels may be difficult to access from behind or inside, or may be
completely closed sections. In some cases, particularly where bolt-on panels are concerned, replacing the
complete panel is sometimes easier and cheaper, or a replacement may be available second-hand.
Repairing Dents 1 of 1
Soft dents or ripples can be repaired easily, but if the damage has resulted in gouges or sharp creases
anywhere on the panel this will have caused the metalwork to stretch, subsequently involving a lot more work to
restore the panel to its original contours. The damaged area almost always extends well beyond the obvious
dents, with a slightly shallow `extension' to the damage.
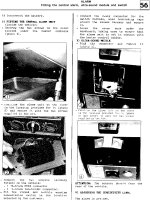
Depending on the access and clearance behind the damaged area, use a metal or wooden panel block under
the panel supporting the deepest parts of the damage. Using a light hammer tap around the edges of the
section being supported by the panel block, at the same time maintaining a steady upward pressure with the
block. (See diagram) Work from the outer edges of the damage towards the center so that the surface is gently
restored to just below its original contour.
Avoid hammering too heavily or hitting the metal supported directly by the block as this causes the metal to
stretch, ending up with a bulge where previously there was a dent.
The intention for this stage is not to bring the panel back to a perfectly smooth surface, but simply to restore the
metal surface to just below its original contours, with no high spots. This allows for a thin layer of bodyfiller which
is much easier to shape to the exact requirements.
co.uk
. . . . the online body and paint repair manual
Carsprays
PDF created with FinePrint pdfFactory Pro trial version
Before mixing any type of filler, the area to be filled, whether it be a small dimple or a previously straightened
metal panel, must be thoroughly dry and free from wax, grease or dust. Check that the correct type of bodyfiller
is being used for the metal surface, if it is galvanised or aluminium.
Remove existing paint and primer down to the metal surface over the whole area to be filled, using a powered
grinder or sander where possible, to produce a rough surface for the filler to adhere to. Original factory baked
finishes can be simply sanded with 80 -120 grit paper if the area to be filled is very small, but best adhesion is
gained by stripping to bare metal for repairs larger than 5cm.
When power tools are not available use a coarse grade (40 grit) production paper to achieve the same effect.
Close attention must be paid particularly to the outer edges of the repair area where the filler will need to be
feathered out. If the surface is not thoroughly roughened it will be impossible to blend the filler properly into the
surrounding panel without leaving an edge which will be very visible when the repair is painted. Finish the edges
of the coarse sanded area with 120 - 180 grit paper to help prevent deep scratches at the edges of the repair
which are easy to miss until the paint is applied.
If creases in the metal prevent the use of abrasives score the surface heavily with a file or screwdriver blade to
ensure the bodyfiller adheres firmly to the panel.
Mix the bodyfiller with the correct hardener according to the makers instructions, making sure it is well mixed
and totally streak-free, preferably within 2-3mins to allow working time on the panel before it begins to set. Apply
firmly to the repair, building up the surface until it is just a little proud of the surrounding panel to allow for
sanding. Use two or three thinner applications if needed, rather than one deep layer, which is harder to apply
smoothly and may sag before it sets. Sanding is not needed between coats of bodyfiller, but it is advisable to
smooth off any spikes or really rough areas to make further applications easier.>>>Continued
Using Bodyfillers and Stopper 1 of 1
When the filler is hard (usually 15 -20 mins) sand into shape using 40-60grit production paper. Power sanders
can speed up this part of the job but care must be taken not to remove too much of the filler, particularly if using
rotary sanding disks. Final shaping is best done with a flat sanding block with abrasive paper attached. Sand in
straight lines, changing direction regularly to avoid sanding low spots or grooves into the filler. For the same
reason never sand in a circular motion as this removes filler too quickly from the same spot. Once the filler
seems to be very near the required shape change to a finer grade paper, eventually finishing with 180 - 280 grit.
Unfortunately shaping bodyfiller is one part of the job that takes patience and a certain amount of practice to get
perfect.
Small pinholes and low spots are usually filled with `stopper', which is basically just a very fine filler. Polyester
Stoppers are used in exactly the same way as bodyfiller, but are meant for use on smaller areas. Cellulose
Stopper, or cellulose putty as it is sometime called, requires lengthy drying times between coats and is still
prone to later sinkage. Very thin coats are an absolute must, with at least 30 mins between, preferably longer.
Once the filler/stopper repair is satisfactory, final finishing before primer coats should be done using 240 grit
WetorDry to remove the last of the deep sanding scratches, flatting finally with 320 grit, A useful trick is to spray
a light coat of black or any dark colour (aerosols will do) onto the repair before moving on to the finer grades.
This way as wet sanding is carried out, deep scratches or any remaining low spots will stand out clearly as the
`guide coat' of dark paint is sanded off. It is much easier to put small defects right at this stage than to find
them in the final coat of paint.
Use a rubbing block at all stages, otherwise the surface will have faint ripples which will not show until painted.
co.uk
. . . . the online body and paint repair manual
Carsprays
PDF created with FinePrint pdfFactory Pro trial version
This section deals with "cosmetic" rust repairs, on panels that do not form part of the vehicles load-bearing
structure. Any repairs to chassis, frame or mounting points of any type must be carried out to a professional
standard, which is not the intended scope of this section.
Rust repairs generally cover two areas; surface rust and rust holes (perforation ) Surface rust can usually be
removed and held at bay successfully, perforated metalwork will need much more extensive work to provide a
lasting repair.
Where surface rust and pitting is evident, additional stages to the normal sanding/feathering process are
required. Use a wire brush attachment or "flap-wheel" type flexible abrasive to completely remove any trace of
corrosion from the pitted surface, paying careful attention to seams and out-of-sight folded edges, to prevent
rust creeping around door edges, etc. When perfectly clean, treat with a proprietary rust remover surface
treatment. Apart from the range available in motor accessory shops, paint suppliers also supply metal
conditioning/surface treatment fluids which are usually phosphoric acid based. Whichever type is used, follow
the manufacturers' instructions, rinse thoroughly and dry the metal immediately. Follow this with etch primer
before any further filling of minor surface defects is attempted. Note: etch primer should not be used as a base
for polyester bodyfillers. Use a primer-filler followed by a stopper intended for use on primers.
Rust Repairs 1 of 2
More serious rusting can lead to obvious holes in the metalwork, or as often happens in double skinned areas
such as rear wheelarches or door bottoms, rust or blisters which appear because the panel has rusted quietly
away from the inside. By the time the first signs show, the metal in that area is already beyond help. The only
long term repair will involve a panel\section replacement, or if the area is very small and the rest of the panel is
absolutely sound, body solder can be used effectively.
For a purely cosmetic temporary repair, the affected area can be sanded back to bare metal and the rusted area
tapped in with a pointed hammer. This will in all probability produce some spectacular holes, which must then
be filled with a glassfibre paste before final finishing with bodyfiller. Bodyfiller on its' own is porous and not
recommended. Sand to shape and finish as described n the “Using Bodyfiller” section Even using glassfibre as
a base, moisture can still attack the metal from the underside, so this can only be considered a temporary repair
which should give a few months reprieve. If possible coat the underside of the repair with a wax based antirust
coating, such as Waxoyl.
co.uk
. . . . the online body and paint repair manual
Carsprays
PDF created with FinePrint pdfFactory Pro trial version
Rust Repairs 2 of 2
It is sometimes viable to repair rusted sections by removing the rusted area and replacing it with a steel patch
welded or brazed into place. The same precautions regarding heat etc., apply as for using body solder, plus
extra care with heat build-up warping the rest of the panel. Use of a MIG welder is preferable, with oxy-
acetylene brazing or welding not really recommended.
Cut away the rusted section as carefully as possible to minimise further damage. A small cutting disk in an
angle grinder or power jigsaw can be used if care is taken to check no damage is being done to other panels,
etc. If possible form a flange on the cut edges of the panel, to create a lowered step to drop a repair section in
to. The repair section should be cut and shaped so that it fits as perfectly as possible into the recess created.
Clean up both sides of the original panel and the repair section before beginning to weld into place, especially if
using a MIG welding machine. Wherever possible weld the patch into place completely without any gaps, which
would allow moisture to gain access again. Weld a short section at a time, possibly an inch or two, allowing the
repair to cool before starting again. This will reduce warping to a minimum.
If a continuous seam weld is not possible or practical, body solder applied properly to the remaining joints will
produce a far longer lasting repair. Whichever method is chosen, it is good practice to seal and rustproof the
back of the repaired area.
Final finishing is as normal, using bodyfiller etc., to blend the patch into the existing bodywork.
Body solder differs from conventional solders in that it becomes semi-solid, i.e., spreadable, before it melts fully
into liquid. A small gas blowlamp is ideal for soldering small to moderate areas. It can only be applied properly to
absolutely clean bare metal, using a liquid or paste flux. Always observe sensible precautions; remove any
flammable materials or plastics from the surrounding area, and check the rear of the repair for wires, pipes or
other items which may be damaged or catch fire.
Grind the rusted area back to bare metal, finishing with a wire brush if necessary to remove all traces of paint
and rust. Tap the holed metal so that it is just below the normal panel surface.
The area must be “tinned” first by applying a flux/solder mix to the heated area then immediately wiping excess
solder away with a clean cloth to leave a smooth, solder coated surface. A build up of body solder can then be
melted into the repair, and with careful use of heat and a small wooden paddle, spread across the area to be
filled. Just enough heat must be applied to the panel to ensure the solder flows properly into the tinned area,
without allowing too much heat to build up and warp the panel. Practice makes perfect, and horizontal repairs
will be much easier than any on a vertical surface.
When cooled, clean away any surplus flux before grinding roughly to shape and finishing with filler as normal.
Avoid breathing grinding dust, as solder contains lead.
co.uk
. . . . the online body and paint repair manual
Carsprays
PDF created with FinePrint pdfFactory Pro trial version
Bolted body panels have become increasingly common over recent years, with many vehicles now using bolted
front wings, front panel assemblies, bonnet slam panels and bumper bar supports. Obviously accident damage
on such cars is much easier to repair, allowing simpler removal/refit of panels, and also easier preparation and
painting in some cases. Panels can be prepared, primed and painted "off-the-car" if a good colour match is
possible.
A close visual inspection usually shows exactly where a particular panel is bolted. Some preliminary dismantling
is usually required, as fastenings may be hidden behind wheel-arch liners , bumper bars or interior trim, or
possibly accessed through a hole or blanking plate. A little bit of investigation will almost certainly reveal all.
Headlamps, indicators or other pieces of trim or hardware can all conceal that one last bolt. Bolts or screws on
lower edges or the underside of panels may have been concealed with anti-chip coating sprayed on after
assembly.
Once all the bolts/screws are located and removed, a reasonable amount of pressure may be needed to
dislodge the panel due to seam sealants which are usually applied along panel joints. Occasionally, some part
of the panel may be firmly fixed with adhesive, e.g., Peugeot 205 front wings, requiring considerable force. If in
doubt check for missed fastenings.
Bolt-On Panels 1 of 1
Replacement panels can be prepared and primed off the car. If a good match is guaranteed, painting can be
carried out as well, but extra care is needed when fitting a painted panel. If painting is to be done with the panel
fitted, it is a good idea to paint all panel edges before fitting. Any holes that need to be drilled, for example
aerial holes or indicators, should be drilled before priming and painting begins. It is also easier to rustproof the
panel thoroughly before it is fitted to the car.
Refitting is simply a reversal of the dismantling sequence, reapplying seam sealers where needed. Leave all
bolts finger tight until panel/door/bonnet gaps have been checked and are correct. Recheck gaps again when
bolts are tightened
If replacing doors with bolt-on hinges, check that any shims which were present on removal are refitted in their
relevant positions. A bead of seam sealer may also be required around hinges to prevent water leaking into the
car interior through door pillars.
co.uk
. . . . the online body and paint repair manual
Carsprays
PDF created with FinePrint pdfFactory Pro trial version
The complete bodyshell of most cars is built up from a variety of sections which are resistance welded together.
This type of weld is more commonly known as a “spot weld” due to its’ appearance – a circular weld about 1/4”
wide. Each section of a modern car contributes to the strength of the whole shell, so it becomes vital that if any
of those sections are removed, a replacement must be welded securely back into position, using a similar
number of welds in the same places as the originals, to restore rigidity.
One noticeable trend of the last few years is the move towards larger and fewer panels. An example of this is a
normal family saloon body side. Previously the side view (minus doors etc. ) would be built up using sills, roof
rails, door pillars and rear quarter, plus other smaller sections where needed. Now a large proportion of vehicles
would have this full bodyside produced in one large pressing, so removing a lot of welded joints at one stroke.
The downside of this progress is that some panels are available only as large sections, or need to be joined with
precision mid-panel.
Obviously different makes and models will have design and detail differences, but the general principles are the
same for most cars. Our examples include a simple front wing change, followed by a more ambitious rear
quarter\rear wing replacement for those with more courage.
Welded Panels - General Info
Remove trim, bumpers etc as required. It can make the job easier in some cases if the bulk of the old panel is
cut off first with a sharp chisel, leaving the welded areas much more accessible. Make a quick note of where
and how it’s welded, so that the new panel can be welded in the same places. (Note: some wings may be
welded on to raised mounts, making weld position important!) Now each spot weld needs to be located and
cleanly removed. Purpose-made spotweld drills are available for this, which work on the basic principle of a
hole saw, cutting around the weld button to separate the two panels. Where access is limited, a sharp chisel
can be used to carefully cut the outer panel only, leaving the bulk of the spotweld still attached to the underlying
panel. It is much safer to leave excess metal on the supporting panels, as this can be cleaned away later– much
better than not leaving any metal to weld too!
Whichever method you choose, the most important part is not to cut away the supporting panel or flanges that
you will need to weld the new wing to. With the bulk of the old panel removed, any remaining bits of panel or
spot weld studs can be easily ground away with an angle grinder to leave a smooth, clean surface.
With all mounting edges clean, check for damaged\twisted areas caused during the removal operation. Once
you are satisfied with the results, try the new panel in place for fit. Genuine manufacturers’ panels and most
reputable aftermarket panels should be fairly easy to align, but there are still poorly fitting panels available, so
it’s buyer beware. Ensure the panel is capable of fitting properly before removing it again for the next stage.
Welded Panels – Front Wing
Clean all paint and primer from the areas to be welded. For those with a spot-welding attachment for their
welding equipment, skip the next step. If not, drill 1/4” holes in the panel mounting points to correspond with the
intended new spot welds.
Refit the new panel to the car, double-checking its’ alignment with door edges, bonnet , headlamp surrounds
and anywhere else it has to fit. Clamp it in place with vice-grips, small g-clamps or whatever fastening method
you are using. In awkward corners a small self-tapping screw might be easier, as you must allow for constant
checking of bonnet gaps etc., before the panel is finally welded into position.
If using a spot-weld attachment, follow the makers instructions for power and timer settings.
Using a standard MIG welder, set at a moderately low setting, start welding each “button weld” from the lower
metal surface, building up a puddle of molten metal which flows into the edges of the hole drilled in the new
panel. A little bit of practice with this method can produce consistent welds of good quality and appearance.
Don’t forget to weld under the front panel or down the inside of the door pillar seam if the original panel was
welded there. Appearance isn’t quite as important for these areas as long as a good strong joint is made.
When all joints have been welded, they can be tidied up if need be using an angle grinder with a stone disc, with
final finishing, etch priming etc., being carried out as normal. A little bit of preparation using stopper over the
visible spot welds under the bonnet will produce a smooth finish virtually indistinguishable from factory welds.
co.uk
. . . . the online body and paint repair manual
Carsprays
PDF created with FinePrint pdfFactory Pro trial version
Replacing body side or quarter panels involves quite a bit more work, as most of the interior/boot trim will need
to be removed, as well as rear windows and possibly rear screen. Check the glasswork section if needed. Fuel
tanks or other mechanical items may need to be removed, depending on the particular vehicle. Sills and pillars
must be checked for internal sound deadening, wiring or pipes.
Before removing any of the old panel, make sure you have the new panel at hand. This way you can see exactly
how much new panel you get, and also if any brackets, door catches, corner sections, rear lamp holders etc.,
are included or supplied as separate parts.
Even if the new panel is supplied as a complete section right up to the roof, it is almost always easier to
measure, cut and join it across the narrowest or least complex part of the centre and rear pillars. This avoids
having to cut into roof support rails and the roof itself, resulting in a major time saving. The same logic applies if
the panel includes door pillars or sill sections which are undamaged and do not need replacing.
Welded Panels – Rear Quarter 1 of 1
Once the decision is made on exactly how much of the panel is to be replaced, measure exactly where you want
to make a joint across the pillars, and mark it accordingly on the vehicle and also the new panel. The same
process of finding, noting and removing spotwelds applies as for front wings. Most will have been hidden by
window and door seals, probably with some more obvious welds around rear lamp clusters and boot panel
joints. Lower edges of wheelarches are usually spotwelded along the lipped flange, but some models may
simply be glued. Before attempting to cut the pillars or sills, it is worth cutting an "inspection" hole a little further
down, to check for reinforcement sections which may be directly behind. If so, more care must be taken, cutting
only the outer panel exactly on your marked line. A sharp hacksaw is probably best for a neat cut. Once the
panel is removed, clean up all edges to remove weld stubs, metal tags etc.
Moving to the new panel, check measurements again before cutting pillars etc. for jointing. At this point it is
probably safer to leave a "safety margin" of about 1cm (in the right direction!!) when cutting any mid-panel joints.
When the panel is offered up for a trial fit and clamped correctly in place, this overlap can be marked and
removed more precisely, or crimped with a flanging tool so that one panel slots under the other. Clean up all
surfaces to be welded, drilling spotweld holes in the new panel if required. Refit to the vehicle and adjust so that
all panel gaps are correct and window openings aligned.
Clamp in position and weld all points that are required. Butt joints across pillars or sills must be seam welded to
regain their original strength. Weld short stretches to avoid excess heat build-up and warping. (Tip - spot weld a
thin metal strip behind wide butt joins to help prevent burn-throughs )
After all welding is completed, remove excess metal from spot and seam welds prior to finishing as normal with
body solder or filler. Body solder is still commonly used on car production lines to fill and hide similar joins.
Welds across pillars or sills will probably need to be tapped down slightly after grinding, as the welding process
will almost certainly have created some warping, leaving high spots which will protrude when the filler is sanded
down.Take extra care around window openings, as tags or bumps may prevent windows from sealing properly,
or even cause them to shatter. Joints should be resealed where necessary with seam sealer to prevent water
leaks and wind noise.
On completion of all filling and sealing work, the vehicle is prepared for primer and painting as normal. Don’t
forget that some interior paintwork damage may have occured around welds, which will need rectification, even
if covered by trim, etc. Completed repairs should be treated with some form of rustproofing to panel interiors.
co.uk
. . . . the online body and paint repair manual
Carsprays
PDF created with FinePrint pdfFactory Pro trial version
A door skin, as the name suggests, is the outer panel, which is folded sharply at the edges of the frame and
then welded (or in some cases, glued) to the inner doorframe. This can be a very economic repair if the interior
of the doorshell is undamaged, or a new door is toexpensive or unobtainable. The following is a general guide
as makes\models differ slightly. and assumes the door is off the car. Inspect the hinges to see what is needed
for removal. A hinge-pin removal tool is required on some models with welded door hinges. Others may be
simple bolted hinges, Torx-drive hinge pins ( e.g. Peugeot ) or Torx-head locking screws (Escort Mk 5 - )
A genuine vehicle manufacturers doorskin will usually be for the full door from top to bottom, aftermarket parts
will normally be the lower section up to window level, and much cheaper. Lower door skin repair sections (rust
repair panels) are available for a lot of common models, but the extra work involved cutting, welding and filling,
is not usually worth the few pounds saved, especially long term.
Remove all the trim, locks etc and particularly glass to avoid spark damage. Use an angle grinder with a metal-
cutting disk to grind about 2-3mm from the edge of the doorskin . This cuts through the folded outer skin without
removing much metal from the door shell. If only the lower half (to window level) is being replaced mark
carefully where the joint will be, and cut across the outer skin with a hacksaw.
Door Skins 1 of 1
Close inspection of the ground-through edge will reveal the outer skin and doorframe layers as you cut. When
all the edge is removed peel back the outer skin. On later models there may be a side impact bar or a stiffening
strip fitted which may also be glued to the outer skin. There will probably be a few spot-welds to finish off with
the grinder, and some adhesive in places. Once the outer skin is gone, peel off the remaining inner strip and
clean up any rough patches with the grinder.
Use a hammer and panel block (or solid rubber block) to even out any damaged edges on the door shell before
dropping the new skin over it to check for fit. Once the new skin is aligned properly, the edges must be folded
over tightly using a hammer and block.
This takes a bit of practice to get absolutely right, so it might be worthwhile trying some spare metal offcuts first.
Support the outer skin and doorshell with the block held at an angle so that only the edge is supported, with
minimal contact on the outer surface of the skin, to avoid damage to the outer skin. Using a flat faced hammer
(preferably a panel hammer) bend the inner lip tightly against the doorshell, working slowly around the door.
Door skinning tools are available, ranging from simple "crimping pliar" types which can leave marks on the outer
surface, to more expensive ratchet/roller models, but for a one-off job a little bit of patience with a small amount
of surface damage is probably preferable.
When the skin is firmly crimped in place, a few spot welds in the original places will suffice to hold it securely, as
well as a seam weld if the window surround section has been hacksawed for a lower section replacement.
Grind flat any welds, using filler where required, and also check for ripples and damage on the outer skin edges
where the crimping has been carried out.
Sand or wire brush any loose factory primer from the door edges and apply a coat of etch primer on the inner
folded edges *before* a bead of seam sealer is applied to the inner door seam. Check that the drain holes in the
door bottom do not get blocked with sealer.
Etch and primer surface the full door. Colour coat the inside of the door, then when dry fit it to the car before
spraying the outer panel. ( If it's a solid colour and you are sure of a good match, paint the whole door before
fitting. Apply heavy tape to the edges for protection before refitting)
Don't forget a coat of Waxoyl or something similar to the insides before replacing the inner trim - most rust on
replaced panels starts on unprotected inside seams!.
After all that, one last thing to consider; check around locally for salvage breaker door prices - you might just
find a complete door with glass for the price of a doorskin, never mind the paint etc.!
co.uk
. . . . the online body and paint repair manual
Carsprays
PDF created with FinePrint pdfFactory Pro trial version
Faulty masking can be one of the most obvious signs of a paint repair, leaving tell-tale paint on mouldings and
trims, therefore time and attention paid to detail is well worth it.
Remove dust, etc. from the repair area prior to beginning masking, preferably by using compressed air to blow
dust and water away, particularly from beneath trims, mouldings and panel edges. Time spent at this stage will
remove the risk of dust or water being blown out onto the wet primer or paint surface. Use lint-free absorbent
cloth, finishing with a "tack cloth" immediately before applying primer/paint.
Ensure edges to be masked are clean and dry before applying masking tape, to avoid the tape peeling back
during the painting process. Tape all edges of window seals, mouldings and adjacent panel edges before using
paper to cover larger areas. Apply tape to the exact edge of the moulding or panel, with no overlap in either
direction. If in doubt, practice a little or get someone with better eyesight to do it! Note: some cheaper brands of
tape might not be as willing to stretch around corners and sharp mouldings!
Depending on which parts of the car are to be painted, mask inside door openings or bonnet/tailgate openings.
This prevents overspray from spoiling doorshuts, etc., and also help prevent dust from blowing out of these
areas.
Masking for Primer or Paint 1 of 1
Make sure that any tape edges do not extend on to the exterior panel surfaces, as a hard paint edge will then be
left when the masking is removed.
Special foam tape is available from motor factors especially for masking gaps between door openings, etc., but
it is quite expensive.
Mask the surrounding area by covering any exposed paintwork, mouldings, glass or bumpers within a minimum
of two feet if using aerosols. If using professional type sprayguns a much larger area will need to be protected.
Start the masking from an inch or so beyond the sanded area. If primer is applied to unsanded paintwork it will
be impossible to "feather-edge" the repair due to poor adhesion of the primer to the unprepared surface. When
joining additional sheets of paper to each other, use masking tape along the full length of the join, otherwise a
surprising amount of overspray can collect on the panel beneath the paper.
Likewise, a much tidier finished repair is obtained by masking wheel arch openings to protect inner arches,
plastic liners and mechanical parts from accidental overspray.
Finally, don’t forget to cover wheels and tyres if needed, either with normal masking methods or proprietary
wheel-masking covers.
co.uk
. . . . the online body and paint repair manual
Carsprays
PDF created with FinePrint pdfFactory Pro trial version
A choice must be made between the differing primer and paint systems available, i.e. basically between an air-
dry cellulose type of repair, or the more durable but chemically dangerous 2-pack products. Each will be dealt
with in turn, beginning with the first step – etch primer - which even some professional bodyshops choose to
miss. Note:bad preparation cannot be cured by more coats of primer.
Etching Primer
Most commercially available acid based etch primers are supplied as primer base plus an acid activator which
must be added before use. Some 1-component etch primers are available from motor factors and in aerosol
form, which are not quite as effective as acid activated primers. Even so, the use of one of these is better than
none at all. Whichever type is chosen, prepare the mixture per the makers instructions.
Depending on the type chosen, apply as follows;
Wash Primers, that is, with no filling properties at all, are usually applied as one single wet coat over all bare
metal areas.
Etch Primer-Fillers have moderate filling properties and are applied in two or three wet coats, leaving 10 - 20
mins between coats to allow solvent to evaporate.
If etch primer is used under a conventional primer filler, then one single wet coat is sufficient .
The etch coat must be dry (resistant to a light fingernail scratch) before continuing with either primer filler or
paint.
Please Note: Acid activated etch primer cannot be stored in metal containers once mixed. The acid component
will eventually eat through tins, etc. The usable life span of the mixed product is limited anyway, so mix only as
much as will be used at one time.
Applying Primers and Surfacers 1 of 1
Primer Fillers/Surfacers
This type of product has a higher solids content (usually talc or similar) which is used to provide filling
properties. `Filling' and `Surfacing' in terms of primer and other sprayable products means the ability to fill small
surface scratches and defects left by previous preparation, not dents, gouges and deep scratches. Once again,
we have the choice between air-dry and 2-pack.
Air dry primer fillers are available from factors and in aerosol form, and are primarily cellulose or acrylic
products. Their main advantages are fast initial drying times, the disadvantages being lower filling power,
reactions with underlying paint products and sinkage if not dried properly. If bought from a trade factor, most of
these products will need to be thinned, usually 50/50 with the appropriate thinners. Follow the particular
products guidelines.
Synthetic resin based primer fillers are still available, but are not now in common use, even though they did
have some good properties to outweigh their long drying times.
Application is normally two or three coats with adequate drying time between coats to allow solvent to
evaporate. Particularly heavy coats will need additional time to dry out, otherwise solvent will remain trapped
below the surface which dries rapidly. A greater number of thin coats - well dried between coats - is preferable
to fewer thick, heavy coats.
2-pack primer fillers have a much higher solids content, which together with their particular type of resin base
gives much better filling power plus less problems with sinkage than air dry products. Most are activated
immediately before use, as once mixed their usable life is limited, depending on temperature and speed of
activator used. Please note that nearly all rely on isocyanate activators which have their own health and safety
risks over and above normal spray-mist concerns. Follow the manufacturers directions for activator and thinner
quantities, as these can vary widely between brands, from 1:1 by volume up to 10:1 for some fillers.
Application is normally one to three coats, depending on the surface build required. As earlier, allow adequate
drying time between coats to prevent solvent build -up in the lower layers. Most two pack primer fillers are very
thick and heavy even when activated and thinned, therefore a suitable spraygun set-up, i.e. large nozzle
capacity, is needed to apply them at anything like a reasonable speed.
Some brands of two pack primers can, when activated and thinned appropriately, be applied as non-sand
surfacers. This means simply that providing the previous preparation work has been carried out with care, and
final flatting done with fine grade papers, the finishing coats of paint can be applied directly on to the primer
without any further flatting.
This method is normally only recommended for use in properly controlled spray booths to limit problems with
dust, etc.
co.uk
. . . . the online body and paint repair manual
Carsprays
PDF created with FinePrint pdfFactory Pro trial version
All primer and filler coats are presumed to be thoroughly hard dry before any sanding and final preparation is
carried out.
Final sanding before applying colour coats is generally carried out wet using the appropriate fine grades of
WetorDry abrasive paper. Small areas can be sanded dry but a finer finish and extended abrasive life is
achieved by wet sanding.
Preparation for solid colours can be with 500 grit or finer WetorDry papers, but metallics and basecoats will
need final flatting with no coarser than 800 grit, preferably finer. The use of coarser grades of WetorDry will
result in visible sand scratches which will show through the final finish, even if extra coats are applied.
Users of power tools, particularly D.A. sanders, can use 320 grit or finer for solid colours, but basecoat metallic
finishes are best finished with finer grades of WetorDry paper.
Large areas or vehicles which do not need to be 100% perfect can be sanded with orbital or d/a sanders using
dry abrasives, but the final finish is usually lower quality than if hand flatted.
Final Preparations 1 of 1
Primered areas should if possible be given a very light `guide coat' to ensure the surface is fully flatted, with any
dry spray sanded smooth. Sand all panels to be sprayed using a flat sanding block with plenty of clean water.
Take care not to leave gouges with the edge of the block, or by applying to much pressure while sanding. Light,
even strokes are all that is needed for efficient sanding, once again avoiding circular motions which tend to
show through the final coats. All areas that are to have paint applied must be sanded until the surface is matt
when dried, otherwise paint adhesion will be poor. Particular attention should be given to panel edges and areas
where trims or mouldings could not be removed, especially awkward places such as around door handles or
wiper spindles.
If the existing paint in these areas is in good condition and only needs to be sanded to `key' the new paint,
abrasive nylon pads, commonly 3M’s Scotchbrite, are available in suitable grades from motor factors. As they
are soft and flexible access to difficult corners is made much easier.
As each panel is sanded wash the residue away before it dries, as some paints and primers can leave a slurry
that sets almost as hard as the original material. Rinse and then dry all the repaired panels with absorbent cloth
without leaving water to dry naturally on the panels, to avoid problems with lime or contaminants in the water
causing problems at a later stage.
co.uk
. . . . the online body and paint repair manual
Carsprays
PDF created with FinePrint pdfFactory Pro trial version
Before masking up, or any paint is applied, this is your one last chance to check repaired surfaces, etc., for
anything that has been missed. Remember that paint will not hide or fill bad repairs, if anything it will make them
look worse!
The following steps presume the paint mixture is prepared as directed by the manufacture, with the correct
thinners and activators in the correct amounts. Final filtering of the mixture as it is put in the spraygun is
recommended using disposable paper filters
If you are new to spraying, regardless of whether the paint is to be applied with an aerosol or a spraygun,
practice on some other surface before putting paint on carefully prepared panels. Everybody will get runs, sags,
stripes and dry spots at first until they get the basic skills required. This applies to professional spray equipment
as well, which just gives you the ability to paint bigger areas badly!
If a full panel is to be painted, start at the top edge applying paint in evenly spaced strokes from one side of the
panel to the other without pausing. Start the flow of paint onto the panel just before the starting edge and stop
the flow of paint just after the finishing edge. By doing this the spray applicator is already moving as the paint is
applied, so there is less chance of a sudden build-up of paint at the start of the panel. This is known as
"triggering" when using a professional type of gun. The next stroke is taken immediately in the opposite
direction, overlapping the first just sufficiently so that there is no "dry spray" gap left between the two. The
amount of overlap will depend on your spray equipment , the more powerful types covering larger areas with
each stroke whilst allowing smaller overlaps.
Finishing Coats – Solid Colours 1 of 1
Complete the full panel in this way from top to bottom. If painting a horizontal panel, e.g. a bonnet , start at one
side working in to the middle, then from the middle outwards to the opposite side, moving around the car as
needed. By not stopping or starting mid-panel, dry joins or unabsorbed overspray can be avoided. Occasionally
it may be easier to paint larger or awkward panels in sections. In this case the strategy would be to always spray
a section immediately adjacent to one which has just been sprayed, trying to avoid overlaps drying out too much
between coats as above.
Where more than one panel is being sprayed, decide which panel to spray first and follow into the next, and so
on, until all panels have been painted. If, suppose, one full side of a car is to be painted, start at the rear wing,
then doors, then finally front wing. A full respray would normally start at, say, the nearside pillars progressing to
the middle of the roof, continuing on the other side from the middle of the roof down to the offside pillars,
followed by your chosen direction around the bottom half of the car from the rear wing in a complete circuit. This
would be repeated for each subsequent coat, allowing time for solvent flash-off between coats.
In all the above, the intention is to prevent any direct spray from the gun falling onto panels which have dried too
much to absorb the overspray. With a little forethought dry patches can usually be avoided altogether, or kept in
places that are small and hence need minimal polishing. The correct grade of thinners and activators is
important. Fast thinners etc will be ideal for a single panel on a cold day, but will make a respray barely possible.
On the other hand, using a slow thinner or activator on a cold day may produce runs or sags easily. Balance the
speed of thinners and activators with the repair in hand, or take advice from your paint supplier.
co.uk
. . . . the online body and paint repair manual
Carsprays
PDF created with FinePrint pdfFactory Pro trial version
Overview
For metallic finishes, most of the section on spraying solid colours applies but with added technicalities to
consider. Some older production cars were painted in metallic colours applied in one process, called single-layer.
Most recent metallics are of the clear-over-base type, which involves a coloured metallic basecoat protected by a
finishing coat of clear lacquer. There are variations on this process explained later. Metallics can show a wide
variation in colour dependent on application techniques. Please see the Colour Matching section.
2/ Single Layer
Available as cellulose and acrylic air-dry, 2-pack and synthetic enamel. All must be thinned and/or activated as
directed by the paint manufacturer.
3/ Basecoat 4/ Lacquer
Most metallic colours and quite a lot of normal solid colours are now applied in a two layer system, where the
basecoat is applied first followed by a clear lacquer.
The basecoat must be thinned as directed by the supplier. Due to the multitude of products available it is almost
impossible to give general guidance on thinning ratios - ask the supplier for a data sheet.
5/ Pearl Effects
Now becoming common on even budget range cars.
6/ Blending Colours
Metallics in particular are notoriously difficult to match in a "new panel edge to old panel edge" situation, therefore
it is usually easier to spend a little longer and blend into adjacent panels than try for a 100% colour match first
time. This method is also of use where the repair is a small area on a large panel with no break lines.
Finishing Coats – Metallics 1 of 3
Single Layer:
Apply two or three coats of prepared mixture until the repaired areas, etc., are blanked out. By their nature
single layer metallics are fairly transparent. The results will probably look stripey or blotchy due to flotation of the
aluminium particles – for a nice even finish proceed as follows:
Thin the remaining paint mixture a little further than previously, about an extra 5-10% thinners only. (Not
activator if using 2-pack) Once the previous coat has been left to flash off (but not dry), usually about 10mins
depending on thinners, apply two or three lighter coats with the gun held a few inches further away from the
panel, with very little flash-off time between. These coats should give an even metallic surface, whilst still being
able to soak in to the previous layers, giving a smooth surface.
Do not wet the surface with thinned paint, otherwise blotches will reappear or it could sag. The surface when dry
will be slightly matt, particularly if cellulose paint was used, but should be smooth enough to compound to a
good gloss. (Single layer metallics do not have the full deep gloss of a lacquered finish) Do not compound or cut
back heavily with single-layer metallics, as over-use of compound or abrasive polishes will bite in to the
aluminium flakes in the paint, leaving a "greyed" effect which can not be removed by further polishing.
If using cellulose paints, don’t be tempted to apply a finishing coat of clear cellulose or blending clear. These
cellulose products must not be used on their own, as they do not "weather" at all well, turning white as time goes
on. This limitation does not apply to acrylic or two-pack lacquers.
co.uk
. . . . the online body and paint repair manual
Carsprays
PDF created with FinePrint pdfFactory Pro trial version
Basecoat + Clear
Most basecoats use only thinners, but occasionally activator may be used, e.g. if applied over plastics. Check
with the supplier. Transparent colours may need a coloured undercoat, called a “groundcoat”. Again, your paint
supplier can tell you if one is needed for a particular colour. Groundcoats and solid-colour basecoats are
applied as normal coats as per ordinary solid colours, observing correct flash-off times.
With their greater covering power, basecoats will usually only need two or three coats. Apply in even coats until
the underlying repairs, etc., are blanked out, allowing the manufacturers recommended flash-off time between
coats. For the final coat before lacquering, attention must be given to the manufacturers instruction sheets, for
the following reasons;
Some basecoat metallic colours are applied as "wet" coats, and dry to give an even metallic finish without
further attention. Other types may require the application of one or two cross coats (lighter coats as used for
single layer metallics) to produce an even, cloud free finish prior to lacquering. Choosing the correct method for
the material in use is particularly important if colour matching adjacent panels is important. In all cases the
basecoat is allowed to flash-off, but not dry before lacquer is applied.
Special basecoat "tack-rags" are available for use between coats and before applying lacquer, to minimise dust
problems. Obviously the surface must be touch dry to use anything like this.
Remember, any stripes, dirt or other defects in the basecoat will be effectively `locked’ in once lacquer is
applied.
Finishing Coats – Metallics 2 of 3
Applying Lacquer
Air drying single pack and two-pack lacquers are used as the final coating for basecoats, not only to protect the
basecoat but also to provide the glossy surface required. The advantages are a much higher gloss than is
normally achieved with single layer metallics, better protection from weathering and pollution, and a harder
wearing surface. Providing dust has not been a major problem in the underlying basecoat, it also presents a
surface suitable for flatting and compounding to remove small surface defects and produce a mirror finish.
Single pack lacquers are (usually) supplied ready thinned, ready for use. Drying times are fast, like cellulose,
which makes them ideal for smaller repairs.
Applications is by three to five normal wet coats with adequate flash-off times between each coat. A balance
needs to be struck between enough applied lacquer (when dry) to allow for polishing and protection, and not too
many coats, which leads to cracking and crazing with these products.
Check the suppliers data sheets for recommended thicknesses.
Two-pack lacquers are much more resilient but have their own application problems due to a)slower drying
times and b) poisonous fumes. Even so, they are the preferred material for most repair shops.
When activated and thinned as directed, application is by two or three normal wet coats with recommended
flash-off times between each coat. Most types will be touch dry within half and hour, and hard dry overnight
(16hrs) at temperatures around 20c.
co.uk
. . . . the online body and paint repair manual
Carsprays
PDF created with FinePrint pdfFactory Pro trial version
Pearl Finishes
A lot of modern metallic colours now have a “pearl” effect, which shows a greater degree of colour change when
viewed from different angles(flip/flop) compared to normal metallics. This is achieved by replacing some, or
occasionally all, of the aluminium in the basecoat formula with mica flakes. The mica itself is virtually
transparent and acts as microscopic lenses producing a prism effect within the paint.
Normal metallic colours which contain “pearl” are mostly applied exactly as a standard metallic, the main
difference being that they are usually poor to cover or may need a coloured grouncoat to match properly. The
mica pigments also tend to be expensive, so be prepared to pay more for pearl colours.
Some vehicle colours are composed of three distinct layers, firstly a coloured basecoat is applied (not to be
confused with a groundcoat). This is followed by a pearl effect basecoat, which is then finished with lacquer.
This type of system is commonly found on white pearl effect cars, but is becoming more common with other
colours.
A further combination of these systems can even include a tinted (coloured ) lacquer used as the final coatings.
Obviously with these finishes colour variations can be produced by the application of more/less lacquer, as well
as the metallic/pearl layers beneath.
Finishing Coats – Metallics 3 of 3
Blending colours
After all repairs, priming and preparation has been done, consider what will be a reasonable area to "lose" your
repaired panel into. This will ideally be a slim rear pillar or narrow section of bodywork, or a moulding or break
line further along from the repair. If using basecoat and clear, it is usually easier and quicker to lacquer
complete panels either side of your repair to completely hide any slight colour difference, blending the lacquer
only if needed across pillars, etc. Thoroughly flat all areas to be lacquered with ultra-fine abrasive pads (usually
grey Scotchbrite), nothing any coarser. If lacquer is to be blended away up a rear pillar or suchlike, use a fine
grade compound to restore the gloss to the last few inches of the abraded area.
Apply colour coats to the repair area as normal until covered, preferably using a lower pressure than usual to
reduce overspray. To blend the colour into surrounding areas apply two or three extra coats, extending the
colour coats a few inches further out for each coat. Arcing the spraygun at the edges of each coat helps the
paint edge to fade away, rather than a sharper cut-off to the colour.
Finish the repair by applying lacquer as normal. If a section is to have lacquer blended as well, apply each coat
in advancing stages of a few inches across/up the area that is being blended, so that the final coat finishes just
short of the abraded edge without overlapping on to unsanded original paint. This ensures that when the lacquer
is hard, the edge of the repair can be compounded into the original paintwork without trace. If lacquer strays on
to unsanded paintwork it will always compound back to a visible edge.
co.uk
. . . . the online body and paint repair manual
Carsprays
PDF created with FinePrint pdfFactory Pro trial version
It would be a perfect world if every respray or panel repair turned out 100% dust free, without any blemishes,
sags or bits to spoil the finished product. Depending on the paint finish required, the final sprayed finish can be
enhanced in a number of ways. For the very lucky few, or those with the use of a professional spray booth with
filtered air input, all that may be required will be a quick once round with a fine hand-glaze polish to bring out
that deep, dazzling gloss. For the rest of us, here’s what comes next.
All these operations can be carried out by hand, but the use of an air or electric powered buffing machine will
save hours of hard work. Care must be taken to avoid prolonged rubbing in one spot, or along edges or pressed
creases in panels, as it is surprisingly easy to take all the paint off again with over-enthusiastic rubbing. This
applies even more so for users with a power polisher, who will also need to take care that the machine is moved
across the surface constantly, otherwise heat generated can melt, damage or change the colour of the paint.
Judicious use of a hand-spray containing water helps to keep polishing heads cool and damp.
Compound, as it is generally known by the trade, is an abrasive paste available in numerous grades, from very
coarse (flatting paste) through medium, to fine and ultra fine. All work by removing a very thin layer of paint,
obviously coarser grades work faster but leave visible scour marks, whereas fine grades remove very little but
leave the surface glossy. Depending on make, they can be water or solvent based, liquid or paste. For use on
new or recent paintwork, only medium grades upwards would be used. Coarse grades are more appropriate for
rapid paint or surface restoration in skilled hands.
Polish is more generally used to describe final surface treatments such as wax or silicone, but the term
becomes interchangeable, with `polishing' and `compounding' tending to mean the same thing to bodyshop
staff.
Compounding and Polishing 1 of 1
Cellulose and acrylic air-drying paints remain reasonably easy to compound and polish for a considerable time,
but 2-pack materials are best compounded initially within a day or two of being sprayed. If left too long, they
become very hard and, if flatted, make it extremely difficult to compound out flatting marks. This is even more
so if power tools are not available. If 2-packs need rectification by way of compounding, it is best to complete
the flatting and compounding stages as soon as possible after initial drying, even if fine compounding is left until
later.
Rectification of problems in the paint surface obviously depends on the depth of paint and the depth of the
problem. Some will compound out without problem, whereas others may be embedded deeper in the paint film
rather than simply stuck on the surface. Minor dust specks or slight dry spray can be rubbed out manually using
a medium grade rubbing compound. Most types are applied with a damp cloth, rubbing with normal hand
pressure in straight lines until the surface is smooth. Usually this leaves the surface dull, but the gloss will be
restored by using a finer grade of compound or polish to finish.
More serious defects, such as larger dust particles, paint sags or heavy `orange peel' effect can be rectified
using ultra-fine wetordry paper , used wet with plenty of soapy water. Use 1200 grade or finer if available,
especially on dark colours. Use a soft sponge rubbing block to avoid leaving finger tramlines in the surface, and
flat the affected paintwork until the surface is smooth, rinsing the abrasive paper often to avoid damage to the
fresh surface. Wiping the surface clean and letting it dry usually shows whether flatting has removed all the
defects. Remember, only remove the minimum of paint to level the surface, as restoring the gloss with
compound will remove a little more.
Again, use a medium grade rubbing compound to remove the flatting marks, either manually or by machine. If
working by hand, wherever possible rub in straight lines along the panel being processed. Using a circular
motion tends to leave swirls which are difficult to remove with finer grades. Use a clean, dry cloth to regularly
buff the area to assess progress. When the flatting marks seem to have given way to a gloss, finish with a fine
grade compound to remove any marks left by the previous compound. It is usually best to process one panel or
area at a time, otherwise it can become a daunting task, especially by hand.
It is possible to flat and polish the whole car in this way, and it does produce an absolutely mirror finish when
done correctly, but it is time consuming and runs the risk of `cut-through' in awkward places, requiring further
paintwork.
Only when all compounding stages, from medium to fine, have been completed is it worth considering waxes or
other surface treatments. Their use any earlier would be at best a waste of time, and at worst might contaminate
surfaces which may need further paintwork.
co.uk
. . . . the online body and paint repair manual
Carsprays
PDF created with FinePrint pdfFactory Pro trial version
Colour matching, or the lack of it, is the most obvious part of some repairs. Here we will try to deal with the
problems involved in choosing the correct colour, and to give you an insight into the things that can go wrong.
Car colours have expanded at a fantastic rate over the last ten years, plus metallics, pearls, etc. etc. adding
their own problems. Most cars have a paint code number, either on the VIN plate, a sticker under the bonnet or
boot, in a doorshut or even stencilled somewhere. Finding this will help identify the colour name. Some old
codes have now been reused, so the year of manufacture is needed as well. Once the colour has been
identified, a check with your paint supplier should reveal whether only one formulation exists for that code, or if
there are multiple shades, called variants. These alternative colours may be a tiny shade different, or in some
cases almost a totally different colour. It is not unusual to have ten or more `variants' for the same colour.
Variations in the original colour on the car can be due to different paint batches, the same colour being supplied
by different paint manufacturers, production differences and even the depth of paint on the final product. Any
problems caused initially by any of these factors are magnified by the volume of cars produced, individual
weathering characteristics and even whether the car is cleaned and polished regularly in it’s lifetime.
Car makers are supplied by many different paint companies, aftermarket refinish paints are produced by even
more. Some are well known names, e.g. I.C.I or Dupont, others have names that are generally unknown and
unpronounceable. All of these could supply a colour, say Ford Radiant Red, which would match an original
Ford panel, but mixed using their own specific pigments and different formulas. This method of producing the
same colour by different means can sometimes produce odd results, such as a red or orange panel that
appears to match perfectly in daylight, but looks like black against white under artificial or street lighting.
Colour Matching 1 of 1
The first stage of colour matching, after identifying the basic colour, is a trip to your paint supplier with either the
car or a piece of the original painted bodywork. They should have a full set of colour variant cards to help decide
on the correct shade. More upmarket outlets should also have a spectrometer available, which in some cases
can even be used to provide a paint formula from scratch. The required shade, once chosen, can then be mixed
by the supplier who hopefully is skilled in the art of accurate paintmixing. Paint formulas are graduated down to
0.1 of a gramme, and whilst good paint suppliers realise the need for absolute accuracy, some staff do not
always show the same enthusiasm.
Metallic colours present their own problems. As well as being available in the same never-ending range of
colours and variations, application techniques also play a major part in colour matching.
Depending on the type of refinish paint used, metallics have the ability to:
Match perfectly when viewed face on, but look different/darker/lighter when viewed at an angle; become darker
if applied heavily; become lighter if applied in light coats; vary the shade by varying air pressure, paint viscosity,
type of thinners, ambient temperature, type and setup of spraygun - in other words there are many more ways to
produce a bad match even with the correct paint.
Newer basecoats go some way to remedy these problems, but the variations possible make `blending' of
metallic repairs a very attractive proposition to avoid colour matching difficulties in the first place. Blending the
basecoat colour over a larger area than the actual repair will produce an invisible repair when done correctly.
co.uk
. . . . the online body and paint repair manual
Carsprays
PDF created with FinePrint pdfFactory Pro trial version