Effective Poster Design for Academic Conferences ppt
Bạn đang xem bản rút gọn của tài liệu. Xem và tải ngay bản đầy đủ của tài liệu tại đây (1.18 MB, 28 trang )
Effective Poster Design for
Academic Conferences
Mary Lee Eggart
Cartographic Section — 430 Howe-Russell-Kniffen
Department of Geography & Anthropology
Louisiana State University
578-6248
A Scientific Poster
• communicates your research at a
conference.
• is a visual presentation of information.
– It should not simply reproduce your written paper
at poster size.
• should be understandable to the viewer
without verbal explanation.
Know Your Audience
• Distracted academics walking through
a crowded, noisy room
• In 3 seconds, a viewer decides whether to
approach your poster or leave.
– Subject must be clearly understandable from at
least 10 feet away.
– Use a
statement,
photograph,
or diagram as
a focal point
to attract
attention.
Know Your Audience
Know Your Audience
• In the next 30 seconds, the viewer
decides if your content is worthy of
further exploration.
– Provide a clear flow of information from
introduction to conclusion.
– Focus on major findings—do not try to
include everything you know.
– Text should be concise enough to be read
in under 10 minutes.
Organize Your Information
• Title, Author(s) and affiliation(s)
• Abstract: include only if required by the conference
• Introduction: a brief but important overview to secure the viewer’s
attention
• Problem: concise statement of the problem
• Materials and Methods: brief description of the processes and
procedures
• Results: outcomes, findings, data
• Conclusion: summary, discussion of significance and relevance of
results, a few easily remembered key conclusions, possible future
research
• References
• Acknowledgments
• Contact Information
Design Your Poster
• Determine final overall size:
– Find out the maximum size allowed by the
conference.
– Find out the maximum size the printer can
produce (e.g. CADGIS lab can print 36” wide by
any length, LSU Graphic Services can print 48”
wide by any length).
– Find out the maximum size your software
can produce (e.g. PowerPoint maximum page
size is 56” x 56”).
Layout — Title Block
• Most prominent feature
• Located at the top of
the poster
• Centered or justified left
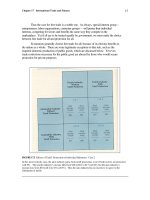
Layout — Body of Poster
• Landscape-oriented layout
– Often best to visually divide space into 2 or more columns
(do not have to be equal width) which are read left to right.
Layout — Body of Poster
• Landscape-oriented layout
– Often best to visually divide space into 2 or more columns
(do not have to be equal width) which are read left to right.
Photo by
Rowan
Barrett
Layout — Body of Poster
• Portrait-
oriented layout
– Read top to
bottom
Layout — Body of Poster
• Alignment:
– The eye looks for edges — align and size text blocks,
headings, figures, etc. consistently
Layout — Body of Poster
• Blank space:
– Leave enough room so that the viewer can stay focused on
individual sections
Photo by Lucy Lomas Photo by Carlton Atwater
Color
• Should
– highlight or emphasize
– separate and define
sections
– associate related
information
• Should not
– compete with the information
– overwhelm the viewer
Color Scheme
• The number of different colors should be limited, but
different tones of the same color can be used.
• If you have colorful
photographs, use them as an
inspiration for your color
scheme.
Background
• Keep the background in the back!
– Use cool and/or muted colors
– Avoid bright, warm colors
Photo by Nicole Barker
Background
• Keep the background in the back!
– Use cool and/or muted colors
– Avoid bright, warm colors
• Background may be
– A solid color
Background
• Keep the background in the back!
– Use cool and/or muted colors
– Avoid bright, warm colors
• Background may be
– A solid color
– A gradient
Background
• Keep the background in the back!
– Use cool and/or muted colors
– Avoid bright, warm colors
• Background may be
– A solid color
– A gradient
– A texture
Background
• Keep the background in the back!
– Use cool and/or muted colors
– Avoid bright, warm colors
• Background may be
– A solid color
– A gradient
– A texture
– A photograph
Figures
• No figures should be smaller than
5” x 7”.
• All figures should have captions.
• Photographs
– At least 300 dpi at final size
– Avoid web captures—they are usually of low
resolution
– Crop photos to highlight the important feature
– Put a thin outline around photos to help them
stand out from the background
– Consider removing background from photo
where possible.
Figures
• Graphs
– Don’t just accept the default
colors and layout of your
graphing program—match
your color scheme.
– Avoid 3-D graphs—they are
very hard to interpret.
Images
• Public Domain images
do not require attribution, but it is good practice to attribute anyway.
(Usually a work enters the public domain 70 years after the death of creator—but there are
exceptions. Some creators designate works to be in the public domain during their lifetime.)
• Creative Commons images
permit reproduction as long as proper attribution is given.
(Available through Flickr, free stock photos archives)
• Royalty/Subscription images
provide high quality images for a single image fee or membership—expensive!
(iStockphoto, Jupiter Images, Getty Images)
• Copyright Protected images
can be used under the fair use doctrine for educational purposes including as
part of a display or presentation at professional symposia. Proper attribution
should be given.
• Sites to obtain copyright-free images to use in your poster:
– Morgue File - probably the best single source of free photos.
– Wikimedia Commons - archive of free multimedia content submitted by Wikipedia users.
– Library of Congress Prints & Photographs online (not all are copyright-free)
– Education Image Gallery. Free images from the Getty collection.
– Google Images using the 'usage rights' filter.
– Flickr Creative Commons - an index of all Flickr images for which the owner has specified a Creative
Commons license (which usually means you can use it)
– FreeFoto.com. A collection of free photographs for private non-commercial use.
– Image*After - large, free photo collection, with images free for any use.
– The Creative Commons search allows you to search Google, Yahoo, Flickr and other sites for material that is
licensed under the Creative Commons - which usually means you can use it without charge in a non-
commercial context.
– For more sources of images, see CLT's multimedia resources listing.
• Information about copyright protection and public domain images:
–
–
Images