gt win proc 2 1506
Bạn đang xem bản rút gọn của tài liệu. Xem và tải ngay bản đầy đủ của tài liệu tại đây (236.05 KB, 7 trang )
Microsoft .Net Framework 2.0
Windows-Based
Client Development
Contents
1
Windows Forms and the User Interface . . . . . . . . . . . . . . . . . . . . . . . . . . . . 1
2
Configuring Controls and Creating the User Interface . . . . . . . . . . . . . . 49
3
Advanced Windows Forms Controls . . . . . . . . . . . . . . . . . . . . . . . . . . . . . . 93
4
Tool Strips, Menus, and Events. . . . . . . . . . . . . . . . . . . . . . . . . . . . . . . . . . 145
5
Configuring Connections and Connecting to Data . . . . . . . . . . . . . . . . 197
6
Working with Data in a Connected Environment . . . . . . . . . . . . . . . . . . 251
7
Create, Add, Delete, and Edit Data in a Disconnected Environment . . 329
8
Implementing Data-Bound Controls . . . . . . . . . . . . . . . . . . . . . . . . . . . . 409
11
Advanced Topics in Windows Forms. . . . . . . . . . . . . . . . . . . . . . . . . . . . . 521
12
Enhancing Usability . . . . . . . . . . . . . . . . . . . . . . . . . . . . . . . . . . . . . . . . . . . 555
15
Deployment . . . . . . . . . . . . . . . . . . . . . . . . . . . . . . . . . . . . . . . . . . . . . . . . . 663
Crystal report . . . . . . . . . . . . . . . . . . . . . . . . . . . . . . . . . . . . . . . . . . . . . . . . 687
3-tier architecture. . . . . . . . . . . . . . . . .. . . . . . . . . . . . . . . . . . . . . . . . . . . . 699
Chapter 1
Windows Forms and the User
Interface
This chapter introduces you to Windows Forms. Windows Forms are the basis for
most Microsoft Windows applications and can be configured to provide a variety of
user interface (UI) options. The developer can create forms of various sizes and
shapes and customize them to the user’s needs. Forms are hosts for controls, which
provide the main functionality of the user interface. Special controls called container
controls can be used to control the layout of the user interface.
Exam objectives in this chapter:
■
■
■
Add and configure a Windows Form.
❑
Add a Windows Form to a project at design time.
❑
Configure a Windows Form to control accessibility, appearance, behavior,
configuration, data, design, focus, layout, style, and other functionality.
Manage control layout on a Windows Form.
❑
Group and arrange controls by using the Panel control, GroupBox control,
TabControl control, FlowLayoutPanel control, and TableLayoutPanel control.
❑
Use the SplitContainer control to create dynamic container areas.
Add and configure a Windows Forms control.
❑
Use the integrated development environment (IDE) to add a control to a
Windows Form or other container control of a project at design time.
❑
Add controls to a Windows Form at run time.
Lessons in this chapter:
■
Lesson 1: Adding and Configuring Windows Forms. . . . . . . . . . . . . . . . . . . . . . 3
■
Lesson 2: Managing Control Layout with Container Controls. . . . . . . . . . . . . 24
1
Lesson 1: Adding and Configuring Windows Forms
3
Lesson 1: Adding and Configuring Windows Forms
This lesson describes how to create and configure Windows Forms. You will learn
how to create forms and refer to them in code, alter the visual properties of the form,
and control the behavior of the form at run time.
After this lesson, you will be able to:
■
Add a Windows Form to a project at design time.
■
Add a new Windows Form at run time.
■
Resize a window at design time or run time.
■
Identify and set the properties that determine a form’s appearance and behavior at
run time.
■
Refer to the default instance of a form in code.
■
Create a non-rectangular form.
Estimated lesson time: 45 minutes
Overview of Windows Forms
Windows Forms are the basic building block of the user interface. They provide a
container that hosts controls and menus and allow you to present an application in
a familiar and consistent fashion. Forms can receive user input in the form of key
strokes or mouse interactions and can display data to the user through hosted con
trols. Although it is possible to create applications that do not contain forms, such
as console applications or services, most applications that require sustained user
interaction will include at least one Windows Form, and complex applications fre
quently require several forms to allow the program to execute in a consistent and
logical fashion.
When you create a new Windows Forms project, a form named Form1 is added to
your project by default. You can edit your form by adding controls and other visual
elements in the designer, which is a graphic representation of a designable, visual ele
ment (such as a Form) that appears in the Visual Studio Integrated Development Envi
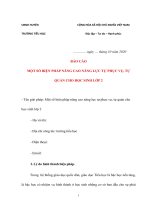
ronment (IDE). The Visual Studio IDE is shown in Figure 1-1.
4
Chapter 1
Figure 1-1
Windows Forms and the User Interface
A Windows Form in the Visual Studio IDE
Adding Forms to Your Project
Most projects will require more than one form. You can add and configure additional
forms at design time, or you can create instances of pre-designed forms in code at run
time.
�
To add a new form to your project at design time
1. From the Project menu, select Add Windows Form. The Add New Item dialog
box opens.
2. Select Windows Form and type a name for the new form in the Name box. Click
Add to add the form to the development environment.
You can add and configure as many forms as your application needs at design
time. You can also create new instances of forms in your code. This method is
most often employed when you want to display a form that has already been
designed. In Visual Basic, you can access default instances of a form by referring
to that form by name. For example, if you have a form named Form1 in your
application, you can refer to it directly by its name, Form1.
//standard dataset function that updates
//details of a customer based on ID
public void Update(BOCustomer cus)
{
OpenCnn();
String selectStr = "UPDATE " + thisTable +
" set " + cus_LName + " = '" + cus.LName + "'" +
", " + cus_FName + " = '" + cus.FName + "'" +
", " + cus_Address + " = '" + cus.Address + "'" +
", " + cus_Tel + " = '" + cus.Tel + "'" +
" where cus_ID = '" + cus.cusID + "'";
OleDbCommand cmd = new OleDbCommand(selectStr,cnn);
cmd.ExecuteNonQuery();
}
CloseCnn();
//standard dataset function that finds and
//return the detail of a customer in a dataset
public DataSet Find(String argStr)
{
DataSet ds=null;
try
{
OpenCnn();
String selectStr = "select * from " + thisTable +
" where cus_ID = '" + argStr + "'";
OleDbDataAdapter da =
new OleDbDataAdapter(selectStr,cnn);
ds = new DataSet();
da.Fill(ds,thisTable);
CloseCnn();
}
catch(Exception e)
{
String Str = e.Message;
}
}
return ds;
private void OpenCnn()
{
// initialise connection
String cnnStr = CnnStr;
cnn = new OleDbConnection(cnnStr);
// open connection
cnn.Open();
}
707
private void CloseCnn()
{
// 5- step five
cnn.Close();
}
// just a supporting function that builds
// and return the insert string for dataset.
private String BuildAddString(BOCustomer cus)
{
// these are the constants as
// set in the top of this module.
strTable="Insert into " + thisTable;
strFields=" (" + cus_ID +
"," + cus_LName +
"," + cus_FName +
"," + cus_Address +
"," + cus_Tel + ")";
//these are the attributes of the
//customer business object.
strValues= " Values ( '" + cus.cusID +
"' , '" + cus.LName +
"' , '" + cus.FName +
"' , '" + cus.Address +
"' , '" + cus.Tel + "' )";
insertStr = strTable + strFields + strValues;
return insertStr;
}
}
}
Possible enhancements
This code is very simple and shows the basic usage of 3-tier architecture. A lot of enhancements
including complete details of a client, error handling and many more are possible.
708