Cisco Network Security Little Black Book pot
Bạn đang xem bản rút gọn của tài liệu. Xem và tải ngay bản đầy đủ của tài liệu tại đây (2.72 MB, 292 trang )
Cisco Network Security Little Black Book
Table of Contents
Cisco Network Security Little Black Book 1
Introduction 4
Is this Book for You? 4
How to Use this Book 4
The Little Black Book Philosophy 6
Chapter 1: Securing the Infrastructure 7
In Brief 7
Enterprise Security Problems 7
Types of Threats 8
Enterprise Security Challenges 8
Enterprise Security Policy 9
Securing the Enterprise 10
Immediate Solutions 14
Configuring Console Security 14
Configuring Telnet Security 16
Configuring Enable Mode Security 17
Disabling Password Recovery 18
Configuring Privilege Levels for Users 20
Configuring Password Encryption 21
Configuring Banner Messages 22
Configuring SNMP Security 24
Configuring RIP Authentication 25
Configuring EIGRP Authentication 27
Configuring OSPF Authentication 31
Configuring Route Filters 35
Suppressing Route Advertisements 40
Chapter 2: AAA Security Technologies 43
In Brief 43
Access Control Security 43
AAA Protocols 48
Cisco Secure Access Control Server 53
Immediate Solutions 56
Configuring TACACS+ Globally 56
Configuring TACACS+ Individually 58
Configuring RADIUS Globally 61
Configuring RADIUS Individually 62
Configuring Authentication 64
Configuring Authorization 72
Configuring Accounting 75
Installing and Configuring Cisco Secure NT 78
Chapter 3: Perimeter Router Security 85
In Brief 85
Defining Networks 85
Cisco Express Forwarding 86
Unicast Reverse Path Forwarding 87
TCP Intercept 87
i
Table of Contents
Chapter 3: Perimeter Router Security
Network Address Translation 89
Committed Access Rate 90
Logging 92
Immediate Solutions 93
Configuring Cisco Express Forwarding 93
Configuring Unicast Reverse Path Forwarding 95
Configuring TCP Intercept 98
Configuring Network Address Translation (NAT) 103
Configuring Committed Access Rate (CAR) 116
Configuring Logging 119
Chapter 4: IOS Firewall Feature Set 123
In Brief 123
Context−Based Access Control 123
Port Application Mapping 127
IOS Firewall Intrusion Detection 129
Immediate Solutions 131
Configuring Context−Based Access Control 131
Configuring Port Application Mapping 143
Configuring IOS Firewall Intrusion Detection 149
Chapter 5: Cisco Encryption Technology 156
In Brief 156
Cryptography 156
Benefits of Encryption 160
Symmetric and Asymmetric Key Encryption 160
Digital Signature Standard 166
Cisco Encryption Technology Overview 167
Immediate Solutions 168
Configuring Cisco Encryption Technology 168
Chapter 6: Internet Protocol Security 189
In Brief 189
IPSec Packet Types 190
IPSec Modes of Operation 191
Key Management 193
Encryption 196
IPSec Implementations 197
Immediate Solutions 197
Configuring IPSec Using Pre−Shared Keys 198
Configuring IPSec Using Manual Keys 214
Configuring Tunnel EndPoint Discovery 224
Chapter 7: Additional Access List Features 231
In Brief 231
Wildcard Masks 233
Standard Access Lists 234
Extended Access Lists 234
Reflexive Access Lists 235
ii
Table of Contents
Chapter 7: Additional Access List Features
Dynamic Access Lists 236
Additional Access List Features 238
Immediate Solutions 239
Configuring Standard IP Access Lists 239
Configuring Extended IP Access Lists 242
Configuring Extended TCP Access Lists 247
Configuring Named Access Lists 250
Configuring Commented Access Lists 252
Configuring Dynamic Access Lists 254
Configuring Reflexive Access Lists 260
Configuring Time−Based Access Lists 263
Appendix A: IOS Firewall IDS Signature List 266
Appendix B: Securing Ethernet Switches 272
Configuring Management Access 272
Configuring Port Security 273
Configuring Permit Lists 275
Configuring AAA Support 276
List of Figures 281
List of Tables 283
List of Listings 284
iii
Cisco Network Security Little Black Book
Joe Harris
CORIOLIS
President and CEO
Roland Elgey
Publisher
Al Valvano
Associate Publisher
Katherine R. Hartlove
Acquisitions Editor
Katherine R. Hartlove
Development Editor
Jessica Choi
Product Marketing Manager
Jeff Johnson
Project Editor
Greg Balas
Technical Reviewer
Sheldon Barry
Production Coordinator
Peggy Cantrell
Cover Designer
Laura Wellander
Cisco ™ Network Security Little Black Book Title
Copyright © 2002 The Coriolis Group, LLC
All rights reserved.
This book may not be duplicated in any way without the express written consent of the publisher,
except in the form of brief excerpts or quotations for the purposes of review. The information
contained herein is for the personal use of the reader and may not be incorporated in any
commercial programs, other books, databases, or any kind of software without written consent of
the publisher. Making copies of this book or any portion for any purpose other than your own is a
violation of United States copyright laws.
Limits of Liability and Disclaimer of Warranty
The author and publisher of this book have used their best efforts in preparing the book and the
programs contained in it. These efforts include the development, research, and testing of the
1
theories and programs to determine their effectiveness. The author and publisher make no warranty
of any kind, expressed or implied, with regard to these programs or the documentation contained in
this book.
The author and publisher shall not be liable in the event of incidental or consequential damages in
connection with, or arising out of, the furnishing, performance, or use of the programs, associated
instructions, and/or claims of productivity gains.
Trademarks
Trademarked names appear throughout this book. Rather than list the names and entities that own
the trademarks or insert a trademark symbol with each mention of the trademarked name, the
publisher states that it is using the names for editorial purposes only and to the benefit of the
trademark owner, with no intention of infringing upon that trademark.
The Coriolis Group, LLC
14455 North Hayden Road
Suite 220
Scottsdale, Arizona 85260
(480) 483−0192
FAX (480) 483−0193
/>Library of Congress Cataloging−in−Publication Data
Harris, Joe, 1974−
Cisco network security little black book / Joe Harris
p. cm.
Includes index.
1−93211−165−4
1. Computer networks−−Security measures. I. Title.
TK5105.59 .H367 2002
005.8−−dc21 2002019668
10 9 8 7 6 5 4 3 2 1
I dedicate this book to my wife, Krystal, to whom I fall in love with all over again every day. I love
you, I always have, I always will. To my son, Cameron, I cannot begin to put into words how much I
love you. You are my world—my purpose in life. To my mother, Ann, thank you for your love and
support, and for always being there for me—you will always be my hero. To my father, Joe Sr.,
thank you for all the sacrifices you had to make, so that I wouldn't have to—they didn't go unnoticed.
Also, thanks for helping to make me the man that I am today—I love you.
—Joe Harris
2
About the Author
Joe Harris, CCIE# 6200, is the Principal Systems Engineer for a large financial firm based in
Houston, Texas. He has more than eight years of experience with data communications and
protocols. His work is focused on designing and implementing large−scale, LAN−switched, and
routed networks for customers needing secure methods of communication.
Joe is involved daily in the design and implementation of complex secure systems, providing
comprehensive security services for the financial industry. He earned his Bachelors of Science
degree in Management Information Systems from Louisiana Tech University, and holds his Cisco
Security Specialization.
Acknowledgments
There are many people I would like to thank for contributing either directly or indirectly to this book.
Being an avid reader of technology books myself, I have always taken the acknowledgments and
dedication sections lightly. Having now been through the book writing process, I can assure you that
this will never again be the case. Writing a book about a technology sector like security, that
changes so rapidly, is a demanding process, and as such, it warrants many "thanks yous" to a
number of people.
First, I would like thank God for giving me the ability, gifts, strength, and privilege to be working in
such an exciting, challenging, and wonderful career. As stated in the book of Philippians, Chapter 4,
Verse 13: "I can do all things through Christ which strengtheneth me." I would also like to thank The
Coriolis Group team, which made this book possible. You guys are a great group of people to work
with, and I encourage other authors to check them out. I would like to extend a special thanks to
Jessica Choi, my development editor. In addition, I would also like to thank my acquisitions editors,
Charlotte Carpentier and Katherine Hartlove, and my project editor, Greg Balas. It was a pleasure to
work with people who exemplify such professionalism, and to the rest of the Coriolis team— Jeff
Johnson, my product marketing manager, Peggy Cantrell, my production coordinator, and Laura
Wallander, my cover designer—thank you all!
In addition, I would like to thank Judy Flynn for copyediting and Christine Sherk for proofreading the
book, respectively, and to Emily Glossbrenner for indexing the book. A big thanks also to Sheldon
Barry for serving as the tech reviewer on the book!
Special thanks to my friend, Joel Cochran, for being a great friend and mentor, and for repeatedly
amazing me with your uncanny ability to remember every little detail about a vast array of
technologies, and for also taking me under your wing and helping me to "learn the ropes" of this
industry. Also thanks to Greg Wallin for the late night discussions and your keen insights into
networking, and for your unique methods of communicating them in a manner that consistently
challenges me to greater professional heights.
Finally, I would like to thank Jeff Lee, Steven Campbell, Raul Rodriguez, Jose Aguinagua, Kenneth
Avans, Walter Hallows, Chris Dunbar, Bill Ulrich, Dodd Lede, Bruce Sebecke, Michael Nelson,
James Focke, Ward Hillyer, Loi Ngo, Will Miles, Dale Booth, Clyde Dardar, Barry Meche, Bill
Pinson, and all those I have missed in this listing for their insight and inspiration.
And last, but certainly not least, I would like to thank my wife, Krystal, for her love, support, and
patience with me during this project. To my son, Cameron, thank you for being daddy's inspiration.
3
Introduction
Thanks for buying Cisco Network Security Little Black Book, the definitive guide for security
configurations on Cisco routers.
New business practices and opportunities are driving a multitude of changes in all areas of
enterprise networks, and as such, enterprise security is becoming more and more prevalent as
enterprises try to understand and manage the risks associated with the rapid development of
business applications deployed over the enterprise network. This coupled with the exponential
growth of the Internet has presented a daunting security problem to most enterprises: How does the
enterprise implement and update security defenses and practices in an attempt to reduce its
vulnerability to exposure from security breaches?
In this book, I will attempt to bridge the gap between the theory and practice of network security and
place much of its emphasis on securing the enterprise infrastructure, but first let me emphasize that
there is no such thing as absolute security. The statement that a network is secure, is more often
than not, misunderstood to mean that there is no possibility of a security breach. However, as you
will see throughout this book, having a secure network means that the proper security mechanisms
have been put in place in an attempt to reduce most of the risks enterprise assets are exposed to. I
have tried to include enough detail on the theories and protocols for reasonable comprehension so
that the networking professional can make informed choices regarding security technologies.
Although the focus of this book is on the Cisco product offering, the principles apply to many other
environments as well.
Is this Book for You?
Cisco Network Security Little Black Book was written with the intermediate or advanced user in
mind. The following topics are among those that are covered:
Internet Protocol Security (IPSec)•
Network Address Translation (NAT)•
Authentication, authorization, and accounting (AAA)•
TCP Intercept•
Unicast Reverse Path Forwarding (Unicast RPF)•
Ethernet Switch Security•
How to Use this Book
This book is similar in format to a typical book in the Little Black Book series. Each chapter has two
main sections: "In Brief," followed by "Immediate Solutions."
"In Brief" introduces the subject matter of the chapter and explains the principles it is based upon.
This section does not delve too deeply into details; instead it elaborates only on the points that are
most important for understanding the material in "Immediate Solutions." "Immediate Solutions"
presents several tasks related to the subject of the chapter and presented in "In Brief." The tasks in
"Immediate Solutions" vary from simple to complex. The vast array of task levels provides a broad
coverage of the subject.
This book contains seven chapters. The following sections include a brief preview of each one.
4
Chapter 1: Securing the Infrastructure
Chapter 1 provides insight into enterprise security problems and challenges that face many
organizations today in the "Internet Age" and focuses on the configuration of networking devices to
ensure restricted and confidential access to them within the enterprise infrastructure.
Chapter 2: AAA Security Technologies
Chapter 2 includes a detailed examination of Cisco's authentication, authorization, and accounting
(AAA) architecture, and the technologies that not only use its features, but also provide them. It
presents proven concepts useful for implementing AAA security solutions and discusses how to
configure networking devices to support the AAA architecture.
Chapter 3: Perimeter Router Security
Chapter 3 describes many of the security issues that arise when connecting an enterprise network
to the Internet. It also details the technologies that can be used to minimize the threat of exposure to
the enterprise and its assets. The chapter covers features such as TCP Intercept, Unicast Reverse
Path Forwarding (Unicast RPF), and Network Address Translation (NAT).
Chapter 4: IOS Firewall Feature Set
Chapter 4 discusses the add−on component to the Cisco IOS that provides routers with many of the
features available to the PIX firewall, which extends to routers with similar functionality as that
provided from a separate firewall device. It covers features such as ContextBased Access Control
(CBAC), Port Application Mapping (PAM), and the IOS Firewall Intrusion Detection System (IDS).
Chapter 5: Cisco Encryption Technology
Chapter 5 presents on overview of encryption algorithms, hashing techniques, symmetric key
encryption, asymmetric key encryption, and digital signatures. It discusses how to configure a router
to support Cisco Encryption Technologies and presents detailed methods for testing the encryption
configuration.
Chapter 6: Internet Protocol Security
Chapter 6 presents an overview of the framework of open standards for ensuring secure private
communications over IP networks and IPSec. It discusses how to configure a router for support of
the protocols used to create IPSec virtual private networks (VPNs) and details the configuration of
preshared keys, manual keys, and certificate authority support.
Chapter 7: Additional Access List Features
Chapter details the use of access lists and the security features they provide. It discusses the use of
dynamic and reflexive access lists, as well as standard and extended access lists.
Appendix A: IOS Firewall IDS Signature List
Appendix A provides a detailed list of the 59 intrusion−detection signatures that are included in the
Cisco IOS Firewall feature set. The signatures are presented in numerical order with a detailed
description of the signature number contained within the Cisco Secure IDS Network Security
Database (NSD).
5
Appendix B: Securing Ethernet Switches
Appendix B presents an overview of methods used to provide security for the Catalyst Ethernet
model of switches. This appendix discusses how to configure VLANS, Vlan Access Lists, IP permit
lists, port security, SNMP security, and support for the AAA architecture on the Catalyst line of
Ethernet switches.
The Little Black Book Philosophy
Written by experienced professionals, Coriolis Little Black Books are terse, easily "thumb−able"
question−answerers and problem−solvers. The Little Black Book's unique two−part chapter
format—brief technical overviews followed by practical immediate solutions—is structured to help
you use your knowledge, solve problems, and quickly master complex technical issues to become
an expert. By breaking down complex topics into easily manageable components, this format helps
you quickly find what you're looking for, with the diagrams and code you need to make it happen.
The author sincerely believes that this book will provide a more cost−effective and timesaving
means for preparing and deploying Cisco security features and services. By using this reference,
the reader can focus on the fundamentals of the material, instead of spending time deciding on
acquiring numerous expensive texts that may turn out to be, on the whole, inapplicable to the
desired subject matter. This book also provides the depth and coverage of the subject matter in an
attempt to avoid gaps in security−related technologies that are presented in other "single" reference
books. The information security material in this book is presented in an organized, professional
manner, that will be a primary source of information for individuals new to the field of security, as
well as for practicing security professionals. This book is mostly a practical guide for configuring
security−related technologies on Cisco routers, and as such, the chapters may be read in any order.
I welcome your feedback on this book. You can either email The Coriolis Group at
, or email me directly at Errata, updates, and more are
available at />6
Chapter 1: Securing the Infrastructure
In Brief
This chapter is made up of two parts. The first part provides insight into enterprise security problems
and challenges that face many organizations today in the "Internet Age." The Internet has changed
the way people live, work, and play. Even more so, it has revolutionized the way business is
conducted and the methods in which businesses communicate. More and more businesses are
recognizing that the Internet provides them with a relatively inexpensive medium for conducting
business on a global scale. Unfortunately, the Internet is missing a lot of key components, one of
which is security. The Internet possesses an unlimited number of possibilities for enterprises, but
enterprises must first weigh the risk of conducting business on the Internet against the security
measures necessary to protect the business they are trying to conduct. As a result of the Internet,
information traffic loads within the enterprise have increased exponentially, and so, too, has the
business value of the infrastructure that supports the higher traffic loads, thereby increasing the risk
of vulnerability to security breaches.
The second part of this chapter focuses on configuration of Cisco routers to ensure restricted and
confidential access to network devices within the enterprise infrastructure. This chapter examines
common features used to secure access to physical and logical interfaces and technologies used to
effectively manage routing updates and control commonly exploited methods for gaining access into
networking devices. It also examines what Simple Network Management Protocol (SNMP) is used
for within a network and methods used to secure SNMP access to networking devices. Finally, it
examines the HTTP server function that a Cisco router can perform, the security risks associated
with it, and the methods used to protect the router if this function is used.
Enterprise Security Problems
One of the major security problems that enterprises face today is that sophisticated and sometimes
complicated security defenses are required to mitigate the newest threats posed by intruders and to
provide a reduction in business vulnerabilities. Another major hurdle involves choosing whether or
not a security solution is the proper fit for the business; a vast number of specialized products in the
market only work in certain parts of the network and fail to provide a true end−to−end solution for
the business. Security is a complicated subject in theory and in practice, and more often than not, is
very difficult to implement, especially when the solution must provide end−to−end security.
To provide the utmost security to your network, you must first have an idea of what it is you are
trying to protect. You must then decide what type of intruders you are trying to protect yourself from.
Intruders can take on many forms, including the following:
Current employees•
Former employees•
Employees that misuse the environment•
Competitors•
Thrill seekers•
The most common terms used today to identify an individual who uses a computer to engage in
mischievous behavior are "hacker" and "cracker." A hacker is intensely interested in the innermost
workings of any computer operating system. Most often, hackers are programmers. As such, they
have advanced knowledge of operating systems and programming languages. They constantly
seek further knowledge, freely share what they have discovered, and, almost never, intentionally
7
damage data. Hackers are sometimes referred to as white−hats.
A cracker breaks into or violates the integrity of someone else's system with malicious intent.
Crackers gain unauthorized access, destroy vital data, deny service to legitimate users, or basically
cause problems for their targets. Crackers are sometimes referred to as black−hats.
Types of Threats
The methods hackers and crackers use to gain unauthorized access into network devices are
known as threats. Having a security problem is bad enough, but defying any effort to categorically
group problems and define methods to protect against them, is the number, nature, and types of
security threats that exist today. These defy any effort that attempts to categorically group and
define methods to protect against problems. A generalized list of threats follows; the methods used
to thwart these threats will be discussed later in this chapter as well as throughout this book:
Unauthorized access—A network intruder can gain unauthorized access to networking
devices through a variety of means, three of which are as follows:
Physical—If attackers have physical access to a machine, more often than not, they
will be able to get in. The techniques used to gain access range from accessing the
device via the console to physically taking apart the system.
♦
System—System access assumes that the intruder already has a user account on
the system. Proper privileges should be granted to the user such that he or she is
authenticated and authorized only to do that which is deemed to be a function of his
or her job duties.
♦
Remote—Remote access involves intruders who attempt to penetrate the system
remotely from across the Internet, through a dial−up connection, or on local or wide
area network. This type of intruder usually has no account privileges.
♦
•
Eavesdropping—Eavesdropping is used to capture TCP/IP or other protocol packets, thus
allowing the intruder to decode the contents of the packet using a protocol analyzer. "Packet
sniffing" is a more common term used to describe the act of eavesdropping. Eavesdropping
leads to information theft, like stolen credit card and social security numbers.
•
Data manipulation—Data manipulation is simply the act of altering files on computers,
vandalizing a Web site, or replacing FTP files.
•
Protocol weakness—The most−used protocol in circulation today is TCP/IP. This protocol
was designed a long time ago. As a result, a number of its design flaws can lead to possible
security problems, such as smurf attacks, IP spoofing, TCP sequence number prediction,
and SYN floods. The IP protocol itself is a very trusting protocol; therefore, hackers are free
to forge and change IP data.
•
Session replay—Intruders can eavesdrop on one or more users involved in a communication
session and manipulate the data in such a manner according to the hack they are trying to
perform.
•
This list does not by any means include all of the types of security threats. Its purpose is to give you
a general idea of the number and types of methods intruders have at their disposal.
Enterprise Security Challenges
One the biggest challenges that IT managers face is choosing from among the vast number of
security offerings and vendors in the market space. IT managers must weigh the cost of security
products against things such as performance, manageability, and scalability. After sorting through
each vendor, IT managers must choose the security solution that most uniquely adapts to and
8
satisfies their business environment. The solution that is chosen must not be overly restrictive and
must allow the business to enable new applications, innovations, and services as needed, without
unnecessary challenges.
After IT managers choose a security solution that most adequately meets their specific needs, more
often than not they find themselves having to develop a design that will allow them to smoothly
integrate the solution into a network environment of products developed by different vendors. This
usually adds to the cost of implementation and overall operation of the network. On top of that, IT
managers must hire skilled security engineers or spend money from their budgets to adequately
train their existing engineers to support the new technologies.
After an organization's IT management has recognized the existence of security threats and has
directed changes to improve its posture or information security process, they should formulate a
plan to address the issue. The first step in implementing this plan is the development of a security
policy.
Enterprise Security Policy
Request for Comments (RFC) 2196, Site Security Handbook, states that "A security policy is a
formal statement of rules by which people who are given access to an organization's technology
and information must abide." A security policy should not determine how an enterprise operates;
instead, the business of the enterprise should dictate how a security policy is written. Business
opportunities are what drive the need for security in the first place. The main purpose of a security
policy is to inform anyone that uses the enterprise's network of the requirements for protecting the
enterprise's technology and information assets. The policy should specify the mechanisms through
which these requirements can be met. Of all the documents an organization develops, the security
policy is one of the most important.
Prior to developing the security policy, you should conduct a risk assessment to determine the
appropriate corporate security measures. The assessment helps to determine areas in which
security needs to be addressed, how the security needs to be addressed, and the overall level of
security that needs to be applied in order to implement adequate security controls. A risk
assessment is a process whereby critical assets are identified and values are placed on the assets.
You determine how much each asset is at risk of being compromised and how much you need to
upgrade or add to it to meet your business needs.
To develop a security policy that is not overly restrictive for users, that balances ease of use with a
certain level of security, and that is enforceable both technically and organizationally, the policy
should contain, at a minimum, some of the topics in the following list:
Acceptable use policy—Spells out what users are allowed and not allowed to do on the
various components within the network; this includes the type of traffic allowed on the
network. The policy should be as explicit as possible to avoid any ambiguity or
misunderstanding.
•
Remote access policy—Spells out to users acceptable or unacceptable behavior when they
have connected to the enterprise via the Internet, a dial−up connection, a virtual private
network (VPN), or any other method of remote connectivity.
•
Incident handling policy—Addresses planning and developing procedures to handle
incidents before they occur. This document also creates a centralized group to be the
primary focus when an incident happens. The incident handling policy can be contained
within the actual security policy, but due to corporate structure, this document often actually
exists as a subdocument to the security policy.
•
9
Internet access policy—Defines what the enterprise considers to be ethical, proper use of its
Internet connection.
•
Email policy—Defines the acceptable use of the enterprise's email systems, including
personal emails and Web−based email.
•
Physical security policy—Defines controls that pertain to physical device security and
access.
•
After you've completed the enterprise security policy, the last step is to perform regular audits.
Audits not only give you a baseline by which to judge what is deemed as normal activity or network
behavior, they also, in many cases, produce results that will be the first alert in the detection of a
security breach. Noticing unusual events within the network can help to catch intruders before they
can cause any further damage.
Securing the Enterprise
The enterprise infrastructure is vulnerable to many different security threats (discussed earlier) from
any number of intruders. The solution to the infrastructure security problem is to securely configure
components of the network against vulnerabilities based on the network security policy. Most
network security vulnerabilities are well known, and the measures used to counteract them will be
examined in detail throughout this chapter.
Physical and Logical Security
Physical and logical security include the following:
Securing console access•
Securing Telnet access•
Setting privilege levels•
Disabling password recovery•
Configuring password encryption•
Setting banner messages•
Securing Console Access
It's important to put the proper physical security mechanisms into place. If the proper physical
security mechanisms are not in place, an intruder could potentially bypass all other logical security
mechanisms and gain access to the device. If an intruder can gain access to the administrative
interface of the router, he could view and change the device's configuration and gain access to
other networking equipment. The first thing you should do to thwart intruders is to set a console
password. If the intruder has already gained physical access to the device, he'll attempt to gain
network access through the console port first. The console port supports many different methods for
authenticating a user and allowing access, some of which are listed here:
Console password•
Local user database•
TACACS+•
RADIUS•
Securing Telnet Access
Telnet is a protocol that allows a user to establish a remote connection to a device. After connected
to the remote device, you are presented with a screen that is identical to the screen that would be
displayed if you were directly connected to the console port. Telnet ports on a router are referred to
10
as virtual terminal ports. Telnet is really no different from a console connection, and as such, the
proper logical security mechanisms should be put into place to ensure that only responsible
personnel are allowed Telnet access. Virtual terminal ports support many different methods for
authenticating a user and allowing access. Some of the methods are included in the following list:
Vty password•
Local user database•
TACACS+•
RADIUS•
Setting Privilege Levels
Privilege levels associate router commands with each security level configured on the router. This
allows for a finer granularity of control when restricting user access. There are 16 privilege levels
contained within the router operating system. Level 2 to level 14 are customizable and allow you to
configure multiple privilege levels and multiple passwords to enable certain users to have access to
specific commands.
Disabling Password Recovery
Setting passwords is the first line of defense against intruders. Sometimes passwords are forgotten
and must be recovered. All Cisco password recovery procedures dictate that the user performs the
password recovery process from the console port of the router or switch. There are, however,
certain circumstances in which the widely available password recovery procedure should be
disabled. One such circumstance is an emergency Add, Move, or Change (AMC), whereby a
networking device needs to be in a location that does not have the proper mechanisms in place for
physical security, thus allowing an intruder a greater chance of circumventing traditional security
measures.
Configuring Password Encryption
All Cisco console and Telnet passwords configured on the router are stored in plain text within the
configuration of the router by default, thus making them easily readable. If someone issues the
show running−config privileged mode command, the password is displayed. Another instance
when the password can easily be read is if you store your configurations on a TFTP server, the
intruder only needs to gain access into the TFTP machine, after which the intruder can read the
configuration with a simple text editor. Password encryption stores passwords in an encrypted
manner on the router. The encryption is applied to all configured passwords on the router.
Setting Banner Messages
You can use banner messages to issue statements to users, indicating who is and who is not
allowed access into the router. Banner messages should indicate the seriousness of an attempt to
gain unauthorized access into the device and should never reflect to the user that gaining
unauthorized access is acceptable. If possible, recite certain civil and federal laws that are
applicable to unauthorized access and let users know what the punishment would be for accessing
the device without express written permission. If possible, have certified legal experts within the
company review the banner message.
SNMP
The Simple Network Management Protocol (SNMP) is an application−layer protocol that helps to
facilitate the exchange of management information between network devices. SNMP enables
11
network administrators to manage network performance, find and solve network problems, and plan
for network growth. An SNMP network consists of three key components: managed devices,
agents, and network−management systems (NMSs). A managed device is a network node that
contains an SNMP agent and resides on a managed network. Managed devices collect and store
management information and make this information available to NMSs by use of the SNMP
protocol. Managed devices can be routers, access servers, switches, computer hosts, or printers.
An agent is a network−management software module that resides in a managed device. An agent
has local knowledge of management information and translates that information into a form
compatible with SNMP. An NMS executes applications that monitor and control managed devices.
NMSs provide the bulk of the processing and memory resources required for network management.
An SNMP managed device has various access levels. These are as follows:
Read−only— Allows read access of the Management Information Base (MIB) on the
managed device
•
Read/write—Allows read and write access of the Management Information Base on the
managed device
•
Write−only—Allows write access of the Management Information Base on the managed
device
•
Routers can send notifications to NMS machines when a particular event occurs. The SNMP
notifications can be sent as a trap or inform request. Traps are unreliable because the receiver does
not send an acknowledgment that it received a trap. However, an NMS machine that receives an
inform request acknowledges the message with an SNMP response. If the NMS does not receive
an inform request, it does not send a response. If the sender never receives a response, the inform
request can be sent again. Thus, informs are more reliable.
Cisco IOS software supports the following versions of SNMP:
SNMPv1•
SNMPv2c•
SNMPv3•
Both SNMPv1 and SNMPv2c use a community−based form of security. The group of managers
able to access the agent is defined by an access list and password.
SNMPv2c support includes a bulk retrieval mechanism and more detailed error−message reporting
to management stations. The bulk retrieval mechanism supports the retrieval of large quantities of
information, minimizing the number of polls required. The SNMPv2c improved error−handling
support includes a larger number of error codes that distinguish different kinds of error conditions.
Error return codes in SNMPv2c report the error type.
SNMPv3 provides for both security models and security levels. A security model is an authentication
strategy that is set up for a user and the group in which the user resides. A security level is the
permitted level of security within a security model. A combination of a security model and a security
level will determine which security mechanism is employed when an SNMP packet is handled.
Routing Protocol Authentication
Routing protocol authentication prevents the introduction of false or unauthorized routing messages
from unapproved sources. With authentication configured, the router will authenticate the source of
each routing protocol packet that it receives from its neighbors. Routers exchange an authentication
key or a password that is configured on each router. The key or password must match between
12
neighbors.
There are two types of routing protocol authentication: plain text authentication and Message Digest
5 (MD5) authentication. Plain text authentication is generally not recommended because the
authentication key is sent across the network in clear text, making plain text authentication
susceptible to eavesdropping attempts. MD5 authentication creates a hash value from the key; the
hash value instead of the actual password is exchanged between neighbors, preventing the
password from being read because the hash, not the password, is transmitted across the network.
Routing Filters
Route filtering enables the network administrator to keep tight control over route advertisements.
Frequently, companies merge or form a partnership with other companies. This can pose a
challenge because the companies need to be interconnected yet remain under separate
administrative control. Because you do not have complete control over all parts of the network, the
network can become vulnerable to malicious routing or misconfiguration. Route filters ensure that
routers will advertise as well as accept legitimate networks. They work by regulating the flow of
routes that are entered into or advertised out of the routing table.
Filtering the networks that are advertised out of a routing process or accepted into the routing
process helps to increase security because, if no route is advertised to a downstream or upstream
neighbor, then no route apparently exists to the network. This will keep intruders from having logical
connectivity to the target destination. It also increases the network stability to a certain degree.
Misconfiguration is determined to be the largest contributor of network instability; however, an
intruder could introduce into routing updates false information that could result in routing problems.
Suppressing Routing Advertisements
To prevent routers on a local network from learning about routes that are dynamically advertised out
on the interface, you can define the interface as passive. Defining an interface as passive keeps
routing update messages from being sent through a router interface, preventing other systems on
the interface from learning about routes dynamically from this router. You can configure a passive
interface for all IP routing protocols except Border Gateway Protocol (BGP).
In networks with large numbers of interfaces, you can set all interfaces to passive using the
passive−interface default command. This feature allows the administrator to selectively determine
over which interfaces the protocol needs to run. After the determination is made to allow the
protocol to run on the interface, the administrator can disable the passive−interface feature on an
interface−by−interface basis with the no passive−interface <interface> command.
Note Making an interface passive for the Enhanced Interior Gateway Routing Protocol (EIGRP)
disables route advertisements sent out the interface that was made passive, just as any other
routing protocol; however, the interface will not listen for route advertisements either.
HTTP Access
Cisco IOS software on routers is equipped with a Web browser user interface that allows you to
issue commands into the router via the Web interface. The Web browser user interface can be
customized and tailored to your business environment. The HTTP server is disabled by default;
when it's enabled, it introduces some new security vulnerabilities into your network. The HTTP
server function, when it's enabled, gives all client devices with logical connectivity to the router the
ability to monitor or modify the configuration of the router. All that needs to reside on the client is a
software package that interprets packets on port 80. This is obviously a major security issue.
13
However, the router software allows you to change the default port that the HTTP server is running
on. You can also configure an access list of specific hosts that are allowed Web access to the router
and apply the access list to the HTTP server. Authentication of each user provides better security if
you elect to use the router's HTTP server functions. Authentication can take place by one of four
different methods:
AAA—Indicates that the AAA function is used for authentication.•
Enable—Indicates that the configured enable password is used for authentication. This is
the default authentication method.
•
Local—Indicates that the locally configured security database is used for authentication.•
TACACS+—Indicates that the Terminal Access Controller Access system is used for
authentication.
•
Immediate Solutions
Configuring Console Security
The console port is used to attach a terminal directly into the router. By default, no security is
applied to the console port and the setup utility does not prompt you to configure security for
console access. Cisco routers have many different modes of operation, one of which is user mode.
When you first access the router via the console port, the router will prompt you for a password, if
one has been configured. After successfully supplying the password, you are logged into user mode
on the router. When a Cisco router is in user mode, the router will display its hostname followed by
the greater than symbol. Here is an example of user mode access:
SecureRouter>
User mode has limited functionality. Enable mode, also called privileged mode, can be accessed by
typing the enable command. If passwords have been configured to access this level of the IOS, the
router prompts you for the correct password. When a Cisco router is in enable mode, the router will
display its hostname followed by the pound sign. Here is an example of enable mode access:
SecureRouter#
Cisco passwords are case sensitive. The simplest and most direct way to connect to the network
device is to use a direct connection to the console port of a router or switch. You can configure a
console password to authenticate users for user mode access by entering the following commands:
SecureRouter#config t
Enter configuration commands, one per line. End with CNTL/Z.
SecureRouter(config)#line con 0
SecureRouter(config−line)#password Coriolis
SecureRouter(config−line)#login
SecureRouter(config−line)#end
14
The preceding configuration sets the user mode password to Coriolis. Cisco routers also maintain
a local user authentication database, which can be used to authenticate users who connect directly
to the console port of a router. Here's an example of configuring the router to use the local user
database for authentication of users who attempt to access the router via the console:
!
username Fred privilege 15 password 0 Flintstone
username Elroy privilege 12 password 0 Jetson
username Captain privilege 8 password 0 Kirk
!
line con 0
login local
transport input none
!
The preceding configuration defines three users: Fred, Elroy, and Captain. Each user has an
associated privilege level defined for their respective login credentials and has a password that is
associated with their username. This allows Fred to log into the router with a username of Fred and
a password of Flintstone. Because Fred's privilege level defines the maximum privilege level that
can be configured on the router, Fred is considered to be the super−user. Elroy has a privilege
level of 12 and the password Jetson.
Note Assignment of privilege levels is discussed in detail later in this chapter.
By assigning Elroy a privilege of 12, the administrator can limit the functionality that Elroy may
have on the router. That's also the case for Captain. When a user plugs into the console port of a
router configured with local authentication, they are first prompted for their username; after
successfully passing the correct username to the router, they are then prompted for the password
that is associated with that username. The following example details these steps:
User Access Verification
Username: Fred
Password: Flintstone
SecureRouter#
Now, what do you think would happen if you were to attempt to log in with the username of Fred
and the password that is associated with Elroy? You would suspect that the router would deny you
access. This example details this attempt:
User Access Verification
Username: Fred
Password: Jetson
% Login invalid
Username:
15
From this, you can see that you must supply the password that is associated with the username
with which you are attempting to gain access.
Warning When using local authentication and assigning privilege levels, you must be
careful to associate the correct username with the correct privilege level.
Anyone who logs in with a privilege level that is equal to 2 or above is logged
directly into privileged mode.
Configuring Telnet Security
Directly connecting to the console of a router is generally a relatively easy method for gaining
access to the device; however, this method is inconvenient and not abundantly scalable. If console
access is the only method available to gain access into the device, an administrator must always
walk, drive, or fly to the physical location of the router and plug into the device's console port.
Fortunately, there are methods for gaining access into the router from a remote location. The most
common method of remote administration for a Cisco router is to use a Telnet session. Unlike with
console access, there are four configuration requirements that must be met before you can use this
method of access:
An enable password must be supplied. This is discussed in the next section.•
The router must have an IP address assigned to a routable interface.•
The routing table of the router must contain a route for the source of the Telnet packet.•
Under line configuration mode, a vty password must be supplied.•
The steps involved in defining Telnet security are similar to the steps used to configure console
security. An example of configuring the fourth requirement (after the first three have been met) can
be seen here:
SecureRouter#config t
Enter configuration commands, one per line. End with CNTL/Z.
SecureRouter(config)#line vty 0 4
SecureRouter(config−line)#login
SecureRouter(config−line)#password letmein
SecureRouter(config−line)#end
SecureRouter#
As mentioned in the preceding section, "Configuring Console Security," Cisco routers also maintain
a local user authentication database, which can be used to authenticate users who directly connect
to the console port of a router. Here is an example of configuring the router to use the local user
database for authentication of users who attempt to access the router via the console:
!
username Fred privilege 15 password 0 Flintstone
username Elroy privilege 12 password 0 Jetson
username Captain privilege 8 password 0 Kirk
!
line vty 0 4
login local
The result is that, when a user telnets to the router with this configuration, they will be prompted to
enter a username and password before being allowed to gain access into the router.
16
Routers can also restrict Telnet access to authorized users with the use of an access list. The
access list is then applied to the virtual terminal ports of the router with the access−class
command. This allows you to restrict Telnet access from a particular IP address or a subnet of IP
addresses. Use the following steps to this method of security:
Use the access−list global configuration command to configure an access list that permits
the specific hosts that are allowed Telnet access.
1.
Use the access−class access−list−number {in|out} command to apply the access list to
the virtual terminal ports.
2.
In the following example, the router is configured to allow only three hosts Telnet access on each of
the available virtual terminal ports:
Router−A#config t
Enter configuration commands, one per line. End with CNTL/Z.
Router−A(config)#access−list 10 permit 10.10.10.19
Router−A(config)#access−list 10 permit 10.10.11.20
Router−A(config)#access−list 10 permit 10.10.12.130
Router−A(config)#line vty 0 4
Router−A(config−line)#access−class 10 in
Router−A(config−line)#end
Router−A#
Note Remember, console and Telnet security is not preconfigured for you by default. One of your
first configuration steps when you initially set up your router should be to configure each of
these interfaces.
Configuring Enable Mode Security
To configure enable mode access, you can use one of two commands: enable password or
enable secret. Both commands accomplish the same thing, allowing access to enable mode.
However, the enable secret command is considered to be more secure because it uses a one−way
encryption scheme based on the MD5 hashing function. Only use the enable password command
with older IOS images and/or boot ROMs that have no knowledge of the newer enable secret
command.
Note The MD5 encryption algorithm will be discussed in detail in Chapter 6. For now, just
remember that this method is considered more secure.
You configure an enable password by entering the enable password <password> command in
global configuration mode:
SecureRouter#config t
Enter configuration commands, one per line. End with CNTL/Z.
SecureRouter(config)#enable password Omni−Pass01
SecureRouter(config)#end
SecureRouter#
The preceding configuration sets the enable password to Omni−Pass01. The result of setting the
enable password can be seen in the following output. From the user mode prompt, you must enter
the enable command to gain access into privileged mode:
17
SecureRouter>enable
Password: Omni−Pass01
SecureRouter#
Note After you enter the enable command, the password you type at the password prompt
will not be displayed. Be sure to type the password exactly as it is configured in the
enable password command.
You configure an enable secret password by entering the following command in global configuration
mode:
SecureRouter#config t
Enter configuration commands, one per line. End with CNTL/Z.
SecureRouter(config)#enable secret Long@Horn10
SecureRouter(config)#end
SecureRouter#
The preceding configuration sets the enable secret password to Long@Horn10. The result of
setting the enable secret password can be seen in the following output. From the user mode
prompt, you must enter the enable command to gain access into privileged mode, as follows:
SecureRouter>enable
Password: Long@Horn10
SecureRouter#
Note After you enter the enable command, the password you type at the password prompt
will not be displayed. Be sure to type the password exactly as it is configured in the
enable password command.
Disabling Password Recovery
The first line of defense against intruders is to set passwords on routers. Sometimes passwords are
forgotten and must be recovered. There are, however, some instances in which the widely known
password recovery procedures should be disabled. When physical security is not possible or in a
network emergency, password recovery can be disabled.
Note Password recovery on routers and switches is outside the scope of this book. However, if you
need an index of password recovery procedures for Cisco network devices, see the following
Cisco Web page: />The key to recovering a password on a Cisco router is through manipulation of the configuration
registers of the router. All router passwords are stored in the startup configuration, so if the
configuration registers are changed properly, the startup configuration with the passwords stored
within them can be bypassed. If you have disabled the password recovery mechanisms, you will not
be able to perform password recovery on the router. Disabling the password recovery procedure of
a Cisco router is a decision that must be thought out ahead of time because the command used to
disable password recovery also disables ROMMON.
18
Warning The command discussed in this section is not recommended for use on any production
router and is explained here only for the benefit of learning within a lab environment.
You can disable the Cisco password recovery procedure by issuing the no service
password−recovery command in global configuration mode:
SecureRouter#config t
Enter configuration commands, one per line. End with CNTR/Z.
SecureRouter(config)#no service password−recovery
WARNING:
Executing this command will disable password recovery mechanism.
Do not execute this command without another plan for
password recovery.
Are you sure you want to continue? [yes/no]: yes
As you can see, the IOS reminds you of how serious disabling the password recovery procedures
are with a warning message and a prompt allowing you to change your mind. To see the results of
changing the password recovery feature, issue the show running−config command. The effects of
issuing the command can be seen in the following configuration:
SecureRouter#show run
Building configuration
Current configuration:
!
version 12.0
service password−encryption
no service password−recovery
!
hostname SecureRouter
After password recovery has been disabled and the configuration has been saved, the widely
available password recovery procedure will not be available on the router. The following output
verifies that password recovery is indeed disabled:
SecureRouter#reload
Proceed with reload? [confirm]
00:14:34: %SYS−5−RELOAD: Reload requested
System Bootstrap, Version 11.3(2)XA4, RELEASE SOFTWARE (fc1)
Copyright (c) 1999 by cisco Systems, Inc.
TAC:Home:SW:IOS:Specials for info
PC = 0xfff14ee8, Vector = 0x500, SP = 0x680127b0
C2600 platform with 49152 Kbytes of main memory
PASSWORD RECOVERY FUNCTIONALITY IS DISABLED
program load complete, entry point: 0x80008000, size: 0x928024
Self decompressing the image : #######################
Warning The use of the command discussed in this section is not recommended for a
production router. It should be used only in extreme circumstances or in a lab
environment!
19
If the no service password−recovery command has been issued on a Cisco router and the
passwords have been forgotten, you must contact your Cisco Technical Support Engineer to obtain
help in gaining access into the router and enabling the password recovery process again.
Configuring Privilege Levels for Users
As mentioned earlier, the Cisco IOS software has two modes of operation. You can configure up to
16 levels of commands for each mode, which allows you to selectively assign authority on a
per−user basis. Commands entered into the IOS can be associated with each privilege level. You
configure the privilege level for a command using the global configuration command privilege
<mode> level <level> <command>. The exact syntax of this command is as follows:
privilege mode level level command | reset command
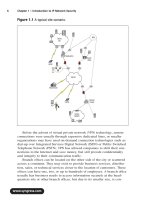
Figure 1.1 displays three users, Cindy, Marsha, and Jan, connected to a local segment. Cindy is
the network engineer; she has full control over Router A. Marsha and Jan are system
administrators; they need only limited functionality on Router A. Here is an example of the
configuration that meets this requirement:
enable secret Cindy
enable secret level 3 Marsha
enable secret level 2 Jan
privilege exec level 3 debug
privilege exec level 3 show running−config
privilege exec level 3 telnet
privilege exec level 2 ping
privilege exec level 2 sh int ser0
privilege exec level 2 sh ip route
line con 0
login
Figure 1.1: Using privilege levels to create administrative levels.
This configuration provides Cindy with the default full administrative rights to the router. Marsha is
given access to all features that are allowed with administrative level 3 and can perform the
20
commands that are listed with a privilege level of 3. Jan is assigned a privilege level of 2 and is
given access to all features and allowed to perform the commands listed with a privilege level of 2.
The key is that each user must use the enable <level> command from the user mode prompt and
log in with the password assigned for that level. An example is provided here:
SecureRouter>
SecureRouter>enable 3
Password: Marsha
SecureRouter#
Configuring Password Encryption
It's relatively simple to configure password encryption on Cisco routers. When password encryption
is configured, all passwords that are configured on the router are converted to an unsophisticated
reversible cipher. Although the algorithm that is used to convert the passwords is somewhat
unsophisticated, it still serves a very good purpose. Intruders cannot simply view the password in
plain text and know what the password is. To enable the use of password encryption, use the
command service password−encryption.
The following example shows a router configuration prior to enabling password encryption. An
enable password, a console password, and a Telnet password is configured:
SecureRouter#show running−config
!
enable password Cisco
!
line con 0
password Networking
!
line vty 0 4
password Security
!
The following example shows the command you would use to enable password encryption on the
router:
SecureRouter#config t
Enter configuration commands, one per line. End with CNTL/Z.
SecureRouter(config)#service password−encryption
SecureRouter(config)#end
SecureRouter#
The results of enabling password encryption can be seen in the following example. Notice that each
password is now represented by a string of letters and numbers, which represents the encrypted
format of the password:
SecureRouter#show running−config
!
enable password 7 05280F1C2243
!
21