A quick tour of adobe Illustrator pot
Bạn đang xem bản rút gọn của tài liệu. Xem và tải ngay bản đầy đủ của tài liệu tại đây (21.47 MB, 403 trang )
$PMPSZPVSXPSMEXJUI
OFXIJHIEFOTJUZXBY
$PMPS4UJLTɥFZDPMPSPO
BOZTVSGBDFJOD
M
V
E
JOHQ
M
B
T
DFMMPQIBOFNFUBMBOEGPJM(SFBU
GPSDSBGUTBOEIPNFVTF'JOEUIFNBUZPVSMPDBM
HSPDFSZPSDSBGUTTUPSF
This interactive demonstration of
Adobe Illustrator is designed to give an
overview of key features of the program
in about one hour.
A Quick Tour of
Adobe Illustrator
Illustrator_cib_book.indb 5 9/20/2003, 1:33:09 AM
Peachpit Press/Scott Design
6
A Quick Tour of Adobe Illustrator
Getting started
You’ll work in one art fi le during this tour. All art fi les are located on the Adobe
Classroom in a Book CD that is located on the inside back cover of this book. Make
sure that you copy the AICIB folder from the CD to your hard drive before starting
this exercise. Before you begin, you need to restore the default preferences for Adobe
Illustrator. Then you’ll open the fi nished art fi le for this lesson to see what you’ll create.
Note: If you’re new to Adobe Illustrator or to vector-drawing applications, you may want to
begin with Lesson 1, “Getting to Know the Work Area.”
1 To ensure that the tools and palettes function exactly as described in this tour, delete
or deactivate (by renaming) the Adobe Illustrator CS preferences fi le. See “Restoring
default preferences” on page 4.
2 Start Adobe Illustrator. When the Welcome Screen appears choose Open Document,
or File > Open.
3 Open the tour_done.ai fi le in the Lesson00 folder, located inside the Lessons folder
within the AICIB folder on your hard drive.
Note: The tour fi le uses an OpenType font named Chaparral Pro Regular. Illustrator CS
comes with Chaparral Pro and a variety of other OpenType fonts so you can use these
features in your work right away. See Lesson 11 for more information on fonts.
Illustrator_cib_book.indb 6 9/20/2003, 1:33:10 AM
Peachpit Press/Scott Design
ADOBE ILLUSTRATOR CS
7
Classroom in a Book
Zoom Out to make the fi nished artwork smaller, and leave it on your screen as you
work. Use the Hand tool (
) to reposition the artwork in the upper left of the page
then drag the lower right corner to make the window smaller. If you don’t want to leave
the image open, choose File > Close.
$PMPSZPVSXPSMEXJUI
OFXIJHIEFOTJUZXBY
$PMPS4UJLTɥFZDPMPSPO
BOZTVSGBDFJOD
M
V
E
JOHQ
M
B
T
DFMMPQIBOFNFUBMBOEGPJM(SFBU
GPSDSBGUTBOEIPNFVTF'JOEUIFNBUZPVSMPDBM
HSPDFSZPSDSBGUTTUPSF
The completed Tour illustration.
For a color illustration of the fi nished artwork in this lesson, see the color section.
Now open the start fi le to begin the tour.
Illustrator_cib_book.indb 7 9/20/2003, 1:33:11 AM
Peachpit Press/Scott Design
8
A Quick Tour of Adobe Illustrator
5 To open the start fi le, choose File > Open, and open the tour_start.ai fi le in the
Lesson00 folder, located inside the Lessons folder within the AICIB folder on your hard
drive.
$PMPSZPVSXPSMEXJUIOFXIJHIEFOTJUZXBY
$PMPS4UJLTɥFZDPMPSPOBOZTVSGBDFJODMVEJOH
QMBTUJDDFMMPQIBOFNFUBMBOEGPJM(SFBUGPS
DSBGUTBOEIPNFVTF'JOEUIFNBUZPVSMPDBM
HSPDFSZPSDSBGUTTUPSF
The start fi le.
6 Choose File > Save As, name the fi le colorstik.ai, and leave the type of fi le format set
to Adobe Illustrator
®
, and click Save. Leave the options at the defaults and click OK.
Creating a basic blend
Illustrator includes a variety of methods for creating blends from one object to another,
giving you the opportunity to create interesting effects that transition colors and shapes.
In this example we will create a smooth color blend by using the existing rectangles on
the document.
1 First, use the Selection tool (
) to select the topmost rectangle in the document
window. Hold down the Shift key and click to add the bottom rectangle to the selection,
2 Use Object > Blend > Make. As a default this creates a smooth color blend. Other
options are available from Object > Blend > Blend Options. For this exercise Smooth
Color should be selected. Blends are discussed in more detail in Lesson 12.
3 Choose Select > Deselect.
4 Choose File > Save.
Illustrator_cib_book.indb 8 9/20/2003, 1:33:11 AM
Peachpit Press/Scott Design
ADOBE ILLUSTRATOR CS
9
Classroom in a Book
Setting default colors
As you start to create in Adobe Illustrator you’ll discover that Illustrator objects have
a stroke (outline) and a fi ll. Learn more about what you can do with strokes and fi lls
in Lesson 5, Painting. For this part of the exercise you’ll want the stroke and fi ll at the
default of black and white.
1 To assure that you are set at default colors of white fi ll and black stroke locate the fi ll
and stroke icons at the bottom of the toolbar.
2 Click on the small black and white swatch in the lower left to reset to the default
colors.
Click to reset
the default colors.
Drawing a star
Adobe Illustrator includes tools to create shapes such as rectangles, circles, polygons
stars and more. In this step we will create a star to fi ll the background.
1 Hold down the mouse button on the Rectangle tool (
)
in the toolbox to display
a group of tools. Select the Star tool
(
)
, and then click, and release anywhere on the
artboard.
2 Clicking once with the Star tool rather than dragging it in the artwork lets you
precisely specify the shape’s dimensions.
3 In the Star dialog box, specify the shape of the star. (We specifi ed 20 pt for Radius 1,
10 pt for Radius 2, and 5 for the number of points on the star.) Click OK.
Illustrator_cib_book.indb 9 9/20/2003, 1:33:12 AM
Peachpit Press/Scott Design
10
A Quick Tour of Adobe Illustrator
Creating a symbol
Now that the star is created we will use it as an Illustrator symbol. Symbols are art
objects you create and store in the Symbols palette. The symbol can then be applied
using the Symbol Sprayer Tool.
1 From the Window menu choose Symbols. A Symbol window appears showing the
default symbols already provided.
2 With the star selected Alt-click (Windows) or Option-click (Mac OS) on the New
Symbol button at the bottom of the Symbols Palette. By holding down the Alt/Option
key you are given the opportunity to name the symbol as it is added to the palette.
Alt or Option-click on the
New Symbol button to add the star.
3 Name the symbol star and click OK. The star has now been added to the Symbols
palette.
4 We won’t need the original star that you created. Select it with the Selection tool and
press the delete key to eliminate it, or choose Edit > Clear.
Applying the symbol using the Symbol Sprayer
Now that the symbol has been added, apply it using the Symbol Sprayer tool.
1 Select the Symbol Sprayer from the toolbar (
).
2 From the Symbols palette select the Star symbol you just added.
Illustrator_cib_book.indb 10 9/20/2003, 1:33:12 AM
Peachpit Press/Scott Design
ADOBE ILLUSTRATOR CS
11
Classroom in a Book
3 Position the mouse over the color blend created earlier then click and drag to
“spray” the stars over the blend.
Click and Drag to apply the star symbol.
Variations of the symbol
By using the Symbolism tools you can change the size and spacing of the stars you just
created.
1 Hold down on the Symbol Sprayer tool (
)and drag to the right to display the
additional hidden tools in the group and select the Symbol Sizer Tool (
).
Illustrator_cib_book.indb 11 9/20/2003, 1:33:12 AM
Peachpit Press/Scott Design
12
A Quick Tour of Adobe Illustrator
2 Position the cursor over any star and note that when you click and hold the mouse,
the star becomes larger. To make the star smaller hold down the Alt key (Windows) or
the Option key (Mac OS) while holding down the mouse.
The Symbol Sizer tool.
3 Experiment with enlarging and reducing the star symbols, stopping when you are
satisfi ed with the results.
4 Choose File > Save.
Spacing out the stars
In this next step you will reorganize the placement of some of the star symbols by using
the Symbol Shifter tool.
1 Click and hold on the recently used Symbol Sizer tool and drag to select the Symbol
Shifter tool (
).
Illustrator_cib_book.indb 12 9/20/2003, 1:33:12 AM
Peachpit Press/Scott Design
ADOBE ILLUSTRATOR CS
13
Classroom in a Book
2 Position the tool over various stars and click and drag to randomly reposition the
stars.
The Symbol Shifter tool.
Creating a clipping mask
A clipping mask allows the user to defi ne a shape to mask other objects. In Adobe
Illustrator this allows the designer to create artwork that can then fi ll virtually any
shape. In this next exercise we will create a custom shape and mask our blend and stars
into it.
An example of two objects before and after using the
clipping mask feature.
Illustrator_cib_book.indb 13 9/20/2003, 1:33:13 AM
Peachpit Press/Scott Design
14
A Quick Tour of Adobe Illustrator
Creating three rectangles for the fi nal shape.
1 Select the Rectangle tool ( ). Click on the default color swatches on the toolbar
to make the fi ll white and the stroke black, or press D. This is the key command for
returning to default fi ll and stroke.
Instead of clicking and dragging to create the fi rst of three rectangles, click and release
once on the artboard. Input the values 315 pt for the Width, and 265 pt for the Height
in the Rectangle dialog box
Enter specifi c values for the rectangle by clicking once on the artboard.
Note: Even if your measurements are not in points you can enter “pt” after the numerical
value. Adobe Illustrator will recognize the measurement as points.
2 Click and release on the artboard again and enter the values 265 pt for the Width,
and 60 pt for the Height to make the second rectangle.
3 Click and release one more time and enter the values 215 pt for the Width, and 60 pt
for the Height for the third and fi nal rectangle.
4 Select the large rectangle and position it over the gradient star artwork created
earlier.
Drag the largest rectangle to the center of the blend, then stack the other two rectangles on top.
Illustrator_cib_book.indb 14 9/20/2003, 1:33:13 AM
Peachpit Press/Scott Design
ADOBE ILLUSTRATOR CS
15
Classroom in a Book
5 Position the other two rectangles so that they are stacked on top of the large one,
with the smallest rectangle on the top. The tops and bottoms should overlap slightly, but
don’t worry about alignment.
6 Choose Select > Deselect and File > Save.
Using the align feature
Illustrator has many precision tools available to make the job of precise positioning
more effi cient. In this step we will utilize the Align palette to align the centers of your
three rectangles before combining them into one larger shape.
1 Using the Selection tool (
), click on one of the rectangles. Then press down the
Shift key and click on the other two rectangles. Pressing the Shift key while clicking on
objects adds to the current selection.
2 Let go of the Shift key and Lock the large rectangle’s position by giving it one last
click.
Note: By clicking on an object before using the Alignment features you essentially lock the
position down, forcing the other selected objects to move into alignment with the locked
object.
3 Choose Window > Align to show the Align palette.
Illustrator_cib_book.indb 15 9/20/2003, 1:33:14 AM
Peachpit Press/Scott Design
16
A Quick Tour of Adobe Illustrator
4 Select Horizontal Align Center. The selected rectangles align horizontally.
The Horizontal Align Center button.
5 Choose Select > Deselect and File > Save.
Using the pathfi nder feature
For a designer, Illustrator offers the ability to create new interesting shapes from
multiple existing shapes. The Pathfi nder palette will be used to create an “Art Deco”
shape from the three rectangles.
1 Using the Selection tool (
), shift click to select all three rectangles.
2 Choose Window > Pathfi nder to bring forward the Pathfi nder palette.
3 Alt-click (Windows) Option-click (Mac OS) the Add to Shape Area button in the
Pathfi nder palette.
The Add to Shape Area button.
Note: If you click the Add to Shape Area button without holding down the Alt/Option
key, the shapes become a compound shape. They are still three separate paths but appear
as though they are combined into one shape. You can release a compound shape and it
reverts to the original shapes. By Alt/Option-clicking the Add to Shape Area button, you
permanently combine the shapes (also called expanding) into one shape. You cannot
retrieve the original shapes once a compound shape has been expanded, but it will keep the
fi le less complex as we add more elements.
Illustrator_cib_book.indb 16 9/20/2003, 1:33:14 AM
Peachpit Press/Scott Design
ADOBE ILLUSTRATOR CS
17
Classroom in a Book
Creating a clipping mask
Now you will create a clipping mask over the blend and stars artwork.
1 Choose Select > Select All, to activate the stars, blend and new shape that you
created.
2 Deselect the text area by holding down the Shift key and clicking on it.
3 Select Object > Clipping Mask > Make. The blend and stars now appear, only in the
area of the mask.
4 File > Save.
The blend and stars masked in the combined shape.
Using the new 3-D effect
Making objects appear three-dimensional is a new feature that is easy to implement, yet
produces impressive results. The trick is creating the correct shape for the result that you
want. In this image we will create the three-dimensional shape of a crayon. The shape
has already been created and saved as another fi le. You will start by copying that shape
and pasting it into the working documents.
1 Choose File > Open, and open crayon.ai fi le in the Lesson00 folder, located inside
the Lessons folder within the AICIB folder on your hard drive.
2 From the menu items choose Select > All and then Edit > Copy.
3 At the very bottom of the Window menu you will fi nd all open documents listed,
select colorstik.ai to bring that document window to the front and then Edit > Paste.
4 Move the crayon shape off to the left so as to not interfere with the current artwork.
Illustrator_cib_book.indb 17 9/20/2003, 1:33:14 AM
Peachpit Press/Scott Design
18
A Quick Tour of Adobe Illustrator
Creating the three-dimensional crayon.
We will now turn the basic shape into a three-dimensional shape using the Revolve
effect. You can revolve an open or closed path around an axis in a counterclockwise
direction to create a 3D object.
1 Select the crayon shape with the Selection tool.
2 Choose Effect > 3D > Revolve. Position the 3D Revolve Options window so the
crayon is visible.
3 Click on the preview checkbox to see how the shape appears while using the Revolve
effect.
4 As a default the angle that the three dimensional shape is created is Off-axis Front.
To customize the angle click on the cube in the position preview pane, then click and
drag. Position the cube so that the crayon is on an angle pointed toward the upper right.
Click and drag the cube to change and revolve it in space.
5 Click OK.
6 File > Save.
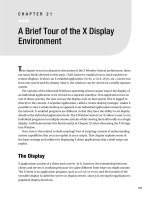
Adding a label
As you may have noticed, while you revolved your crayon in space, your shape has many
sides to it. In this next exercise you will locate the surface that is visible and apply a label
to the crayon.
1 Select the crayon and choose Window > Appearance.
The Appearance palette lists the attributes of the crayon, including the 3D Revolve
effect.
Illustrator_cib_book.indb 18 9/20/2003, 1:33:14 AM
Peachpit Press/Scott Design
ADOBE ILLUSTRATOR CS
19
Classroom in a Book
2 Double-click on 3D Revolve in the Appearance palette to open the 3D Revolve
options window. Any revisions to the present Revolve effect must be made by opening
the options from the Appearance palette.
3 Click on the Map Art button on the upper right of the Revolve Options window and
turn on the preview for this window.
4 Select the surface of the object. In this instance we select 1 of 4, the surface of the
crayon where a label would normally appear.
5 Use the Map Art feature to select a symbol to wrap around the object. Select from
the pop-up menu the Symbol named “label.”
6 In the window pane beneath, click and drag the label symbol so that it is visible. The
light gray area is visible in this view.
Select the symbol and the surface that you want to map.
7 Click OK to fi nalize the symbol placement, and OK again for the 3D fi lter.
8 File > Save.
Illustrator_cib_book.indb 19 9/20/2003, 1:33:14 AM
Peachpit Press/Scott Design
20
A Quick Tour of Adobe Illustrator
Cloning the crayon
The fi nished artwork has three crayons in it. Instead of creating each one, you will
duplicate the original.
1 Select the crayon with the Selection tool (
) and drag it to position it over the
masked image of the stars.
Note: When the revolved object is selected the original anchor points are visible. This can be
confusing at times, but is a benefi t if you need to edit the shape.
2 After the crayon is positioned, hold down the Alt (Windows) or Option (Mac OS)
key and drag down to create a clone of the original crayon.
Note: You must hold down the Alt/Option key the entire time that you are dragging the
crayon. A clone of the crayon will appear when the mouse is released.
3 Repeat the clone so there are three crayons.
Clone using the Selection tool and
Alt/Option key modifi er.
Changing the color of the crayon.
The 3D Effect is an intelligent effect that allows you to change the color of the crayon
and still retain the shading and dimension.
1 Make sure the Swatches palette is forward. If not, choose Window > Swatches.
Illustrator_cib_book.indb 20 9/20/2003, 1:33:15 AM
Peachpit Press/Scott Design
ADOBE ILLUSTRATOR CS
21
Classroom in a Book
2 Select the bottom crayon, then click on a blue swatch.
Change the color of the crayon with the Swatches palette.
3 Click on the top crayon and choose green from the swatches palette, leave the
middle crayon red.
Applying transparency
In Adobe Illustrator you have the ability to apply various levels of transparency to
objects. Blending modes are also available. Transparency and blending modes are
discussed in greater detail in Lesson 6.
In this next section we will apply Transparency to two of the crayons. If the
Transparency palette is not visible choose Window > Transparency.
1 Leaving the top-most crayon untouched, select the middle crayon and in the
Transparency window reduce to 75%. You can do this by dragging the pop-up slider, or
by typing 75 into the text box.
The Transparency palette.
Illustrator_cib_book.indb 21 9/20/2003, 1:33:15 AM
Peachpit Press/Scott Design
22
A Quick Tour of Adobe Illustrator
2 Select the bottom Crayon and assign 50% Transparency.
3 File > Save.
Creating the crescent shape
You will now create the shape of a crescent moon by using the Pathfi nder palette. If your
Swatches palette is not visible choose Window > Swatches.
1 Choose Select > Deselect to make sure no objects are selected.
2 Click once on the Fill swatch at the bottom of the toolbar and then click on the
yellow swatch in the Swatches palette. Click once on the Stroke swatch and click on the
None swatch (
)in the Swatches palette.
A
B
C
A. Fill. B. Stroke.
C. None.
3 Select the Ellipse tool ( ) from the toolbar. The Ellipse tool is in the same group of
shapes as the Rectangle, Rounded Rectangle, Polygon, Star and Lens Flare tools. If it is
not immediately visible, hold down on the Shape tool and drag to select the Ellipse tool.
Click and drag to select the Ellipse tool if it is not visible.
4 Hold down Shift-Alt (Windows) or Shift-Option (Mac OS) then click and drag
to draw a circle that’s almost half the size of our masked frame. (Holding down Shift
constrains the ellipse to a circle. Holding down Alt/Option draws from the center rather
than from the left side.) If you can’t get this to work the fi rst time use Edit > Undo to try
again.
Illustrator_cib_book.indb 22 9/20/2003, 1:33:15 AM
Peachpit Press/Scott Design
ADOBE ILLUSTRATOR CS
23
Classroom in a Book
Note: If you are having diffi culty creating the circle, practice in the scratch area. When
you have a circle that you are happy with, use the Selection tool to click and drag it into
position.
5 If you want to be certain that the circle is not too large or small choose Window >
Transform. The Width and Height should be approximately 200 pt. You can type 200 in
the text boxes for W and H if you wish.
Create a circle for the moon.
6 With the circle still selected use the Selection tool ( ) and hold down the Alt key
(Windows) or Option key (Mac OS) while dragging up and slightly to the left. This
clones a new circle that overlaps the original. When subtracted this will form the inner
part of our crescent shape.
Clone and Overlap the circle.
Illustrator_cib_book.indb 23 9/20/2003, 1:33:15 AM
Peachpit Press/Scott Design
24
A Quick Tour of Adobe Illustrator
7 With the cloned circle still selected, use the Selection tool and Shift-click on the
original circle, to select both objects.
Locate the Pathfi nder palette, and Alt-click (Windows) or Option-click (Mac OS) the
Subtract from Shape Area button in the Pathfi nder palette. This forms the crescent
shape of the moon. Remember, Alt/Option+clicking expands the two shapes into one,
subtracting the overlapping circle from the other.
Subtract the topmost circle to form a crescent shape.
Adding live effects
To add more dimension to this image you will add a drop shadow to the crescent shape.
In order to do this without permanently affecting the object, you will use the Effects
feature. This feature is discussed in more detail in Lesson 10.
1 Select the newly created crescent shape.
2 Choose Effect > Stylize > Drop Shadow. Note that you have many options from
which to choose. For this exercise we will leave it at the default settings and click OK.
The Drop Shadow Effect.
Illustrator_cib_book.indb 24 9/20/2003, 1:33:15 AM
Peachpit Press/Scott Design
ADOBE ILLUSTRATOR CS
25
Classroom in a Book
Note: The Filter and the Effect menu items might look repetitive, but they are very different
in how they apply their attributes. When using the Drop shadow effect it can be selected,
edited, and even deleted using the Appearance palette, whereas the Drop Shadow fi lter
creates a separate object which is not easily changed, or ungrouped.
Wrapping text around artwork
Our fi nal step is to wrap text around the crescent shape. Illustrator CS now uses the
same type engine and offers the same features as Adobe InDesign, a high-end page
layout program. The intuitive text wrap option offers more fl exibility than in previous
versions.
1 Drag the crescent shape over the text if it is not overlapping already. The text wrap
has not been applied yet, so the crescent shape is covering up some of the text.
2 Select Object > Text Wrap > Make Text Wrap. Leave the default text offset set to 6 pt,
this is the distance that the text will be pushed away from the crescent shape. Click OK.
Overlap the moon into The Text Wrap feature applied.
the text area.
If you are not happy with the wrap, reposition the crescent shape or change the amount
of offset by choose Object > Text Wrap > Text Wrap Options. See Lesson 11 for more
information about the text wrap feature.
3 Choose File > Save then Choose File > Close.
Congratulations! You have completed the initial tour of Adobe Illustrator CS. You are
now ready to start creating on your own and progress through the rest of the lessons.
Illustrator_cib_book.indb 25 9/20/2003, 1:33:16 AM
Peachpit Press/Scott Design
CLASSROOM
IN A BOOK
®
Adobe
®
Illustrator
®
cs
www.adobepress.com
Illustrator_cib_book.indb 1 9/20/2003, 1:01:32 AM
Peachpit Press/Scott Design
© 2004 Adobe Systems Incorporated and its licensors. All rights reserved.
Adobe® Illustrator® CS Classroom in a Book® for Windows® and Mac OS
If this guide is distributed with software that includes an end user agreement, this guide, as well as the software described in it, is furnished
under license and may be used or copied only in accordance with the terms of such license. Except as permitted by any such license, no
part of this guide may be reproduced, stored in a retrieval system, or transmitted, in any form or by any means, electronic, mechanical,
recording, or otherwise, without the prior written permission of Adobe Systems Incorporated. Please note that the content in this guide is
protected under copyright law even if it is not distributed with software that includes an end user license agreement.
The content of this guide is furnished for informational use only, is subject to change without notice, and should not be construed as
a commitment by Adobe Systems Incorporated. Adobe Systems Incorporated assumes no responsibility or liability for any errors or
inaccuracies that may appear in the informational content contained in this guide.
Please remember that existing artwork or images that you may want to include in your project may be protected under copyright law. The
unauthorized incorporation of such material into your new work could be a violation of the rights of the copyright owner. Please be sure
to obtain any permission required from the copyright owner.
Any references to company names in sample templates are for demonstration purposes only and are not intended to refer to any actual
organization.
Adobe, the Adobe logo, Adobe Garamond, Adobe Jenson, Adobe Wood Type, Acrobat, Classroom in a Book, Illustrator, InDesign, Myriad,
PageMaker, Photoshop, PostScript, PostScript 3, PressReady, and Trajan Pro are either registered trademarks or trademarks of Adobe
Systems Incorporated in the United States and/or other countries.
Apple, Mac, and Macintosh are trademarks of Apple Computer, Inc. registered in the U.S. and other countries. Microsoft, Windows,
and Windows NT are trademarks of Microsoft Corporation registered in the U.S and/or other countries. TRUMATCH is a registered
trademark of Trumatch, Inc. All other trademarks are the property of their respective owners.
Adobe Systems Incorporated, 345 Park Avenue, San Jose, California 95110, USA
Notice to U.S. Government End Users. The Software and Documentation are “Commercial Items,” as that term is defi ned at 48 C.F.R.
§2.101, consisting of “Commercial Computer Software” and “Commercial Computer Software Documentation,” as such terms are used in
48 C.F.R. §12.212 or 48 C.F.R. §227.7202, as applicable. Consistent with 48 C.F.R. §12.212 or 48 C.F.R. §§227.7202-1 through 227.7202-
4, as applicable, the Commercial Computer Software and Commercial Computer Software Documentation are being licensed to U.S.
Government end users (a) only as Commercial Items and (b) with only those rights as are granted to all other end users pursuant to the
terms and conditions herein. Unpublished-rights reserved under the copyright laws of the United States. Adobe Systems Incorporated,
345 Park Avenue, San Jose, CA 95110-2704, USA. For U.S. Government End Users, Adobe agrees to comply with all applicable equal
opportunity laws including, if appropriate, the provisions of Executive Order 11246, as amended, Section 402 of the Vietnam Era Veterans
Readjustment Assistance Act of 1974 (38 USC 4212), and Section 503 of the Rehabilitation Act of 1973, as amended, and the regulations at
41 CFR Parts 60-1 through 60-60, 60-250, and 60-741. The affi rmative action clause and regulations contained in the preceding sentence
shall be incorporated by reference.
Adobe Press books are published by Peachpit Press, Berkeley, CA. To report errors, please send a note to
Printed in the U. S. A.
ISBN# 0-321-19380-6
9 8 7 6 5 4 3 2 1
Illustrator_cib_book.indb 2 9/20/2003, 1:01:33 AM
Peachpit Press/Scott Design
iii
Contents
Getting Started . . . . . . . . . . . . . . . . . . . . . . . . . . . . . . . . . . . . . . . . 1
About Classroom in a Book . . . . . . . . . . . . . . . . . . . . . . . . . . . . . . . 1
Prerequisites . . . . . . . . . . . . . . . . . . . . . . . . . . . . . . . . . . . . . . . . . . . . 1
Installing the program . . . . . . . . . . . . . . . . . . . . . . . . . . . . . . . . . . . 2
Installing the Classroom in a Book fonts . . . . . . . . . . . . . . . . . . . 2
Copying the Classroom in a Book fi les . . . . . . . . . . . . . . . . . . . . . 2
Restoring default preferences. . . . . . . . . . . . . . . . . . . . . . . . . . . . . 2
Additional resources . . . . . . . . . . . . . . . . . . . . . . . . . . . . . . . . . . . . . 4
A Quick Tour ofAdobe Illustrator . . . . . . . . . . . . . . . . . . . . . . . 5
Getting started . . . . . . . . . . . . . . . . . . . . . . . . . . . . . . . . . . . . . . . . . . 6
Creating a basic blend. . . . . . . . . . . . . . . . . . . . . . . . . . . . . . . . . . . . 8
Creating a symbol . . . . . . . . . . . . . . . . . . . . . . . . . . . . . . . . . . . . . . 10
Creating a clipping mask . . . . . . . . . . . . . . . . . . . . . . . . . . . . . . . . 13
Using the align feature . . . . . . . . . . . . . . . . . . . . . . . . . . . . . . . . . . 15
Using the pathfi nder feature. . . . . . . . . . . . . . . . . . . . . . . . . . . . . 16
Creating a clipping mask . . . . . . . . . . . . . . . . . . . . . . . . . . . . . . . . 17
Using the new 3-D effect . . . . . . . . . . . . . . . . . . . . . . . . . . . . . . . . 17
Cloning the crayon. . . . . . . . . . . . . . . . . . . . . . . . . . . . . . . . . . . . . . 20
Changing the color of the crayon. . . . . . . . . . . . . . . . . . . . . . . . . 20
Applying transparency . . . . . . . . . . . . . . . . . . . . . . . . . . . . . . . . . . 21
Creating the crescent shape . . . . . . . . . . . . . . . . . . . . . . . . . . . . . 22
Adding live effects . . . . . . . . . . . . . . . . . . . . . . . . . . . . . . . . . . . . . . 24
Lesson 1 Getting to Know the Work Area. . . . . . . . . . . . . . . . . . . . . . . . 29
Getting started . . . . . . . . . . . . . . . . . . . . . . . . . . . . . . . . . . . . . . . . . 30
Viewing artwork. . . . . . . . . . . . . . . . . . . . . . . . . . . . . . . . . . . . . . . . 33
Changing the view of artwork . . . . . . . . . . . . . . . . . . . . . . . . . . . 36
Using Adobe online services . . . . . . . . . . . . . . . . . . . . . . . . . . . . . 46
Review questions . . . . . . . . . . . . . . . . . . . . . . . . . . . . . . . . . . . . . . . 47
Review answers . . . . . . . . . . . . . . . . . . . . . . . . . . . . . . . . . . . . . . . . 47
Illustrator_cib_book.indb iii 9/20/2003, 1:01:33 AM
Peachpit Press/Scott Design
iv
CONTENTS
Lesson 2 Selection Basics . . . . . . . . . . . . . . . . . . . . . . . . . . . . . . . . . . . . . . . 51
Getting started . . . . . . . . . . . . . . . . . . . . . . . . . . . . . . . . . . . . . . . . . 52
Using the Selection tool . . . . . . . . . . . . . . . . . . . . . . . . . . . . . . . . . 52
The Direct Selection tool . . . . . . . . . . . . . . . . . . . . . . . . . . . . . . . . 54
Exploring on your own . . . . . . . . . . . . . . . . . . . . . . . . . . . . . . . . . . 62
Review questions . . . . . . . . . . . . . . . . . . . . . . . . . . . . . . . . . . . . . . . 63
Review answers . . . . . . . . . . . . . . . . . . . . . . . . . . . . . . . . . . . . . . . . 63
Lesson 3 Creating Basic Shapes . . . . . . . . . . . . . . . . . . . . . . . . . . . . . . . . . 67
Getting started . . . . . . . . . . . . . . . . . . . . . . . . . . . . . . . . . . . . . . . . . 68
Setting up the document. . . . . . . . . . . . . . . . . . . . . . . . . . . . . . . . 69
Using basic shape tools. . . . . . . . . . . . . . . . . . . . . . . . . . . . . . . . . . 70
Drawing the pencil shape . . . . . . . . . . . . . . . . . . . . . . . . . . . . . . . 70
Drawing the piece of stationery . . . . . . . . . . . . . . . . . . . . . . . . . . 76
Drawing with the Rectangular Grid tool. . . . . . . . . . . . . . . . . . . 77
Decorating the stationery border. . . . . . . . . . . . . . . . . . . . . . . . . 81
Tips for drawing polygons, spirals, and stars . . . . . . . . . . . . . . . 83
Painting the logo . . . . . . . . . . . . . . . . . . . . . . . . . . . . . . . . . . . . . . . 84
Copying and scaling shapes . . . . . . . . . . . . . . . . . . . . . . . . . . . . . 87
Review questions . . . . . . . . . . . . . . . . . . . . . . . . . . . . . . . . . . . . . . . 89
Review answers . . . . . . . . . . . . . . . . . . . . . . . . . . . . . . . . . . . . . . . . 89
Lesson 4 Drawing with the Pen tool. . . . . . . . . . . . . . . . . . . . . . . . . . . . . 93
Getting started . . . . . . . . . . . . . . . . . . . . . . . . . . . . . . . . . . . . . . . . . 94
Creating straight lines. . . . . . . . . . . . . . . . . . . . . . . . . . . . . . . . . . . 97
Creating curved paths. . . . . . . . . . . . . . . . . . . . . . . . . . . . . . . . . . . 98
Building a curve . . . . . . . . . . . . . . . . . . . . . . . . . . . . . . . . . . . . . . . 100
Curves and corner anchor points . . . . . . . . . . . . . . . . . . . . . . . . 104
Creating the pear illustration . . . . . . . . . . . . . . . . . . . . . . . . . . . 107
Editing curves . . . . . . . . . . . . . . . . . . . . . . . . . . . . . . . . . . . . . . . . . 117
Finishing the pear illustration . . . . . . . . . . . . . . . . . . . . . . . . . . . 119
Exploring on your own . . . . . . . . . . . . . . . . . . . . . . . . . . . . . . . . . 122
Review questions . . . . . . . . . . . . . . . . . . . . . . . . . . . . . . . . . . . . . . 125
Review answers . . . . . . . . . . . . . . . . . . . . . . . . . . . . . . . . . . . . . . . 126
Illustrator_cib_book.indb iv 9/20/2003, 1:01:33 AM
Peachpit Press/Scott Design