UNIT 4. PRODUCTION AND MANAGEMENT OF ELECTRONIC DOCUMENTS LESSON 2. FROM HARDCOPY TO ELECTRONIC DOCUMENTNOTE doc
Bạn đang xem bản rút gọn của tài liệu. Xem và tải ngay bản đầy đủ của tài liệu tại đây (877.66 KB, 20 trang )
4. Production and management of electronic documents - 2. From hardcopy to electronic document - page 1
Information Management Resource Kit
Module on Management of
Electronic Documents
UNIT 4. PRODUCTION AND MANAGEMENT OF
ELECTRONIC DOCUMENTS
LESSON 2. FROM HARDCOPY TO
ELECTRONIC DOCUMENT
© FAO, 2003
NOTE
Please note that this PDF version does not have the interactive features offered
through the IMARK courseware such as exercises with feedback, pop-ups,
animations etc.
We recommend that you take the lesson using the interactive courseware
environment, and use the PDF version for printing the lesson and to use as a
reference after you have completed the course.
4. Production and management of electronic documents - 2. From hardcopy to electronic document - page 2
Objectives
At the end of this lesson you will be able to:
• distinguish the different phases of the digitizing
process; and
• understand the importance of correctly planning the
process.
The process
REGISTERING DOCUMENTS
SCANNING
OPTICAL CHARACTER
RECOGNITION
PROOFREADING AND
REFORMATTING
The process of converting a stack of books and
magazines into a set of electronic documents
includes the following phases:
1) Registering the documents.
2) Scanning the documents to convert them to
image files.
3) Optical character recognition (OCR):
converting the documents from image to text
format which can be read by word processors.
4) Proofreading and reformatting the
documents, and producing the final version.
4. Production and management of electronic documents - 2. From hardcopy to electronic document - page 3
The process
It is possible to scan and OCR in a single operation.
But it may be better to do these tasks separately: scan using
the software that came with your scanner, then OCR the
resulting files in a dedicated OCR program.
Here’s why:
OCR is more time-consuming than scanning. Rather than
tying up the computer attached to the scanner, it may be better
to have someone else (or several people) do the OCR
separately.
The dedicated software that comes with the scanner is designed
for that scanner, so it produces the best-quality output. But it
may not be able to do OCR, or it may lack some of the features
of a specialist OCR program.
A disadvantage of scanning and performing the OCR separately
is that scanning alone produces image files, which can be very
large. A solution is to store them on rewritable CDs, and delete
the ones you have finished with.
REGISTERING DOCUMENTS
PROOFREADING AND
REFORMATTING
SCANNING
OPTICAL CHARACTER
RECOGNITION
Managing documents
If you have to scan a large number of
documents, you should first catalogue them and
use a filing system to keep track of them.
If not, you risk misplacing hardcopies
(embarrassing if they must be returned to their
owners), lose files, skip steps in the process, or
duplicate work – perhaps without realising it.
You also risk losing electronic versions of files
because they have been misnamed or saved into
the wrong subdirectory.
Moreover, a good filing system is vital so
everyone of the digitizing team knows what
they are supposed to do and can fill in for one
another in case of absence.
4. Production and management of electronic documents - 2. From hardcopy to electronic document - page 4
Managing documents
Keep the hardcopies of documents at each stage of the process separate from those at earlier
and later stages. As each document is processed, take it out of one folder, process it, and put it
in the next folder.
Documents that you have received but which have not yet been registered.
To Scan
To Scan
To OCR
To OCR
To Edit
To Edit
Final
Final
To Register
To Register
Click on any folder to view which type of documents it contains.
It is a good idea to keep the hardcopies of documents until you have finished the whole
process, in case you need to refer back to them (for example, you may need to rescan a page
if the file has been corrupted).
Managing documents
To Scan
To Scan
To OCR
To OCR
To Edit
To Edit
Final
Final
Documents that have been given subjects and that
are ready for scanning.
Documents that are in final format and can be
returned.
Documents that have been scanned and that are
ready for optical character recognition.
Documents that have undergone the OCR process
and that are ready for spellchecking and layout.
4. Production and management of electronic documents - 2. From hardcopy to electronic document - page 5
Managing documents
To OCR: Digital image (e.g. TIF) files that are ready to OCR.
To Edit: OCR files, ready to be proofread.
Final: Finished files
You will also need a way of keeping track of electronic versions of the documents you have scanned.
In general, keep separate versions of each file in different subdirectories:
It is a good idea to keep previous versions of a file until you are finished with the document, just in
case the file becomes corrupted and you have to go back to a previous version.
Make sure you also keep copies (backups) of all documents for each stage.
Keep the electronic copies somewhere other than the computer you are working on, in case the
hard disk crashes or the computer is stolen. You can save the copies on your network server, or on
CD-ROMs using a CD-writer.
Registering documents
As soon as a document arrives you should
register it so you can keep track of it.
This is the first book I have to scan, but
before I have to register it
4. Production and management of electronic documents - 2. From hardcopy to electronic document - page 6
bt011962
code for the publication
series (the journal Buletin
Teknik)
volume and issue
number (volume 01,
issue 1)
year (1996)
article within that issue of
the journal
Registering documents
You first have to assign a filename to each document.
The filename is the basis for a good filing system. Give each document a filename so you can
identify it easily.
The following is an example of a filename:
Filenames for books can start with the code of the publisher.
On the hardcopy of each document, write
the filename somewhere unobtrusive (such
as inside the front cover or on the back) so
you can identify it easily. If you have to
return a book to its owner, do not write on
the book itself; use an adhesive label
instead.
If you are producing a digital library, you will
have to assign subjects and perhaps
keywords to each document. You can do
this at the same time as assigning filenames,
or you can get a specialist (such as a
librarian) to do it later.
Registering documents
bt011962
Filename:
bt011962
4. Production and management of electronic documents - 2. From hardcopy to electronic document - page 7
Registering documents
If you work in a library, you may be able to download this information from the catalogue database.
The publisher
The filename
The author(s)
The title of the journal or
magazine (for articles) or
the book series (if
relevant)
Any keywords
assigned
The year of
publication
The volume, issue and page
numbers (for journal or
magazine articles)
The document title
The subject(s)
assigned
The document’s
language
You can use a spreadsheet to keep track of the documents you are registering.
For each document, enter the following information (each item in a separate column):
Registering documents
You can print out the spreadsheet file so staff can refer to them and make notes by hand, or you
can send the file to your colleagues, so that they can update and resend it to you.
Anyway, it’s important to update the spreadsheet regularly.
• Where the document came from (e.g.,
from which library or personal collection),
and where and when to return it (if it must
be returned)
• Date scanned, by whom
• Date of OCR, by whom
• Date proofread, by whom
• Whether the file is in final format (ready
for use)
• Notes on the status of the document
You may need to add extra columns if you also want to record other items, such as the title in
English or another language or the publication city.
You can also add columns to this spreadsheet so you can note the following:
4. Production and management of electronic documents - 2. From hardcopy to electronic document - page 8
Scanning documents
Before scanning, clean any dust off the documents to be scanned, and make sure that all the
pages are present and in the right order.
If the document is in poor condition (as with well-used library books), try to find a fresh copy.
If you have a sheet-fed scanner, cut the book
open (easy and neat if you use a printer’s cutting
machine) to get individual sheets you can feed
through the scanner. If necessary, you can rebind
the books later.
If you don’t want to damage the books, you can
photocopy each page and feed the photocopy
through the scanner – though this uses a lot of
paper and reduces the quality of the scan. If the
book contains photographs, you should scan
them separately by hand: photos do not
photocopy well.
Scanning documents
To scan a document, place it face down on the scanner platen, or put the pages into the sheet
feeder. After this, in the scanning software, choose a setting: resolution and colour. The software
may produce a separate image file (probably in TIF format), or it may save the files in its own
proprietary format for you to convert later.
For this type of material… …use this resolution
Text and graphics that are mainly to be
displayed on screen, and perhaps printed
out using a computer printer
300 dpi, or ‘OCR’ setting
High-quality photos for inclusion in a
photo library or printed publications
600 dpi or higher
Test the scanner on some sample documents at your chosen settings: poor quality can cause
errors in the OCR process later. You may have to adjust the resolution or contrast for each document
to allow for things like different quality printing and transparent paper.
For this type of material… …use this colour setting
Text, black & white line drawings Black & white
Black & white photos grayscale
Colour photos and pictures Colour
4. Production and management of electronic documents - 2. From hardcopy to electronic document - page 9
150 dpi, black & white
300 dpi, black& white
300 dpi, grayscale
600 dpi, black & white
Scanning documents
Click on the answer of your choice.
What do you think is an appropriate scanner setting for a typical book printed in black ink with a
few tables and line drawings?
Scanning documents
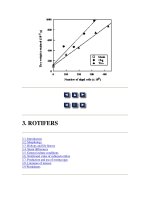
There is a trade-off between image size and quality: the better the quality, the more disk space the
image takes up. For general use, try to keep the image size to a minimum by scanning at the lowest
resolution that gives you an acceptable result (probably 300 dpi).
If you need high-quality images, then scan at a higher resolution.
Scan photographs as JPG, and pictures with large blocks of the same colour
(such as diagrams) as GIF.
If a diagram contains labels, scan the labels as part of the graphic rather than
as separate text blocks. Make sure that all the labels in diagrams can be read in
the scanned version.
You may also choose to scan figure captions as part of the graphic: this
ensures that they do not get separated from the figure they refer to. But if the
caption contains valuable information not mentioned elsewhere in the text on
that page, scan it as a text block. This makes sure that the caption text can be
searched by a search engine (if you put the documents on the Internet or into a
digital library).
4. Production and management of electronic documents - 2. From hardcopy to electronic document - page 10
Scanning documents
Tables create special problems later at the OCR stage, because:
• they often contain lines and small type, making it difficult for OCR software to recognize the
individual characters, and
• they contain numbers – which are hard to proofread.
Two ways to solve these problems are:
• scan the tables and treat them as pictures rather than text, or
• retype the tables rather than scanning and trying to OCR them.
Scanning documents
Save in
If you are combining scanning and OCR, you can save the resulting OCR file in a format that can
be read by your word processor (e.g., DOC) or your web editor (e.g., HTM).
Filename:
bt011962
SCANNING
Now, scan each page of the document at the settings you have chosen.
If you are doing the scanning and OCR separately, save the file(s) in TIF format.
Follow the file-naming convention you have chosen: e.g., bt011962.tif for the document with the
filename bt011962.
Then, save these files in the ‘To OCR’ subdirectory.
4. Production and management of electronic documents - 2. From hardcopy to electronic document - page 11
Scanning documents
If your document contains both text and pictures,
it may be best to scan twice: once to scan the text in
black & white, and again to scan the pictures in
colour.
Save the text and each picture as separate files.
You will reincorporate them into the document later.
This can save time in the long run.
If you have chosen to produce your document in
HTML format, put the HTML document in its own
subdirectory, along with the pictures that go with it.
Save the images with the same name as the
document, but numbered consecutively (e.g. 01, 02,
03, etc.).
Optical character recognition
Now, you can OCR the file that is in the ‘To OCR’ subdirectory.
OCR software converts a scanned image into a text file that a word processor can read. To do
this, it must first recognize where the text is on the page (it may be able to detect blocks of
text automatically, or you may have to do it manually).
The software then breaks the text blocks down
into lines and individual characters. It tries to
match the image of each letter against patterns it
recognizes as an ‘a’, ‘b’, etc
If it does not recognize a particular character it
may ask the user for help.
If the OCR software fails to recognize a large
number of characters, it may be better to adjust
the settings or retype all or parts of the document,
rather than trying to correct the OCR version.
4. Production and management of electronic documents - 2. From hardcopy to electronic document - page 12
Optical character recognition
Save the file in a format such as DOC for Microsoft Word (if you want to produce PDF
documents), or in HTM format (if you want to produce HTML documents).
Lastly, name your file following your file-naming convention, and save it to the ‘To Edit’
subdirectory.
See the example below:
OCR
Filename:
bt011962
SCANNING
OR
Optical character recognition
You have registered a document as bt021973. After scanning, you will save the file as __________
in the folder _________. You then OCR this file and create a file named _____________. You save
this file in the folder ____________.
bt021973.tif
To OCR
bt021973.doc
To Edit
1
2
3
4
Click on each option and drag it in the appropriate space.
When you have finished, click on the Confirm button.
4. Production and management of electronic documents - 2. From hardcopy to electronic document - page 13
Proofreading
Now you have to do proofreading. You can do this in
two ways:
• Comparing the scanned text on screen with the
hardcopy, and entering the corrections directly into the
computer. You can use your word processor’s
spellchecker to help you find spelling errors quickly.
• Printing out the scanned text and comparing it with
the original copy. Mark any corrections on the printout,
then enter them into the computer. This is a slower
method, but may be the best option if you do not have
enough computers for each proofreader.
You can combine these two methods: first correct any
obvious mistakes (such as major layout problems and
spelling errors) on screen. Then print out the file and
check, by hand, for errors which could be difficult to
identify.
Proofreading
You can do proofreading using either your web editing program (for a HTML file), or your word
processor (if the file is destined to become PDF).
Word processors are generally easier to use for editing and may have a more powerful
spellchecker, so you may still decide to use a word processor for these tasks, then save the
document in HTML format.
However, such files are generally large because the word processor inserts many unnecessary
formatting codes. So, after editing the document in your word processor, try saving it in an
intermediate format, such as TXT (plain ASCII text) or RTF.
Then, open this in your web editor and save it as HTML. This usually results in smaller, more
manageable files. Special programs to convert from one format to another are also available.
PROOFREADING
or
or
4. Production and management of electronic documents - 2. From hardcopy to electronic document - page 14
Layout
Your OCR software may produce a document that consists of straight text: no columns, no pictures,
no headers and footers.
You may have to reinsert these by hand, or correct
where they appear on the page. You may also want
to change the typeface, heading styles, and so on, to
make the document more attractive and
readable.
Alternatively, you may be able to adjust the settings
of your OCR program so it preserves the layout of
the page. This can be helpful, but it is rarely totally
satisfactory.
It may be best to correct major layout problems
before doing the proofreading.
You can correct more detailed layout problems at
the same time as proofreading. But it is probably
better to do it afterwards in a separate operation to
avoid proofreading errors.
Layout
For HTML documents, you should probably use a
simple layout: a single column of text, and so on.
Use your web editing program to insert the pictures
and captions. Make sure that all the links to the
images are correct, or the images will not display in
the document.
For documents destined to become PDFs, you can use
your word processor to create a suitable layout.
If you want to create both HTML and PDF versions of
the document, do all the proofreading and layout in
your word processor, then convert the finished result
into PDF and HTML formats.
Do not try to recreate the original layout exactly:
it can be very difficult and time-consuming.
4. Production and management of electronic documents - 2. From hardcopy to electronic document - page 15
Producing the final version
For many documents, you may have to add some information to the text so that readers can
identify it easily.
For a book, make sure the book title, author or editor, publisher and publication date
are all included.
For chapters in a book, also include the title and author of that chapter and the
original page numbers in the printed version of the book.
For journal articles, include journal title, date, volume and issue number, the article
title and authors, and the page numbers in the original printed journal.
You can include this information on the first page or in a footnote. You can also put the book or
journal title in a header or footer on each page. This information is especially important for scientific
articles, where the reader needs to be able to cite the original source accurately.
Producing the final version
In HTML and PDF files, you can add ‘bookmarks’
and hyperlinks into a document.
You can, for example, build a ‘live’ table of
contents for that document, so the user can
click on a chapter title in the Table of Contents, and
jump directly to that chapter in the text.
When you have finished, you can put your
documents in the ‘Final’ folder.
4. Production and management of electronic documents - 2. From hardcopy to electronic document - page 16
Summary
• There are four stages in digitizing documents: registering, scanning,
optical character recognition, and proofreading and reformatting.
• Before scanning a large number of documents, first catalogue them,
and use a filing system to keep track of them.
• To scan a document, place it face down on the scanner platen, choose
a suitable setting (resolution and colours) and scan each page of the
document at the settings you have chosen.
• OCR software converts a scanned image into a text file that a word
processor can read.
•To obtain the final version of a file, you have to proofread it and
correct the layout. For many documents, you should add some
information to the text so that readers can identify it easily.
Exercises
The following six exercises will test your understanding of the concepts covered in the lesson and
provide you with feedback.
Good luck!
4. Production and management of electronic documents - 2. From hardcopy to electronic document - page 17
To OCR
To Scan
To Edit
To Register
Final
You may wish to keep five file folders to hold the documents as they undergo the scanning
process. Put these five folders in the correct order.
Exercise 1
Order the options by clicking on each.
When you have finished, click on the Confirm button.
You should keep earlier versions of files even though they take up a lot of disk
space.
True
False
Exercise 2
Click on the answer of your choice
4. Production and management of electronic documents - 2. From hardcopy to electronic document - page 18
Scanning is more time-consuming than OCR.
True
False
Exercise 3
Click on the answer of your choice.
Exercise 4
If your OCR program makes many errors trying to read a document, what can you do?
Type your answer in the box.
When you have finished, click on View Answer.
4. Production and management of electronic documents - 2. From hardcopy to electronic document - page 19
What is the most time-consuming part of the entire process?
Scanning
OCR
Proofreading
Exercise 5
Click on the answer of your choice.
When you do the layout, try to reflect the original layout as far as possible in the
document.
True
False
Exercise 6
Click on the answer of your choice.
4. Production and management of electronic documents - 2. From hardcopy to electronic document - page 20
If you want to know more
ReadIris website: example of scanning and OCR software:
()
OmniPage website: example of scanning and OCR software:
()
FineReader website: example of scanning and OCR software:
()
Guide to Digital Scientific Artwork:
( )
Additional Reading:
Witten, I.H. & Bainbridge, D. 2002. How to build a digital library.
The Morgan Kaufmann Series in Multimedia Information and
Systems, Edward Fox, Series Editor. ISBN: 1-55860-790-0