Adobe Photoshop Lightroom 5 - Quick Start Guide
Bạn đang xem bản rút gọn của tài liệu. Xem và tải ngay bản đầy đủ của tài liệu tại đây (5.01 MB, 76 trang )
ADOBE PHOTOSHOP LIGHTROOM 5 - QUICK START GUIDE
www.lightroomqueen.com/lr5quickstart
1
ADOBE
PHOTOSHOP
LIGHTROOM 5
QUICK START GUIDE
Victoria Bampton
www.lightroomqueen.com
www.lightroomqueen.com/lr5quickstart
LEGAL NOTICE:
© 2013 Victoria Bampton. All rights reserved
This eBook is available for free download from />Adobe, the Adobe logo, Lightroom, and Photoshop are either registered trademarks or
trademarks of Adobe Systems Incorporated in the United States and/or other countries.
THIS PRODUCT IS NOT ENDORSED OR SPONSORED BY ADOBE SYSTEMS INCORPORATED,
PUBLISHER OF ADOBE PHOTOSHOP LIGHTROOM.
All other trademarks are the property of their respective owners.
The information contained within this ebook is given in good faith and is believed to
be accurate, appropriate and reliable at the time it is given, but is provided without any
warranty of accuracy, appropriateness or reliability. The author does not accept any liability
or responsibility for any loss suffered from the reader’s use of the advice, recommendation,
information, assistance or service, to the extent available by law.
2
ADOBE PHOTOSHOP LIGHTROOM 5 - QUICK START GUIDE
www.lightroomqueen.com/lr5quickstart
3
TABLE OF CONTENTS 3
INTRODUCTION 4
BEFORE YOU START 5
BASIC LIGHTROOM WORKFLOW 8
INSTALLING LIGHTROOM 10
GETTING PHOTOS INTO LIGHTROOM 15
BACKING UP LIGHTROOM 23
THE LIGHTROOM WORKSPACE 26
VIEWING YOUR PHOTOS IN LIGHTROOM 30
SELECTING THE BEST PHOTOS 38
ADDING METADATA TO YOUR BEST PHOTOS 43
FINDING AND FILTERING YOUR PHOTOS 48
EDITING THE BEST PHOTOS 51
FURTHER EDITING IN OTHER PROGRAMS 67
YOUR FINISHED PHOTOS 70
CONGRATULATIONS, YOU’RE NOW A LIGHTROOM USER! 75
TABLE OF CONTENTS
ADOBE PHOTOSHOP LIGHTROOM 5 - QUICK START GUIDE
4 www.lightroomqueen.com/lr5quickstart
L
ightroom is an image management and editing program designed especially
for photographers. It guides you through your workflow, including organizing,
editing, and sharing your digital images and videos.
It’s designed around a database, rather than a file browser, so it keeps a record of the files even
when the original photos are offline. That also makes it quick to search and find photos.
Lightroom’s Develop module is a non-destructive, parametric editor. That simply means that your
edits are saved as text instructions, rather than being applied to the pixels themselves, so it doesn’t
degrade the original image data. You can experiment without fear.
This Quick Start Guide is designed to guide you through a simple Lightroom workflow. It’ll give you
a taste of what Lightroom can do, and help you to feel comfortable using Lightroom to manage
your photos, while avoiding the most frequent problems.
We’re not going to cover every tool, button, slider and checkbox, and we’re not going to cover all
the possible variations in workflow. If we did, it would fill hundreds of pages and then it wouldn’t be
a getting started guide!
You’ll find detailed information in the Help documentation provided by Adobe at
and in books such as my own book, Adobe Photoshop
Lightroom 5 - The Missing FAQ, available from and online
bookstores. I hope you find the information useful. Now let’s get started
INTRODUCTION
WHAT IS A CATALOG?
All of the information about your photos
is stored as text in a database. This is
called a Lightroom Catalog. In a library
of books, the library catalog doesn’t
contain the books themselves, but
a record of where to find each book
and information about it. Similarly,
Lightroom’s catalog records where to
find the photo on the hard drive and
stores information about that photo,
but it doesn’t contain the photo itself.
Lightroom also keeps small previews
of the photos, like a library catalog may
keep a photo of the book’s cover.
ADOBE PHOTOSHOP LIGHTROOM 5 - QUICK START GUIDE
www.lightroomqueen.com/lr5quickstart
5
B
efore you start importing your photos into Lightroom, you have a couple
of decisions to make. Making them now will save a lot of unnecessary
work later.
First, you need to decide where to store your catalog and photos on your computer. And then it’s
useful, but not essential, to decide on your folder structure and file naming. In a recent poll, folder
structure was the main thing Lightroom users wished they’d understood when they started.
WHERE WILL YOU STORE YOUR CATALOG?
Because Lightroom is a non-destructive editor and cataloging program, all of the information about
your photos and the changes you’ve made within Lightroom are stored in Lightroom’s catalog.
When you first start Lightroom, it’ll ask you where to store the catalog and what to name it. By
default, the catalog will be called Lightroom 5 Catalog.lrcat and it will be stored in your main
Pictures folder.
Next to the catalog, Lightroom will create a Previews folder (Windows) / file (Mac) called Lightroom
5 Catalog Previews.lrdata. The previews folder/file contains a small JPEG preview of all the photos
you import, so it can grow very large.
We’ll select the location in the “Installing Lightroom” section on page 10.
BEFORE YOU START
DO I HAVE TO USE A CATALOG?
Lightroom always creates a catalog, but
you can add the files at their existing
location, so it doesn’t have to turn your
existing workflow upside-down. It’s also
possible to write some of the settings
into the files themselves, or sidecar
files for proprietary raw files, using a
metadata format called XMP.
ADOBE PHOTOSHOP LIGHTROOM 5 - QUICK START GUIDE
6 www.lightroomqueen.com/lr5quickstart
If you have plenty of space on your boot drive (usually C:\ on Windows or Macintosh HD on Mac),
then you could keep the catalog and previews in the default location, or you could select another
drive. If you’re not sure what to choose, Lightroom will use the default settings, and you can choose
to move it later.
Wherever you choose to store your catalog and previews, make a note of the catalog name and
location you choose, as you’ll need to ensure the catalog is backed up.
WHERE WILL YOU STORE YOUR PHOTOS?
Lightroom doesn’t hide your photos away from you. They’re kept as normal image files in folders
on your hard drive, which you can also access using other software. We’ll select the location in the
“Getting Photos Into Lightroom” section on page 15.
By default, Lightroom will copy your photos into the Pictures folder in your user account. If you
already have an organized filing system, you can choose to leave the photos where they are, or you
can choose another location, such as another hard drive.
If you work on a laptop, or a desktop computer with a small boot drive, remember that your
Pictures folder will fill up quickly, so you may want to store your photos on another internal drive or
a mains-powered external drive instead of the default Pictures folder.
It’s best to keep all the folders of photos under a single parent folder (or one for each drive),
rather than scattering the photos around your hard drives. It’s easier to back up the photos if
they’re in one or two locations. As your collection of photos grows, you can easily expand onto
additional hard drives.
JUST ONE CATALOG?
Lightroom is designed to manage all of
your photos in a single catalog. It can’t
search across multiple catalogs or open
multiple catalogs at the same time.
Unless you have a really good reason
for using multiple catalogs (for
example, personal vs. work photos),
try to stick to just one, and use folders
and collections to separate different
types of photography.
CATALOGS VS. FILE BROWSERS
Originally recorded using Lightroom 1,
George Jardine’s video remains one of
the best explanations of using catalogs
instead of browsing for files.
/>ADOBE PHOTOSHOP LIGHTROOM 5 - QUICK START GUIDE
www.lightroomqueen.com/lr5quickstart
7
HOW WILL YOU ORGANIZE YOUR PHOTOS INTO FOLDERS?
Importing photos into Lightroom doesn’t force you to rearrange them. If you already have a well
thought out filing system, you can keep your existing folder structure. It’s best not to duplicate
photos in multiple folders—we’ll explore how to use keywords and collections to group similar
photos.
As far as Lightroom’s concerned, your choice of folder structure doesn’t make a lot of difference.
Folders are just a place to store the photos, and you can use metadata/keywords to organize them.
That said, you do need some level of organization to make it easy to back up your photos.
Many people choose a date-based folder structure, with folders for days (or shoots) within folders
for months, which in turn are in folders for years.
HOW WILL YOU NAME YOUR PHOTOS?
The main things to consider when naming your files is to make the names unique. File names
direct from the camera may be repeated many times. For example, if your camera creates names
like IMG_4857, once you’ve taken 9999 photos, it will start counting again at 0001. If a file
doesn’t have a unique name, and it’s accidentally moved to another folder, other photos could be
overwritten.
The date and time works well as a unique file name, for example, YYYYMMDD-HHMMSS (year
month day—hour minute second). If you prefer to keep to the camera file name, YYYYMMDD-
original file number (and a camera code if you’re shooting with more than one camera) can work
well with a low risk of duplication.
You can rename the files at any time, as long as you do it within Lightroom, but doing it at the
time of import means that any backups you make while importing will have the same names as the
working files.
WHAT IS METADATA?
Metadata is often defined as ‘data
describing data’.
As far as photos are concerned,
metadata describes how the photo
was taken (camera, shutter speed,
aperture, lens, etc.), who took the
photo (copyright) and descriptive
data about the content of the photo
(keywords, captions).
Lightroom also stores all of your
Develop edits as metadata, which
means that it records your changes as
a set of text instructions (i.e. Exposure
+0.33, Highlights −30, Shadows +25,
etc.) instead of applying them directly
to the image data. That means you
can change your mind later without
degrading the image.
8 www.lightroomqueen.com/lr5quickstart
ADOBE PHOTOSHOP LIGHTROOM 5 - QUICK START GUIDE
W
e mentioned earlier that Lightroom guides you through a basic
workflow, and we’re going to follow its lead in this eBook. Here’s a
quick summary of the path you’ll take
Capture
•
Think about your file format—raw vs. JPEG
•
Expose the photo correctly in the camera to produce the best quality
Import
•
Store photos in organized folders
•
Consider renaming to a unique filename
•
Apply basic metadata such as copyright and general keywords
•
Apply any Develop presets as a starting point, such as a camera profile
•
Build previews to save time later
Organize
•
Browse through your photos
•
Manage photos in folders
•
Group photos into collections and stacks
•
Add flags, star ratings and labels to identify your favorite photos
•
Add additional metadata, such as keywords and map locations
•
Search for photos using filters and smart collections
•
Don’t forget to back up the catalog as well as the photos themselves
BASIC LIGHTROOM WORKFLOW
ADOBE PHOTOSHOP LIGHTROOM 5 - QUICK START GUIDE
www.lightroomqueen.com/lr5quickstart
9
Develop
& Retouch
•
Adjust tone & color
•
Remove noise, sensor dust, sharpen and apply lens corrections
•
Straighten & crop
•
Apply effects, such as black & white or split tones
•
Switch to Photoshop and other external editors for pixel based editing
•
You can also create panoramic shots and HDR photos in external editors
Output
•
Create finished files in the size, format and color space of your choice
•
Email your photos direct from Lightroom
•
Print using your printer or save layouts to JPEG to print at a local print lab
There are further output options which we won’t consider in this Quick Start
Guide, including:
•
Use Export plug-ins to enhance your export, such as adding borders
•
Design photo books, save them as PDF eBooks or have them printed by Blurb
•
View slideshows and export them to video, PDF and JPEG formats
•
Create web galleries to upload to your website
•
Use Publish Services to synchronize with Flickr and other photo sharing
websites or folders on your hard drive
ADOBE PHOTOSHOP LIGHTROOM 5 - QUICK START GUIDE
10 www.lightroomqueen.com/lr5quickstart
W
hether you’re installing the trial for the first time, or you’ve
already purchased Lightroom, the installation and program
are the same.
Download the latest version from Adobe—it’s always the full program, so you can just download the
trial from />MINIMUM SYSTEM REQUIREMENTS
The minimum system requirements for installing Lightroom are:
Windows
•
Intel® Pentium® 4 or AMD Athlon® 64 processor
•
DirectX 10–capable or later graphics card
•
Microsoft® Windows 7 with Service Pack 1 or Windows 8
•
2GB of RAM (4GB minimum recommended)
•
2GB of available hard-disk space
•
1024x768 display
•
Internet connection required for Internet-based services
INSTALLING LIGHTROOM
ADOBE PHOTOSHOP LIGHTROOM 5 - QUICK START GUIDE
www.lightroomqueen.com/lr5quickstart
11
Mac
•
Multicore Intel® processor with 64-bit support (that’s all Intel Macs apart from
the original Core Duo)
•
Mac OS X 10.7 (Lion) or 10.8 (Mountain Lion)
•
2GB of RAM (4GB minimum recommended)
•
2GB of available hard-disk space
•
1024x768 display
•
Internet connection required for Internet-based services
That is the minimum required in order to install Lightroom, but it is likely to ‘walk’ rather than run
on those specs! Lightroom does benefit from higher specification hardware.
MULTIPLE COMPUTERS
Lightroom’s license agreement is cross-platform (both Windows and Mac)
and it allows the main user to use Lightroom on 2 computers as long as
they’re not in use at the same time, for example, a desktop and a laptop.
Lightroom isn’t designed to be used over a network. The Lightroom
catalog needs to be stored on a locally attached drive (internal or
external), and can only be used by one person at a time. The photos,
however, can be stored on a network drive or NAS unit.
There are options for using your catalog on multiple machines, such as
between your desktop and laptop.
Those options include:
• Export as Catalog and Import from Another Catalog to split/
merge smaller chunks of the catalog.
• Store your main catalog and photos on an external drive, and
plug that drive into your chosen machine.
• Copy the catalog between devices, perhaps using software
such as Dropbox, as long as you only use one copy of the
catalog at a time and allow the software to finish synchronziing
before switching machines.
ADOBE PHOTOSHOP LIGHTROOM 5 - QUICK START GUIDE
12 www.lightroomqueen.com/lr5quickstart
INSTALLING LIGHTROOM ON A WINDOWS PC
The Windows version comes with a standard installer, and is installed like all other Windows software.
1. Find the .exe file that you’ve downloaded and double click to run it. By default, the download
will be stored in your Downloads folder.
2. Double click the Lightroom_5_11.exe file to start the installer. The name of the file may vary
slightly depending on the language version.
3. Follow the on screen instructions, and agree to the License Agreement.
4. Confirm that you want to install to the main Program Files folder and then on the final screen,
press Install. Once it’s completed, press Finish to close the installer.
5. Go to the desktop and look for the Lightroom 5 shortcut. Double click to open the application.
Figure 2 Extract the files to your computer before
letting the installer automatically run.
Figure 1 Double click on the exe
file to start the installer.
Figure 3 Follow the on screen instructions to
finish installing the software.
Figure 4 Double click the shortcut on
the desktop to launch Lightroom.
ADOBE PHOTOSHOP LIGHTROOM 5 - QUICK START GUIDE
www.lightroomqueen.com/lr5quickstart
13
INSTALLING LIGHTROOM ON YOUR MAC
To install the Mac version of Lightroom you must run the installer,
instead of dragging an app into the Applications folder.
1. Find the .dmg file that you’ve downloaded and double click to open it.
By default, the download will be stored in your Downloads folder.
2. Double click the Adobe Photoshop Lightroom.pkg file to launch the installer.
3. Follow the on screen instructions, pressing Continue to move
between screens, and agree to the License Agreement.
4. On the final screen, confirm that you want to install to the main
Applications folder and press Install.
5. The installer will ask for your
computer administrator password
before installing. Once it’s completed,
press Close to close the installer.
6. Go to the Applications folder or Launchpad
and look for Adobe Photoshop Lightroom 5.
Double click to open the application.
Figure 5 Double click on the dmg file to open it.
Figure 6 Double click on the installer to run it.
Figure 7 Press Continue to move
through the installer screens.
Figure 9 Double click on the app
in the Applications folder to launch
Figure 8 Confirm the install location (Macintosh
HD/Applications by default) and then press Install.
ADOBE PHOTOSHOP LIGHTROOM 5 - QUICK START GUIDE
14 www.lightroomqueen.com/lr5quickstart
OPENING LIGHTROOM FOR THE FIRST TIME
Once Lightroom is installed, there are very few differences between the
Windows and Mac versions, apart from the slightly different appearance.
We’ll carry on using the Mac version for screenshots, but where there are
notable differences, we’ll show both.
1. If you haven’t used Lightroom before, it will ask to create a catalog,
as we discussed on page 5. Press Continue to use the default
location, or Choose a Different Destination to select another folder and
catalog name.
2. Lightroom will then ask for your license key. If you’re using the trial,
simply select the ‘I want to try’ option and press Finish. If you’ve
already purchased a serial number, press Next and enter it on the next
screen. It’s worth registering your software with Adobe too, as they will
then keep a record of your serial number in case you lose it in future.
3. Lightroom’s main interface will open with some initial tips in the center
of the screen. Those tips and related yellow highlights will give you a
quick guided tour of Lightroom. You can press Next to view the tips, or
you can check the ‘Turn Off Tips’ checkbox and click anywhere else on
the screen to hide them.
Figure 12 Tips appear in the center of the screen, with
yellow highlights.
Figure 10 When you first open Lightroom, it asks
whether you want to run as a trial or enter your serial
number.
Figure 11 Lightroom then asks where to store your
new Lightroom catalog.
www.lightroomqueen.com14
ADOBE PHOTOSHOP LIGHTROOM 5 - QUICK START GUIDE
www.lightroomqueen.com/lr5quickstart
15
A
s Lightroom is based around a database, the first thing you’ll need to do is add
the information about your photos to Lightroom’s database. This process is
called Importing. Don’t let that confuse you—although it’s called importing,
the photos don’t go ‘into’ Lightroom. A better word to describe the process might be
reference, link, or register.
Just because you’re importing photos into Lightroom doesn’t mean you’re tied in. Your photos
are always accessible, the metadata can be written to the file in standardised formats that other
software can understand (excluding Develop settings), and you can export the Developed photos to
standardised formats if you ever decide to switch to other software.
While you’re importing the photos, Lightroom can copy or move the photos to a new location of
your choice, but that’s not required—if the photos are already safely on your hard drive, Lightroom
can reference them at their existing location.
First we’ll consider importing new photos from a memory card or camera, and then we’ll look at
adding your existing photos too.
GETTING PHOTOS INTO LIGHTROOM
FILE FORMATS
Most camera raw file formats are
supported by Lightroom. You can
check whether your camera’s raw
files are supported by visiting
/>If your camera’s newly released, you
may need to wait for an update to
support your camera.
Lightroom can also import DNGs,
JPEGs, TIFFs, PSD files saved with
maximize compatibility, and PNG files.
ADOBE PHOTOSHOP LIGHTROOM 5 - QUICK START GUIDE
16 www.lightroomqueen.com/lr5quickstart
Figure 13 Photos are added to Lightroom’s catalog using the Import dialog.
The first thing
you’ll need to
do is add the
information
about your
photos to
Lightroom’s
database. This
process is called
Importing but
a better word
to describe the
process might
be reference,
link, or register.”
ADOBE PHOTOSHOP LIGHTROOM 5 - QUICK START GUIDE
www.lightroomqueen.com/lr5quickstart
17
IMPORTING FROM A MEMORY CARD
1. Insert your memory card into the card reader or attach the camera to the computer. Card
readers usually work more reliably with Lightroom than direct camera connections.
2. By default, the Import dialog shows automatically when inserting a memory card, but if it
doesn’t appear, press the Import button in the lower left corner of the Lightroom workspace.
3. In the Source panel, on the left hand side of the Import dialog, click on your memory card. If
you only have a single device attached, it may be selected automatically.
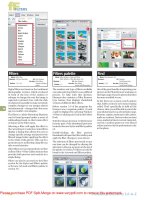
4. Your photos will show as thumbnails in the central preview area. It’s possible to view and
uncheck photos in the Import dialog, but it’s easier to sort through them in the Library module
after import.
5. At the top of the Import dialog, select Copy. This will copy the photos from the memory card to
your computer’s hard drive. Move and Add will be disabled automatically when importing from a
memory card.
6. In the right hand panels, you decide how Lightroom should handle the photos as it imports
them, including setting filenames and locations.
Figure 16 Select Copy at the top of the dialog, to copy
the photos to your hard drive.
Figure 15 You can uncheck photos you don’t want to
import.
Figure 14 Select the memory card in
the Source panel.
Your photos will show as thumbnails in
the central preview area. It’s possible to
view and uncheck photos in the Import
dialog, but it’s easier to sort through
them in the Library module after import.”
ADOBE PHOTOSHOP LIGHTROOM 5 - QUICK START GUIDE
18 www.lightroomqueen.com/lr5quickstart
7. In the File handling panel, set the Render Previews pop-up to Standard. Once Lightroom’s
finished importing the photos, it will create previews to allow you to browse quickly.
8. Make sure the Don’t import suspected duplicates checkbox is checked. It’s not infallible but it
helps avoid creating duplicates if you forget to reformat the card in the camera before shooting
more photos.
9. Check the ‘Make a Second Copy’ option and click on the file path to choose a location on
another hard drive. Consider it only a temporary backup, and not a replacement for a proper
backup system. We’ll consider backups in more detail in the next section.
10. In the File Renaming panel, you can rename the photos as they’re imported. How have you
decided to name your files? In this example, we’ll create a preset for a date/time based
filename, but you can create a different filename template if you prefer. Check the Rename
Photos checkbox, and then in the Template pop-up, select Edit.
The Filename Template Editor dialog allows you to create a variety of file naming templates
using tokens. In the Preset pop-up at the top,select the Date-Filename preset and then click
in the white area below and delete the Filename token.
Further down the dialog, in the Additional section, there’s a pop-up of date/time based
tokens. Select Hour from the pop-up and press Insert. Repeat for Minute and Second. The
tokens at the top should now read Date (YYYYMMDD)—Hour Minute Second.
Finally, save it as a preset by selecting the Preset pop-up at the top of the dialog and choosing
Save Current Settings as New Preset… and giving it a name. Press Done to close the dialog,
and check that your new preset is selected in the File Renaming panel.
Figure 18 If you select Edit in the File Renaming panel,
you’ll see the Filename Template Editor. It uses tokens to
build a filename structure of your choice. The date tokens
are shown in the inset screenshot.
Figure 17 In the
File Renaming panel,
you can set a new
file naming template,
or you can leave it
unchecked to retain
the camera filename.
ADOBE PHOTOSHOP LIGHTROOM 5 - QUICK START GUIDE
www.lightroomqueen.com/lr5quickstart
19
PREVIEW SIZE
Minimal & Embedded—quick to import,
but slow when viewing the photos
Standard—recommended default, takes
time initially but much quicker when
viewing the photos
1:1—select 1:1 size if you need to zoom
in on every photo to check focus.
11. In the Apply During Import panel, Develop Settings allows you to apply a preset to all of the
imported photos, but leave it set to None for now.
You can use the Metadata option to add your copyright to the photos at the time of import,
so that none are missed. In the Metadata pop-up, select New and you’ll see the New
Metadata Preset dialog. Give the preset a name such as Copyright Preset and enter your
copyright information. Only checked fields will be saved. Press the Create button and your
new preset will be selected in the Metadata pop-up in the Import dialog.
In the Keywords section, you can add general keywords that apply to all of the photos, but
we’ll come back to adding specific keywords in the Library module.
12. Finally you need to set the Destination for the photos. Where did you decide to keep your
photos on page 6? Navigate to that location in the Destination panel.
Figure 19 In the File Handling panel,
choose your preview size and temporary
backup location.
Figure 20 In the Apply During Import
panel, add your copyright metadata.
ADOBE PHOTOSHOP LIGHTROOM 5 - QUICK START GUIDE
20 www.lightroomqueen.com/lr5quickstart
13. How did you decide to organize your photos on page 7? The options at the top of the
Destination dialog allow you to set the folder structure. The folders in italic preview the folder
hierarchy that will be created by your import, so you can test different options to see what
will happen. If you’re not sure which to select, the settings shown in the screenshots are a
good default.
14. That’s a lot of preferences to set every time you want to import some photos! But that’s not
a problem, Lightroom will remember your last used settings, and you can keep additional sets
of settings as presets. At the bottom of the Import dialog are the Import Presets. Select Save
Current Settings as New Preset from the pop-up and give it a name such as ‘Import from
Card’ and press Create. In future, you can select that preset from the pop-up.
15. Finally, press the Import button. The Import dialog will close and the photos will start to
appear in the Library module. They’ll be grouped in a special collection in the Catalogs panel
called Current Import/Previous Import, and they’ll also show up in the Folders panel.
Figure 22 Save your
settings as a preset using
the pop-up at the bottom
of the dialog.
Figure 21 Choose where to put the photos using
the Destination panel. If you’re not sure which folder
structure to use, YYYY/MM/DD is a good default.
Lightroom will remember your last used
settings, and you can keep additional sets
of settings as presets.”
ADOBE PHOTOSHOP LIGHTROOM 5 - QUICK START GUIDE
www.lightroomqueen.com/lr5quickstart
21
ADDING YOUR EXISTING PHOTOS
As a keen photographer, you likely already have a large number of photos and videos stored on your
hard drive. Those photos can also be imported into your Lightroom catalog, either at their current
location or at a new location.
1. Open the Import dialog by pressing the Import button or by going to File menu > Import Photos
& Video. Your hard drives are listed in the Files section of the Source panel. Navigate to the
folder currently holding your photos. If you find a standard Windows or Mac dialog easier to use,
click the large button above the Source panel and choose Other Source from the menu.
2. Select the folders containing your photos. If the photos are stored under a single folder, such
as the Existing Photos folder in figure [x], you can select that folder and check the Include
Subfolders checkbox above. If your photos are spread around multiple folders, hold down Ctrl
(Windows) / Cmd (Mac) while clicking on multiple folders, or hold down Shift while clicking on
the first and last folder in a series of consecutive folders. If you have thousands of photos to
import, it can help to break the import into smaller chunks, for example, 10,000 at a time.
3. Do you want to leave the photos where they are, or copy/move them to a new location? Make
your choice from the options at the top of the Import dialog. Select:
•
Add—if you like your existing folder structure and want to leave the photos where they are
•
Move—to let Lightroom move the photos to a new location that you’ll set in the
Destination panel
•
Copy—if you want to leave the original photos alone and create a copy in the location you
choose in the Destination panel. You will need twice as much hard drive space if you
choose this option, as you’ll be duplicating all of your photos.
4. In the File Handling panel, decide which size previews to build immediately after import.
Lightroom will need to build standard-sized previews before you can view the photos, but you
may want to delay that process until a more convenient time if you’re importing thousands of
Figure 23 Select
your folders of
existing photos using
the Files section of
the Source panel.
Figure 24 To
add your photos to
Lightroom’s catalog
without moving them,
select Add at the top
of the dialog.
EXPLORE DNG
Copy as DNG is one of the options at
the top of the Import dialog. DNG is an
openly documented raw file format. We
won’t go into it in detail in this Quick
Start Guide, but it’s a topic you might
want to explore further. You can easily
convert your files later in your workflow.
ADOBE PHOTOSHOP LIGHTROOM 5 - QUICK START GUIDE
22 www.lightroomqueen.com/lr5quickstart
existing photos. If you choose Minimal now, you can build previews later by selecting the photos
in the Library menu and selecting Library menu > Previews > Build Standard-Sized Previews.
5. Don’t Import Suspected Duplicates is especially useful if you’re moving photos to a new
location while importing
6. If you’ve set the import type to Add, your work is done—just press Import and allow Lightroom
to register all of the selected photos in the catalog.
7. If you’ve chosen Move or Copy, you’ll need to choose where to put the photos. Where did you
decide to keep your photos on page 6? Navigate to that location in the Destination panel.
8. How did you decide to organize your photos on page 7? As in the Importing New Photos
section, you set the folder structure using the Organize pop-up. The folders in italic preview
the folder hierarchy that will be created by your import, so you can test different options to
see what will happen.
•
By Original Folders—moves or copies the photos to your new location, but retains the
existing folder structure.
•
By Date—creates a dated folder structure, using the Date Format of your choice.
•
Into One Folder—places the photos in a single folder. When importing all of your existing
photos, it’s usually best to skip this option.
9. Save your preset for next time, as in step 14 on page 20, and then press the Import
button.
Figure 26 If you choose to move/copy your existing
photos, Lightroom can replicate your previous folder
structure or create a new one.
Figure 25 If you’re importing a large number of
photos, set Render Previews to Minimal and build
them at a more convenient time.
ADOBE PHOTOSHOP LIGHTROOM 5 - QUICK START GUIDE
www.lightroomqueen.com/lr5quickstart
23
B
efore we go any further, it’s essential to know how to
back up your work.
BACK UP YOUR CATALOG
Since all of the work you do in Lightroom is stored in your Lightroom catalog, you’ll need to ensure
that it’s backed up regularly.
It’s a database, and while corruption is relatively rare, it is possible. By default, Lightroom prompts
you to back up your catalog weekly. It creates a new folder using current date/time as the name of
the folder, and copies the catalog into that new folder. It keeps all of those different versions, so
you can ‘step back in time’ to an earlier version if some corruption occurs.
By default, Lightroom puts the backups in dated folders inside a Backups folder, which is stored
next to your catalog. You can change that location to another drive using the Back Up Catalog
dialog, and the frequency is set using the Catalog Settings dialog.
To change the settings, open the Catalog Settings dialog to the General tab. On Windows, Catalog
Settings is under the Edit menu, or on Mac it’s under the Lightroom menu. Change the Backup
Settings pop-up to ‘When Lightroom next exits’.’
BACKING UP LIGHTROOM
KEEP VERSIONED BACKUPS
Lightroom’s catalog is just a database
and, while comparatively rare,
databases can become corrupted—so
backup the catalog regularly, and keep
older backups for a while.
ADOBE PHOTOSHOP LIGHTROOM 5 - QUICK START GUIDE
24 www.lightroomqueen.com/lr5quickstart
Quit Lightroom and the Back Up Catalog dialog will appear. Press Choose to select a new location
on another drive then press Back up. Leave ‘Test integrity’ and ‘Optimize catalog’ checked as they’re
good general maintenance.
Restart Lightroom and return to the Catalog Settings dialog to choose a suitable frequency for
future backups. If you’re working on a large number of photos, you may want to back up every day,
whereas if you only use Lightroom a few times each month, monthly may be plenty. Weekly is a
good average.
BACK UP YOUR PHOTOS
Lightroom’s Catalog Backup is just that—a backup of your catalog. Your photos are not stored ‘in’
Lightroom and Lightroom’s Catalog Backup doesn’t back up the photos. Consider how you’re going
to keep your photos backed up—and how easily you could restore them if there was a problem.
The ‘Second Copy’ backup in the Import dialog simply copies the imported photos into folders called
‘Imported on [date]’ so it’s great as a temporary backup while you ensure the photos have been
safely added to your main backups. It won’t replicate your working folder structure, back up any
additional photos such as those edited in Photoshop, or remove any photos you’ve deleted, so it’s
not a replacement for a backup system.
Figure 27 Backup frequency is set using the Catalog
Settings dialog.
Figure 28 When the backup runs, you can change the
backup location.
Lightroom’s Catalog Backup is just that—a
backup of your catalog. Your photos are
not stored ‘in’ Lightroom and Lightroom’s
Catalog Backup doesn’t back up the photos.”
ADOBE PHOTOSHOP LIGHTROOM 5 - QUICK START GUIDE
www.lightroomqueen.com/lr5quickstart
25
The easiest way to back up your photos is to include them in your main system backups. You are
running backups of your whole computer, aren’t you? Windows comes with its own Backup and
Restore tool, and Mac OSX comes with Time Machine, both of which can back up your computer
files to an external drive. Or, for a little more control, you can run dedicated backup or file
synchronization software. Whichever option you choose, double check that all of your photos are
being safely backed up, as some software excludes external drives by default.
BACK UP THE EXTRAS
Over the course of time, you’ll gather presets and templates that you’ve created or downloaded
from other websites, so you’ll want to back those up too. You can manually copy them from their
various locations, which are listed in the back of this book. There’s a Lightroom plug-in which backs
up all of the Lightroom settings and manages the number of catalog backups, called TPG Backup,
which can be downloaded from /> Figure 30
Windows includes
a Backup &
Restore tool
Figure 29 Mac OS X includes
Time Machine for backing up and
restoring your data.
There’s a
Lightroom
plug-in which
backs up all of
the Lightroom
settings and
manages
the number
of catalog
backups, called
TPG Backup”