Hướng dẫn sử dụng SYSWINV3 4
Bạn đang xem bản rút gọn của tài liệu. Xem và tải ngay bản đầy đủ của tài liệu tại đây (2.64 MB, 174 trang )
SYSWIN
Software Programming Tool for
OMRON Programmable Logic Controllers
VERSION 3.4
For use with IBM compatible 486 and Pentium computers
with Microsoft Windows
II User Manual OMRON SYSWIN
OMRON SYSWIN User Manual Published October 1999
Document Reference SYSWIN-EMAN-3.4
The information in this document has been checked carefully and is believed to be entirely reliable. However, no
responsibility is assumed for inaccuracies. Furthermore, OMRON reserves the right to make changes to any product
described herein to improve reliability, functionality and design. OMRON does not assume any liability arising out of the
applications or use of the product described herein, neither does it convey any licence under its patent rights or the rights of
others.
Copyright © 1996-1999 OMRON Europe B.V. All rights reserved.
OMRON is a registered trademark of OMRON Manufacturing of the Netherlands BV. IBM, PC/AT are registered
trademarks of International Business Machines Corporation. Microsoft is a registered trademark and Windows is a
trademark of Microsoft Corporation.
CONTENTS
User Manual OMRON SYSWIN III
1. GETTING STARTED WITH SYSWIN 1-1
Welcome to SYSWIN 1-1
Contacting Technical Support 1-2
Licence Registration Information 1-2
About this Manual 1-3
SYSWIN Features 1-4
Introduction to Controller Link 1-4
System Requirements 1-5
Token Copy Protection 1-6
Installation 1-8
Starting SYSWIN 1-9
Configuring the SYSWIN Environment 1-10
SYSWIN Help System 1-10
2. WORKING WITH PLC PROJECTS 2-1
Program Structure 2-1
Setting Up a Project 2-2
Project Setup 2-3
Project Information 2-4
Creating Ladder Programs 2-4
Ladder Programming Workspace 2-6
Creating a Network 2-7
Editing Networks 2-11
Saving and Loading Projects 2-13
Editors 2-14
Statement List Editor 2-15
Address Symbol Editor 2-16
Network Symbol Editor 2-18
Block / Network Manager 2-19
Block Symbol Editor 2-20
Checking the Program 2-21
Global Editing - Find and Replace 2-21
On-Screen Cross Reference 2-23
Printing the Project 2-24
3. TESTING WHILE CONNECTED 3-1
Working While Connected 3-1
Checking Project Parameters 3-2
PLC Modes of Operation 3-3
Downloading PLC Programs 3-3
Verifying PLC Programs 3-4
Uploading PLC Programs 3-5
PLC Status 3-6
I/O Generate 3-6
Executing and Monitoring Programs 3-7
Online Editing 3-8
Ladder Monitoring Checks 3-9
Data Set Bar 3-10
Setting Data Values 3-11
Forcing Address Bits 3-12
Other Functions 3-14
4. DATA DISPLAY EDITOR 4-1
Setting Up the Data Display Editor 4-3
Editing Data Items 4-4
5. DATA TRACE AND TIME CHART MONITORING 5-1
Configuring the Trace 5-2
Recording the Trace 5-3
Reviewing the Trace 5-3
6. CONFIGURING PLC SPECIFIC FEATURES 6-1
Function Mapping 6-1
Memory Allocation 6-2
I/O Table Editing 6-2
PLC Setup 6-9
7. ADVANCED PROJECTS 7-1
Project Setup Dialog 7-1
Conversion to Other PLCs 7-3
Project Preferences 7-3
Project Password 7-5
Processing the Program 7-6
8. ADVANCED COMMUNICATIONS 8-1
Connection Guide 8-1
Information Guide 8-7
Procedures Guide 8-13
Bridging Guide 8-19
Dialogs Guide 8-22
CONTENTS
IV User Manual OMRON SYSWIN
9. ADVANCED FUNCTIONS 9-1
Function Plan Editor 9-1
Importing a Project From Disk 9-2
Maintaining Libraries 9-2
Templates 9-3
Producing EPROMs 9-4
Saving to PMF File Format 9-4
Converting Projects From Other Packages 9-5
10. CONFIGURING THE ENVIRONMENT 10-1
Global Preferences - Ladder Diagram /
Function Plan 10-1
Global Preferences - Data Display 10-5
Global Preferences - Data Trace / Time Chart
Monitoring 10-6
.INI File Preferences 10-6
11. ADVANCED INSTALLATIONS 11-1
Operating System Installation Guide 11-2
Connection Guide 11-7
Procedure Guide 11-9
APPENDIX A - SYSWIN FILE TYPES A-1
APPENDIX B - FORMAT SPECIFIERS B-1
APPENDIX C - FILE FORMATS C-1
PMF Files C-1
Section Types and Descriptions C-2
ADR Files C-5
APPENDIX D - SCREEN REFERENCE D-1
APPENDIX E - PLC INTERFACE CABLE
CONNECTIONS E-1
INDEX
1 GETTING STARTED WITH SYSWIN
User Manual OMRON SYSWIN 1-1
1
GETTING STARTED WITH SYSWIN
Welcome to SYSWIN
The OMRON SYSWIN software is designed for use with
SYSMAC C and CV series Programmable Logic
Controllers (PLCs). It provides a straightforward method of
creating and maintaining programs and testing their
operation, either offline or connected to a PLC.
SYSWIN offers a comprehensive range of facilities for the
PLC programmer, from program editing to full symbolic
and network debugging, including:
■ New program creation
■ Program storage and editing
■ Uploading and downloading code to a PLC
■ Program status during execution by PLC
■ Commenting programs:
Symbolic addresses
Symbolic block and network names
Comments
■ Maintenance of library files
■ Printing program and documentation
■ Conversion from other packages
SYSWIN runs in the Microsoft Windows environment
(version 3.1 or greater) on standard IBM and compatible
486 and Pentium-based desktop computers. SYSWIN is
intuitive to use, and allows the programmer to rapidly
configure a specific project and enter network and program
data. PLC programs can be constructed in either ladder or
function plan format, and previously tested networks can be
recalled from libraries. A special statement list editor allows
PLC programs to be viewed and checked in their mnemonic
format.
These features are designed to enable users to easily adapt
PLC programs to changing requirements. Additional
features allow the testing of new networks in a supportive
and safe environment.
The SYSWIN software can communicate with both C and
CV series PLC. Serial communications with the PLC can be
through RS-232C or RS-422 serial interfaces with or
without a modem. Network Service Boards can be used in
the PC to attach to the PLCs using SYSMAC-LINK or
SYSMAC-NET networking.
Communications are handled transparently, leaving the
programmer free to focus on the coding aspects of a
particular PLC project.
NOTE! It is very important that you register your copy
of the SYSWIN software with your local
OMRON Sales Office, in order to qualify for
technical support. OMRON is not able to help
you unless you have registered.
1 GETTING STARTED WITH SYSWIN
1-2 User Manual OMRON SYSWIN
Contacting Technical Support
If you follow the installation instructions for the copy
protection system in this chapter and in the Advanced
Installations chapter you should not encounter any
difficulties. However, if you have a problem, then contact
Customer Services.
If you have a problem, it is important that you check that it
does not relate to a fault outside SYSWIN. It is essential
that you check the following:
■ The PC is working correctly
■ The PLC is working correctly
■ The communications system is set up correctly
■ The errors are cleared in the PLC
When you need to contact Customer Services, fill in the
details in the form below. A clear and concise description of
the problem is required, together with the exact text of any
error messages.
Version number of SYSWIN
Licence Number of software
Registration Number of software
Operating system and version number
PLC t ype, model and CPU details
Type of communications in use
Serial
SYSMAC-LINK
SYSMAC-NET
Controller Link
Ethernet
Licence Registration Information
SYSWIN V3.4 takes advantage of a different method of
Licence Registration, which replaces the Software Token
and Hardlock (Dongle), which were used on previous
versions.
On the back of the CD-ROM box, and incorporated in the
label of Diskette 1, is a “Licence Number”.
e.g. 11111-22222-33333-44444-55555
You will be asked to enter this during installation of the
software. The number must be entered exactly as it is
printed.
After installation of the software, a “Registration Number”
is displayed in the software information under the “Help”
dropdown menu.
e.g. aaa-bbb-ccc-ddd-eee
When the “Software Registration Card” is filled in, both
the “Licence Number” and the “Registration Number”
are required. Support for your software may not be
available if it is not registered.
If an existing Token or Hardlock are present on a PC, and
SYSWIN is installed over a previous version, you will not
be asked to enter the licence number. After installation a
“Licence Number” can be entered by selecting “Activate
SYSWIN” from the “Help” dropdown menu.
1 GETTING STARTED WITH SYSWIN
User Manual OMRON SYSWIN 1-3
About this Manual
This User Manual will help you to get started with
SYSWIN, by describing the software installation and
computer configuration, and by leading you through the
basics of SYSWIN programming. It also provides a detailed
reference for all of the on-screen SYSWIN functions.
Separate OMRON manuals describe the PLC programming
structure and instruction set in detail. Some small example
programs are included with the SYSWIN software, to
demonstrate some of the most commonly used features, and
if you are new to PLC programming, you can work through
these to familiarise yourself with the software.
SYSWIN comes with a comprehensive context-sensitive
online help system, which is designed to complement this
manual, and provide a quick reference at any point in the
SYSWIN application when the manual is not to hand. This
generalhelpsystemallowsyoutoobtainprogressivelymore
information about any topic by selecting keywords within
the descriptive text. In addition, quick help is provided for
all PLC instructions.
Throughout this manual, it is assumed that you have a
working knowledge of Microsoft Windows, and know how
to:
■ Use the keyboard and mouse
■ Select options from Windows menus
■ Operate dialog boxes
■ Locate, open and save data files
■ Edit, cut and paste text
■ Use the Program Manager or taskbar
If you have not used Windows before, it is recommended
that you spend some time working with it using the
Microsoft documentation, before using SYSWIN.
This introductory section deals with several important
aspects of installing and setting up SYSWIN. We
recommend that you read the entire section, especially the
notes on copy protection, before installing the software.
Manual Conventions
For quick reference on how to do certain tasks, instruction
sequences are in bold type and arrowed (for e xample ➧ Click on
the OK button).
Words in bold capitals (for example: File|Open) refer to commands
in the SYSWIN menus.
Words in italics (for example: Save Program ) are used for options
such as check boxes and buttons in dialogs.
Keyboard combinations are indicated by the key names to be
pressed together, for example Shift+F6.
Special Symbols
The ➧ character points to an instruction
Special instructions for C series PLCs
Special instructions for CV series PLCs
1 GETTING STARTED WITH SYSWIN
1-4 User Manual OMRON SYSWIN
SYSWIN Features
This new version of SYSWIN V3.4 offers increased
functionality for the creation and testing of PLC programs
and increases the range of PLCs it supports.
Features in SYSWIN V3.4
■ Support for the SYSMAC ALPHA PLCs with 3
digit Expansion Functions
■ Controller Link Protocol Support
■ Communications with C-series PLCs using
Ethernet via the PCMCIA interface
■ Communications with a CV-series PLC using
Ethernet
■ Communications with a PLC via a C200H
Bridge using SYSLINK
■ Import and export of data between SYSMAC-CDM
and SYSMAC-SCS
■ CV Memory Card support
■ Error history log
■ Project password protection
■ Program Password protection
■ Unit Setup
■ Advanced Installations
■ Support for updates to C200HX(CPU65 and
CPU85)
■ Additional PLC set up for C Series PLCs
■ Additional CV I/O Table support
■ C Series I/O Table support
■ Memory Card Support for CV Series PLCs to
allow for partial download
New features in SYSWIN V3.4:
■ Support for the CQM1H PLC type
■ Additional PLC setup support: High Speed Counter
Settings for CPM1, CPM1A, CQM1, and CPM2
PLC types; Analogue settings for CQM1 (CPU45
only).
Introduction to Controller Link
SYSWIN additionally supports the Controller Link
network. The Controller Link is an FA network that can
send and receive large data packets flexibly and easily
among the OMRON C200HX/HG/HE PLCs, CV series
PLCs and IBM PC/AT or compatible computers.
The Controller Link supports data links that enable data
sharing and a message service that enables sending and
receiving data when required. Data link areas can be freely
set to create a flexible data link system and effectively use
data areas.
The network is connected using shielded twisted-pair cable,
and high-volume data transmissions at high speed enable
construction of a wide range of networks, from low level
systems to high.
1 GETTING STARTED WITH SYSWIN
User Manual OMRON SYSWIN 1-5
System Requirements
SYSWIN operates on IBM and compatible personal
computers with 80486 or better central processors,
including Pentiums. It should be possible to fully install
SYSWIN on any computer that can run Windows 3.1
software.
The following configuration is recommended as a minimum
system for running SYSWIN effectively:
■ 50 MHz 80486 or better CPU, running in enhanced
mode (90 MHz Pentium Processor is
recommended)
■ At least 8 Mbytes RAM
(16 Mbytes RAM recommended or 32 Mbytes for
Microsoft Windows NT users)
■ Hard disk storage with at least 10 Mbytes of free
space
■ VGA or better display system (800 x 600 SVGA or
higher resolution is recommended)
■ Microsoft Windows 3.1 or higher (Microsoft
Windows 3.11 for Workgroups is recommended)
■ Mouse
It is possible to run SYSWIN in CPM1 or Demonstration
mode on any machine that can run Windows software.
If you intend to connect a PLC to the computer for
executing program code and testing, you will require:
■ RS-232C connection via a standard serial port on
the computer (COM1 etc.), or
■ RS-422 connection, or
■ SYSMAC-LINK Network Service Board, or
■ SYSMAC-NET Network Service Board, or
■ Controller Link Service Board, or
■ Ethernet
Refer to the appropriate hardware system manuals for full
information about connecting and configuring these devices
for your environment. The Advanced Communications
chapter in this manual provides detailed guidance on how to
use SYSWIN for setting up communications. General
information about cabling requirements is given in
Appendix E.
NOTE! Windows 3.1 is not compatible with Ethernet
connections unless this service is provided by a
third party package
1 GETTING STARTED WITH SYSWIN
1-6 User Manual OMRON SYSWIN
Token Copy Protection
A copy protection mechanism within SYSWIN prevents
illegal use of the software by locking it to a specific hard
disk. The mechanism consists of an operation token, which
must be installed on your system before you use the
software. When SYSWIN is running, it looks for an
operation token, and runs in demonstration mode if it is not
found.
PLEASE READ THIS SECTION CAREFULLY! There are
some important points to note about this copy protection
system and how it might affect your computer.
Installation
If you are installing on a non-standard configuration, that is,
not using either Windows 3.1, Windows 3.11, Windows 95,
Windows 98 or Windows NT , you should read the
Advanced Installations chapter before attempting to install
the operation token.
When you install the operation token that protects your
software, certain files are created on your system that are
not normally visible. It is important that these hidden files
are not moved or deleted. If they are, the operation token
will be damaged, and SYSWIN will not work.
If you ever see the names of the hidden files on your screen,
be careful: you may be about to invalidate your valuable
SYSWIN software!
Restrictions
Your operation token must be transferred back to the master
diskette, for example, if you need to move SYSWIN to a
different computer, or in certain other situations. The token
can only be transferred to or from an operation token
diskette. You cannot install the token to a RAM disk.
System Backup
Most backup utilities do not touch the hidden files created
by the protection mechanism. However, some utilities allow
you to backup and restore hidden files. This option should
not normally be used, because it would cause the protection
mechanism to consider the token invalid. The hidden files
used by the protection mechanism do not have the Archive
file attribute set, so it may be possible to restrict a backup to
files with this attribute set.
File Maintenance
Some file management utilities (for example: Xtree, and
Norton Utilities) list hidden files, and can move them to
other directories, or remove them from the system. Using
this type of software, you may delete the SYSWIN copy
protection files accidentally. If any software mentions these
files during a maintenance operation that removes files,
immediately STOP what you are doing, and move the token
back to the SYSWIN master token diskette, using the Token
Mover. Re-install the token after all maintenance has been
done.
Disk Cache Operation
Certain disk caching software interferes with the installation
of SYSWIN, and should be disabled temporarily during the
installation process. The /d option of Multisoft
Corporation’s PC-Kwik utility should be disabled, for
example. HyperCache has a non-standard option for
accessing diskettes, which should also be disabled during
installation.
1 GETTING STARTED WITH SYSWIN
User Manual OMRON SYSWIN 1-7
Disk Compression
The copy protection mechanism is compatible with disks
that have been compressed with programs such as
SuperStor, Stacker, DoubleSpace and DriveSpace.
However, SYSWIN must be moved back to the master
diskette when installing any of these compression systems,
as mentioned in their manuals. Failure to do so can cause
the protection mechanism to consider the token invalid.
Disk Defragmenters
SYSWIN’s copy protection mechanism is compatible with
and not affected by disk defragmenters such as Central
Point’s Compress, Digital Research’s Diskopt, Stac’s
Sdefrag and Microsoft’s Defrag.
Backing Up SYSWIN Token Diskettes
The token diskettes each contain a ‘fingerprint,’ which is
written to a non-standard track. This prevents them from
being copied, even by advanced disk copying programs.
You cannot, therefore, copy these diskettes for backup
purposes. If the masters become damaged or lost, you must
contact Customer Services for a replacement.
The SYSWIN program diskettes can be backed up,
however, to allow the masters to be stored in a safe place.
NOTE! If you are in any doubt about whether any of the
actions you may perform could cause you to
lose tokens, move the token back to the token
disk.
1 GETTING STARTED WITH SYSWIN
1-8 User Manual OMRON SYSWIN
Installation
Installing the SYSWIN Software
This section deals with the installation of SYSWIN on a
standard workstation. For installations related non-standard
workstations please refer to Chapter 11.
The SYSWIN software is supplied on CD-ROM or on high-
density 3.5” diskettes, and is installed easily from within
Windows.
Installing from CD-ROM
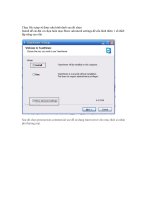
Start Windows and insert the SYSWIN CD-ROM in the CD
drive. If Autorun is enabled (Microsoft Windows 95,
Windows 98 or Windows NT only), the setup program
starts automatically. The setup program can be started
manually, by following the instructions in the
README.TXT in the root directory of the CD.
Installing from Floppy Disk
Start Windows and insert SYSWIN Program Diskette #1 in
a suitable diskette drive (our example uses Drive A:). To
install SYSWIN:
➧ Launch the Run dialog
Choose Run from the Start button from the taskbar
(Windows 95, Windows 98 or Windows NT only) or
from the Program Manager File menu (Windows 3.1 or
Windows 3.11 for Workgroups only). The Run dialog
appears.
➧ Enter the installation command line
Type the diskette drive letter and the SYSWIN Setup
program (for example: A:\SETUP).
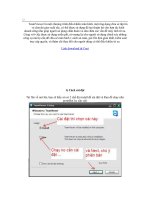
➧ Start the Setup program
Click on the OK button. The installation begins.
Further dialogs appear during the installation:
■ Select your desired language for SYSWIN
operation.
■ Enter a path name under which to store the
SYSWIN program files.
■ Select the operation mode as instructed. To fully
activate SYSWIN type in the Licence Number
exactly as shown on the CD-ROM or Diskette. This
dialog is not shown if SYSWIN has already been
fully activated with a token or valid Licence
Number.
Once these are completed, the appropriate files are copied to
your hard drive or the network drive. If necessary, you are
prompted to insert other Program Diskettes when the
software requires it.
SYSWIN V3.4 is fully activated by entering the Licence
Number shown on the CD-ROM or Diskette. SYSWIN
V3.4 can also be fully activated using a token or dongle
from previous version of SYSWIN. For details on using
tokens and dongles, consult the original documentation
shipped with the previous version, and chapter 11 of this
manual.
1 GETTING STARTED WITH SYSWIN
User Manual OMRON SYSWIN 1-9
Starting SYSWIN
Initial Screen
After the software installation, a new group window for
SYSWIN is created. The software is ready to run, and can
be started by double-clicking on the SYSWIN icon.
If the default preferences have been used, the Automatically
connect to the PLC facility will be set and SYSWIN starts
by checking that the selected communications port is
available. It then attempts to connect to the PLC. If the port
is not available it displays an error message but still
continues.
When SYSWIN first starts up, it displays a window similar
to the one shown below. The SYSWIN window offers many
features to ease the process of programming, using the
mouse or keyboard or both. You can configure the display
for any size monitor so that you have as much or as little
information as you need, using options from the
Preferences menu (see Chapter 10). Any changes you make
are saved in the SYSWIN.INI file and are restored next time
you run SYSWIN.
Use this section to familiarise yourself with the layout of the
SYSWIN display, and to set it up as you desire for
programming.
1 GETTING STARTED WITH SYSWIN
1-10 User Manual OMRON SYSWIN
Configuring the SYSWIN
Environment
SYSWIN is supplied with default settings that are suitable
for the first time user and there is no requirement for these
to be changed when starting the system. These are global
settings and apply to all projects. These settings, for the
Drawing, Window, Editing and Options, are listed in
Configuring the Environment chapter where all the options
are described. All settings may be viewed by selecting
Preferences from the Menu Bar and selecting the
appropriate item.
Project Preferences, which are local settings for each
project, are discussed in the Working with PLC Projects
chapter and are detailed in the Advanced Projects chapter.
SYSWIN Help System
SYSWIN comes with a detailed context-sensitive help
system. At any time while using the software, you can get
help on the particular point at which you are working, or on
general aspects of SYSWIN. This system is intended to
complement the manual, by providing online reference to
specific functions of the software and how to use them. The
manual is designed to provide more tutorial information and
discuss the various facilities offered by SYSWIN.
Three levels of help are provided in the software: General
Help, for dialogs, messages and menus; Quick Reference,
for programming reference; Instant Help, providing brief
descriptions of commonly used commands.
= GENERAL HELP
General help is obtained by pressing the F1 key or by
selecting an option from the Help menu. This provides
descriptive help on SYSWIN menus and dialogs, as well as
guidance on messages. It can be used at any point in the
software, to take you straight to the topic on which you need
help. The Help menu can be accessed from the main screen
editors, and is best used when you are browsing for help on
the use of SYSWIN.
+ = QUICK REFERENCE
Detailed help on programming elements - functions, timers
and counters, editing and function selection dialogs - can be
obtained by pressing Ctrl+F1 while the desired element is
highlighted. This is termed Quick Reference, since it
displays a summary of the necessary programming
information for any specific item.
If there is not a valid instruction highlighted then Quick
Reference starts up on the contents page and allows you to
click on any item to have help information displayed.
In the Statement List Editor Ctrl+F1 can also be used in the
same way if you place the cursor over an instruction.
1 GETTING STARTED WITH SYSWIN
User Manual OMRON SYSWIN 1-11
When the bubble help facility (see the Configuring the
Environment chapter) is switched on, a brief description of
each button is displayed when the cursor is positioned over
it for a few seconds.
Status Bar
There is a general status bar at the bottom of the SYSWIN
screen. This provides several helpful pieces of information
while programming:
Instant Help A brief message appears in the Status
Bar as menu commands and buttons are
selected. This field normally shows the
current block and network information.
Step Number This is the step number of the first
instruction in the network.
Cursor position The point in the ladder program where
the cursor is currently located.
Online Edit
status
The online status.
PLC mode When connected to a PLC, this shows
the current PLC mode. Connection
errors are also displayed here.
PLC scan time This field is only shown when the PLC
monitoring is active, and indicates the
scan time for the currently executing
program.
The SYSWIN status bar can be enabled and disabled with
the Preferences|Window dialog.
1 GETTING STARTED WITH SYSWIN
1-12 User Manual OMRON SYSWIN
2 WORKING WITH PLC PROJECTS
User Manual OMRON SYSWIN 2-1
2
WORKING WITH PLC PROJECTS
Program Structure
Although it is possible to create a program that consists of a
simple series of networks, SYSWIN encourages you to
break down a program into groups of networks, which form
functional blocks.
The concept of programming in blocks is designed not only
to make it easier for you to work through a program, by
splitting it into manageable chunks, but also to maintain the
program after it has been in use for a while. Programming in
blocks also eases the process of creating library modules
that can be incorporated into future programs.
SYSWIN encourages the creation of groups of networks
within blocks, again promoting the concept of working in a
structured manner, as shown in this example:
Typical SYSWIN program hierarchy
2 WORKING WITH PLC PROJECTS
2-2 User Manual OMRON SYSWIN
With CV series PLCs, interrupt routines are held in separate
blocks, and main blocks are sequential and joined together.
For both C and CV series, the last block in the main
program must contain the END instruction, as normal.
Way of Working
Normally you would not be connected to the PLC when
preparing the main structure of a program. After
programming you would check the program carefully before
connecting and downloading it to the PLC. Checking of
program syntax and validity of functions is done by
SYSWIN at various times as a protective mechanism, but
any logical checking that you do speeds up the debugging
process.
The use of the Project|Program Check feature described
later in this chapter should be noted to ensure that the
program you are creating is compatible with the PLC you
propose to use.
However, SYSWIN’s editing features make it very practical
for you to program more interactively while connected,
especially if the PLC has no critical outputs connected. This
way, your program is verified as each new network is
entered, and the project is kept constantly up to date as a
working system.
Setting Up a Project
When planning a PLC programming project, various items
need to be considered and set up within SYSWIN before
beginning to lay down program instructions. For example, it
is important for SYSWIN to know the model and
configuration of the PLC you wish to program, so that it can
establish the correct program checking and communications
for that PLC. Programming should, wherever possible, be
done for the PLC that is to be used. Once set for a project, it
is not advisable to change the PLC, and preparation of an
initial specification for the program is therefore
recommended.
Project Checklist
Before programming, it is recommended that you make up a
checklist of the important program aspects, including its
structure and PLC parameters. To start a new project in
SYSWIN, you should follow these steps in addition to the
basic procedure outlined in your PLC programming manual:
➧ Determine essential parameters of the PLC
The SYSWIN project setup needs to know:
PLCseries(CorCV)
PLC type (C200H, CQM1, etc.)
CPU (where applicable)
Type of communications interface
Your choice of editor and project type.
➧ Assign specific project information
Text information should be provided at least for:
Company name or originator
Project and version number.
➧ Check the project preferences
Determine how you want the project to be displayed,
and how the statement list code is to be generated.
➧ Allocate PLC memory (where applicable)
Work out the balance required between program
memory and expansion data memory.
2 WORKING WITH PLC PROJECTS
User Manual OMRON SYSWIN 2-3
➧ Establish the PLC setup parameters
Configure the parameters necessary for the desired way
of running the PLC. Some C Series PLCs do not
support this function.
➧ Create the appropriate I/O table
List all I/O devices and addresses related to them. Some
C Series PLCs do not support this function.
➧ Create a basic structure for the program
Note how you plan to group functional networks to
make up program blocks (for example: startup, control,
shutdown).
➧ Decide how to input and edit the program
SYSWIN offers two main methods of working on a
program: ladder diagram and function plan. The
Statement List Editor allows you to view and check
programs at the instruction level, once a diagram has
been created.
NOTE! While you can switch between ladder and
function plan editing as you work, it is strongly
recommended that you choose one method and
continue with it for best progress.
Project Setup
This dialog, accessed with the Project|Project Setup
command, establishes the PLC type, so that SYSWIN can
perform proper checks while you work. It also appears
automatically when you select the File|New command.
There are no defaults for the Project Setup, however,
features are preselected by SYSWIN to give you a starting
point for a project. The Advanced Projects chapter gives
details of all settings that can be selected for the project, but
the following are the initial settings made by SYSWIN.
Series: C
Editor: Ladder
Project Type: Program
PLC Type: Model CPM1/CPM1A
CPU All
Interface: Serial Communications
Bridge Option: Direct
Modem Option: Local
Coding Option: SYSMAC-WAY
Accepting these settings allows you to start a project, but it
is important to ensure that they match with the PLC and the
Communications method that will be used.
Further information on the options is available in the
Advanced Projects and the Advanced Communications
chapters.
2 WORKING WITH PLC PROJECTS
2-4 User Manual OMRON SYSWIN
Project Information
Though not essential when starting, it is good practice to set
up the project front page information before programming.
This information is printed when the front page option is
selected at printing time, and can be viewed any time to
verify that you are working on the correct project. It can be
changed at any time without affecting the program.
Company
Insert your company or organisation name here.
Plant
The site where the program is to operate, or the equipment
with which the PLC is to be attached.
Project
A name for the overall project. This could include the PLC
type and model number for completeness.
Version
Current version of the software. This should be updated
every time the program is changed after it has been first
released. Until the program has been tested and debugged, it
should be clearly indicated as unfinished.
Promotion
This field can contain a release number or date, indicating
when the program was issued and went live, or be used as a
comment field.
Creating Ladder Programs
This section describes in a tutorial style the process of
preparing ladder programs with SYSWIN, and how to use
the various tools to improve your productivity. SYSWIN
offers many methods of working with its tools: you can use
either the mouse or the keyboard to prepare a program, and
experimentation with both is worthwhile if you are new to
this software. In general, instructions here are given for
keyboard usage.
Use the File|New project command to start up a new
project. The Project Setup dialog appears, to enable you to
set up the basic parameters as described in the previous
section. You are then returned to the programming
workspace, ready to input instructions into the first network.
The example program that is used in this section is for a
C200H PLC. If you wish to work through the example,
select this PLC type and model in the Project Setup dialog.
2 WORKING WITH PLC PROJECTS
User Manual OMRON SYSWIN 2-5
About the Keyboard
Navigating through the SYSWIN screen is straightforward
with the keyboard, using function and editing keys as
appropriate. The function keys select SYSWIN operations
from the toolbar at the top of the screen. For the drawing
tools, you use keys that look like the symbol they draw, for
example - the ‘-’ key for a horizontal short.
SYSWIN dialogs work in the same way as in other
Windows applications: you can use the mouse to select a
field or button, and to make selections from list boxes.
The keyboard can be faster, however, especially if you are
in the habit of using it during your general programming
work.
Selecting options and fields is done by holding down the
Alt key while pressing the letter that is underlined in the
field name, or by using the Tab key to move from field to
field in sequence. Shift+Tab moves backwards through
each one.
Toolbar Programming Functions
The Enter key normally accepts the dialog. The Escape
key closes the dialog if there is a Close button on the dialog,
or cancels if there is a Cancel button displayed.
2 WORKING WITH PLC PROJECTS
2-6 User Manual OMRON SYSWIN
Ladder Programming Workspace
ThemainareaoftheSYSWINscreenisdevotedtothe
ladder program display, as a window covering part of the
total programming workspace. To view a larger portion of
the workspace, you can use Preferences|Overview Mode
command - selecting this same command again switches
back to normal mode.
When first running SYSWIN, or opening a program, you
will always see the lefthand ‘rail’, from which ladder
program networks always begin. A righthand rail exists in
the workspace, at its extreme right, but this is normally off
the screen. When you complete a network, outputs are
drawn showing a small vertical bar to indicate the right rail.
This saves having to scroll the display to see the righthand
side of your networks.
NOTE! Within a network it is possible to create more
space at the bottom of the network by pressing
the space bar as many times as necessary.
Navigating Networks
The currently selected network is generally displayed at the
top left of the workspace window. The lefthand side of the
power rail is highlighted and the program scrolls as you
move up and down between networks. SYSWIN has a
keyboard interface that allows the Up and Down arrow keys
to roll up and down between networks. PageUp and
PageDown keys scroll the screen by full pages. The
Block|Insert network command (Alt+Insert) enables you
to create a new network, above or below the selected one.
Using the mouse, double-clicking on the left side of the
current network bar, if visible, inserts a new network above
it.
Within a network, the current position is indicated by a
highlighted rectangular block, called the cursor. As you
move around a network, using the arrow keys, the cursor
moves with you. You can go directly to any point in the
program by clicking the mouse on the desired location. The
cursor is actually highlighting the element or space at that
point, and if you enter an element, it replaces the one
displayed. To insert elements between others, you must first
use the Edit|Insert row or Edit|Insert column command
(Alt+Down and Alt+Right) to create a space into which the
new element can be entered.
You can place elements anywhere within the workspace of a
network, but the network is not considered complete until
you link elements together. If a network check is
satisfactory, the network is automatically redrawn and tidied
up, bringing everything to the left rail, with the minimum
distance between each element. A network is checked when
you move to or insert a network after an edit, when you
change any of the PLC parameters, when you select the
Statement List Editor, and at other times when SYSWIN
requires a network to be complete before continuing. To
force a check at any time, press Alt+Enter or Shift+F8.
The maximum network size in SYSWIN is 100 rows by 25
columns.
2 WORKING WITH PLC PROJECTS
User Manual OMRON SYSWIN 2-7
Creating a Network
Bearing in mind that individual networks should be kept as
simple as is practical, they can be entered rapidly. In the
simple example below, there are three elements in the first
network. The elements are placed in sequence, working
from left to right, following these keystrokes (the function
key equivalents can be used if preferred):
➧ Press the ‘"’ (double quote) key to place an open
contact
The Contact Dialog appears, to allow you to
enter more information.
➧ Enter ‘253.13’ as the address, then press Enter
The address identification is displayed above the
symbol in the program.
➧ Press the ‘"’ (double quote) key again to place
another contact
The Contact Dialog appears again.
➧ Enter ‘HR1’ as the address, then press Enter
The address is displayed as before. Notice that it is
expanded into its full bit format - HR00.01.
➧ Press ‘-’ two or three times
The connecting horizontal line moves to the
right.
➧ Press ‘O’ to place an output
The Output Dialog appears.
➧ Enter ‘200’ as the address, then press Enter
The symbol is displayed with its expanded address
shown as 2.00. Since it is an output, it has a righthand
‘rail’ attached. This network is now complete.
➧ Press Alt+S, to move to the address Symbol field
Enter a symbolic name for this output, then press Enter.
The cursor returns to the network and shows the name
below the output.
➧ Press Alt+Enter to check the network
The network is redrawn. Notice how it has been
compacted to eliminate the redundant horizontal
lines that were entered.
NOTE! Keys used together with Alt and Ctrl keys may
be different for implementations in different
languages.
The key points to note from this small exercise are:
■ Simple keystrokes are used to place elements
■ Addresses can be entered in abbreviated form
■ Redundancy is automatically removed on check
■ Symbolic names can be entered later if desired,
although it is good practice to create them as the
program is entered.
About Addresses
It is important to use the standard form of addresses in
SYSWIN. Addresses may have two components - a channel
number and a bit number - and these should be separated by
a dot. In the example above, the address ‘200’ has been
interpreted by SYSWIN as ‘2.00’. If we had meant to use
bit zero at address 200, it would have been necessary to
enter it as ‘20000’ or (preferably) ‘200.00’. Note that in the
second step of the example, we used ‘253.13’ to illustrate
this, where we mean bit 13 in channel 253.
2 WORKING WITH PLC PROJECTS
2-8 User Manual OMRON SYSWIN
Adding to a Network
Any network can be expanded with simple editing
functions. For example, to create a simple OR instruction at
the start of the network just entered:
➧ Position the cursor on the leftmost element
Use the arrow keys to move it there.
➧ Press the space bar to create a new element line
The network expands downward, and the cursor is at the
left rail. Press the down arrow and you are ready to
insert a new element.
➧ Press the ‘"’ (double quote) key to place an open
contact
The Contact Dialog appears as before.
➧ Enter ‘HR0’ as the address, then press Enter
The window closes and the address is expanded to
HR00.00 above the drawn symbol.
➧ Press the Up arrow to move up to the top line
The cursor is positioned ready to insert a new vertical
connecting line. Note that the line is inserted on the left
side of the cursor.
➧ Press ‘|’ or ‘!’ to insert a vertical connecting line
The first and second lines are now connected.
The network is now complete as everything is connected.
Press Alt+Enter to check it is valid and to redraw the
network.
To view the actual instructions generated by this
network, use the Statement List Editor. Select the
editor via the Editors menu, or by clicking on its button on
the toolbar (Ctrl+F8). The instructions are listed in
mnemonic format, and can be edited in the normal way. If
everything is correct, then the ladder is redrawn; if errors
are detected, then you are warned. The Statement List
Editor is described in detail later in this chapter.
Adding Comments to a Network
It is recommended that you add comments to
networks as they are written, so that it is easier to
understand their functions when reviewing the program
later. You use the Network Symbol Editor to name a
network and add suitable comments. Start the editor by
selecting it from the Editors menu, by selecting the
Network Symbol Editor button on the toolbar (Ctrl+F7), or
by simply double-clicking the mouse on the network
comment bar (if it is visible).
In the Network Symbol Editor, a network can be given a
name up to 15 characters long, and up to 30,000 characters
of text as a description or comment. Note that text can be
wrapped to fit onto the display screen.
The Network Symbol Editor is described in more detail later
in this chapter.
2 WORKING WITH PLC PROJECTS
User Manual OMRON SYSWIN 2-9
Adding More Networks
After the initial entry of a program, you usually
need to add further networks. Use the Block|Insert
network command to open a new network (the preferred
shortcut is Alt+Insert). Alternatively, select the button on
the toolbar (Shift+F6). You are asked to specify whether
you want the new network to be above or below the
currently selected one.
A new network area appears in the workspace, and you can
begin entering the new network immediately.
NOTE! Individual networks must be entered separately,
and all elements must be joined together in a
network.
Blocks and Networks
At the top of the program that you have entered, there is a
block header above the first network. This is automatically
created by SYSWIN when a new program is started.
Although a program can be produced within a single block,
it is strongly recommended that you break up the program
into small manageable groups of networks within separate
blocks.
You use the Block/Network Manager to form groups of
networks, and to provide names and comments for the
blocks you have created. The Block Symbol Editor is
started through the Editors menu, or through the
Block|Block / network manager, which has its own toolbar
button (Ctrl+F5). Double-clicking on the block header bar
also opens the Block Symbol editor.
Block information is entered in the same way as with the
Network Symbol Editor, and once accepted, it is displayed
on the block header in the ladder workspace.
You are always working within a single block, and
while in that block you have access only to the
networks it contains. To move to another block of networks,
you must use the Block|Select block / network command,
accessible with a toolbar button (Shift+F5). This dialog
allows you to go directly to a specific block or network
anywhere in the program - it also provides a search-by-
name facility for networks.
NOTE! You can also switch between blocks by using
the Ctrl+Shift+PageUp and
Ctrl+Shift+PageDown keys.
A detailed description of the Block/Network Manager is
provided later in this section.
Entering Functions, Timers and Counters
All ladder programs use functions in addition to the basic
instructions, and most use timers and counters. These are
entered in much the same way as symbols, but because most
of them require data parameters on which to operate, the
process involves different dialogs.
Functions
SYSWIN uses your setting of the PLC type, together with
your function mapping parameters (where they apply) to
determine which functions are available to use. When a
function is selected, a dialog box is displayed requesting the
necessary data.
If you know which function you wish to insert in a network,
the easiest way to enter it is to use the ‘F’ key. This displays
the function dialog box, and you can type in the name or
number of the function.