Simply Beautiful Ribboncraft doc
Bạn đang xem bản rút gọn của tài liệu. Xem và tải ngay bản đầy đủ của tài liệu tại đây (14.34 MB, 130 trang )
CINCINNATI, OHIO
www.artistsnetwork.com
NORTH LIGHT BOOKS
50 QUICK AND
EASY PROJECTS
heidi boyd
Simply Beautiful Ribboncraft Copyright © 2005 by
Heidi Boyd. Manufactured in China. All rights
reserved. The patterns and drawings in the book are
for the personal use of the reader. By permission of
the author and publisher, they may be either hand-
traced or photocopied to make single copies, but
under no circumstances may they be resold or repub-
lished. It is permissible for the purchaser to make the
projects contained herein and sell them at fairs,
bazaars and craft shows. No other part of this book
may be reproduced in any form or by any electronic
or mechanical means including information storage
and retrieval systems without permission in writing
from the publisher, except by a reviewer, who may
quote a brief passage in review. Published by North
Light Books, an imprint of F+W Publications, Inc., 4700
East Galbraith Road, Cincinnati, Ohio 45236. (800) 289-
0963. First edition.
09 08 07 06 05 5 4 3 2 1
Library of Congress Cataloging-in-Publication Data
Simply beautiful ribboncraft: 50 quick and easy proj-
ects / Heidi Boyd.
p. cm.
Includes index.
eISBN-13: 978-1-60061-280-0
1. Ribbon work. I. T
itle.
TT850.5.B67 2005
746".0476 dc22
2004065428
Editors: Jolie Lamping Roth and David Oeters
Designer: Marissa Bowers
Layout Artist: Jessica Schultz
Production Coordinator: Robin Richie
Photographers: Al Parrish, Tim Grondin, Hal Barkan
and Christine Polomsky
Photo Stylists: Jan Nickum and Nora Martini
metric conversion chart
TO CONVERT
Inches
Centimeters
Feet
Centimeters
Yards
Meters
Sq. Inches
Sq. Centimeters
Sq. Feet
Sq. Meters
Sq. Yards
Sq. Meters
Pounds
Kilograms
Ounces
Grams
TO
Centimeters
Inches
Centimeters
Feet
Meters
Yards
Sq. Centimeters
Sq. Inches
Sq. Meters
Sq. Feet
Sq. Meters
Sq. Yards
Kilograms
Pounds
Grams
Ounces
MULTIPLY BY
2.54
0.4
30.5
0.03
0.9
1.1
6.45
0.16
0.09
10.8
0.8
1.2
0.45
2.2
28.4
0.04
DEDICATED TO…
For fellow crafters, who just can't sit still and are
compelled to keep your hands busy creating. Your
enthusiasm is infectious! I love to hear from you
and meet you at signings and demonstrations.
Working countless hours in the studio is
a solitary occupation. I’m especially grateful
for the encouragement and support of Karina
Illingworth, Mellissa Orth, Claudia Brzoza, Deb
Merrill, Sylvia Wyler, Candee Kaknes, Poppy
Arford, Hannah Beattie and Patti Michaud.
Artist
HEIDI BOYD
creates innovative craft projects for both children and
adults, emphasizing the elements of surprise and accessibility. In addition
to
SIMPLY BEAUTIFUL RIBBONCRAFT
, Heidi has authored
SIMPLY
BEAUTIFUL BEADING
,
SIMPLY BEAUTIFUL GREETING CARDS,
WIZARD CRAFTS
,
PET CRAFTS
and
FAIRY CRAFTS
, all published by
North Light Books. She’s contributed proprietary projects to
BETTER
HOMES AND GARDENS
magazines and craft books.
With a degree in fine arts, Heidi has taught workshops and art
classes in schools and art centers for more than a decade. She lives in
Maine with her husband, two sons and dog.
author
ABOUT THE
acknowledgments
•
Thanks
to Jolie Lamping Roth for getting this book rolling
and to David Oeters who picked it up and got it to
print. Christine Polomsky who graciously helped me
through yet another marathon photo shoot. Marissa
Bowers, who truly made this book Simply Beautiful.
Sally Finnegan for her crucial role in getting my books
onto store shelves. I'm always grateful for the talents
of photo stylists and proofreaders who quietly play an
integral role in making a quality publication.
INTRODUCTION 7
getting started
8
ribbon
•
8
tools
•
10
techniques
•
12
Tying a bow
|
12
Trimming ribbon ends
|
13
Ruffling
|
13
CHAPTER 1
home
accents
14
Gilded frame
|
16
Tassels
|
18
Votive candleholder
|
20
Flowers on top
|
22
Berry sachets
|
24
Pillow
|
26
Hat box
|
28
Rickrack table set
|
30
Window wreath
|
32
Organdy flowers
|
36
Glass plate
|
40
CHAPTER 2
special
occasions
42
Spring spool basket
|
44
Seaside photo album
|
48
Fall fairy
|
50
Petal ornaments
|
54
Buttoned baubles
|
56
Dragonfly card
|
58
Flower card
|
60
Fashion purse card
|
62
Fashion shoes card
|
64
Wedding card
|
66
Rosebud necklace
|
68
Ring pillow
|
70
Reception bouquet
|
72
CHAPTER 3
gifts for
family
& friends
74
Baby photo sleeves
|
76
Baby mobile
|
78
Baby door hanger
|
80
CHAPTER 3, continued
Onesies
|
82
Beribboned blanket
|
84
Blooming lunch pail
|
86
Travel case
|
88
Drawstring sachet
|
90
Bookmark
|
92
Journal
|
94
Ribbon sketchbook
|
96
CHAPTER 4
jewelry &
accessories
98
Ribbon barrettes
|
100
Ribbon rose pin
|
102
Ribbon rose barrette
|
104
Rose ponytail holder
|
105
Ponytail holder
|
106
Gingham headband
|
108
Antique choker
|
110
Multi-strand choker
|
112
Organdy choker
|
114
Pendant purse
|
116
Ribbon handbag
|
118
Cigar box purse
|
120
PATTERNS 124
RESOURCES 126
INDEX 127
6
7
introduction
i
f you've ever taken the time to save a ribbon from a package,
lingered over a ribbon display in a fabric store, or even riffled
through an old drawer of cast off ribbons, then you've experi-
enced their attraction first hand. Like fabrics, they come in an endless
variety of colors, but what makes ribbons uniquely appealing is their
lush, silky texture. They're simply irresistible to the touch. Some elab-
orate varieties feature an exquisite mixture of metallic and translucent
fibers with wire edges making them ideal for crafting. Others have
intricate patterns of swirling hearts and flowers woven with tiny silken
threads. I find their beautiful detail a source of visual fascination.
Making crafts with ribbons has never
been easier. My objective in designing proj-
ects for this book was to take advantage of
many ribbon varieties and find simple tech-
niques to transform them into useful crafts.
In just an evening crafters can be rewarded
with a beautiful finished project. Eliminat-
ing the need to sew, both double-sided craft
tape and fusible web quickly became the
indispensable tools to my ribbon crafting
success. They effortlessly attach ribbon to
glass, metal, fabric and paper without the
mess and drying time associated with glues.
Whether you enjoy jewelry making, card
making, scrapbooking or embellishing fabric,
ribbons can be easily incorporated into your
creations. Extremely versatile, the endless
array of ribbon varieties, colors and sizes
makes it easy to find the perfect ribbon for any
application. I've shared ways to personalize
your home décor by fusing ribbons to fabric
to create elegant pillow covers, sachets and
table linens. I've experimented with laying rib-
bon flat, tying it in bows and ruffling it before
attaching it to paper to make handcrafted
cards. Paired with beautiful glass, stone and
silver beads, ribbons make stunning feminine
chokers, necklaces, barrettes and headbands.
This book is intended for everyone.
Absolutely no prior knowledge in bow tying or
sewing is required. You'll find easy-to-follow
instructions for each step. Before you know it
you'll have impressed family and friends with
a stunning array of ribbon crafts, decorations
and gifts. Like untying a ribbon wrapped pres-
ent, I hope this book unfolds to offer you
hours of inspiration and creative enjoyment.
8
Beautiful ribbon is everywhere and with each season the selection
grows as different fibers, patterns and colors are incorporated into new
designs. Ribbon can easily be found in both craft and fabric stores. You can even find ribbon in many scrapbook and
beading stores.
ribbon
GETTING STARTED:
purchasing
If you need a small amount of expensive ribbon, I sug-
gest purchasing it by the foot. Otherwise, it’s usually
more economical to buy a whole spool (or package) of
ribbon. Check out the selection of specialty holiday rib-
bon on sale after the season has passed. This is a great
time to stock up and expand your collection.
Look for reds and pinks in the spring, pastels in
early summer, red, white and blue at the end of the
summer, black and harvest colors in early winter and
silver and gold metallics after New Year’s. When you see
a design or color you like, don’t hesitate to purchase it.
There’s no guarantee that the design will remain on the
market. Be on the lookout for unique vintage ribbons
salvaged from milliners’ and dressmakers’ studios. Most
importantly, amass colors and varieties of ribbons that
inspire you to create.
storage
Nothing is as frustrating as reaching into a pile of ribbon
searching for a certain color ribbon, only to find it com-
pletely tangled and knotted with other ribbon. I suggest
using a rubber band or small piece of tape to prevent
opened ribbon spools from unwinding. Line ribbon
spools into a plastic storage bin, or thread them onto a
homemade hanging rack made with dowel rods. Both
storage solutions ensure that colors are easy to locate
and the ribbon is accessible.
types of ribbon
Here’s a sampling of different ribbons to help familiar-
ize you with the basic features of each variety. This
should help you locate the appropriate ribbon for each
project in the book.
You can always select a different ribbon color, but
in most cases the type and size of ribbon is crucial to the
ease of re-creating the craft. For instance, wire-edged
ribbon is ideal for creating ribbon flowers. The wires
hold the shaped petal in place, but the same wire makes
the ribbon a bad choice for machine stitching.
Many ribbons are difficult to classify as they share
aspects of two or even three different varieties. For
instance, a holiday ribbon may be velvet and have
metallic gold edges that are wired, or an organdy ribbon
may also have satin strips. When dealing with hybrid
ribbons just make sure the ribbon you choose has the
integral characteristic neccessary to make the project
work. For example, you might prefer to wrap metallic
ribbon around the glass votive candleholder. This substi-
tution will work as long as the ribbon is still sheer enough
to let candlelight pass through.
|
FEATHERED EDGE
|
The fibers along the top and bot-
tom edges of the ribbons have been pulled out into a
pattern of loops. The decorative edge makes the ribbon
appear wider than it actually is.
|
BROCADE
|
A wide,
heavyweight ribbon that is distinguished by repeated
decorative motifs. Usually woven in rich jewel tones and
commonly used in home decorating projects.
|
SATIN
|
Silky smooth, this common ribbon features the widest
selection of widths and color shades.
|
DOUBLE-SIDED
RIBBON
|
Unlike satin ribbon, double-sided ribbon is
equally shiny on both sides. Sometimes this ribbon fea-
tures two separate solid colors, with one on each side.
|
BEADED FRINGE
|
1
⁄
4
" (6mm) or
1
⁄
8
" (3mm) wide satin
ribbon tops most beaded fringe. Repeated strands of seed
beads with sequins or crystals hang from the bottom edge
of the ribbon. It’s sold by the yard at fabric stores or in
packages at craft supply stores.
|
VELVET
|
Velvet ribbon
features soft fibers on the topside and flat woven ribbon
on the underside. It’s most commonly found in deep
blue and black colors and is sold almost exclusively in
fabric stores.
|
POLKA DOT AND PRINTED RIBBON
|
The top side of these ribbons is stamped with a pattern.
The under side is usually plain.
|
ORGANDY
|
The sheerest of ribbons, it allows light to
pass through with the subtlest tints of
color.
|
WIRE-EDGED
|
Thin wires
can be invisibly woven into the edges
of almost any kind of ribbon. The
wire allows the positioned ribbons to
hold their shape. This ribbon isn’t
intended to be laundered, and is most
frequently used in flower arranging.
|
METALLIC
|
Shiny threads create a metallic ribbon
that reflects light. Sometimes metallic fibers are only
incorporated though the center or sides of the ribbon.
|
JACQUARD
|
Jacquard ribbon has a woven pattern
that repeatedly runs through the length of the ribbon.
The woven threads only make a pattern on one side of the
ribbon. The multiple threads tend to increase the thick-
ness of the ribbon.
|
GINGHAM AND PLAID RIBBONS
|
The checked pattern is woven into the ribbon and is clearly
visible on both the front and back. Gingham ribbons are
traditionally red or black paired with white. They’re light-
weight and feel like satin.
|
GROSGRAIN
|
Grosgrain is a
sturdy woven ribbon that has a flat matte finish. It’s distin-
guished by tight vertical ridges that run across the ribbon.
9
RIBBONS
printed ribbon
beaded fringe
feathered edge
brocade organdy jacquard wire-edged
satin metallic grosgrain
adhesives
|
ALEENE’S 2 IN I
|
Perfect for gluing lightweight paper projects as it
allows you to reposition items before permanently adhering them in place.
|
MEMORY GLUE
|
This craft glue is strong enough to glue scrapbook embellish-
ments to most surfaces. The narrow applicator tip makes it easy to position the
glue exactly where you need it and controls the glue flow to prevent it from
pooling. It dries flat and will not buckle the paper surface.
|
ALEENE’S
PLATINUM BOND TEXTILE GLUE
|
This heavy-duty adhesive is perfect for
permanently adhering embellishments to ribbon.
|
BEACON’S CRAFTFOAM
GLUE
|
It’s difficult to secure foam pieces with traditional adhesives.
I strongly suggest using glue that is formulated especially for this purpose.
|
BEACON'S HOLD THE FOAM GLUE
|
This product is formulated to work with
porous Styrofoam surfaces. Using products like this will give you peace of mind that
your projects will last longer.
|
MOD PODGE
|
This classic découpage medium is simply
brushed over ribbon and paper to adhere it to the desired surface.
|
HOT GLUE
|
Ideal for an instant bond, hot
glue easily holds lightweight items together.
|
DOUBLE-SIDED CRAFT TAPE
|
Craft
tape simplifies adhering ribbons to almost every surface. Liquid glue can seep through
the porous ribbon fabric, but craft tape tightly bonds the ribbon in place. Available in
a variety of widths starting at
1
⁄
8
" (3mm). Look for this heavy-duty adhesive where craft
and scrapbook supplies are sold. Don’t substitute standard double-sided office tape.
|
FUSIBLE WEB TAPE
|
Position fusible tape between ribbon
and fabric and then activate the adhesive by ironing the layers
together. You can find this product in fabric stores.
|
CLEAR
NAIL POLISH
|
While not an adhesive, it can be applied to
cut ribbon edges to prevent the threads from fraying. I find
the built-in brush and thick polish easy to control. If you
prefer, you can substitute Fraycheck liquid seam sealant.
10
When shopping for supplies, I’m always stumbling upon appealing new tools that
make crafting even easier. New products appear on the market all the time. What
you’ll find below is a sampling of tools and some tips on how to get the most out of your tools. Remember, if you can’t
find the exact tool mentioned below, there are plenty of products that will work just as well, if not better.
tools
GETTING STARTED:
aleene’s 2 in 1
decoupage medium
fusible web tape
aleene’s platinum bond textile glue
memory glue
11
tools
You’ll need very few tools to get ready for ribboncrafting. Many of
these are used in scrapbooking and jewelry crafting as well. Don’t
hesitate to invest in these relatively inexpensive and versatile items.
|
SCISSORS
|
Sharp scissors are crucial to the success and ease of
crafting with both fabric and ribbon. Dull scissors won’t make a clean
cut and will fray the ribbon ends. I use a variety of Fiskars scissors.
Long shears for cutting fabric, and smaller tips for trimming thread
ends and making tight cuts. My personal favorite is Softouch scissors,
which have a central spring and require little pressure to make a cut.
|
PAPER TRIMMER
|
This handy tool makes cutting paper to exact
measurements a breeze. It’s perfect for cutting paper to cover boxes
and make cards.
|
IRON
|
Breathe second life into wrinkled ribbons.
Press them flat so they look like new. Use low heat and a press cloth
to prevent scorching the ribbon.
|
AWL
|
This is a useful tool for pre-
punching stitching holes or creating openings for rivets.
|
SMALL
CRAFT HAMMER
|
This lightweight hammer is perfect for flattening
eyelets and firmly snapping rivets together.
|
EYELET SETTER
|
Match
the size of the eyelet setter to the selected eyelet. Exert force on the
setter with a craft hammer.
|
WIRE CUTTER
|
Don’t nick your scis-
sors blades by using them to cut wire. Wire cutters are both safer
and easier to use. They are especially handy for cutting through
heavy wire-cored floral stems.
|
NEEDLE-NOSE PLIERS
|
Jewelry
projects require shaping and manipulating wire and findings with
needle-nose pliers.
|
HOLE PUNCHES
|
Fiskars makes good quality
paper punches. I frequently use the
1
/
8
" (3mm) and
1
⁄
4
" (6mm) sized
hole punches when paper crafting. They make ideal sized holes for
threading thin ribbons.
RIBBON CRAFTING TOOLS
❉
tip
>
As with any sewing project, it is important to press
the fabric. Ribbon has crease lines when it’s sold packaged
around cardboard. It takes just seconds to iron and flatten
it. Ironing ribbon also renews recycled or tangled ribbons.
Use the silk setting on your iron and work on a protected
surface. The trick is to quickly pull the ribbon out from under
the iron to avoid scorching it.
❉
tip
>
Be sure to finish the ribbon ends after
you’ve completed a project, otherwise they'll fray.
Apply a thin line of clear nail polish along the cut
ribbon edge. The polish doesn’t disappear when it
dries, so it’s important to apply as little as possible
while still trapping the cut fibers. Wipe the brush
against the bottle rim to remove excess polish.
paper trimmer
eyelet setter
awl
hammer
hole punch
scissors
needle-nose
pliers
12
Crafting with ribbon is much easier than you might
think. These quick and easy techniques will help you
get the most from your ribbon and start crafting simply
beautiful projects.
techniques
GETTING STARTED:
tying a bow
This classic bow tying technique makes the most attractive ribbon bows. So if you’re someone who cheats
and ties two loops together, revisit these steps to make beautiful ribbon bows.
one
•
Form a ribbon loop, making it the size that
you will need for the project. Hold the ends in one
hand. This loop will become the left side of the bow.
three
•
Pull this same ribbon out through the
right side of the newly formed bow center to make
the right side of the bow. Do not pull the ribbon all the
way through. You should have formed another loop.
two
•
Bring the left ribbon end up, over and
around the bottom of the loop to form the center of
the bow.
123
four
•
Pull evenly on both bow loops to tighten the center of the bow. If
necessary, pull on each loop separately to even the size of the loops.
4
13
trimming ribbon ends
You have many options when trimming the ends of your ribbons. Below are three different options. Don’t hesitate to switch to another of these
options for any of the projects in this book. Before trimming any tied bow, line up the ends or measure them to cut the ribbons at equal lengths.
straight
•
Cut straight across the ribbon
ends to make even horizontal lines.
notch
•
Fold the ribbon in half and then cut
through both layers at a diagonal angle towards
the fold. The notch is revealed when the ribbon is
unfolded. The appearance of this technique can vary
depending on how deep or shallow you cut the notch.
Make an identical notch on the other ribbon end.
diagonal
•
Cut the ribbon ends diagonally,
making one side the mirror image of the other. The
longer ribbon edges should line up with the sides of
the bow and the shorter edges will fall below the
center of the bow. The angle of the cut will affect
the finished length of the ribbon.
ruffling
This technique looks more complicated than it is. You don’t need to be an experienced
ribbon crafter to ruffle ribbon, and the results are beautiful.
one
•
Thread a sewing needle with a generous
amount of thread and leave the end unknotted.
Make a simple straight stitch down the center of
the ribbon length.
three
•
Ribbon rosettes are made using the
same ruffling technique with one variation; the
stitches are sewn up one edge of the ribbon. If you
use a two-colored ribbon, then the finished flower
will be the color of the unstitched side.
two
•
While holding the needle in one hand,
slide the ribbon toward the thread end. If you need
more ruffles at the base, hold the thread ends and
slide the ribbon up. You can easily loosen or tighten
the ruffles to expand or shrink the length of the rib-
bon. Once the ruffle is manipulated to the desired
length, cut off the needle and knot the thread ends.
123
home accents
i
t’s the individual decorating touches that truly make your home
unique. Use the ribbon crafts in this section to accent your per-
sonal decorating style. The variety of ribbon colors, patterns and
styles makes it easy to coordinate projects with your existing décor.
The throw pillows and rickrack table set
are a cinch to make and perfect for someone
new to the craft of sewing. Both use pur-
chased table linens so the edges are already
professionally sewn. Not prepared to try
sewing at all? Fool your friends with the
following projects that cleverly mimic the
appearance of sewn ribbon by using double-
sided craft tape. Display treasured photos in
a wooden frame that is gilded in metallic
ribbon. Flower topped boxes are a beautiful
way to stash odds and ends while creating a
decorative focal point on end tables and
bureaus. Set a romantic mood with flickering
light from an organdy ribbon votive holder.
Looped ornate ribbon tassels add luxury
to a room as they hang from armoires or
curtains. Beautiful centerpiece flowers are
quickly assembled with organdy ribbon and
wire. Weave ribbons over the back of a clear
glass plate to make an original decorative dish.
An ornament of ribbon and crystal beads cap-
tures the light as it streams in your windows.
Turn the pages of this section and you’re
sure to find something simply beautiful to
make your home décor reflect your creativity.
CHAPTER
1
16
gilded frame
M
ake an ordinary wood frame extraordinary with strips
of ornate brocade, satin and metallic ribbons. The
diagonal folding technique at the corners gives the
ribbon a sewn appearance, but it’s simply adhered with double-
sided craft tape. This project can be easily adapted for different
color schemes and frame sizes by matching the width of the
double-sided craft tape to the width of the selected ribbons.
MATERIALS
photo frame
1" (3cm) wide brocade ribbon
1
⁄
4
" (6mm) gold wire-edged ribbon
1
⁄
4
" (6mm) blue satin ribbon
double-sided craft tape:
1" (3cm) and
1
⁄
2
" (13mm) widths
Aleene’s Memory Glue
NOTE: Tape width should match
the total ribbon width.
❉
tip
>
This project is
the perfect way to recycle
chipped or scratched wood
frames. If the scratches are
on the inside edge of the
frame, line the first ribbon
against the inside edge. If
the chips are on the outside
corners, position the ribbon
against the outside edge.
The unblemished parts of
the wood will remain visi-
ble, and damaged areas will
be decoratively concealed.
17
one
•
Apply a strip of 1" (3cm) wide double-sided
craft tape to the outer edge of the frame, then apply a
strip of
1
⁄
2
" (13mm) wide double-sided craft tape against
the inside edge of each 1" (3cm) tape strip. You should
have a total of 1
1
⁄
2
" (4cm) of tape around the four sides of
the frame, so the total tape width equals the total width
of the ribbons you are using. Peel the backing off one of
the 1" (3cm) wide tape pieces to expose the adhesive.
three
•
Peel the backing from one strip of the
1
⁄
2
"
(13mm) tape. Place the
1
⁄
4
" (6mm) blue ribbon along the
outside edge of the
1
⁄
2
" (13mm) tape strip, leaving a
1
⁄
4
"
(6mm) space between the blue ribbon and the brocade
ribbon placed in step 2. Fold both corners under at an
angle. Repeat the process to attach the three remaining
sides of the satin ribbon around the frame, connecting
the diagonal folds at each corner.
two
•
Place the 1" (3cm) wide brocade ribbon over the exposed adhesive. At
the corners, fold the ribbon ends under and at an angle, then trim away excess
ribbon. Peel the backing off an adjoining 1" (3cm) tape strip, and place another
length of brocade into the adhesive. Fold both ends under at an angle. Make sure
the new diagonal fold connects with the last folded ribbon corner. Repeat the process
to attach brocade ribbon to the remaining two sides of the frame and complete three
more corner connections.
12
3
four
•
Place a length of the
wire-edged ribbon between the
brocade and the satin ribbons along
the top of the frame. Do not fold the
ribbon at the corners but make a
diagonal cut. Place two more lengths
of wire-edged ribbon down either
side of the frame, diagonally cutting
the corners so that they connect with
the first ribbon.
five
•
Join two lengths of gold
ribbon to the bottom of the frame,
one at each corner. Bring the ribbons
together, tie them into a small bow
and trim the ends. If necessary, add a
little glue under the cut ribbon corners
to help them lie flat.
4
5
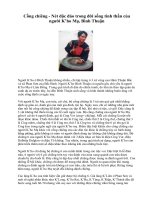
18
tassels
MATERIALS
18" (46cm) silk cord
6' to 8' (1.5m to 2m) lengths of
assorted varieties of ribbons: in
widths from
1
⁄
8
" (3mm) to 1
1
⁄
2
" (4cm)
large wooden bead
large glass bead
16" (41cm) of 26-gauge wire
Aleene’s Textile Glue
12" (30cm) wooden ruler
ANOTHER SIMPLY
BEAUTIFUL
IDEA
This project brings new life to old ribbons.
Combine remnants from old ribbon spools
with new spools. The resulting mixture of
ribbon varieties will create an interesting
finished tassel.
T
hese unique tassels will add whimsy and elegance to any
room. Use them as tiebacks around drapes, or loop them
around a cabinet pull or doorknob.
19
one
•
Wrap each ribbon variety three to four times around a ruler.
Pinch the layers of wrapped ribbon against the ruler with one hand while
adding new lengths of ribbon with the other hand.
1
two
•
Carefully slide the ribbons off the ruler leaving the looped
shape intact. Wrap the center of the wire around the middle of the rib-
bons. Tightly twist the wires together above the ribbons. It’s important
that the wire prevent any loose ribbon ends from sliding out. Thread
both wire ends through a wooden bead and a glass bead.
2
three
•
Wrap the wire around the center of the silk cord,
and trim away the excess wire. Bring the cord ends together and
tie them in an overhand knot. Slide the knot down the cord until it
rests over the glass bead and conceals the wire connection, then
pull the knot tight.
3
four
•
Tightly wrap a thin ribbon scrap around all the ribbon
loops,
1
⁄
2
" (13mm) below the wooden bead. Tie the ribbon into a
bow and trim the ends so they’re the same length as the looped
ribbon. Bring the silk cord ends together and tie them in an over-
hand knot. To help prevent the cord ends from unraveling, squeeze
a small amount of glue into the cut ends. With your fingertips,
carefully twist the individual fibers into the glue.
4
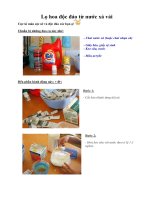
20
votive candleholder
T
ransform clear glassware into stunning votive candle-
holders. Layers of sheer ribbons filter candlelight to make
a romantic focal point. Scent the room by lighting subtly
fragrant candles. The glass will safely contain any melted wax.
MATERIALS
glass votive candleholder [3" (8cm)
in diameter and 3" (8cm) high]
10" (25cm) of 1
3
⁄
8
" (3cm)
wide gold organdy ribbon
10" (25cm) of 1
3
⁄
8
" (3cm)
wide red organdy ribbon
10" (25cm) of
1
⁄
4
" (6mm)
wide gold metallic ribbon
10" (25cm) of
1
⁄
4
" (6mm)
wide black velvet ribbon
1
⁄
2
" (13mm) and
1
⁄
4
" (6mm) wide double-
sided craft tape (heat resistant)
craft glue
clear nail polish
NOTE: Look for straight-sided glassware
so the wrapped ribbons lie flat.
ANOTHER SIMPLY
BEAUTIFUL
IDEA
To make a complete set of ribbon lights, select various sized glassware.
Make use of any sheer ribbon scraps you may already own. Don’t skip velvet
ribbon, it adds contrast and drama to the otherwise sheer holder. Experiment
with positioning the ribbons in different combinations before taping them to
the glass.
21
one
•
Apply
1
⁄
2" (13mm) wide double-sided craft tape around the
center of the glass. Peel off the protective backing and wrap red organdy
ribbon over the exposed adhesive. Carefully trim the ribbon end so it over-
laps by
1
⁄
8" (3mm), then apply nail polish to the cut edge.
1
two
•
Apply a second band of
1
⁄
2" (13mm) wide double-sided craft
tape under the lip of the glass. Peel off the protective backing and wrap
the gold organdy ribbon over the exposed adhesive. The bottom edge of
the gold ribbon should overlap the top edge of the red ribbon. Trim the
ribbon end so it overlaps by
1
⁄
8" (3mm) and apply nail polish to the cut
edge. If necessary, use a small piece of double-sided craft tape to secure
the ribbon end flush against the wrapped ribbon.
2
three
•
Apply a band of
1
⁄
4" (6mm) wide double-sided craft tape
below the red organdy ribbon on the glass. Peel off the backing and wrap
the gold metallic ribbon over the exposed adhesive.
3
four
•
Apply a final band of
1
⁄
4" (6mm) wide double-sided craft tape
around the base of the votive, directly below the gold metallic ribbon.
Peel off the backing and wrap the velvet ribbon over the exposed adhe-
sive. Glue the end of the ribbon flush against the wrapped velvet.
4
ANOTHER SIMPLY
BEAUTIFUL
IDEA
If you need a larger gift box
simply select wider ribbon,
and larger silk flowers, such
as bachelor buttons, that will
cover the additional surface.
22
flowers on top
P
ut your wrapping paper aside! Ribbon and silk flowers will
quickly transform a plain cardboard box into a stunning
gift box. These flower-topped boxes are the perfect way
to present wedding favors. The flowers will spread blooming
color over the reception tables.
MATERIALS
2
1
⁄
2
" (6cm) square by 1
1
⁄
2
" (4cm) tall
white papier mâché box
four 8" (20cm) pieces of
5
⁄
8
" (6mm) wide
light purple ribbon
10" (25cm) of
3
⁄
8
" (10mm) wide
grosgrain ribbon
2
1
⁄
8
" (5cm) square decorative paper
nine silk flowers (african violets)
1
⁄
4
" (6mm) wide double-sided craft tape
clear nail polish
glue gun
23
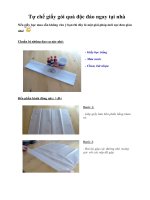
one
•
Apply eight strips of double-sided craft tape to the sides of the box.
Position the end of each strip inside the box, bring the length of the tape over the
top edge, then press the end of the tape down against the outside of the box.
Place two tape strips on each side of the box. Don’t place tape on the base of
the box. Press all the positioned tape firmly in place, then peel off the backing.
two
•
Begin placing the four
5
⁄
8" (16mm) wide ribbon lengths over the exposed
tape. Position the end of the first ribbon length inside the box, follow the tape
over the side of the box, then stretch the ribbon across the base of the box. Lay
the remaining ribbon against the tape on the other side of the box; end inside the
box. Repeat the process, covering two taped sides and the underside of the box
with the three remaining ribbon lengths.
three
•
Place the decorative paper square inside the box to cover the ends
of the ribbon.
12
3
four
•
Cut the silk flower heads off the stems and hot glue
three rows of three flowers onto the box lid.
4
five
•
Apply double-sided craft tape around the rim of the lid, then peel the
backing off the tape. Lay the
3
⁄
8" (10mm) wide grosgrain ribbon over the exposed tape.
Trim the end of the ribbon and apply clear nail polish to the cut end to prevent fraying.
5