BR hệ THỐNG THẮNG NISSAN VERSA HATCH BACK 2012
Bạn đang xem bản rút gọn của tài liệu. Xem và tải ngay bản đầy đủ của tài liệu tại đây (1.04 MB, 39 trang )
BRAKES
SECTION
BR
BRAKE SYSTEM
A
B
C
D
E
CONTENTS
SERVICE INFORMATION ........................... 2
.
BRAKE BOOSTER ........................................... 20 BR
On Board Inspection ...............................................20
.
Removal and Installation ........................................21
.
PRECAUTIONS .................................................. 2
.
Precaution for Supplemental Restraint System
(SRS) "AIR BAG" and "SEAT BELT PRE-TENSIONER" .................................................................. 2
.
Precaution Necessary for Steering Wheel Rotation After Battery Disconnect .................................... 2
.
Precaution for Brake System ................................... 3
.
VACUUM LINES ............................................... 23
Component .............................................................23
.
Removal and Installation ........................................23
.
Inspection ...............................................................23
.
On Board Inspection ...............................................25
.
Component .............................................................25
.
Removal and Installation of Brake Pad ..................26
.
Removal and Installation of Brake Caliper Assembly ...........................................................................27
.
Disassembly and Assembly of Brake Caliper Assembly ....................................................................29
.
Brake Burnishing Procedure ...................................32
.
Special Service Tool ................................................ 4
.
Commercial Service Tool ......................................... 4
.
NOISE, VIBRATION AND HARSHNESS
(NVH) TROUBLESHOOTING ............................ 5
.
NVH Troubleshooting Chart ..................................... 5
.
BRAKE PEDAL .................................................. 6
.
K
M
SERVICE DATA AND SPECIFICATIONS
(SDS) ................................................................. 38
N
BRAKE MASTER CYLINDER ...........................14
.
On-Board Inspection .............................................. 14
.
Removal and Installation ........................................ 14
.
Disassembly and Assembly ................................... 15
.
Revision: July 2011
J
Component .............................................................33
.
Removal and Installation of Drum Brake Assembly
....33
Removal and Installation of Wheel Cylinder ...........36
.
Disassembly and Assembly of Wheel Cylinder ......36
.
On Board Inspection ................................................ 9
.
Drain and Refill ......................................................... 9
.
Bleeding Brake System ............................................ 9
.
Hydraulic Circuit ..................................................... 11
.
Front Brake Tube and Hose ................................... 11
.
Rear Brake Tube and Hose ................................... 12
.
Inspection After Installation .................................... 13
.
I
REAR DRUM BRAKE ....................................... 33
BRAKE FLUID .................................................... 9
.
BRAKE TUBE AND HOSE ...............................11
.
H
FRONT DISC BRAKE ....................................... 25
PREPARATION .................................................. 4
.
Inspection and Adjustment ....................................... 6
.
Removal and Installation .......................................... 7
.
G
BR-1
General Specification .............................................38
.
Brake Pedal ............................................................38
.
Check Valve ...........................................................39
.
Brake Booster .........................................................39
.
Front Disc Brake .....................................................39
.
Rear Drum Brake ....................................................39
.
2012 Versa
L
O
P
PRECAUTIONS
< SERVICE INFORMATION >
SERVICE INFORMATION
PRECAUTIONS
Precaution for Supplemental Restraint System (SRS) "AIR BAG" and "SEAT BELT
PRE-TENSIONER"
INFOID:0000000007328832
The Supplemental Restraint System such as “AIR BAG” and “SEAT BELT PRE-TENSIONER”, used along
with a front seat belt, helps to reduce the risk or severity of injury to the driver and front passenger for certain
types of collision. This system includes seat belt switch inputs and dual stage front air bag modules. The SRS
system uses the seat belt switches to determine the front air bag deployment, and may only deploy one front
air bag, depending on the severity of a collision and whether the front occupants are belted or unbelted.
Information necessary to service the system safely is included in the SRS and SB section of this Service Manual.
WARNING:
• To avoid rendering the SRS inoperative, which could increase the risk of personal injury or death in
the event of a collision which would result in air bag inflation, all maintenance must be performed by
an authorized NISSAN/INFINITI dealer.
• Improper maintenance, including incorrect removal and installation of the SRS can lead to personal
injury caused by unintentional activation of the system. For removal of Spiral Cable and Air Bag
Module, see the SRS section.
• Do not use electrical test equipment on any circuit related to the SRS unless instructed to in this
Service Manual. SRS wiring harnesses can be identified by yellow and/or orange harnesses or harness connectors.
PRECAUTIONS WHEN USING POWER TOOLS (AIR OR ELECTRIC) AND HAMMERS
WARNING:
• When working near the Airbag Diagnosis Sensor Unit or other Airbag System sensors with the Ignition ON or engine running, DO NOT use air or electric power tools or strike near the sensor(s) with a
hammer. Heavy vibration could activate the sensor(s) and deploy the air bag(s), possibly causing
serious injury.
• When using air or electric power tools or hammers, always switch the Ignition OFF, disconnect the
battery, and wait at least 3 minutes before performing any service.
Precaution Necessary for Steering Wheel Rotation After Battery Disconnect
INFOID:0000000007328833
NOTE:
• This Procedure is applied only to models with Intelligent Key system and NATS (NISSAN ANTI-THEFT SYSTEM).
• Remove and install all control units after disconnecting both battery cables with the ignition knob in the
″LOCK″ position.
• Always use CONSULT to perform self-diagnosis as a part of each function inspection after finishing work. If
DTC is detected, perform trouble diagnosis according to self-diagnostic results.
For models equipped with the Intelligent Key system and NATS, an electrically controlled steering lock mechanism is adopted on the key cylinder.
For this reason, if the battery is disconnected or if the battery is discharged, the steering wheel will lock and
steering wheel rotation will become impossible.
If steering wheel rotation is required when battery power is interrupted, follow the procedure below before
starting the repair operation.
OPERATION PROCEDURE
1.
2.
3.
4.
Connect both battery cables.
NOTE:
Supply power using jumper cables if battery is discharged.
Use the Intelligent Key or mechanical key to turn the ignition switch to the ″ACC″ position. At this time, the
steering lock will be released.
Disconnect both battery cables. The steering lock will remain released and the steering wheel can be
rotated.
Perform the necessary repair operation.
Revision: July 2011
BR-2
2012 Versa
PRECAUTIONS
< SERVICE INFORMATION >
5. When the repair work is completed, return the ignition switch to the ″LOCK″ position before connecting
the battery cables. (At this time, the steering lock mechanism will engage.)
6. Perform a self-diagnosis check of all control units using CONSULT.
Precaution for Brake System
INFOID:0000000007328834
A
B
• Refill using recommended brake fluid. Refer to MA-13.
• Never reuse drained brake fluid.
• Be careful not to splash brake fluid on painted surface of body. If brake fluid is splashed on painted surfaces C
of body immediately wipe it off with cloth and then wash it away with water.
• To clean or wash all parts of master cylinder, disc brake caliper and wheel cylinder, use new brake fluid.
• Never use mineral oils such as gasoline or kerosene. They will ruin rubber parts of the hydraulic system.
D
• Use a flare nut wrench when removing a brake tube and use a
flare nut torque wrench when installing a brake tube.
• When installing brake tubes and hoses, be sure to check torque.
E
• Before working, turn ignition switch OFF and disconnect connectors of ABS actuator and electric unit (control unit) or the battery
cable from the negative terminal.
• Burnish the new braking surfaces after refinishing or replacing
BR
drums or rotors, after replacing pads or linings, or if a soft pedal
occurs at very low mileage. Refer to BR-32, "Brake Burnishing
Procedure" .
G
SBR686C
H
I
J
K
L
M
N
O
P
Revision: July 2011
BR-3
2012 Versa
PREPARATION
< SERVICE INFORMATION >
PREPARATION
Special Service Tool
INFOID:0000000007328835
The actual shapes of Kent-Moore tools may differ from those of special service tools illustrated here.
Tool number
(Kent-Moore No.)
Tool name
Description
—
(J-46532)
Brake and clutch pedal height measurement tool
Measuring brake pedal height
LFIA0227E
38-PFM90.5
( — )
Pro-Cut PFM90 On-Car Brake Lathe
Turning rotors
ALFIA0092ZZ
Commercial Service Tool
INFOID:0000000007328836
Tool name
Description
1. Flare nut crowfoot
2. Torque wrench
Removing and installing brake piping
a: 10 mm (0.39 in) / 12 mm (0.47 in)
S-NT360
Pin punch
Removing and installing reservoir tank pin
Tip diameter: 4 mm (0.16 in)
ZZA0515D
Power tool
Removing nuts, bolts and screws
PIIB1407E
Revision: July 2011
BR-4
2012 Versa
Symptom
Revision: July 2011
×
×
×
Rotor imbalance
Shims damaged
Noise
Pads/Lining - uneven wear
Possible cause and
SUSPECTED PARTS
Shake
×
Shimmy, Shudder
×
×
×
BR-5
×
×
×
×
×
DIFFERENTIAL
SUSPENSION
TIRES
ROAD WHEEL
DRIVE SHAFT
STEERING
Drum out of round
Rotor thickness variation
Rotor rust
Rotor deflection
Rotor deformation
Rotor runout
WHEEL HUB
×
Rotor damage
×
PS-5, "NVH Troubleshooting Chart"
FAX-5, "NVH Troubleshooting Chart"
NVH Troubleshooting Chart
WT-5, "NVH Troubleshooting Chart"
WT-5, "NVH Troubleshooting Chart"
FSU-6, "NVH Troubleshooting Chart"
MT-9, "NVH Troubleshooting Chart"
FAX-5, "NVH Troubleshooting Chart"
BR-33
BR-29, BR-33
—
BR-29, BR-33
BR-29, BR-33
BR-29, BR-33
BR-29, BR-33
BR-29, BR-33
BR-25
BR-25, BR-33
BR-25, BR-33
Reference page
Pads/Lining damaged
NOISE, VIBRATION AND HARSHNESS (NVH) TROUBLESHOOTING
< SERVICE INFORMATION >
NOISE, VIBRATION AND HARSHNESS (NVH) TROUBLESHOOTING
INFOID:0000000007328837
A
Use the chart below to help you find the cause of the symptom. If necessary, repair or replace these parts.
B
×
×
×
×
×
×
×
×
×
×
×: Applicable
×
×
×
×
×
2012 Versa
C
D
E
BR
G
H
I
J
K
L
M
N
O
P
BRAKE PEDAL
< SERVICE INFORMATION >
BRAKE PEDAL
Inspection and Adjustment
INFOID:0000000007328838
INSPECTION
1.
Check brake pedal free height (H) from dash panel top surface
using Tool.
Tool number
2.
:
—
(J-46532)
Check clearance between pedal stopper (C1) and threaded end
of stop lamp switch and ASCD cancel switch (C2), if equipped.
AWFIA0557ZZ
•
Brake pedal free height (H) (from dash panel top surface)
: Refer to BR-38, "Brake Pedal".
Brake pedal full stroke (S)
: Refer to BR-38, "Brake Pedal".
Clearance between pedal stopper (C1) and threaded end of stop
lamp switch and ASCD cancel switch (C2), if equipped.
: Refer to BR-38, "Brake Pedal".
ADJUSTMENT
1.
Loosen stop lamp switch and ASCD cancel switch, if equipped, by rotating it counterclockwise by 45°.
Revision: July 2011
BR-6
2012 Versa
BRAKE PEDAL
< SERVICE INFORMATION >
2. Loosen lock nut on input rod, then rotate input rod to set pedal to
the specified height, and tighten the lock nut.
CAUTION:
Make sure that the threaded end of input rod stays inside
clevis.
Lock nut
3.
4.
6.
B
: Refer to BR-21, "Removal and Installation".
With the pedal pulled and held by hand, press stop lamp switch
and ASCD cancel switch, if equipped, until their threaded end
contacts the brake pedal stopper.
With the threaded end of stop lamp switch and ASCD cancel
switch, if equipped, contacting brake pedal stopper, rotate the
switches clockwise by 45° to secure.
CAUTION:
Make sure that the clearance (C) between pedal stopper and
switch threaded end is within specification.
Clearance between pedal
stopper (C1) and threaded
end of stop lamp switch
and ASCD cancel switch
(C2), if equipped.
5.
A
C
D
E
BR
: Refer to BR-38, "Brake
Pedal".
G
SFIA3064E
Check that the stop lamps go out when the brake pedal is released.
CAUTION:
Make sure that stop lamps go off when brake pedal is released.
Start the engine and check the brake pedal for smooth operation.
H
I
Removal and Installation
INFOID:0000000007328839
COMPONENTS
J
K
L
M
N
O
AWFIA0540GB
1.
Snap pin
2.
Stop lamp switch
3.
Brake pedal assembly
5.
Clevis pin
6.
Brake pedal pad
7.
P
Clip
4.
ASCD cancel switch (if equipped)
REMOVAL
1.
Remove the instrument lower panel LH. Refer to IP-11, "Component Parts".
Revision: July 2011
BR-7
2012 Versa
BRAKE PEDAL
< SERVICE INFORMATION >
2. Disconnect accelerator pedal position sensor harness connector.
3. Remove stop lamp switch and ASCD cancel switch, if equipped,
from brake pedal assembly.
4. Remove snap pin and clevis pin from clevis of brake booster.
5. Remove nuts from brake pedal bracket, and remove brake pedal
assembly from vehicle.
6. Remove accelerator pedal from brake pedal assembly.
SFIA2044E
INSPECTION AFTER REMOVAL
• Check brake pedal upper rivet for deformation.
• Make sure that the lapping length of sub-bracket and slide plate is
at least 6.9 ± 0.5 mm (0.272 ± 0.020 in).
• Check brake pedal for bend, damage, and cracks on the welded
parts.
• Replace brake pedal assembly if any non-standard condition is
detected.
SFIA2866E
• Check clevis pin and plastic stopper for damage and deformation.
Replace clevis pin as necessary.
SBR997
INSTALLATION
1.
2.
Install the accelerator pedal on the brake pedal assembly. Refer to ACC-4, "Removal and Installation".
Install the brake pedal assembly on the lower dash panel and
tighten the brake pedal assembly nuts in the order as shown to
specification.
AWFIA0524GB
3.
Installation of the remaining components are in the reverse order of the removal.
• After installing brake pedal assembly to vehicle, adjust brake pedal. Refer to BR-6, "Inspection and
Adjustment".
• After installing accelerator pedal, check accelerator pedal. Refer to ACC-4, "Removal and Installation".
Revision: July 2011
BR-8
2012 Versa
BRAKE FLUID
< SERVICE INFORMATION >
BRAKE FLUID
A
On Board Inspection
INFOID:0000000007328840
CHECKING BRAKE FLUID LEVEL
B
• Make sure the fluid level in the reservoir tank is within the standard
(between MAX and MIN lines).
• Visually check around the reservoir tank for fluid leaks.
• If fluid level is excessively low, check brake system for fluid leaks.
• Release parking brake lever and see if brake warning lamp goes
off. If not, check brake system for fluid leaks.
C
D
E
SFIA3067E
Drain and Refill
INFOID:0000000007328841
CAUTION:
• Refill using recommended brake fluid. Refer to MA-13, "Fluids and Lubricants".
• Never reuse drained brake fluid.
• Be careful not to splash brake fluid on painted areas; it may cause paint damage. If brake fluid is
splashed on painted areas, immediately wipe them with cloth and wash it away with water.
• Before working, disconnect connectors of ABS actuator and electric unit (control unit) or battery
negative terminal.
1. Connect a vinyl tube to bleed valve.
2. Depress the brake pedal, loosen the bleed valve, and gradually
remove the brake fluid.
BR
G
H
I
J
K
WFIA0512E
3.
4.
5.
Clean inside of reservoir tank, and refill with new brake fluid.
Loosen bleed valve, depress brake pedal slowly to full stroke
and then release it. Repeat the procedure every 2 or 3 seconds
until the new brake fluid comes out, then close the bleed valve
while depressing the brake pedal. Repeat the same procedure
for each wheel.
L
M
N
Bleed the air from the brake hydraulic system. Refer to BR-9,
"Bleeding Brake System" .
O
WFIA0513E
Bleeding Brake System
INFOID:0000000007328842
CAUTION:
• While bleeding, pay attention to master cylinder fluid level.
• Before working, disconnect connectors of ABS actuator and electric unit (control unit) or the battery
cable from the negative terminal.
1. Connect a vinyl tube to the rear right bleed valve.
2. Fully depress brake pedal 4 to 5 times.
Revision: July 2011
BR-9
2012 Versa
P
BRAKE FLUID
< SERVICE INFORMATION >
3. With brake pedal depressed, loosen bleed valve to let the air out, and then tighten it immediately.
4. Repeat steps 2, 3 until no more air comes out.
5. Tighten bleed valve to specified torque. Refer to BR-25, "Component" (front disc brake), BR-33, "Component" (rear drum brake).
6. Following the steps 1 to 5 above, with master cylinder reservoir tank filled at least half way, bleed air from
the rear right, front left, rear left, and front right brake, in that order.
Revision: July 2011
BR-10
2012 Versa
BRAKE TUBE AND HOSE
< SERVICE INFORMATION >
BRAKE TUBE AND HOSE
A
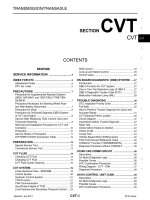
Hydraulic Circuit
INFOID:0000000007328843
B
C
D
E
BR
G
SFIA3068E
1.
Front disc brake
2.
Brake master cylinder
4.
Rear drum brake
5.
Connector
7.
Brake tube
8.
3.
Brake booster
6.
ABS actuator and electric unit
(control unit)
H
Brake hose
:
Union bolt
18.2 N.m (1.9 kg-m, 13.0 ft-lb)
:
Connector bolt
7.0 N.m (0.71 kg-m, 62 in-lb)
:
I
Flare nut
16.2 N.m (1.7 kg-m, 12.0 ft-lb)
CAUTION:
• All tubes and hoses must be free from excessive bending, twisting and pulling.
• Make sure there is no interference with other parts when turning steering both clockwise and counterclockwise.
• Brake tubes and hoses are an important safety part. Always disassemble the parts and retighten
their fittings, if a brake fluid leak is detected. Replace applicable part with a new one, if damaged part
is detected.
• Be careful not to splash brake fluid on painted areas; it may cause paint damage. If brake fluid is
splashed on painted surfaces of body, immediately wipe them with cloth and then wash it away with
water.
• Do not bend or twist brake hose sharply, or strongly pull it.
• When removing components, cover brake line connections so that dirt, dust, or other foreign matters do not get in.
• Refill using recommended brake fluid. Refer to MA-13, "Fluids and Lubricants".
• Never reuse drained brake fluid.
• Do not reuse copper sealing washers.
NOTE:
When removing components such as hoses, tubes/lines, etc., cap or plug openings to prevent fluid from spilling.
Front Brake Tube and Hose
INFOID:0000000007328844
REMOVAL
Revision: July 2011
BR-11
2012 Versa
J
K
L
M
N
O
P
BRAKE TUBE AND HOSE
< SERVICE INFORMATION >
1. Drain brake fluid. Refer to BR-9, "Drain and Refill".
2. Using a flare nut wrench, remove brake tube from brake hose.
3. Remove union bolt and discard the copper sealing washers.
CAUTION:
Do not reuse copper sealing washers.
4. Remove brake hose from caliper assembly.
5. Remove lock plate, and remove brake hose.
SFIA1118E
INSTALLATION
1.
2.
3.
4.
5.
6.
7.
Assemble union bolt (A) and new copper sealing washers (1) on
to brake hose.
CAUTION:
Do not reuse copper sealing washers.
Position the L-shape metal fitting of the brake hose to the brake
caliper assembly positioning hole.
Tighten union bolt (A) to the specified torque. Refer to BR-11,
"Hydraulic Circuit".
Connect brake hose to brake tube, and temporarily tighten flare
nut by hand as much as possible.
Secure brake hose and brake tube with lock plates.
Tighten flare nut to the specified torque with a suitable tool. Refer to BR-11, "Hydraulic Circuit".
Bleed the air from the brake hydraulic system. Refer to BR-9, "Bleeding Brake System".
Rear Brake Tube and Hose
AWFIA0795ZZ
INFOID:0000000007328845
NOTE:
When removing components such as hoses, tubes/lines, etc., cap or plug openings to prevent fluid from spilling.
REMOVAL
1.
2.
3.
Drain brake fluid. Refer to BR-9, "Drain and Refill".
Remove brake tube from brake hose using a suitable tool.
Remove lock plate, and remove brake hose.
SFIA1120E
INSTALLATION
1.
Connect brake hose to brake tube, and temporarily tighten flare nut by hand as much as possible.
Revision: July 2011
BR-12
2012 Versa
BRAKE TUBE AND HOSE
< SERVICE INFORMATION >
2. Secure it to the bracket with the lock plate.
3. Tighten flare nut to the specified torque using a suitable tool.
Refer to BR-11, "Hydraulic Circuit".
A
B
C
SFIA1120E
4.
D
Bleed the air from the brake hydraulic system. Refer to BR-9, "Bleeding Brake System".
Inspection After Installation
INFOID:0000000007328846
E
CAUTION:
• Always disassemble the parts and retighten their fittings, if a brake fluid leak is detected. Replace
applicable part with a new one, if damaged part is detected.
BR
• If leak is detected at the connections, retighten it or replace the damaged part.
1. Check brake hose, tube, and connections for fluid leaks, damage, twisting, deformation, contact with other
parts, and loose connections.
G
2. While depressing pedal under a force of 785 N (80 kg-f, 177 lb-f) with the engine running for approximately 5 seconds, check for fluid leaks from each part of the brake hydraulic system.
H
I
J
K
L
M
N
O
P
Revision: July 2011
BR-13
2012 Versa
BRAKE MASTER CYLINDER
< SERVICE INFORMATION >
BRAKE MASTER CYLINDER
On-Board Inspection
INFOID:0000000007328849
LEAK INSPECTION
• Check for leaks around the master cylinder installation surface, the reservoir tank installation surface, and all
the brake tube connections.
Removal and Installation
INFOID:0000000007328850
AWFIA0827GB
1.
Reservoir tank
2.
Master cylinder
3.
Brake booster
4.
Clevis
5.
Spacer
6.
Gasket
Up
CAUTION:
• Be careful not to splash brake fluid on painted areas; it may cause paint damage. If brake fluid is
splashed on painted areas, immediately wipe them with cloth and wash it away with water.
• Do not reuse O-ring.
• Do not reuse master cylinder nuts.
NOTE:
When removing components such as hoses, tubes/lines, etc., cap or plug openings to prevent fluid from spilling.
REMOVAL
1.
2.
3.
4.
Drain the brake fluid. Refer to BR-9, "Drain and Refill".
Remove the battery. Refer to SC-7, "Removal and Installation".
Remove the air duct. Refer to EM-16, "Removal and Installation".
Remove the air cleaner. Refer to EM-16, "Removal and Installation".
Revision: July 2011
BR-14
2012 Versa
BRAKE MASTER CYLINDER
< SERVICE INFORMATION >
5. Disconnect the brake fluid level switch harness connector.
6. Disconnect the clutch hose from the reservoir tank, if equipped.
7. Remove the brake tube from master cylinder using a suitable tool.
8. Remove the master cylinder assembly nuts, and remove master cylinder assembly.
9. Remove O-ring from master cylinder.
A
B
INSTALLATION
CAUTION:
• Refill using recommended brake fluid. Refer to MA-13, "Fluids and Lubricants".
• Never reuse drained brake fluid.
• Check if the rod of primary piston has dust or scratches.
1. Install O-ring to master cylinder.
CAUTION:
• Do not reuse O-ring.
• Apply silicone grease for O-ring, primary piston rod and
to inside of booster.
2. Install master cylinder to brake booster assembly, and tighten
nuts to the specified torque.
CAUTION:
• Do not damage or strain rod of primary piston.
• Do not reuse master cylinder nuts.
C
D
E
BR
G
SFIA2614E
3.
Install brake tubes to master cylinder, and temporarily tighten the flare nuts on the brake tube to master
cylinder by hand.
4. Tighten brake tube flare nuts to the specified torque using a flare nut torque wrench. Refer to BR-11,
"Hydraulic Circuit".
5. Connect the clutch hose to the reservoir tank, if equipped.
6. Connect brake fluid level switch harness connector.
7. Install the air cleaner. Refer to EM-16, "Removal and Installation".
8. Install the air duct. Refer to EM-16, "Removal and Installation".
9. Install the battery. Refer to SC-7, "Removal and Installation".
10. Refill with new brake fluid and bleed the air from the brake hydraulic system. Refer to BR-9, "Bleeding
Brake System".
Disassembly and Assembly
H
I
J
K
INFOID:0000000007328851
L
COMPONENTS
M
N
O
P
SFIA3094E
Revision: July 2011
BR-15
2012 Versa
BRAKE MASTER CYLINDER
< SERVICE INFORMATION >
1.
Reservoir cap
2.
Oil filter
3.
Reservoir tank
4.
Grommet
5.
Piston stopper
6.
Cylinder body
7.
Pin
8.
Brake fluid level switch
9.
O-ring
10.
Secondary piston assembly
11.
Primary piston assembly
12.
13.
Guide assembly
14.
Snap ring
:
Plate
Brake fluid
PBC (Poly Butyl Cuprysil) grease
: or silicone-based grease
DISASSEMBLY
CAUTION:
While working, cover primary piston rod with cloth to prevent it from being damaged.
1. Secure flange of cylinder body in vise as shown.
CAUTION:
• Use copper plate or cloth to cover flange when securing
in vise.
• When securing master cylinder assembly in a vise, be
sure not to over-tighten.
WFIA0514E
2.
3.
4.
Using a pin-punch [commercial service tool: diameter approx. 4
mm (0.16 in)], remove pin from reservoir tank.
Remove master cylinder assembly from vise.
Remove reservoir tank and grommet from cylinder body.
WFIA0515E
5.
While pushing primary piston, remove piston stopper through
secondary tank boss hole in the cylinder body.
WFIA0516E
Revision: July 2011
BR-16
2012 Versa
BRAKE MASTER CYLINDER
< SERVICE INFORMATION >
6. Remove snap ring while pushing primary piston.
CAUTION:
Be careful not to pop out piston.
7. Holding rod of primary piston, remove primary piston assembly,
plate and guide assembly by pulling straight to prevent piston
cup from being caught by the inner wall of cylinder.
8. Remove plate and guide assembly from primary piston.
CAUTION:
Be careful not to damage rod from the inner wall of plate.
A
B
C
WFIA0517E
BRA0561D
9.
D
Tap flange using a soft block such as wood, and carefully pull
secondary piston assembly straight out to prevent cylinder inner
wall from being damaged.
E
BR
G
WFIA0518E
INSPECTION AFTER DISASSEMBLY
Cylinder Body
• Check the inner wall of cylinder for damage, wear, corrosion, and pin holes. Replace cylinder body if necessary.
ASSEMBLY
CAUTION:
• Never use mineral oils such as kerosene or gasoline during the cleaning and assembly processes.
• Make sure that there is no foreign material such as dirt and dust on the inner wall of cylinder, piston,
and piston cup. Be careful not to damage parts with a service tool when assembling.
• Do not drop parts. If a part is dropped, do not use it.
1. Apply brake fluid to the inner wall of cylinder body, primary piston assembly and secondary piston assembly.
2. Insert secondary piston and primary piston assembly into cylinder body in this order.
CAUTION:
• Pay attention to the orientation of piston cup, and insert
straight to prevent cup from being caught by the inner
wall of cylinder.
• Always replace inner kit as a set.
SBR089C
3.
Set the slit of secondary piston towards the piston stopper
mounting hole of cylinder body while pushing in the primary piston. Then install the piston stopper through the slit of secondary
piston.
H
I
J
K
L
M
N
O
P
WFIA0516E
Revision: July 2011
BR-17
2012 Versa
BRAKE MASTER CYLINDER
< SERVICE INFORMATION >
4. Insert plate and guide assembly into cylinder body.
CAUTION:
• Be careful not to damage rod of primary piston.
• Pay attention to the orientation of guide assembly.
• Do not drop O-ring.
• Be careful the guide and/or plate are not inserted at an
angle to cylinder inner wall.
SFIA1469E
5.
Be careful not to damage rod of primary piston with the cloth.
Then insert snap ring to cylinder body while pushing primary piston.
CAUTION:
Make sure that snap ring is securely engaged in cylinder
body inner diameter groove.
WFIA0517E
6.
Apply brake fluid to a grommet, and press it into reservoir tank to install.
7.
Install reservoir tank to cylinder body.
CAUTION:
Pay attention to the orientation of reservoir tank. Make sure
reservoir tank is fully seated on master cylinder.
WFIA0519E
8.
Secure flange of cylinder body in vise as shown.
CAUTION:
• Use copper plate or cloth to cover flange for securing in
the vise.
• When securing master cylinder assembly in a vise, be
sure not to over-tighten.
• Be sure to secure the flange part with the brake tube
installation side of cylinder body facing up (chamfered pin
insert hole of cylinder body facing up).
WFIA0514E
Revision: July 2011
BR-18
2012 Versa
BRAKE MASTER CYLINDER
< SERVICE INFORMATION >
9. Using a pin punch [commercial service tool: diameter approx. 4
mm (0.16 in)], insert the reservoir tank pin into the pin hole.
A
B
C
WFIA0515E
D
E
BR
G
H
I
J
K
L
M
N
O
P
Revision: July 2011
BR-19
2012 Versa
BRAKE BOOSTER
< SERVICE INFORMATION >
BRAKE BOOSTER
On Board Inspection
INFOID:0000000007328852
OPERATING CHECK
• With the engine stopped, change the vacuum to the atmospheric pressure by depressing brake pedal several times at intervals of 5 seconds.
• Then with brake pedal fully depressed, start engine and when the
vacuum pressure reaches the standard, make sure that the clearance between brake pedal and floor panel decreases.
WFIA0520E
AIRTIGHT CHECK
• Run engine at idle for approximately 1 minute, and stop it after
applying vacuum to booster. Depress brake pedal normally to
change the vacuum to the atmospheric pressure. Make sure that
distance between brake pedal and floor panel gradually increases.
WFIA0521E
• Depress the brake pedal while engine is running, then stop engine with brake pedal depressed. The pedal
stroke should not change after holding pedal down for 30 seconds.
Revision: July 2011
BR-20
2012 Versa
BRAKE BOOSTER
< SERVICE INFORMATION >
Removal and Installation
INFOID:0000000007328853
A
B
C
D
E
BR
G
H
I
AWFIA0827GB
1.
4.
Reservoir tank
2.
Master cylinder
3.
Brake booster
Clevis
5.
Spacer
6.
Gasket
J
K
Up
REMOVAL
CAUTION:
• Be careful not to splash brake fluid on painted areas such as body. It may cause paint damage. If
brake fluid is splashed on painted surfaces of body, wipe them with cloth immediately and then wash
it away with water.
• Be careful not to deform or bend brake tubes while removing and installing brake booster.
• Replace clevis pin if it is damaged.
• Be careful not to damage brake booster stud bolt threads. If brake booster is tilted or inclined during
installation, dash panel may damage the threads.
1. Remove vacuum hose from brake booster.
2. Remove master cylinder assembly. Refer to BR-14, "Removal and Installation".
3. Remove the battery and battery tray. Refer to SC-7, "Removal and Installation".
4. Remove the instrument lower panel LH. Refer to IP-11, "Component Parts".
L
M
N
O
P
Revision: July 2011
BR-21
2012 Versa
BRAKE BOOSTER
< SERVICE INFORMATION >
5. Remove snap pin and clevis pin on the clevis of the brake
booster, and disconnect the input rod from the brake pedal.
SFIA2044E
6.
7.
8.
9.
10.
Remove brake pedal nuts on pedal bracket.
Remove the cowl top. Refer to EI-22, "Removal and Installation".
Remove between spacer and dash panel nut from dash panel.
Remove brake booster and spacer.
Remove spacer and gasket from brake booster.
INSTALLATION
1.
Loosen lock nut to adjust input rod length (B) to the specified
value.
Input rod length (B)
2.
3.
4.
5.
6.
7.
8.
9.
10.
11.
12.
13.
: Refer to BR-39, "Brake Booster".
Install spacer and gasket to brake booster and tighten spacer
nut (brake booster side) to the specified torque.
CAUTION:
Be sure to install the gasket between brake booster and
dash panel.
After adjusting length (B), temporarily tighten lock nut to install
brake booster assembly to dash panel.
Connect brake pedal to clevis of input rod with the clevis pin and snap pin.
Install brake pedal bracket nuts and tighten them to the specified torque.
Install master cylinder assembly. Refer to BR-14, "Removal and Installation".
Install the battery tray and battery. Refer to SC-7, "Removal and Installation".
Adjust the height and play of brake pedal. Refer to BR-6, "Inspection and Adjustment".
Tighten lock nut of input rod to the specified torque.
Install vacuum hose into brake booster. Refer to BR-23, "Removal and Installation".
Install cowl top. Refer to EI-22, "Removal and Installation".
Install instrument lower panel LH. Refer to IP-11, "Component Parts".
Bleed the air from the brake hydraulic system. Refer to BR-9, "Bleeding Brake System".
Revision: July 2011
BR-22
SGIA0060E
2012 Versa
VACUUM LINES
< SERVICE INFORMATION >
VACUUM LINES
A
Component
INFOID:0000000007328854
B
C
D
E
BR
G
WFIA0541E
1.
Hose clamp
2.
Engine side indicator stamp (for
built-in check valve orientation)
3.
Vacuum hose
4.
Clip
5.
Clip position stamp
6.
Vacuum tube
A.
To intake manifold
B.
To brake booster
H
I
Removal and Installation
INFOID:0000000007328855
REMOVAL
1.
2.
3.
4.
J
Remove the air intake duct. Refer to EM-16, "Removal and Installation".
Disconnect the vacuum hose from the intake manifold.
Disconnect the vacuum hose from the brake booster.
Disconnect the vacuum hose from the clip and remove the vacuum hose and vacuum tube assembly.
INSTALLATION
Installation is in the reverse order of removal.
CAUTION:
• Because the vacuum hose at the intake manifold contains a built-in check valve, it must be installed
in the correct orientation. Refer to the stamp or label to confirm correct installation orientation.
Brake booster will not operate normally if hose is installed in the reverse orientation.
• Insert vacuum hose at least 24 mm (0.94 in) on to the vacuum
tube and vacuum fittings on the brake booster and intake
manifold as shown.
• Never use lubricating oil during assembly.
K
L
M
N
O
P
SBR225B
Inspection
INFOID:0000000007328856
VISUAL INSPECTION
Check for improper installation, damage and deterioration. Replace parts as necessary.
Revision: July 2011
BR-23
2012 Versa
VACUUM LINES
< SERVICE INFORMATION >
CHECK VALVE INSPECTION
Use a suitable tool (A) to check the built-in check valve.
Replace the vacuum hose with the built-in check valve as an assembly if the vacuum hose is out of specifications.
When connected to booster side (B)
When connected to engine side (C)
: Refer to BR-39,
"Check Valve".
: Refer to BR-39,
"Check Valve".
JPFIA0024ZZ
Revision: July 2011
BR-24
2012 Versa
FRONT DISC BRAKE
< SERVICE INFORMATION >
FRONT DISC BRAKE
A
On Board Inspection
INFOID:0000000007328857
PAD WEAR INSPECTION
B
• Check pad thickness from check hole on cylinder body.
Standard thickness
Repair limit thickness
: Refer to BR-39, "Front
Disc Brake".
: Refer to BR-39, "Front
Disc Brake".
C
D
E
BRA0010D
Component
INFOID:0000000007328858
BR
CLZ25VF
G
H
I
J
K
L
M
AWFIA0641GB
1.
Union bolt
2.
Brake hose
3.
Copper sealing washer
4.
Cap
5.
Bleed valve
6.
Sliding pin bolt
7.
Cylinder body
8.
Piston seal
9.
Piston
N
10.
Piston boot
11.
Inner shim cover
12.
Inner shim
13.
Inner pad
14. Pad wear sensor
15.
Pad retainer
16.
Outer pad
17. Outer shim
18.
Outer shim cover
19.
Sliding pin
20. Sliding pin boot
21.
Bushing
22.
Torque member bolt
23. Torque member
O
: Brake fluid
1:Molykote AS-880N grease
P
Front
2: Rubber grease
3: Molykote 7439 grease
Revision: July 2011
BR-25
2012 Versa