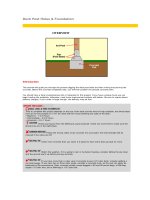
Deck post holes
Bạn đang xem bản rút gọn của tài liệu. Xem và tải ngay bản đầy đủ của tài liệu tại đây (86.7 KB, 4 trang )
D
eck Post Holes & Foundation
OVERVIEW
Introduction
This tutorial will guide you through the process digging the deck post holes and then mixing and pouring the
concrete. Before the concrete completely sets, you will then position the precast concrete piers.
You should have a fairly comprehensive list of materials for this project. If you have a pickup truck you can
begin hauling the materials, otherwise, most home improvement centers will deliver. Be sure to inquire about
delivery charges, if your order is large enough, the delivery may be free.
Time to complete this project depends on the size of the deck and the level of help available, the times listed
here are for two people on a 10’x 30’ deck with the house defining two sides of the deck.
• Beginner - 7 to 9 hours
• Intermediate - 6 to 8 hours
• Advanced - 5 to 7 hours
Check your layout from the Marking & Layout tutorial check one more time to make sure the
string lines are in the right place.
Follow the mixing ratios of dry concrete mix and water, the final strength will be
reduced if the ratios are off.
Order more concrete than you need, it is easier to have extra than go back for more.
Watch the weather, if it is going to rain or be below freezing, consider letting the sky clear
and the ground warm up before pouring concrete.
If you have more than a cubic yare of concrete to pour (27 cubic feet), consider getting a
concrete buggy. If you have two or three cubic yards, consider a concrete truck, as the cost can easily be
balanced by the convenience. Note, concrete usually comes bagged in 60 and 90 pound bags, a 60# bag
equals 1/3 cubic foot, and a 90# bag is 1/2 Cubic foot.
STEPS
1. Gather your tools at the deck site and keep them close at hand. Dig the
holes for the concrete pads and make sure the excavated dirt is kept out of
the way. Dig all of the holes before starting the concrete. Be sure to
remove all "crumbs" from the hole. If the soil is not firm, it might be
necessary to build some forms to keep the holes at a reasonable size and
shape. This form material must be removed after the concrete is cured and
dirt should be packed in around the void left by the form. Another tip: put
the dirt on plastic or plywood and it will be easier to haul away.
2. Set up your mixing station so that there you do not have to move the
mixed concrete far as it becomes very heavy. If the ground is very dry,
dampen the holes with the garden hose. This will keep the water from
leaching out of the wet concrete into the dry ground.
3. Begin mixing the concrete with a gallon (not a critical measure) of water in
the bottom of the mixing tub, and then add the dry mix. Add water slowly
until all of the concrete is wet. When the concrete is completely mixed with
water the mixture should be a little stiff, which means that when you take a
scoop of mixed concrete and roll it back into the mix and it maintains its
shape.
4. Pour or shovel the fully mixed concrete in the hole and tamp it down into
the corners and edges with a rod or your shovel.
5. Once the hole is evenly filled, smooth the top surface so that it is level and
even using a "wood float." The surface does not have to be as smooth as
your driveway, just even it out.
6. The concrete will begin to harden, however you have some time before
placing the precast concrete pier. If the uncured concrete is too wet, you
will need to wait until it is dry enough to support the pier and yet still allow
the pier to sit down into the mix a bit. If the mix is a bit thick, set the pier
in place on top of the wet concrete and twist the pier left and right a couple
of times to force the pier into the wet concrete.
7. Once the pier is in place, check to see that it is level and use a plumb bob
to position it directly below the location you have marked with the string
grid line.
8. Go back to the uncured concrete and smooth out any bumps and wrinkles
you created when placing the pier using the concrete float. Repeat the last
few steps until all of the concrete pads and piers are in place.
9. When all the pads are completed, take a few steps back and survey your
handiwork to make sure that everything is in place. You will be glad you did
when everything sets and you move on to the next tutorial.
10.
When you finish the concrete, be sure to thoroughly clean all of your tools.
It will be much easier now than waiting until you need the tools again and
the concrete is set and solid.
SHOP LIST
Materials Needed
•
Concrete
•
Post Bases
•
Fresh Water
Tools Needed
•
Spade and other shovels
•
Breaker bar
•
Concrete mixing hoe
•
Concrete finishing tools, wood float
•
Torpedo level
•
Plumb bob
•
Mixing pan or wheel burrow
•
Garden hose with spray nozzle
•
"Rod" for tamping concrete