wordware publishing learn javascript (2002)
Bạn đang xem bản rút gọn của tài liệu. Xem và tải ngay bản đầy đủ của tài liệu tại đây (3.53 MB, 270 trang )
Learn JavaScript
Chuck Easttom
Wordware Publishing, Inc.
Library of Congress Cataloging-in-Publication Data
Easttom, Chuck.
Learn JavaScript / by Chuck Easttom.
p. cm.
Includes index.
ISBN 1-55622-856-2 (pbk.)
1. JavaScript (Computer program language). I. Title.
QA76.73.J39 E38 2001
005.2'762 dc21 2001046844
CIP
© 2002, Wordware Publishing, Inc.
All Rights Reserved
2320 Los Rios Boulevard
Plano, Texas 75074
No part of this book may be reproduced in any form or by
any means without permission in writing from
Wordware Publishing, Inc.
Printed in the United States of America
ISBN 1-55622-856-2
10987654321
0110
Product names mentioned are used for identification purposes only and may be trademarks of their respective
companies.
All inquiries for volume purchases of this book should be addressed to Wordware Publishing, Inc., at the
above address. Telephone inquiries may be made by calling:
(972) 423-0090
Contents Summary
Chapter 1 HTML Primer 1
Chapter 2 JavaScript Primer 13
Chapter 3 Alerts, Prompts, and User Feedback 33
Chapter 4 Image Effects 43
Chapter 5 Background Effects 59
Chapter 6 The Document Object Model 75
Chapter 7 Working with Date and Time 87
Chapter 8 Working with Cookies 97
Chapter 9 Working with the Status Bar 111
Chapter 10 Creating Dynamic Menus 121
Chapter 11 Working with Forms 135
Chapter 12 Strings in JavaScript 149
Chapter 13 Math in JavaScript 157
Chapter 14 Adding Plug-ins 169
Chapter 15 Objects in JavaScript 181
Chapter 16 Tips and Tricks 187
Chapter 17 JavaScript Games 197
Chapter 18 ActiveX and JavaScript 209
Chapter 19 Programming and JavaScript 217
Chapter 20 Antique Bookstore Project 223
Appendix A Online Resources 235
iii
Appendix B HTML Reference 239
Appendix C JavaScript Reference 243
Appendix D Common Errors 249
Index 251
iv
n
Contents Summary
Contents
Acknowledgments xi
Introduction xiii
Chapter 1 HTML Primer 1
Images and Hyperlinks 4
Colors and Backgrounds 6
Tables 7
Lists 9
Marquee 11
Summary 11
Chapter 2 JavaScript Primer 13
Essential Tools 13
Choosing a Browser 14
Basic JavaScript Structure 14
The <SCRIPT> Tag 14
Internal Scripts 14
External Scripts 15
Placing JavaScript Code 15
JavaScript Conventions 16
Using the Semicolon 16
Case Sensitivity 17
Comments 17
Using Quotes 17
Your First Script 18
Fundamental JavaScript Concepts 20
Data Types and Variables in JavaScript 20
JavaScript Operators 22
JavaScript Statements 23
Multiple Statements 23
Nested Statements 24
JavaScript Expressions 24
JavaScript Function Declarations 25
Calling Functions 26
Dialog Boxes 28
Alert Boxes 28
Confirm Boxes 28
Prompt Boxes 29
v
if Statement 30
Summary 31
Chapter 3 Alerts, Prompts, and User Feedback 33
Alert Boxes 33
Prompt Boxes 35
Writing Back to the Web Page 38
Antique Bookstore Project 41
Summary 42
Chapter 4 Image Effects 43
The Image Object 43
Rollover 44
Slide Show 46
Image Preview 51
Banner Ads 53
Image Pop-up 54
Antique Bookstore Project 56
Summary 57
Chapter 5 Background Effects 59
Document Object 59
Changing the Background Color 59
Changing the Background Image 62
More Background Effects 68
Antique Bookstore Project 70
Summary 73
Chapter 6 The Document Object Model 75
The window Object Hierarchy 75
document Object 76
history Object 76
The document Object 77
The window Object 80
The navigator Object 83
Using the history Object 84
Antique Bookstore Project 85
Summary 86
Chapter 7 Working with Date and Time 87
Time of Day 87
DayofWeek 89
Setting Timeout 92
Antique Bookstore Project 93
Summary 95
Chapter 8 Working with Cookies 97
Baking Your First Cookie 97
vi
n
Contents
setCookie 99
getCookie 100
Calling the Functions 101
Bake Another Cookie 102
Antique Bookstore Project 106
Summary 109
Chapter 9 Working with the Status Bar 111
Image Data 111
T-Banners 114
Antique Bookstore Project 118
Summary 119
Chapter 10 Creating Dynamic Menus 121
Pop-Up Menus 121
Drop-Down Menus 124
Pull-Down Menus 125
Expanding Menus 129
Antique Bookstore Project 132
Summary 134
Chapter 11 Working with Forms 135
Form Basics 135
Text Fields and Buttons 137
Options 138
Radio Buttons 140
Check Boxes 141
Event Handlers in Form Elements 143
onSubmit 143
onReset 145
Synopsis of Form Elements 146
Antique Bookstore Project 147
Summary 147
Chapter 12 Strings in JavaScript 149
Creating Strings 149
String Length 149
String Methods 151
charAt() 151
indexOf() 152
lastIndexOf() 153
substring() 153
Number-to-String Conversion 154
Empty String Concatenation 155
Antique Bookstore Project 155
Summary 155
Contents
n
vii
Chapter 13 Math in JavaScript 157
Mathematical Operators 157
The Math Object 159
Constants 159
E 160
LN2 160
LN10 160
LOG2E 160
LOG10E 161
PI 161
SQRT2 161
Math Methods 161
Arithmetic Methods 162
abs() 162
ceil() 162
floor() 162
log() 163
max(), min() 163
pow() 163
round() 163
sqrt() 164
Trigonometric Methods 164
cos() 164
Antique Bookstore Project 166
Summary 168
Chapter 14 Adding Plug-ins 169
Putting a Plug-in into Your HTML 169
Using Plug-ins in JavaScript 170
What Plug-ins are Already Installed? 174
LiveAudio 175
Antique Bookstore Project 179
Summary 179
Chapter 15 Objects in JavaScript 181
Properties 181
Using Properties 181
Methods 182
Using Methods 183
Object-Oriented Concepts 183
Building Your Own Objects 184
Constructor Functions 185
Summary 186
Chapter 16 Tips and Tricks 187
Inline Frames 187
Browser Detection 189
System Information 189
viii
n
Contents
Finding Mouse Location 190
Password 191
Browser Information 191
Printing the Page 192
Antique Bookstore Project 192
View the Directory 194
Summary 195
Chapter 17 JavaScript Games 197
Press the Button 197
Roll the Dice 200
Viva Las Vegas 202
Summary 207
Chapter 18 ActiveX and JavaScript 209
Theoretical Background 209
Using ActiveX for TCP/IP 210
Ticking Clock 212
Slider Text 213
Summary 215
Chapter 19 Programming and JavaScript 217
General Concepts 217
Arrays 218
Summary 221
Chapter 20 Antique Bookstore Project 223
The Main Screen 223
Inventory Pages 227
Finishing the Pages 232
Summary 235
Appendix A Online Resources 235
Appendix B HTML Reference 239
Appendix C JavaScript Reference 243
Appendix D Common Errors 249
Index 251
Contents
n
ix
Writing a book is a very difficult task, and it is never the work of a single per
-
son. I would like to take the time to thank some of the people who were
indispensable in making this book happen:
Jim Hill and Wes Beckwith, the wonderful guys at Wordware Publishing who
labored through this with me. Without Jim and Wes, this book simply could not
have happened. Their ideas and input helped create this book. Not to mention
that Jim always paid for lunch!
A very special thanks to Norman Smith who did an outstanding technical
review of this book. Norm, you saved me from really embarrassing myself.
Your review work is simply top notch.
Finally, I need to thank my wife, Misty, and my son, AJ, who both tolerated me
spending hours secluded in my den working on this project. Without all of
these people, this book would never have happened.
xi
Prerequisites
This book assumes you have absolutely no prior knowledge of JavaScript. A
basic working knowledge of HTML is preferred but not essential. The first
two chapters provide a basic introduction on HTML and JavaScript. The rest of
the book takes you step by step through the process of building an actual web
site using both HTML and JavaScript. However, the main emphasis of this
book is teaching you JavaScript. After Chapter 1, “HTML Primer,” all HTML
is simply shown to provide context for the JavaScript, and an explanation for
the HTML code is not usually given. However, only standard HTML tech-
niques are used and the code is presented in a very organized manner so that
anyone with a basic knowledge of HTML can easily follow along.
As each new concept is introduced, I will first explain the concept in a generic
context and then I will show how it applies specifically to the web site we are
building. In this way, you will get both the concept and the application.
How to Read This Book
Some computer programming books are meant for you to simply take what
you need from certain chapters. This book is intended for you to read from
start to finish. If you follow the examples provided, when you complete the
book you will have a completely functional web site with lots of HTML and
plenty of interesting JavaScripts.
Programming Style
As both an aid to the reader and to illustrate good programming practices, I
use a uniform style throughout this entire text and in all the sample code,
which you can download from www.wordware.com/javascript. I also have a
xiii
tendency to comment very heavily—some would say too much. This comes
from teaching and creating code samples for students. I hope you will find this
helpful:
for (var intcounter = 0; intcounter < 10; ++intcounter)
{
[JavaScript statements]
}// end of for loop
Some JavaScript scripters prefer to use a different style:
for (var num = 0; num < 10; ++num){
[JavaScript statements]
}
A lot of my style preferences are just that, preferences. It is hard to call one
style right and another wrong. However, I strongly suggest when you are writ-
ing code to consider the fact that other programmers will probably need to
read your code at some point. You don’t want them to have absolutely no idea
what you were thinking when you wrote your code. I try to write code in such
a way that even a novice programmer with no prior knowledge of the project at
hand could easily deduce the intended purpose of the code.
þ
NOTE: Many tags in HTML must be closed. The <B> tag must be closed
with </B>. However some tags, such as <TD> and <TR>, do not have
to be closed. Some HTML programmers prefer to close them anyway. I do
not. This is simply a style difference, but one you will see throughout this
book.
Special Features
Each chapter takes you step by step through several examples showing the
techniques that chapter focuses on. The end of each chapter has a section
called Antique Bookstore Project. As you read through the book, this section
will gradually build a complete web site for a fictitious antique bookstore. It is
my hope that this will give you a good feel for the process of developing a com
-
mercial web site. All the code for the finished web site can be downloaded
from www.wordware.com/javascript.
xiv
n
Introduction
The Code
The code for this book can be downloaded from www.wordware.com/javascript.
All the chapter examples are there ready to run. Note that the numbered
examples in the text correspond to the examples in the code files. The com
-
plete Antique Bookstore Project is also included. Finally, there is a folder full
of extra samples you can use in your own web sites. I strongly recommend you
browse the code and use the resources provided for you.
Introduction
n
xv
Chapter 1
HTML Primer
This chapter is provided to give you a basic working knowledge of HTML. For
those readers who lack this knowledge or feel that they may need a refresher,
this chapter is essential to following the rest of the book. Experienced HTML
programmers, however, should feel free to skip this chapter. JavaScript is a
scripting language that is embedded into HTML documents in order to add
significant functionality to those web pages. For this reason a working knowl-
edge of HTML is essential to understanding and using JavaScript. I will be
introducing some interesting HTML tags as we go through the book; however,
I feel that getting you up to speed with a basic knowledge is critical.
HTML, or Hypertext Markup Language, is a relatively simple markup lan-
guage that web browsers can use to display web pages. You can write HTML
code in any text editor. I personally use Windows Notepad. Just remember
when you save the file to save it as an .htm or .html file. The browser recog-
nizes files with the .htm and .html extensions and will look in them for valid
HTML code. HTML has had a long history and has gone through a number of
revisions. Each successive revision adds more functionality to HTML, and
with the current version (as of this writing) of HTML (Version 4.0), it is a very
powerful language that can take some time to learn. Fortunately, most work on
web pages can be done with just the essentials of HTML, and that is what this
chapter will teach you.
þ
NOTE: Many tags in HTML must be closed. For example, the <B> tag must
be closed with </B>. However, some tags, such as <TD> and <TR>, do
not have to be closed. Some HTML programmers prefer to close them
anyway. I do not. This is simply a style difference, but one you will see
throughout this book.
1
The first question is how do we get the web browser to know that our docu
-
ment has HTML codes for it to read? HTML code is composed of tags that let
the browser know what is to be done with certain text. At the beginning of
your document you place the command <HTML> and at the end you put
</HTML>; the web browser will know that the codes in between are sup
-
posed to be HTML.
<HTML>
put HTML code here
</HTML>
You have to admit that this is pretty simple. But this web page won’t do much
of anything at all. So let’s do the obligatory “Hello World” sample that every
programming book starts off with. It will show you how to do text and some
basic HTML.
Example 1-1
<HTML>
<HEAD>
<TITLE>My First HTML Page</TITLE>
</HEAD>
<BODY>
<P><CENTER>
<B><FONT SIZE="+2">Hello World</FONT></B>
</CENTER>
</BODY>
</HTML>
Believe it or not this little snippet shows you most of what you need to know
about HTML. To begin with, note that everything is contained between the
<HTML> and </HTML> tags. These two commands define the beginning
and the end of the HTML document. The web browser will ignore any items
outside these commands. Next we have a section that is contained between
the <HEAD> and </HEAD> commands. This is the header portion of your
HTML document. The <TITLE> and </TITLE> commands contain the title
that will actually appear in the title bar of your browser. A lot more can be
done in the head section, but that will be addressed as we work our way
through this book.
Then we have the <BODY> and </BODY> commands. As you might have
guessed this is the body of your HTML document. This is where most of your
web page’s code is going to go. Now inside the body section we have some
text and some additional text that defines how the text will appear in the
2
n
Chapter 1
browser. The <P> command defines the beginning and the end of a para
-
graph. The <B> and </B> commands tell the browser to make whatever
text is between them bold. <FONT SIZE="+2"> tells the browser how big
the text should be (there are a variety of methods for doing this, as we shall
see). The </FONT> command ends the font section of the HTML code. If
you entered the HTML code correctly, then you should be able to view your
web page in any browser and see an image much like that in Figure 1-1.
By now I trust you have noticed a pattern. All the commands have an opening
command and a closing command. Well, this is true for all but a very few
HTML commands. Just remember this rule: You close the commands in oppo
-
site order of how you opened them. Notice in Example 1-1 I opened the
commands before the text like this: <P><CENTER><B><FONT
SIZE="+2">, and then closed them like this: </FONT></B></CENTER>.
(<P> does not need to be closed.) This is important to remember. You can
think of this as “backing out” of your commands.
HTML Primer
n
3
1
Chapter
Figure 1-1
Images and Hyperlinks
What we have so far gives you a very simple web page that displays one
phrase in bold text. Admittedly, this is not very impressive, but if you under
-
stand the concepts involved with using these HTML commands then you
conceptually understand HTML. Now let’s expand your knowledge of HTML.
Usually web pages contain more than simply a title and some text. Other items
you might put in a web page would include images and links to other web
pages. Placing an image on an HTML document is rather simple:
<IMG SRC="imagepath\imagename" WIDTH=52 HEIGHT=88 ALIGN=bottom>
You simply provide the path to the image and the name of the image, including
its file extension (such as .gif, .bmp, .jpg, etc.). The other properties in this
command allow you to alter the placement and size of the image. You can alter
its width and height as well as its alignment.
You will also note that when you first place an image on an HTML page it has a
border around it. You can get rid of this by adding BORDER = 0 into the tag,
as in this example:
<IMG SRC="somepic.gif" BORDER =0>
Putting a hyperlink to another web site or to an e-mail address is just as simple:
<A HREF="">
This link will connect to the URL (uniform resource locator) contained inside
the quotation marks. In order to use this methodology to create an e-mail link
simply use this:
<A HREF="mailto:">
You simply have to change the “http://” portion to “mailto:”. Notice that all
three of the preceding methods have one thing in common. They do not close
the command in the typical manner that other HTML commands are closed.
Now let’s examine the source code for a simple but complete HTML
document:
Example 1-2
<HTML>
<HEAD>
<TITLE>Test HTML Page</TITLE>
</HEAD>
<BODY BGCOLOR="blue">
<P>
4
n
Chapter 1
<CENTER><B><FONT SIZE="+2">My First Web Page </FONT></B></CENTER>
<P>I am learning HTML !. I <B><I>LOVE</I></B> HTML!
<P><CENTER><IMG SRC="advjscript.jpg" ></CENTER>
<P>
<P><CENTER>You can email me at</CENTER>
<P>
<CENTER><A HREF="mailto:">Email ME</A>
</CENTER><
<P><CENTER>Or go to this publisher's Web Site </CENTER>
<P><CENTER><A HREF="">Wordware Publishing</A></CENTER>
</BODY>
</HTML>
First a few clarifications. You should note at the beginning a new command:
<BODY BGCOLOR="blue">
You can change the background color of your page using this command and any
standard color. You can also set a background image for your HTML document
with a similar command:
<BODY background="mypicture.gif">
The advjscript.jpg image is available in the code files in a folder named Chap-
ter 1. If you entered the code properly and used the image supplied, your web
page should look something like Figure 1-2.
HTML Primer
n
5
1
Chapter
Figure 1-2
Now I will be the first to admit that this sample web page is very trivial. But it
does contain the basics of HTML. With the material we have covered so far
you can display images, texts, links, e-mail links, background colors, and back
-
ground images. Not too bad for just a few short pages.
Colors and Backgrounds
Let’s examine a few other simple items we can add to our HTML documents.
The first is altering text color. You can set the default text color for the entire
document and you can alter the color of specific text. You alter the default text
color for the entire document using a technique very similar to the one used to
alter the background color:
<BODY TEXT="blue">
This text simply tells the browser that unless otherwise specified, all text in
this document should be blue. In addition to changing the default color of all
text in a document you may wish to simply change the color of a specific sec-
tion of text. This is fairly easy to do as well. Instead of using the BODY TEXT
command we use the FONT command:
<FONT COLOR="red">This is red text</FONT>
This, like the other color commands, can be used with any standard color.
There are a wide variety of tags you can use to alter the appearance and
behavior of text and images. Just a few others for you to consider would be the
<BLINK> </BLINK> tag which, as the name implies, causes the text to
blink (this is only supported by Netscape and will not work in Internet
Explorer). Another example is <STRIKE> </STRIKE>, which causes the
text to appear with a line through it, a strike through. The tags we have cov
-
ered so far are enough to allow you to accomplish what you need in HTML.
6
n
Chapter 1
Tables
The next HTML command we are going to examine is the table. They are a
very good way to organize data on your web page. You can use tables with or
without a border. I will explain the various reasons to use one method or the
other.
First I will show you how to create a table with a border:
Example 1-3A
<TABLE BORDER=1>
<TR>
<TD>
<P>This
<P>Is a
<TR>
<TD>
<P>Table
<TD>
<P>With a border
</TABLE>
By now you should be able to recognize that the <TABLE> and </TABLE>
tags actually contain the table. Each <TR> tag designates another row in the
table. The <TD> tag creates a cell within that row (TD refers to table data).
Using those three tags you can create a table with any number of rows or col-
umns you wish. Notice that the first line of this code has the BORDER
property set to 1. This means the border has a width and is therefore visible.
In some instances you may not want the border to show. Tables can be used
simply to hold images and text in relative positions. In cases such as this you
may not wish to have a visible border. Below is an example of a table whose
borders will not show.
Example 1-3B
<P><TABLE BORDER=0 CELLSPACING=0 CELLPADDING=0>
<TR>
<TD>
<P>This
<TD>
<P>is a
<TR>
<TD>
HTML Primer
n
7
1
Chapter
<P>Table
<TD>
<P>With no borders or padding
</TABLE>
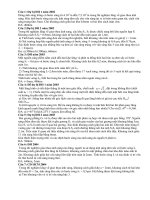
Notice that the BORDER, CELLPADDING, and CELLSPACING properties
are all set to 0. This causes the table itself to not be displayed. However, the
contents of the table will display. You should also notice that in both examples I
have placed text in each cell.
Figure 1-3 shows two tables, one with a border and one without.
Since the entire purpose of this book is to teach you JavaScript, the obvious
question on your mind should be “How do I insert scripts into HTML?” Well,
fortunately, that is not particularly difficult. The browser deals with script
code (including JavaScript) like it handles HTML code, scanning the source
from left to right and from top to bottom. JavaScript has “tags” of its own by
which it instructs the browser and determines the layout. However, JavaScript
is not read exactly like HTML. In HTML, the browser acts immediately
according to the elements it recognizes. Not all JavaScript code refers to
actions that take place while the page is loading. Some parts are just kept in
memory until they are called. For instance, if you write a function and do not
call it, the browser does not do anything with it. This part of the script stays in
8
n
Chapter 1
Figure 1-3