Astm f 842 14
Bạn đang xem bản rút gọn của tài liệu. Xem và tải ngay bản đầy đủ của tài liệu tại đây (388.84 KB, 16 trang )
Designation: F842 − 14
Standard Test Methods for
Measuring the Forced Entry Resistance of Sliding Door
Assemblies, Excluding Glazing Impact1
This standard is issued under the fixed designation F842; the number immediately following the designation indicates the year of original
adoption or, in the case of revision, the year of last revision. A number in parentheses indicates the year of last reapproval. A superscript
epsilon (´) indicates an editorial change since the last revision or reapproval.
This standard has been approved for use by agencies of the U.S. Department of Defense.
2. Referenced Documents
1. Scope
2.1 ASTM Standards:2
E631 Terminology of Building Constructions
2.2 AAMA Standard:3
AAMA 1303.5 Voluntary Specifications for Forced Entry
Resistant Aluminum Sliding Glass Doors
2.3 CAWM Standards:3
CAWM 300-96 Forced Entry Resistance Tests for Sliding
Glass Doors
CMBSO 1-79 California Model Building Security Ordinance
1.1 These test methods determine the ability of sliding door
assemblies to restrain, delay, or frustrate forced entry.
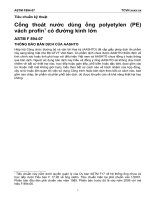
1.2 For purposes of these test methods, sliding door assemblies are defined as described in 1.2.1 – 1.2.4 and as shown in
Fig. 1. Sliding door assemblies with a combination of operable
panels and fixed panels (lites) shall be classified and tested
separately for each type.
1.2.1 Type A—A sliding door assembly which incorporates
one or more sliding panels that lock to the jamb.
1.2.2 Type B—A sliding door assembly which incorporates
one or more sliding panels that lock to an intermediate jamb.
1.2.3 Type C—A sliding door assembly which incorporates
one or more sliding panels that abut and lock to other panels.
1.2.4 Type D—A sliding door assembly which incorporates
one or more fixed or stationary panels that are designed not to
open.
3. Terminology
3.1 Definitions—Definitions for standard terminology can
be found in Terminology E631.
3.2 Definitions of Terms Specific to This Standard:
3.2.1 door frame assembly, n—the combination of a head,
sill, and jambs surrounding and supporting fixed and sliding
panels.
3.2.2 fixed jamb stile, n—vertical members of fixed or
stationary panels adjacent to any jamb.
3.2.3 intermediate jamb, n—vertical member of a frame
other than the outermost vertical members.
3.2.4 locking device(s) (lock), n—one or more components
of a sliding door assembly intended to resist opening of the
sliding door panel from the exterior.
3.2.5 sliding door assembly, n—a combination of one or
more sliding door panels with or without one or more fixed
panels within a common frame.
NOTE 1—See Fig. 1 for graphic depiction of sliding door assembly
types.
1.3 The values stated in inch-pound units are to be regarded
as standard. The values given in parentheses are mathematical
conversions to SI units that are provided for information only
and are not considered standard.
1.4 This standard does not purport to address all of the
safety concerns, if any, associated with its use. It is the
responsibility of the user of this standard to establish appropriate safety and health practices and determine the applicability of regulatory limitations prior to use.
2
For referenced ASTM standards, visit the ASTM website, www.astm.org, or
contact ASTM Customer Service at For Annual Book of ASTM
Standards volume information, refer to the standard’s Document Summary page on
the ASTM website.
3
Available from the American Architectural Manufacturers Association
(AAMA), 1827 Walden Office Square, Suite 550, Schaumburg, IL 60173-4268,
.
1
These test methods are under the jurisdiction of ASTM Committee E06 on
Performance of Buildings and are the direct responsibility of Subcommittee E06.51
on Performance of Windows, Doors, Skylights and Curtain Walls.
Current edition approved May 1, 2014. Published June 2014. Originally
approved in 1983. Last previous edition approved in 2013 as F842 – 13. DOI:
10.1520/F0842-14.
Copyright © ASTM International, 100 Barr Harbor Drive, PO Box C700, West Conshohocken, PA 19428-2959. United States
1
F842 − 14
FIG. 1 Typical Horizontal Sliding Door Assembly Types (viewed from the exterior)
2
F842 − 14
performance level. Glazing which breaks, but does not allow
entry, shall not be considered a failure to attain the performance level.
4. Summary of Test Method
4.1 The procedure consists of mounting a sliding door
specimen into a test assembly fixture which in turn is mounted
to a wall support fixture, and, after removing all exterior
fasteners and loose component items, specified loads and
forces are applied to the sliding door test specimen in a
prescribed sequence. Following removal of all loads, a determination is made whether or not entry can be gained through
the sliding door test specimen from the exterior.
6.3 Multiple Panels—Sliding door assemblies with a combination of operable panels and fixed panels (lites) shall be
classified and tested separately for each panel type. If multiple
panels within a sliding door assembly are identical in construction and locking condition, only one panel need be tested.
6.4 Test Sequence—Perform the tests for each sliding door
test specimen in the sequence as outlined in Section 10. The
sequence for testing multiple panels shall be at the discretion of
the testing agency.
5. Significance and Use
5.1 These test methods are intended to establish a measure
of resistance for sliding door assemblies subjected to attacks
(other than impacting glazing materials) by unskilled or
opportunistic burglars. Resistance to higher levels of force
generated by skilled burglary attack requires methods, such as
alarms, communication, or apprehension systems, or special
security glazing materials more sophisticated than those evaluated by these test methods. Technicians performing the test
should understand the intent of this test method and should be
trained on the execution and pass/fail criteria.
6.5 Loading—Apply test loads and forces at a rate not to
exceed 10 lb/s (45 N/s). Maintain performance loads for a
period of 60 6 5 s.
6.6 Load Removal—At the conclusion of each test, remove
all loads before starting the next test.
7. Apparatus
7.1 Instrumentation—Load and time measuring devices
with an accuracy of 62 % of the full scale shall be incorporated in the test setups. The scale ranges used shall assure that
the performance levels are within an accuracy of 65 %.
5.2 Entry through a sliding door assembly can be accomplished by impacting or removing glazing materials. This
method does not evaluate glazing materials for breakage or
de-glazing. Other standards must be used to evaluate forced
entry by impacting or removing glazing.
7.2 Load Attachments—Brackets, fasteners, or other devices
used in performing these tests shall be designed and attached so
as to minimize their influence on the test results.
5.3 Acceptance criteria for performance levels are a matter
for authorities having specific jurisdiction to establish. Suggested guidelines are found in Annex A1.
7.3 Test Frame—The test fixture shall be designed and
constructed to accept and rigidly secure the sliding door
specimen and to provide rigid points of anchor for all test loads
described in 10.3. The load bearing members of the test fixture
shall be constructed to limit deflection of such members to a
maximum of 1⁄8 in. (3 mm) under full prescribed load.
6. Test Criteria
6.1 Sliding Door Test Specimen—The same sliding door
assembly shall be used for all testing and shall contain panels
having the greatest height and width for which approval is
sought. Each unique panel/frame arrangement and locking
arrangement shall be tested.
6.1.1 The construction of the sliding door test specimen,
including all hardware, components, and arrangement of panels
shall be representative of that for which acceptance is desired.
6.1.2 The sliding door test specimen shall consist of the
entire assembled unit, including frame, glazing, and anchorage
as supplied by the manufacturer for installation in the building.
6.1.3 Unless otherwise specified, the test specimen shall
contain the weakest code compliant safety glazing for testing
and shall be single glazed if designed for either single or
double glazing, or double glazed if designed exclusively for
multiple glazing. Products tested with glazing materials other
than the weakest code compliant safety glazing shall qualify
only the specific glazing material tested.
6.1.4 Sliding door assemblies tested with more than one
locking device shall not qualify sliding door assemblies with
fewer locking devices, regardless of size.
7.4 Tools for Disassembly—The following tools shall be
used for disassembly of the test specimen:
7.4.1 A spatula, putty knife, or other non-cutting tool with a
thin blade, 0.024 6 0.004 in. (0.6 6 1 mm) thick, 0.78 6 0.08
in. (20 6 2 mm) wide, and 3.5 6 0.4 in. (90 6 10 mm) long.
(A Warner model #604 Putty Knife is known to meet these
specifications.)4
7.4.2 Any non-powered, straight, or Phillips head screwdriver appropriate to the mechanical fastener with a maximum
length of 6 in. (150 mm).
7.4.3 Standard slot-type pliers with a 6 to 7 in. (150 to 175
mm) overall length.
7.5 Tools for Hardware Manipulation—The following tools
shall be used for manipulation of the locks of the test specimen:
7.5.1 A spatula, putty knife, or other non-cutting tool with a
thin blade, 0.024 6 0.004 in. (0.6 6 0.1 mm) thick, 0.78 6
0.08 in. (20 6 2 mm) wide, and 3.5 6 0.4 in. (90 6 10 mm)
long.4
6.2 Performance Criteria—The performance level is attained if all locking devices remain engaged and entry cannot
be gained during the test or upon removal of loads. If during
testing, any component, including the glazing material, fails,
allowing entry, this shall be considered a failure to attain the
4
The sole source of supply of the Warner model #604 known to the committee
at this time is Warner Manufacturing Company, 13435 Industrial Park Blvd.,
Plymouth, MN 55441. If you are aware of alternative suppliers, please provide this
information to ASTM International Headquarters. Your comments will receive
careful consideration at a meeting of the responsible technical committee,1 which
you may attend.
3
F842 − 14
10.3 Type B Sliding Door Assembly:
10.3.1 Perform the disassembly test defined in Annex A2,
A2.1. Following the completion of the disassembly test perform tests B1 through B7 as defined in Annex A2 for the
performance grade desired using the loads and times indicated
in Table A1.1 in Annex A1. At the completion of tests B1
through B7 perform the hardware manipulation test and the
panel manipulation test defined in Annex A2, A2.2, and A2.3.
7.5.2 A piece of black annealed 16 gage wire at least long
enough to reach from the point of insertion to the locking
device(s).5
8. Hazards
8.1 Glass breakage may occur during the application of
loads or forces required by these test methods. Take adequate
precautions to protect personnel from broken glass.
9. Preparation
10.4 Type C Sliding Door Assembly:
10.4.1 Perform the disassembly test defined in Annex A2,
A2.1. Following the completion of the disassembly test perform tests C1 through C7 as defined in Annex A2 for the
performance grade desired using the loads and times indicated
in Table A1.1 in Annex A1. At the completion of tests C1
through C7 perform the hardware manipulation test and the
panel manipulation test defined in Annex A2, A2.2, and A2.3.
9.1 Mount the sliding door test specimen into a 2 by 4 or 2
by 6 in. (40 by 100 or 40 by 150 mm) lumber surround fixture,
in accordance with the manufacturer’s written installation
instructions. Additional attachment means are permitted between the lock jamb and the test frame provided such means do
not increase the strength of the connection between locking
devices and the sliding door members beyond the door
manufacturer’s installation specifications.
10.5 Type D Sliding Door Assembly:
10.5.1 Perform the disassembly test defined in Annex A2,
A2.1. Following the completion of the disassembly test perform tests D1 through D3 as defined in Annex A2 for the
performance grade desired using the loads and times indicated
in Table A1.1 in Annex A1. At the completion of tests C1
through C7 perform the hardware manipulation test and the
panel manipulation test defined in Annex A2, A2.2, and A2.3.
9.2 Install the sliding door assembly specimen into the test
fixture.
11. Report
8.2 Locking devices, glass, and other sliding door test
specimen components may suddenly fail when loads and forces
are applied during these test methods, causing panels to open
rapidly. Take adequate precautions to protect personnel from
rapidly moving weights and sliding door test specimen components.
11.1 The report shall contain a description of the results of
the test(s) performed in accordance with these test methods.
9.3 Close and lock the sliding door test specimen. Submit
each operable unit to five cycles of opening, closing, and
locking prior to testing.
11.2 The report shall include at least the following:
11.2.1 Identification of the sliding door test specimen;
11.2.2 Type, size, location, and number of locking devices
and other hardware;
11.2.3 Type, location, and number of installation fasteners;
11.2.4 Type and thickness of glazing material;
11.2.5 Bill of materials;
11.2.6 Assembly drawings;
11.2.7 Performance level, loads, and times (L1, L2, L3, L4,
T1) used;
11.2.8 A statement as to whether the sliding door specimen
complies or not and the grade at which it complies;
11.2.9 A description of the method of installation or installation fastening; and
11.2.10 A description of the test equipment used.
10. Procedure
10.1 The disassembly test, hardware manipulation test, and
panel manipulation test referenced in the following parts of
Section 10 are fully described in Annex A2.
10.1.1 Without in any other manner intentionally damaging
the sliding door test specimen, remove from the sliding door
test specimens all screws, glazing beads, and any other
members or other mechanical fasteners that can be removed
readily from the exterior within a time limit of 5 min using the
tools stipulated in 7.4.
10.2 Type A Sliding Door Assembly:
10.2.1 Perform the disassembly test defined in Annex A2,
A2.1. Following the completion of the disassembly test perform tests A1 through A7 as defined in Annex A2 for the
performance grade desired using the loads and times indicated
in Table A1.1 in Annex A1. At the completion of tests A1
through A7 perform the hardware manipulation test and the
panel manipulation test defined in Annex A2, A2.2, and A2.3.
12. Precision and Bias
12.1 These test methods do not generate numerical values.
They establish a pass/fail condition which cannot generate
numerical values for precision and bias.
13. Keywords
5
The properties of black annealed 16 gage wire are described in Machinery’s
Handbook, 22nd Edition, Available from Industrial Press, Inc., 200 Madison Ave.,
New York, NY 10016-4078.
13.1 doors; fenestration; forced entry resistance; laboratory
method; sliding glass doors
4
F842 − 14
ANNEXES
(Mandatory Information)
A1. SUGGESTED MEASURED PERFORMANCE
TABLE A1.1 Suggested Measured PerformanceA
Load Identification
T1
L1
L2
L3
L4
Grade 10
5 min
300 lbf (1334 N)
175 lbf (778 N)
30 lbf (133 N)
50 lbf (222 N)
plus weight of
panel
Grade 20
Grade 25
5 min
500 lbf (2224 N)
200 lbf (890 N)
50 lbf (222 N)
50 lbf (222 N)
plus weight of
panel
5 min
800 lbf (3559 N)
200 lbf (890 N)
50 lbf (222 N)
50 lbf (222 N)
plus weight of
panel
Grade 30
10 min
800 lbf (3559 N)
400 lbf (1779 N)
100 lbf (445 N)
50 lbf (222 N)
plus weight of
panel
Grade 40
10 min
1100 lbf (4893 N)
550 lbf (2447 N)
150 lbf (667 N)
50 lbf (222 N)
plus weight of
panel
A
It is suggested that Table A1.1 be used with the understanding that five levels of load identification are established with load identification 40 being the highest and 10
being the lowest. Use of load identifications should be selected in accordance with security objective desired. Grade 25 parallels the requirements of CMBSO 1-79 and
CAWM 300-96.
A2. TESTS
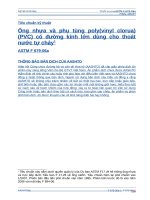
member within 3 in. (75 mm) of the locking device, in a
direction parallel to the plane of the glass that would tend to
open the panel. The load shall be distributed evenly between
the interior and exterior sides of the locking device so as to
minimize rotation. (Two equal concentrated loads which together equal L1.) (See Fig. A2.1.)
A2.1 Disassembly Test
A2.1.1 Remove from the door test specimen all screws,
glazing beads, and any other members or other mechanical
fasteners that can be removed readily from the exterior within
a time limit of 5 min using the tools stipulated in 7.4. Removal
of the indicated parts shall be done carefully so as not to cause
collateral damage to the specimen.
A2.4.3 Test A2—With the sliding panels in the test position,
a concentrated load (L1) shall be applied separately, from the
exterior, to each member incorporating a locking device, at a
point on the sash member within 3 in. (75 mm) of the locking
device, in a direction parallel to the plane of the glass that
would tend to open the panel, while, simultaneously, an
additional concentrated load (L2) is applied to the panel
member containing the locking device in the direction perpendicular to the plane of the glazing material toward the interior
side of the sliding door test specimen. Where more than one
primary lock is used, the loads shall be equally divided among
the locks and shall be applied simultaneously. (Two equal
concentrated loads which together equal L1.) (See Fig. A2.2.)
A2.2 Hardware Manipulation Test
A2.2.1 Examine the door test specimen and determine a
method of inserting the tools in 7.5 from the outside so as to
contact the locking device(s). Using one technician only,
attempt to gain entry by manipulating the locking device(s)
with these tools in any combination without intentionally
removing material from the panel or frame to facilitate access
to the locking devices. Conduct this test continuously for a
time limit of (T1). Manipulation of the locking devices shall be
done in a manner that will not cause collateral damage to the
specimen.
A2.4.4 Test A3—With the sliding panels in the test position,
a concentrated load (L1) shall be applied separately, from the
exterior, to each member incorporating a locking device, at a
point on the sash member within 3 in. (75 mm) of the locking
device, in a direction parallel to the plane of the glass that
would tend to open the panel, while, simultaneously, an
additional concentrated load (L2) is applied to the panel
member containing the locking device in the direction perpendicular to the plane of the glazing material toward the exterior
side of the sliding door test specimen. Where more than one
primary lock is used, the loads shall be equally divided among
the locks and shall be applied simultaneously. (Two equal
concentrated loads which together equal L1.) (See Fig. A2.3.)
A2.3 Panel Manipulation Test
A2.3.1 While attempting to open the sliding door assembly,
lift, push, pull or otherwise manipulate by hand from the
exterior all panels to the full confines of the frame. This test
shall be conducted continuously for a time limit of (T1).
A2.4 Type A Sliding Door Assembly Tests
A2.4.1 Perform the disassembly test defined in Annex A2,
section A2.1.
A2.4.2 Test A1—With the sliding panels in the test position,
a concentrated load (L1) shall be applied separately to each
member incorporating a locking device, at a point on the panel
5
F842 − 14
FIG. A2.1 Test A1
FIG. A2.2 Test A2
FIG. A2.3 Test A3
A2.4.5 Test A4—With the sliding panels in the test position,
a concentrated load (L1) shall be applied separately, from the
exterior, to each member incorporating a locking device, at a
point on the sash member within 3 in. (75 mm) of the locking
device, in a direction parallel to the plane of the glass that
would tend to open the panel, while, simultaneously, an
additional concentrated load (L2) is applied to the panel
member containing the locking device in the direction perpendicular to the plane of the glazing material toward the interior
side of the sliding door test specimen and, simultaneously,
lifting the sliding door panel vertically to the uppermost limit
within the confines of the sliding door frame assembly with a
load (L4). Apply the lifting load at the mid-span of the bottom
rail of the test panel. Where more than one primary lock is
used, the loads shall be equally divided among the locks and
shall be applied simultaneously. (Two equal concentrated loads
which together equal L1.) (See Fig. A2.4.)
A2.4.6 Test A5—With the sliding panels in the test position,
a concentrated load (L1) shall be applied separately, from the
exterior, to each member incorporating a locking device, at a
point on the sash member within 3 in. (75 mm) of the locking
device, in a direction parallel to the plane of the glass that
would tend to open the panel, while, simultaneously, an
additional concentrated load (L2) is applied to the panel
member containing the locking device, in the direction perpendicular to the plane of the glazing material toward the exterior
6
F842 − 14
panel member within 3 in. (75 mm) of the locking device, in a
direction parallel to the plane of the glass that would tend to
open the panel and simultaneously applying a concentrated
load (L3) in the direction perpendicular to the plane of the
glazing material, toward the interior side of the sliding door
specimen, to the bottom rail on the same panel within 3 in. (75
mm) of the corner opposite the stile containing the locking
device. Where more than one primary lock is used, the loads
shall be equally divided among the locks and shall be applied
simultaneously. (Two equal concentrated loads which together
equal L1.) (See Fig. A2.6.)
A2.4.8 Test A7, Outside Sliding Panels—With the sliding
door panel lifted vertically to the uppermost limit within the
confines of the sliding door frame assembly with a load (L4),
while, simultaneously, with the sliding panels in the test
position, a concentrated load (L1) shall be applied separately to
each member incorporating a locking device, at a point on the
panel member within 3 in. (75 mm) of the locking device, in a
direction parallel to the plane of the glass that would tend to
open the panel and simultaneously applying a concentrated
load (L3) in the direction perpendicular to the plane of the
glazing material, toward the exterior side of the sliding door
specimen, to the bottom rail on the same panel within 3 in. (75
mm) of the corner opposite the stile containing the locking
device. Where more than one primary lock is used, the loads
shall be equally divided among the locks and shall be applied
simultaneously. (Two equal concentrated loads which together
equal L1.) (See Fig. A2.7.)
FIG. A2.4 Test A4
side of the sliding door test specimen and, simultaneously,
lifting the sliding door panel vertically to the uppermost limit
within the confines of the sliding door frame assembly with a
load (L4). Apply the lifting load at the mid-span of the bottom
rail of the test panel. Where more than one primary lock is
used, the loads shall be equally divided among the locks and
shall be applied simultaneously. (Two equal concentrated loads
which together equal L1.) (See Fig. A2.5.)
A2.4.9 After completion of Tests A1 through A7 and with
all loads removed, perform the hardware manipulation test and
the panel manipulation test.
A2.4.7 Test A6, Inside Sliding Panels—With the sliding
door panel lifted vertically to the uppermost limit within the
confines of the sliding door frame assembly with a load (L4),
while, simultaneously, with the sliding panels in the test
position, a concentrated load (L1) shall be applied separately to
each member incorporating a locking device, at a point on the
A2.5.1 Perform the disassembly test defined in Annex A2,
section A2.1.
FIG. A2.5 Test A5
FIG. A2.6 Test A6—Inside Sliding Panels
A2.5 Type B Sliding Door Assembly Tests
7
F842 − 14
FIG. A2.7 Test A7—Outside Sliding Panels
FIG. A2.8 Test B1
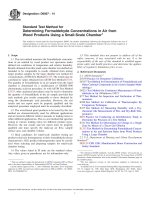
A2.5.2 Test B1—With the sliding panels in the test position,
two concentrated loads (L1) shall be applied separately to each
member incorporating a locking device, at a point on the panel
member within 3 in. (75 mm) of the locking device, in a
direction parallel to the plane of the glass that would tend to
open the panel. Apply the first load (L1) at the stile in such a
manner as to exert the load on the locking device or handle by
straddling it at points on the sliding door panel member within
3 in. (75 mm) of each side of the locking device in a direction
parallel to the plane of the glazing material that would tend to
open the door. Apply the second load (L1) at the intermediate
jamb in such a manner as to exert the load on the intermediate
jamb in a direction parallel to the plane of the glazing material
and opposite to the first load (L1). The load attachment point
for the second load shall be at the same height above the frame
sill and in the same vertical plane as the load attachment points
for the first load. Apply both loads simultaneously and equally.
The load shall be distributed evenly between the interior and
exterior sides of the locking device so as to minimize rotation.
(Two equal concentrated loads which together equal L1.) (See
Fig. A2.8.)
at the stile in such a manner as to exert the load on the locking
device or handle by straddling it at points on the sliding door
panel member within 3 in. (75 mm) of each side of the locking
device in a direction parallel to the plane of the glazing
material that would tend to open the door. Apply the second
load (L1) at the intermediate jamb in such a manner as to exert
the load on the intermediate jamb in a direction parallel to the
plane of the glazing material and opposite to the first load (L1).
The load attachment point for the second load shall be at the
same height above the frame sill and in the same vertical plane
as the load attachment points for the first load. Apply both
loads simultaneously and equally. Where more than one
primary lock is used, the loads shall be equally divided among
the locks and shall be applied simultaneously. (Two equal
concentrated loads which together equal L1.) (See Fig. A2.9.)
A2.5.4 Test B3—With the sliding panels in the test position,
two concentrated loads (L1) shall be applied separately, from
the exterior, to each member incorporating a locking device, at
a point on the sash member within 3 in. (75 mm) of the locking
device, in a direction parallel to the plane of the glass that
would tend to open the panel, while, simultaneously, an
additional concentrated load (L2) is applied to the panel
member containing the locking device in the direction perpendicular to the plane of the glazing material toward the exterior
side of the sliding door test specimen. Apply the first load (L1)
at the stile in such a manner as to exert the load on the locking
device or handle by straddling it at points on the sliding door
panel member within 3 in. (75 mm) of each side of the locking
device in a direction parallel to the plane of the glazing
material that would tend to open the door. Apply the second
load (L1) at the intermediate jamb in such a manner as to exert
the load on the intermediate jamb in a direction parallel to the
plane of the glazing material and opposite to the first load (L1).
The load attachment point for the second load shall be at the
same height above the frame sill and in the same vertical plane
as the load attachment points for the first load. Apply both
NOTE A2.1—The application of the (L1) loads singly or eccentrically
will tend to deglaze the adjacent fixed panel that could affect the results of
the test adversely. In order to alleviate this situation, apply the second
reactive load (L1) before the first load (L1), or apply both loads in equal
stages so that the results are not adversely affected by deglazing of the
fixed panel.
A2.5.3 Test B2—With the sliding panels in the test position,
two concentrated loads (L1) shall be applied separately, from
the exterior, to each member incorporating a locking device, at
a point on the sash member within 3 in. (75 mm) of the locking
device, in a direction parallel to the plane of the glass that
would tend to open the panel, while, simultaneously, an
additional concentrated load (L2) is applied to the panel
member containing the locking device in the direction perpendicular to the plane of the glazing material toward the interior
side of the sliding door test specimen. Apply the first load (L1)
8
F842 − 14
confines of the sliding door frame assembly with a load (L4).
Apply the lifting load at the mid-span of the bottom rail of the
test panel. Apply the first load (L1) at the stile in such a manner
as to exert the load on the locking device or handle by
straddling it at points on the sliding door panel member within
3 in. (75 mm) of each side of the locking device in a direction
parallel to the plane of the glazing material that would tend to
open the door. Apply the second load (L1) at the intermediate
jamb in such a manner as to exert the load on the intermediate
jamb in a direction parallel to the plane of the glazing material
and opposite to the first load (L1). The load attachment point
for the second load shall be at the same height above the frame
sill and in the same vertical plane as the load attachment points
for the first load. Apply both loads simultaneously and equally.
Where more than one primary lock is used, the loads shall be
equally divided among the locks and shall be applied simultaneously. (Two equal concentrated loads which together equal
L1.) (See Fig. A2.11.)
A2.5.6 Test B5—With the sliding panels in the test position,
two concentrated loads (L1) shall be applied separately, from
the exterior, to each member incorporating a locking device, at
a point on the sash member within 3 in. (75 mm) of the locking
device, in a direction parallel to the plane of the glass that
would tend to open the panel, while, simultaneously, an
additional concentrated load (L2) is applied to the panel
member containing the locking device in the direction perpendicular to the plane of the glazing material toward the exterior
side of the sliding door test specimen and, simultaneously,
lifting the sliding door panel vertically to the uppermost limit
within the confines of the sliding door frame assembly with a
load (L4). Apply the lifting load at the mid-span of the bottom
rail of the test panel. Apply the first load (L1) at the stile in
such a manner as to exert the load on the locking device or
FIG. A2.9 Test B2
loads simultaneously and equally. Where more than one
primary lock is used, the loads shall be equally divided among
the locks and shall be applied simultaneously. (Two equal
concentrated loads which together equal L1.) (See Fig. A2.10.)
A2.5.5 Test B4—With the sliding panels in the test position,
two concentrated loads (L1) shall be applied separately, from
the exterior, to each member incorporating a locking device, at
a point on the sash member within 3 in. (75 mm) of the locking
device, in a direction parallel to the plane of the glass that
would tend to open the panel, while, simultaneously, lifting the
sliding door panel vertically to the uppermost limit within the
FIG. A2.10 Test B3
FIG. A2.11 Test B4
9
F842 − 14
attachment point for the second load shall be at the same height
above the frame sill and in the same vertical plane as the load
attachment points for the first load. Apply both loads simultaneously and equally. Where more than one primary lock is
used, the loads shall be equally divided among the locks and
shall be applied simultaneously. (Two equal concentrated loads
which together equal L1.) (See Fig. A2.13.)
handle by straddling it at points on the sliding door panel
member within 3 in. (75 mm) of each side of the locking device
in a direction parallel to the plane of the glazing material that
would tend to open the door. Apply the second load (L1) at the
intermediate jamb in such a manner as to exert the load on the
intermediate jamb in a direction parallel to the plane of the
glazing material and opposite to the first load (L1). The load
attachment point for the second load shall be at the same height
above the frame sill and in the same vertical plane as the load
attachment points for the first load. Apply both loads simultaneously and equally. Where more than one primary lock is
used, the loads shall be equally divided among the locks and
shall be applied simultaneously. (Two equal concentrated loads
which together equal L1.) (See Fig. A2.12.)
A2.5.8 Test B7, Outside Sliding Panels—With the sliding
door panel lifted vertically to the uppermost limit within the
confines of the sliding door frame assembly with a load (L4),
while, simultaneously, with the sliding panels in the test
position, two concentrated loads (L1) shall be applied separately to each member incorporating a locking device, at a
point on the panel member within 3 in. (75 mm) of the locking
device, in a direction parallel to the plane of the glass that
would tend to open the panel and simultaneously applying a
concentrated load (L3) in the direction perpendicular to the
plane of the glazing material, toward the exterior side of the
sliding door specimen, to the bottom rail on the same panel
within 3 in. (75 mm) of the corner opposite the stile containing
the locking device. Apply the first load (L1) at the stile in such
a manner as to exert the load on the locking device or handle
by straddling it at points on the sliding door panel member
within 3 in. (75 mm) of each side of the locking device in a
direction parallel to the plane of the glazing material that would
tend to open the door. Apply the second load (L1) at the
intermediate jamb in such a manner as to exert the load on the
intermediate jamb in a direction parallel to the plane of the
glazing material and opposite to the first load (L1). The load
attachment point for the second load shall be at the same height
above the frame sill and in the same vertical plane as the load
attachment points for the first load. Apply both loads simultaneously and equally. Where more than one primary lock is
A2.5.7 Test B6, Inside Sliding Panels—With the sliding
door panel lifted vertically to the uppermost limit within the
confines of the sliding door frame assembly with a load (L4),
while, simultaneously, with the sliding panels in the test
position, two concentrated loads (L1) shall be applied
separately, to each member incorporating a locking device, at
a point on the panel member within 3 in. (75 mm) of the
locking device, in a direction parallel to the plane of the glass
that would tend to open the panel and simultaneously applying
a concentrated load (L3) in the direction perpendicular to the
plane of the glazing material, toward the interior side of the
sliding door specimen, to the bottom rail on the same panel
within 3 in. (75 mm) of the corner opposite the stile containing
the locking device. Apply the first load (L1) at the stile in such
a manner as to exert the load on the locking device or handle
by straddling it at points on the sliding door panel member
within 3 in. (75 mm) of each side of the locking device in a
direction parallel to the plane of the glazing material that would
tend to open the door. Apply the second load (L1) at the
intermediate jamb in such a manner as to exert the load on the
intermediate jamb in a direction parallel to the plane of the
glazing material and opposite to the first load (L1). The load
FIG. A2.12 Test B5
FIG. A2.13 Test B6—Inside Sliding Panels
10
F842 − 14
used, the loads shall be equally divided among the locks and
shall be applied simultaneously. (Two equal concentrated loads
which together equal L1.) (See Fig. A2.14.)
A2.5.9 After completion of Tests B1 through B7 and with
all loads removed, perform the hardware manipulation test and
the panel manipulation test.
A2.6 Type C Sliding Door Assembly Tests
A2.6.1 Perform the disassembly test.
A2.6.2 Test C1—With the sliding panels in the test position,
two concentrated loads (L1) shall be applied separately to each
member incorporating a locking device, at a point on the panel
member within 3 in. (75 mm) of the locking device, in a
direction parallel to the plane of the glass that would tend to
open the panel. Apply the first load (L1) at the stile in such a
manner as to exert the load on the locking device or handle by
straddling it at points on the sliding door panel member within
3 in. (75 mm) of each side of the locking device in a direction
parallel to the plane of the glazing material that would tend to
open the door. Apply the second load (L1) at the meeting stile
of the sliding panel that is adjacent to the sliding panel that
contains the lock. Apply this load in such a manner as to exert
the load on the meeting stile in a direction parallel to the plane
of the glazing material and opposite to the first load (L1) in an
effort to separate the engaged meeting stiles. The load attachment point for the second load shall be at the same height
above the frame sill and in the same vertical plane as the load
attachment points for the first load. Apply both loads simultaneously and equally. The load shall be distributed evenly
between the interior and exterior sides of the locking device so
as to minimize rotation. (Two equal concentrated loads which
together equal L1 in opposing directions.) (See Fig. A2.15.)
FIG. A2.15 Test C1
will tend to deglaze the adjacent fixed panel that could affect the results of
the test adversely. In order to alleviate this situation, apply the second
reactive load (L1) before the first load (L1), or apply both loads in equal
stages so that the results are not adversely affected by deglazing of the
fixed panel.
A2.6.3 Test C2—With the sliding panels in the test position,
two concentrated loads (L1) shall be applied separately, from
the exterior, to each member incorporating a locking device, at
a point on the sash member within 3 in. (75 mm) of the locking
device, in a direction parallel to the plane of the glass that
would tend to open the panel, while, simultaneously, an
additional concentrated load (L2) is applied to the panel
member containing the locking device in the direction perpendicular to the plane of the glazing material toward the interior
side of the sliding door test specimen. Apply the first load (L1)
at the stile in such a manner as to exert the load on the locking
device or handle by straddling it at points on the sliding door
panel member within 3 in. (75 mm) of each side of the locking
device in a direction parallel to the plane of the glazing
material that would tend to open the door. Apply the second
load (L1) at the meeting stile of the sliding panel that is
adjacent to the sliding panel that contains the lock. Apply this
load in such a manner as to exert the load on the meeting stile
in a direction parallel to the plane of the glazing material and
opposite to the first load (L1) in an effort to separate the
engaged meeting stiles. The load attachment point for the
second load shall be at the same height above the frame sill and
in the same vertical plane as the load attachment points for the
first load. Apply both loads simultaneously and equally. Where
more than one primary lock is used, the loads shall be equally
divided among the locks and shall be applied simultaneously.
(Two equal concentrated loads which together equal L1 in
opposing directions.) (See Fig. A2.16.)
NOTE A2.2—The application of the (L1) loads singly or eccentrically
A2.6.4 Test C3—With the sliding panels in the test position,
two concentrated loads (L1) shall be applied separately, from
the exterior, to each member incorporating a locking device, at
a point on the sash member within 3 in. (75 mm) of the locking
device, in a direction parallel to the plane of the glass that
would tend to open the panel, while, simultaneously, an
FIG. A2.14 Test B7—Outside Sliding Panels
11
F842 − 14
FIG. A2.16 Test C2
FIG. A2.17 Test C3
additional concentrated load (L2) is applied to the panel
member containing the locking device in the direction perpendicular to the plane of the glazing material toward the exterior
side of the sliding door test specimen. Apply the first load (L1)
at the stile in such a manner as to exert the load on the locking
device or handle by straddling it at points on the sliding door
panel member within 3 in. (75 mm) of each side of the locking
device in a direction parallel to the plane of the glazing
material that would tend to open the door. Apply the second
load (L1) at the meeting stile of the sliding panel that is
adjacent to the sliding panel that contains the lock. Apply this
load in such a manner as to exert the load on the meeting stile
in a direction parallel to the plane of the glazing material and
opposite to the first load (L1) in an effort to separate the
engaged meeting stiles. The load attachment point for the
second load shall be at the same height above the frame sill and
in the same vertical plane as the load attachment points for the
first load. Apply both loads simultaneously and equally. Where
more than one primary lock is used, the loads shall be equally
divided among the locks and shall be applied simultaneously.
(Two equal concentrated loads which together equal L1 in
opposing directions.) (See Fig. A2.17.)
the load on the meeting stile in a direction parallel to the plane
of the glazing material and opposite to the first load (L1) in an
effort to separate the engaged meeting stiles. The load attachment point for the second load shall be at the same height
above the frame sill and in the same vertical plane as the load
attachment points for the first load. Apply both loads simultaneously and equally. Where more than one primary lock is
used, the loads shall be equally divided among the locks and
shall be applied simultaneously. (Two equal concentrated loads
which together equal L1 in opposing directions.) (See Fig.
A2.18.)
A2.6.6 Test C5—With the sliding panels in the test position,
two concentrated loads (L1) shall be applied separately, from
the exterior, to each member incorporating a locking device, at
a point on the sash member within 3 in. (75 mm) of the locking
device, in a direction parallel to the plane of the glass that
would tend to open the panel, while, simultaneously, an
additional concentrated load (L2) is applied to the panel
A2.6.5 Test C4—With the sliding panels in the test position,
two concentrated loads (L1) shall be applied separately, from
the exterior, to each member incorporating a locking device, at
a point on the sash member within 3 in. (75 mm) of the locking
device, in a direction parallel to the plane of the glass that
would tend to open the panel, while, simultaneously, lifting the
sliding door panel vertically to the uppermost limit within the
confines of the sliding door frame assembly with a load (L4).
Apply the lifting load at the mid-span of the bottom rail of the
test panel. Apply the first load (L1) at the stile in such a manner
as to exert the load on the locking device or handle by
straddling it at points on the sliding door panel member within
3 in. (75 mm) of each side of the locking device in a direction
parallel to the plane of the glazing material that would tend to
open the door. Apply the second load (L1) at the meeting stile
of the sliding panel that is adjacent to the sliding panel that
contains the lock. Apply this load in such a manner as to exert
FIG. A2.18 Test C4
12
F842 − 14
a manner as to exert the load on the locking device or handle
by straddling it at points on the sliding door panel member
within 3 in. (75 mm) of each side of the locking device in a
direction parallel to the plane of the glazing material that would
tend to open the door. Apply the second load (L1) at the
meeting stile of the sliding panel that is adjacent to the sliding
panel that contains the lock. Apply this load in such a manner
as to exert the load on the meeting stile in a direction parallel
to the plane of the glazing material and opposite to the first load
(L1) in an effort to separate the engaged meeting stiles. The
load attachment point for the second load shall be at the same
height above the frame sill and in the same vertical plane as the
load attachment points for the first load. Apply both loads
simultaneously and equally. Where more than one primary lock
is used, the loads shall be equally divided among the locks and
shall be applied simultaneously. (Two equal concentrated loads
which together equal L1 in opposing directions.) (See Fig.
A2.20.)
member containing the locking device in the direction perpendicular to the plane of the glazing material toward the exterior
side of the sliding door test specimen and, simultaneously,
lifting the sliding door panel vertically to the uppermost limit
within the confines of the sliding door frame assembly with a
load (L4). Apply the lifting load at the mid-span of the bottom
rail of the test panel. Apply the first load (L1) at the stile in
such a manner as to exert the load on the locking device or
handle by straddling it at points on the sliding door panel
member within 3 in. (75 mm) of each side of the locking device
in a direction parallel to the plane of the glazing material that
would tend to open the door. Apply the second load (L1) at the
meeting stile of the sliding panel that is adjacent to the sliding
panel that contains the lock. Apply this load in such a manner
as to exert the load on the meeting stile in a direction parallel
to the plane of the glazing material and opposite to the first load
(L1) in an effort to separate the engaged meeting stiles. The
load attachment point for the second load shall be at the same
height above the frame sill and in the same vertical plane as the
load attachment points for the first load. Apply both loads
simultaneously and equally. Where more than one primary lock
is used, the loads shall be equally divided among the locks and
shall be applied simultaneously. (Two equal concentrated loads
which together equal L1 in opposing directions.) (See Fig.
A2.19.)
A2.6.7 Test C6, Inside Sliding Panels—With the sliding
door panel lifted vertically to the uppermost limit within the
confines of the sliding door frame assembly with a load (L4),
while, simultaneously, with the sliding panels in the test
position, two concentrated loads (L1) shall be applied
separately, to each member incorporating a locking device, at
a point on the panel member within 3 in. (75 mm) of the
locking device, in a direction parallel to the plane of the glass
that would tend to open the panel and simultaneously applying
a concentrated load (L3) in the direction perpendicular to the
plane of the glazing material, toward the interior side of the
sliding door specimen, to the bottom rail on the same panel
within 3 in. (75 mm) of the corner opposite the stile containing
the locking device. Apply the first load (L1) at the stile in such
A2.6.8 Test C7, Outside Sliding Panels—With the sliding
door panel lifted vertically to the uppermost limit within the
confines of the sliding door frame assembly with a load (L4),
while, simultaneously, with the sliding panels in the test
position, two concentrated loads (L1) shall be applied
separately, to each member incorporating a locking device, at
a point on the panel member within 3 in. (75 mm) of the
locking device, in a direction parallel to the plane of the glass
that would tend to open the panel and simultaneously applying
a concentrated load (L3) in the direction perpendicular to the
plane of the glazing material, toward the exterior side of the
sliding door specimen, to the bottom rail on the same panel
within 3 in. (75 mm) of the corner opposite the stile containing
the locking device. Apply the first load (L1) at the stile in such
a manner as to exert the load on the locking device or handle
by straddling it at points on the sliding door panel member
within 3 in. (75 mm) of each side of the locking device in a
direction parallel to the plane of the glazing material that would
tend to open the door. Apply the second load (L1) at the
intermediate jamb in such a manner as to exert the load on the
intermediate jamb in a direction parallel to the plane of the
FIG. A2.19 Test C5
FIG. A2.20 Test C6—Inside Sliding Panels
13
F842 − 14
glazing material and opposite to the first load (L1). The load
attachment point for the second load shall be at the same height
above the frame sill and in the same vertical plane as the load
attachment points for the first load. Apply both loads simultaneously and equally. Where more than one primary lock is
used, the loads shall be equally divided among the locks and
shall be applied simultaneously. (Two equal concentrated loads
which together equal L1 in opposing directions.) (See Fig.
A2.21.)
A2.6.9 After completion of Tests C1 through C7 and with
all loads removed, perform the hardware manipulation test and
the panel manipulation test.
A2.7 Type D Sliding Door Assemblies
A2.7.1 Perform the disassembly test.
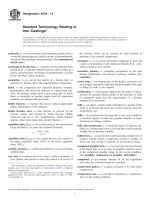
A2.7.2 Test D1—With the fixed panel in the test position,
apply a concentrated load (L1) at the center of the fixed jamb
stile in the direction parallel to the plane of the glazing material
that would tend to separate the fixed panel from the jamb. (See
Fig. A2.22.)
FIG. A2.22 Test D1
A2.7.3 Test D2—With the fixed panel in the test position,
apply a concentrated load (L1) at the center of the fixed jamb
stile in the direction parallel to the plane of the glazing material
that would tend to separate the fixed panel from the jamb
while, simultaneously, an additional concentrated load (L2) is
applied to the center of the stile opposite the fixed jamb stile in
the direction perpendicular to the plane of the glazing material,
and in a direction that would tend to separate the stile from the
member with which it mates. (See Fig. A2.23.)
A2.7.4 Test D3—With the fixed panel in the test position,
apply a concentrated load (L1) at the center of the fixed jamb
stile in the direction parallel to the plane of the glazing material
FIG. A2.23 Test D2
that would tend to separate the fixed panel from the jamb,
simultaneously, lift the fixed panel vertically to the uppermost
limit within the confines of the door frame assembly with a
load (L4). Apply the lifting load to the mid-span of the bottom
rail of the fixed test panel. (See Fig. A2.24.)
A2.7.5 After completion of Tests D1 through D3 and with
all loads removed, perform the hardware manipulation test and
the sash manipulation test.
FIG. A2.21 Test C7—Outside Sliding Panels
14
F842 − 14
FIG. A2.24 Test D3
APPENDIX
(Nonmandatory Information)
X1. BACKGROUND INFORMATION
X1.1 A number of documents relative to forced entry
resistance testing and test standards were reviewed in the
development of these test methods, including those published
by the American Architectural Manufacturers Association,
California Association of Window Manufacturers, National
Wood Window and Door Association, International Conference of Building Officials, and National Institute of Law
Enforcement and Criminal Justice. In addition, available crime
incident and attack reports were reviewed, such as the California Crime Technological Research Foundation Report. Based
on the above information and actual designing and testing by
manufacturers associated with door assemblies, these ASTM
Door Test Methods were written.
Forced Entry Resistant Aluminum Sliding Glass Doors and
CAWM 300-96, Forced Entry Test for Sliding Glass Doors.
The CAWM 300 document is the basis for the California
Model Building Security Ordinance, CMBSO 1-79. The three
standards are similar in scope and include test methods
essentially identical in intent. This version of ASTM F842 can
be considered to be consistent with the intent of both the
AAMA and the CAWM test methods.
X1.4 However, the suggested measured performance levels
provided in Table A1.1 do not include the minimum performance requirements of AAMA 1303 or CAWM 300 at the
Grade 10 level of Test Method F842. The user could specify
performance levels higher than Grade 10 to assure the minimum performance levels for the AAMA and CAWM standards.
It is suggested that the user specify Test Method F842, Grade
10, and add the other performance requirements indicated in
the note following Table A1.1 as required for a specific project.
The AAMA and CAWM documents are to be retired from
publication in 2003 and replaced by ASTM F842.
X1.2 These test methods are designed to measure forcedentry resistance of door assemblies. They are not addressed to
situations involving high crime areas or areas attacked by
professional, sophisticated criminals. To protect against this
type of crime, a multiple approach must be taken. This will
often include alarm and other surveillance systems and specially designed doors, hardware, and burglary-resistance glazing materials, and, perhaps different test methods. Basically,
this type of approach must be custom designed to meet the
demands of the specific area or problem and is considered
costly beyond the needs of the resident of a low-crime area.
X1.5 In researching the revision of this test method ASTM
received assistance from several police departments and from
the statistics available through the FBI and the National Crime
Center. It was evident that the mode of attempting a forced
entry has changed over the years. Statistics at the time of the
first edition of this standard indicated reluctance on the part of
the inexperienced or casual burglar to break the glass in the
door assembly or to make noise during the entry attempt. More
recent information indicates that limited noise due to breaking
X1.3 There are three existing test methods for forced entry
resistance of doors that are known to be incorporated in
Building Codes including this ASTM Test Method. The others
include AAMA 1303.5-1976, Voluntary Specifications for
15
F842 − 14
glass is accepted and that a prevalent means of forcing a door
or window is to kick the panel or sash near the locking
hardware. The burglar relies on quick entry and leaving the
scene before the arrival of law enforcement officers more than
skill or stealth. For this reason the specifier may wish to
include testing for glass breakage in their specification at the
Grade 30 or Grade 40 performance.
ASTM International takes no position respecting the validity of any patent rights asserted in connection with any item mentioned
in this standard. Users of this standard are expressly advised that determination of the validity of any such patent rights, and the risk
of infringement of such rights, are entirely their own responsibility.
This standard is subject to revision at any time by the responsible technical committee and must be reviewed every five years and
if not revised, either reapproved or withdrawn. Your comments are invited either for revision of this standard or for additional standards
and should be addressed to ASTM International Headquarters. Your comments will receive careful consideration at a meeting of the
responsible technical committee, which you may attend. If you feel that your comments have not received a fair hearing you should
make your views known to the ASTM Committee on Standards, at the address shown below.
This standard is copyrighted by ASTM International, 100 Barr Harbor Drive, PO Box C700, West Conshohocken, PA 19428-2959,
United States. Individual reprints (single or multiple copies) of this standard may be obtained by contacting ASTM at the above
address or at 610-832-9585 (phone), 610-832-9555 (fax), or (e-mail); or through the ASTM website
(www.astm.org). Permission rights to photocopy the standard may also be secured from the ASTM website (www.astm.org/
COPYRIGHT/).
16