home power magazine - issue 057 - 1997 - 02 - 03
Bạn đang xem bản rút gọn của tài liệu. Xem và tải ngay bản đầy đủ của tài liệu tại đây (18.59 MB, 113 trang )
Heart
Inverter / Charger
-
+
Auxiliary
Battery Bank
Main AC Panel
In
Out
Outlets
Outlets
heart interface
Grid Power In
In
Out
Main AC Panel
Auxiliary
Battery Bank
+
-
Heart
Inverter / Charger
14.25
E-Meter
E
F
Ah
A
V
t
SEL SET
Cruising Equipment
Visit our Web page at:
5245 Shilshole Avenue NW, Seattle, WA 98107 usa Phone: (206) 782-8100 Fax: (206) 782-4336
Simple and Reliable Solutions
For Global Power Problems!
Millions of people loose AC power daily. Earthquakes, floods, hurricanes, ice storms,
tornados, and other disasters can cause the grid to fail. In many countries the grid is so
unreliable that there are a dozen power outages a day. The result systems crash and
business stops. A back up power system is the only insurance. Our system is simple: A
Freedom Inverter/Charger supplies reliable AC power during outages and quickly re-
charges the battery when power is restored. The Link 2000, or the popular E-Meter, is used
to monitor the system so you know exactly how much energy you have consumed and how
long your battery will last.
Inverter Features Instrumentation Features
UL Listed Models 750 - 2500 Watts Volts, Amps, Ahrs, and Time Remaining
Charging rates from 25-130 amps Learns Charging Efficiency
120V & 230V, 50 & 60 HZ Models Simple to Use and Install
Typical Back Up Power System
World Leader in Back Up Power
TM
21440 68th Ave. S. Kent WA 98032 (206) 872-7225 Outside WA (800) 446-6180 Fax (206) 872-3412
Visit our Web page at:
Things that Work!
tested by
Home Power
Fundamentals
HOME POWER
THE HANDS-ON JOURNAL OF HOME-MADE POWER
6 Low Budget
An old family cabin in
Colorado gets a new wind
and solar hybrid electric
power system for cheap.
12 Solar Volunteers
A rural volunteer fire station
goes solar. Rich Hunter
gives the low-down on the
system design and the
installation which used
fireman labor.
18 Living with Wind
Dan Whitehead explores the
dos and don’ts of wind
generator maintenance.
Tricks of the trade and some
dern good safety tips are
revealed.
32 Site and Mount!
For many of us the point to
RE is doing it ourselves.
Richard Perez and John
Drake discusse the basics of
siting and building a
seasonally adjustable PV
mounting rack.
Features
Things that Work!
Features
GoPower
Issue #57 February / March 1997
28 Solar / Wind Hybrid
Steve Cooper gives his 30
foot sailboat “Rainbow” the
power to cruise without the
wind. A PV-powered electric
motor is the vessels new
auxiliary propulsion.
56 Where the Rubber
Meets the Road
Shari Prange continues her
series. This time we explore
the subtleties of driving an
EV in a race situation.
24 Water Pumping in the
Great White North
Leigh and Pat Westwell
install a PV & Wind system
to get water to Andy Roy’s
cattle, even during the
Canadian winter.
39 Cost Verses Price
John Schaefer discusses
the imbalance between
what it costs to produce
energy from solar and what
the utilities will pay for it;
with some suggestions to
reduce the gap.
44 Solar Cooking in Peru
Tara Miller and Sam Brown
travel to southern Peru to
teach building and cooking
with solar ovens.
74 A PV lighting system
Jade Mountain’s new
complete PV/LED lighting
system for under $100.
90 Home & Heart
Spreading the word
Sometimes it is easy to
forget how little the general
population knows about
renewables. We all can
help.
96 the Wizard speaks…
Zero point field theory.
104 Writing for Home Power
Here’s a writer’s guide to
getting your RE experiences
printed in Home Power.
105 EV Tech Talk
Mike Brown’s new column
answers technical questions
about electric vehicles. In
this issue, “How to find a
bad battery in an EV battery
pack and what to do about
it.”
Access Data
Home Power Magazine
PO Box 520,
Ashland, OR 97520 USA
Editorial and Advertising:
916-475-3179 voice and FAX
Subscriptions and Back Issues:
800-707-6585 VISA / MC
Computer BBS:
707-822-8640
Internet E-mail:
World Wide Web:
Paper and Ink Data
Cover paper is 50% recycled (10%
postconsumer and 40% preconsumer)
Recovery Gloss from S.D. Warren Paper
Company.
Interior paper is recycled (30%
postconsumer) Pentair PC-30 Gloss
Chlorine Free from Niagara of Wisconsin
Paper Corp.
Printed using low VOC vegetable based
inks.
Printed by
St. Croix Press, Inc.,
New Richmond, Wisconsin
Legal
Home Power (ISSN 1050-2416) is
published bi-monthly for $22.50 per year
at PO Box 520, Ashland, OR 97520.
International surface subscription for $30
U.S. periodicals postage paid at Ashland,
OR, and at additional mailing offices.
POSTMASTER send address corrections
to Home Power, PO Box 520, Ashland,
OR 97520.
Copyright ©1997 Home Power, Inc.
All rights reserved. Contents may not be
reprinted or otherwise reproduced without
written permission.
While
Home Power Magazine
strives for
clarity and accuracy, we assume no
responsibility or liability for the usage of
this information.
Regulars
Columns
Access and Info
Recycled Paper
Cover: Sunset atop Dan Whitehead’s tower with insets of solar food drying, a PV system, and an electric race car.
4 From Us to You
80
HP’
s Subscription form
81
Home Power’
s Biz Page
93 Happenings — RE events
97 Letters to Home Power
107 Q&A
109 Micro Ads
112 Index to Advertisers
78 Independent Power
Providers
Don Loweburg discusses
utility restructuring and
renewable energy in
California. The new utility
buzz word for solar power is
“distributed generation.”
82 Code Corner
John Wiles tells us about
lightning frying his inverter
and how you might keep
lightning from damaging
your RE system.
86 Power Politics
Is U.S. energy policy being
dictated by large
corporations for their own
profit? Is our government
ignoring us?
Recyclable Paper
50 Uplifting
Phil Brown builds a solar-
powered boat lift with perfect
attention to detail. A fun and
useful project that eliminates
the need for the strongarm
method.
62 Solar Dehydrator
Dennis Scanlin and students
at Appalachian State
University designed and built
this through-pass solar food
dryer and you can too.
Homebrew
4
Home Power #57 • February / March 1997
William von Brethorst
Mike Brown
Phil Brown
Sam Coleman
Steve Cooper
John Drake
Rich Hunter
Kathleen Jarschke-Schultze
Stan Krute
Don Loweburg
Harry Martin
Tara Miller
Karen Perez
Richard Perez
Shari Prange
Benjamin Root
Dennis Scanlin
John Schaefer
Bob-O Schultze
Michael Welch
Leigh & Pat Westwell
Dan Whitehead
John Wiles
Myna Wilson
People
“ Think about it…”
“Water, water
everywhere
and not a drop
to drink”
Ashland Oregon
New Year’s Day 1997
By now our friends in the industry and most of our readers know that
Home
Power
central, here at Agate Flat, is less than extravagant, it might even be
considered rustic. But homesteading is a never ending process and, alas, it is
time once again to make moves towards the plush decadence of the
nineteenth century.
So begins a project to provide us, the occupants of the plywood palace, with
the luxuries of an indoor toilet, indoor shower with genuine hot water, and a
critter proof garden bed. Joe Schwartz (pictured above) is the construction
guru in charge of this 16' by 24' bath house / green house. The goal is to
integrate local, renewable, low embodied energy building materials to create a
space that is energy efficient, practical, and pleasant to inhabit. Straw bale
north walls will be stuccoed with the local mud (sticky stuff). South windows
are salvaged double pane, low-e, argon filled. It’s nifty how the most
ecologically sensible solutions are often the least expensive labor intensive
construction techniques also save money, cuz we’re doing it ourselves.
Once completed, the building will house a composting toilet system, sink,
shower and tub, clothes washer, solar hot water system with propane back-
up, wood stove back-up for the passive solar heat, and a large indoor garden
bed. Of course, being that we are solar nerds, we will have to equip the
building with a renewable energy system. Yeah, PV and maybe even wind.
Look for future articles on construction techniques, and the hot water, power,
composting toilet, and grey water systems. –Ben
Under Construction
Under Construction
SOLAR DEPOT
four color on film
full page, bled
this is page 5
6
Home Power #57 • February / March 1997
bout 10 miles north of Hayden,
Colorado is the Zars Homestead
which has been in existence for
over 100 years. It has been without
electricity or services from the
beginning. The present owner, Reed
Zars of Laramie, has been slowly re-
building the main cabin after a fire
caused by lightning destroyed the
original structure. He had a limited
budget and wanted systems and
designs which could be upgraded as
building use increased or as new
services and amenities were added. For
now, the cabin is used only on
weekends and occasionally for three or
fours days at a time during holidays.
The property has the distinct advantage of a year-round
spring piped into the cabin crawl space (a delight, in
that the crawl space was almost 6 feet high and the full
length of the cabin). The spring was generally available
even in the depths of winter, though sometimes the
transfer pipe froze up. The spring provides about 10
gpm but only about 5 to 10 psi in pressure. This could
not properly supply the toilet and sinks, nor safely
supply the propane water heater.
The Plan
After the usual preliminary “what-if?” scenarios, a plan
was decided on to install the main components of a
system for water, heat, and electricity that would allow
future re-work as cabin usage changes. Because the
cabin is usually not heated unless occupied, all major
electrical equipment was located in the crawl space. Its
depth, size, and location would assure a year-round
temperature difference of only 30˚ to 40˚. In the
summer the space would be cool (45˚F) and in the
winter, the radiated ground heat would keep the space
around 30˚F.
When the cabin was not in use, the inverter would be
off, but the array controller would still be active to keep
the batteries charged. After much consideration, the
William von Brethorst ©1997 William von Brethorst
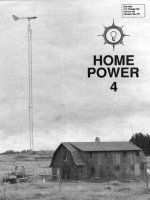
Above: The Zars Homestead with its new PV and wind power system.
A Low Budget Cabin System
A
7
Home Power #57 • February / March 1997
System
components chosen were a Trace
DR-1524 inverter, an APT “Smart-
Charger” controller, an Air-303 wind
generator, two Solavolt 85 Watt
modules and four Photocomm 225
Amp-hour “golf cart”, wet-cell, lead
acid batteries. The system voltage
chosen was 24 VDC, mainly for
lower line loss but also because the
DC devices were 24 VDC. The
batteries were mounted in an
insulated box with room for four
additional cells. The battery box was
constructed from 3/4 inch plywood
with R-11 fiberglass insulation inside
and poly-cell matting over the box
floor to prevent cold-sinking.
Water Delivery
The water pressure problem was
solved by adding a small 24 VDC
booster pump with a pre-charged
pressure tank to prevent constant
cycling of the pump. The Shur-Flo
3.1 gpm pump was installed and
plumbed so it could be bypassed in
case of failure (as diaphragm pumps
wear out faster than centrifugal
pumps). A valve system allows the
spring to feed the house directly, if
required. A BZ products low-voltage
disconnect was added so that in the
event of a leak, the pump would not run continuously
and completely discharge the batteries. A manual on-off
switch was also installed.
Electrical
The system inverter and controls were pre-fabricated
on a plywood board and wired and tested in the
Planetary Systems shop in Jackson. We did this
System Component Costs
# Component Cost %
1 House Wiring & Installation $1,135 21%
2 Solavolt 85W PV modules $870 16%
1 Vestfrost Fridge $800 15%
1 Trace Inverter $795 15%
1 PV/Wind Installation $500 9%
1 Air-303 Wind Generator $495 9%
4 Lead-acid Batteries $312 6%
1 Controls/Disconnects/Wire $288 5%
1 Mounting $100 2%
Total System Cost
$5,295
Above: The Zars Homestead’s power wall with Trace 1524 inverter, insulated
battery box, and pressure tank system.
Below: Electrician Skip Chisolm installs the 120 vac
service panel.
Smartcharger
Vista 3
29.5
DR 1524
trace
Two Solavolt PV Modules
85 Watts each, wired for 24 Volts DC
Four Photocomm Lead Acid Batteries
225 Amp Hours at 24 Volts
Pump Switch
DC rated
Shur-Flo pump
3.1 gpm
Low Voltage Disconnect
BZ Products
ac
Distribution Panel
with circuit breakers
To ac loads
Ammeter
Wind Amps in
To plug
for portable generator
Trace Inverter, DR-1524
1500 Watt modified sine wave
APT, Vista-3 Meter
PV Amps in, Load Amps out,
System Voltage
200 Amp Fuse
Shunt
APT Smartcharger,
charge controller
Southwest Windpower, Air 303
300 Watt, DC output
Fused Disconnect
20 Amp
Circuit Breaker
Lightning Arrestor
APT, LA100V
8
Home Power #57 • February / March 1997
System
because the site was really remote. A failure on-site
could have been costly to the homeowner (and
installer). This also saved time and cost for the
homeowner. The entire system was installed and up-
and-running in 22 hours, including ac wiring of the
house lights, switches, and outlets. The loads for this
system were very light, but the ability to expand the
system for heavier use was built in. Lighting was ac
compact fluorescent and the fridge was ac. The cabin
included some propane lamps for use when power was
low, and the main heat source was a wood stove.
Wind Genny
The Air-303 wind generator was mounted at the ridge of
the building about 6 feet above the roof for a very good
reason. The winds at the site range from 16 to 35 miles
per hour average. A taller tower would have
necessitated a much sturdier mount, thus more cost.
With the famous (infamous) Wyoming winds, this site
can have very heavy gusts. The tower height also kept
the wire run short for less voltage loss. The average
output from this unit has ranged from 50 to 185 Watts,
easily enough to operate the fridge without any solar
input.
This expandable system’s battery box is designed
accommodate up to eight golf cart type batteries at
about 450 Amp hours of storage. With the addition of
another Trace model 1524 inverter, the owner can
increase his ac output capacity to 3000 watts
continuous.
The final touch was adding an outside weatherproof
box with a plug to connect a generator for backup
The Zars’ Homestead System
9
Home Power #57 • February / March 1997
System
System Load Table
Run Hours Days W-hrs
# Appliance Watts /Day /Week /Day
1 Fridge (Vestfrost) 120 6 2 206
1 Pump 24 VDC 86 1 2 25
2 Liv. Rm. Lights 16 2 2 18
2 Kitchen Lights 16 2 2 18
1 Bath Light 16 3 2 14
3 Upstairs Lights 16 1 2 14
1TV 40 1 2 11
2 Outside Lights 16 1 2 9
1 Stereo 20 1 2 6
Energy Consumed Daily in Watt-hours
321
power or additional charging when required. The
Trace’s charger input settings can be adjusted to match
the output of even the smallest portable generator,
allowing complete flexibility. Following the installation of
the drywall and plumbing, the place was operational,
cozy, and warm.
This installation is an example of what can be
accomplished with even a limited budget and some
extensive pre-planning by an experienced PV
designer/installer who can also be on-site to see that
things are done properly.
Access:
Author, Wm. von Brethorst, Planetary Systems, 2400
Shootin Iron Ranch Rd., Jackson, WY 83001
Phone & FAX: 307-734-8947
Internet email:
Web: ssnet/~planetary
Project electrician: Skip Chisholm, PO Box 594, Victor,
MT 59875
Above: Detail of the pressure tank (wrapped in
insulation), 24 Volt Shur-Flo Pump, and BZ Products
low voltage Disconnect.
SOUTHWEST WINDPOWER
camera ready
four color
7.125 wide
4.5 high
10
Home Power #57 • February / March 1997
PHOTOVOLTAIC SERVICES NETWORK
four color on negative
7.125 wide
4.5 high
MORNINGSTAR
four color on film
3.5 wide
4.5 high
INTRODUCES THE NEW
MX SERIES INVERTER
The world’s first truly N+1 redundant true sine wave
power inverter. This means no single malfunction will
cause the unit to fail. All systems are modular,
expandable, “hot” insertable and remote capable, with
power levels up to 20 KW.
• true sine wave
• most reliable inverter
• input voltages from 12Vdc up to 120Vdc
2225 E. Loop 820 N.–Ft. Worth, TX 76118-7101 voice: 817.595.4969 fax: 817.595.1290
toll free: 800.886.4683 email address:
Northwest
Energy Storage
The First Name In R-E Batteries
10418 Hwy. 95 N.
Sandpoint, ID 83864
Voice 208-263-6142
Fax 208-265-3677
800-718-8816
(ask for a free copy)
Tackling the Bureaucracy
With a clear picture of what was
needed and almost limitless energy,
Andy McKee, Four Mile Area Fire
Chief and project engineer for the
construction project, set about
defining and financing the
photovoltaic portion of the
construction effort in early 1995.
Helped by Marc Roper of the
Colorado Office of Energy
Conservation, Hal Post of Sandia
National Laboratories and others, he
developed a comprehensive design
specification with clearly identified
objectives for performance. Armed
with this tool, Andy went the rounds
of financial institutions and funding
sources for several months, finally
securing financing assistance from
Sandia, Public Service of Colorado
and local volunteers.
Contract Awarded to Local Firm
Discover Solar Engineering, located
in Divide, Colorado was one of
several firms selected to receive a
request for quotation for the
photovoltaic system installation.
Andy and his team reviewed the bids
and awarded the contract to
Discover Solar Engineering in
September 1995. Very competitive
pricing and near-by location were
keys to the selection. The system design phase was
greatly simplified due to the completeness of the
specifications. With computer design assistance from
Solar Electric Specialties of Santa Barbara, CA,
Discover Solar was able to precisely calculate the best
fit of panels, inverter and batteries to match the needs
for the fire services’ building. During evaluation of bids, it
was decided to go with Pacific Chloride 2 volt deep cycle
batteries for extended life. These batteries, along with
the other major components, Siemens PC-4JF 75 watt
panels, Trace 4024 4000 watt true sine wave inverter
and the Ananda APT power center, were all selected
with the intent of providing a highly reliable, long lasting
system, designed for years of trouble free operation.
A complete written contract was prepared and agreed
upon before beginning work. Materials, expected
performance, system design, labor provided, and
warranties, were spelled out in advance. Knowing who
is going to do what and what the finished system will
deliver before you start is the best way to assure
satisfaction.
12
Home Power #57 • February / March 1997
Rich Hunter ©1997 Rich Hunter
our Mile Fire Station, a volunteer
organization started in 1984 to
provide fire and ambulance
services for 69 square miles of Teller
County and ambulance service for 235
square miles of Park County in central
Colorado, has recently completed
construction of their new building.
Located over a mile from the nearest
utility lines, the volunteers decided on
solar to provide their electric power. The
site houses emergency equipment and
is used for meetings and training as well
as serving as the command center
when the volunteers are called to duty.
Four Mile Fire StationFour Mile Fire Station
Four Mile Fire StationFour Mile Fire StationFour Mile Fire Station
FF
FFF
Goes SolarGoes Solar
Goes SolarGoes SolarGoes Solar
13
Home Power #57 • February / March 1997
Systems
As part of the contract, agreement was made to
cooperate on the installation labor. Volunteers helped
on a variety of tasks such as mounting the arrays on
the roof, building a battery enclosure, assisting in
pulling cable and many other tasks. The installation
cost was kept to a minimum by the outstanding effort of
several volunteers.
Working with a crew of dedicated assistants, installation
was started in October before the really cold weather
and snows arrived. We met on a weekday morning and
determined how we would proceed with the help and
scheduling availability of the volunteers. First, Andy and
his team built the battery enclosure and installed the
wall support for the inverter and APT Power Center.
Then, we all worked together for several days securing
the roof mounts to the metal-roofed building. Since we
were going to install solar heat collectors to aid in
heating the building, in addition to the photovoltaic
panels, space on the south facing roof was at a
premium. The PV panels were firmly secured on the
lower portion of the roof with Andy crawling under the
rafters and atop the previously installed sprayed
insulation inside the building while Sandy Knox, another
dedicated volunteer, and I drilled holes and fed the
mounting screws down to him from the outside. In all,
the volunteers contributed about 140 hours of effort.
The installation was completed by the first week in
November.
PV System Components
The system was designed to be completely automatic
and provide sufficient electric power to meet the
expected part-time operation needs of the volunteer
organization.
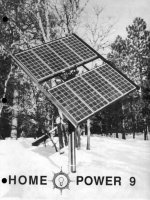
18 Siemens PC-4JF 75 watt panels were mounted, 3
panels per mount, on the south facing roof above the
office area. These panels operate especially well in cold
weather and typically output the rated 4.4 amps per
module in a full sun condition. The current output is the
key determinant in evaluating actual output power. The
nine pairs of panels deliver a total of over 40 amps on
clear sunny days. At 25 volts nominal, and an average
6 hour sun day, this results in 6000 watts hours of
energy stored each day. This is considerably less than
the 75 watts of rated power per panel times 6 hours per
day, but is well above the amount needed to meet the
system requirements.
Two panels were wired in series to create 24 volt sets.
Pairs of 12 gauge wires from each set were individually
run from the panels to an array combiner box located
on the western wall of the equipment bay building. The
array combiner consists of individual fuses for each
panel pair, a main 60 amp DC rated circuit breaker, a
negative lead bus bar and a lightning arrestor all
mounted in a weatherproof plastic enclosure. The wire
size was determined by calculating the acceptable 2%
maximum loss allowable over the total distance from
the farthest panel pair to the array combiner assembly.
The power was fed from the panels to a 60 amp charge
controller installed in the APT control center which was
located in the first bay of the equipment area. 6 gauge
THHN wire was used for this run. The size again being
determined by calculating for a maximum of 2% loss
Above: The PV combiner box
contains fuses for each 24 Volt pair,
a circuit breaker, and an APT
lightning arrestor.
Right: The eighteen Siemens
modules were racked and bolted
directly to the station’s metal roof.
14
Home Power #57 • February / March 1997
Systems
from the array combiner to the control panel. By paying
careful attention to wire sizing and minimizing lengths of
cable runs, we managed to conform to all building
codes and keep system wiring losses to well under 5%
for the total system.
The batteries, 12 Pacific Chloride 2 volt deep cycle
batteries with a combined storage capacity of 1270 AH,
were considerably more expensive than some other
commonly used residential batteries (e.g. the L-16 6
volt 350 AH units), but should provide a much longer life
time. They are very heavy, each cell of the 85CB-25
weighs about 150 LB, but the more lead, the more
power and the longer the battery life.
The DC power was converted to 120 volt ac through a
Trace 4024 true sine wave inverter. Requirements for
the emergency services operation includes using a
small computer for record keeping and battery charging
to charge their portable phones. It was felt that the sine
wave inverter would best handle these types of loads.
In addition, it is planned to use this inverter to control a
standby propane fired generator for additional power
generation in the near future. This sine wave inverter is
rapidly becoming a standard for residential PV systems.
It offers plenty of power for most applications, and the
programming features, internal metering and high
charging capability are all features valuable to the user.
An APT control center houses safety fuses, charge
controller, and system metering. A 60 amp charge
controller was selected to allow room for expansion
should more panels be added in the future. The charge
controller circuitry has a normal setting for regular
operation and an equalize setting to allow “over-
charging” of the batteries from the PV panels on a
periodic basis. The APT metering consists of a “smart
light” meter to allow casual monitoring of battery
condition and a Vista-3 digital read-out meter. By
selecting the proper function, the Vista-3 displays
battery voltage, input current and output “load” current.
A Trace T-220 transformer completes the system. This
unit “steps-up” the 120vac from the sine wave inverter
to 240 vac for running large loads.
System Size Calculations
The average estimated daily energy requirement for the
building is 3.7kw and the peak power is 4.8kw. With
rigid load management, the maximum load will stay
below 4kw. Worst month output from the panels was
calculated to be 4.2kw per day in January based on the
siting and the geographical location.
The PV panel output was calculated using insolation
data for Eagle Colorado, a latitude of 39.65 degrees
north, a longitude of 106.92 degrees west, and a tilt
angle of 65 degrees. Average output per month is
shown below.
Above: The power wall with Ananda Power Center,
Trace 4 Kilowatt inverter, and step up transformer.
System Component Cost
Component Cost %
PV Panels, Supports, Combiner $7,930 42%
Inverter and Controls $4,360 23%
Batteries $3,930 21%
Labor $2,000 11%
Installation material, wire, conduit $700 4%
Total Cost
$18,920
System Costs
The system was awarded to Discover Solar
Engineering as a result of a competitive bid, with price
being a key element in the selection process. As such,
Discover Solar and its supplier, Solar Electric
Specialties, pushed the limit to offer the lowest possible
price. A lot of labor was “volunteered” by Discover Solar
and a lot more labor was “volunteered” by members of
the Emergency Services team. Total out of pocket cost
to the Emergency Services Organization was $18,920.
Building Codes
No job is complete until it has been inspected. In Teller
County, our county electrical Inspector travels to each
and every installation, no matter how small or remote
May
5.4
5.2
5.0
4.8
4.6
4.4
4.2
4.0
Jan
Feb
Mar Apr Jun Jul Aug Sep Oct Nov Dec
Avg. KWh / Day
Average KilloWatt Hours Per Day from a 1350 Watt PV Array
15
Home Power #57 • February / March 1997
Systems
the site. The emergency services building is considered
a commercial building and had to meet the
requirements for commercial construction in addition to
conforming to all applicable residential dwelling codes.
In addition to the county electrical inspection, Andy
invited representatives from the Colorado Office of
Energy Conservation and Sandia Labs to attend a
formal acceptance test and walk through. Mark Roper,
of the COEC and Jack Cannon from Sandia came up to
Florissant on a clear sunny day in November to
participate. We did a lot of things the typical homeowner
might not think to do, but probably should consider
+
–
+
–
+
–
+
–
+
–
+
–
+
–
+
–
+
–
+
–
+
–
+
–
Trace
4.0 Kilowatt
+
–
+
–
+
–
+
–
+
–
+
–
+
–
+
–
+
–
+
–
+
–
+
–
+
–
+
–
+
–
+
–
+
–
+
–
Eighteen Photovoltaic Modules
Siemens PC-4JF
75 Watts each, wired for 24 Volts
PV Combiner Box
Each 24 Volt pair fused at 10 amp
60 amp breaker on main hot
Ananda Power Center
main disconnect, charge controller,
metering, and ac distribution
Sine Wave Inverter
Trace, SW 4024
4000 Watts
Step-up Transformer
Trace T220
120 to 240 vac
To 240 vac Loads
To 120 vac Loads
Twelve 2 Volt Lead Acid Cells
Pacific Chloride
Wired for 24 Volts
APT
APT Lightning Arrestor
Right:
An insulated
battery box
hold the twelve
Pacific
Chloride 2 Volt
cells, 1270
amp-hours at
24 Volt
Four Mile Fire Station’s Power System
Four Mile Fire Station’s Power System
16
Home Power #57 • February / March 1997
Systems
when reviewing his or her new installation. Checking
panel output, switch operation, ground currents, AC
performance, frequency and amplitude, to name a few.
Our system passed all the tests with flying colors.
Training:The Final Step
with the system installed and up and running,
schematics and technical manuals prepared, the final
step was to make sure the end users knew how to
operate and maintain the system. The Four Mile
installation is a little unusual in that any one of several
volunteers might need to know how to operate and
maintain the system. We decided on a formal
presentation to provide instructions to this potentially
large group.
Fortunately, Jack Cannon from Sandia was able to stay
on for the training class. While it is a little intimidating to
try to teach PV to a class with an expert like Jack in the
audience, his participation opened the doors for a
variety of in-depth questions and led to a lively and
informative session. While not walking away as experts
in PV the four mile volunteers did get a good
introduction to the subject and lots of practical advice
on what to expect from their system and how to best
maintain it.
Solar Heating
A separate project for the emergency services building
was the installation of a solar/propane heating system
to provide heat to the building during the cold winter
months. A total run of three miles of tubing was laid into
the 50’ by 60’ equipment bay when the cement floor
was poured. The slab is 6 inches thick concrete, with
insulation material between the concrete and the
ground. In this closed loop system, a mixture of
propylene/glycol and water is heated by the sun by five
4 by 8 foot solar panels mounted on the roof, fed
through a boiler/mixer system and distributed to the
multiple zones throughout the equipment bays. A
propane fired Agua Star instantaneous hot water heater
supplements the solar for heating during extra cold
periods. SunFire, of Boulder Colorado, a company
specializing in radiant heating systems and solar
services, provided the system design, panels, heating
controls, propane heater, materials and installation.
Emergency services personnel waded through the
setting cement to lay the tubing. The solar heating
panels were purchased used to keep the system cost
low. Total solar heating system cost, exclusive of the
heater tubes was about $10,000. The solar portion of
the system was designed to provide about 50% of the
annual heating requirements for the equipment bay and
the office area. It was determined that maintaining an
ambient air temperature above 50 degrees F in the
equipment bay would be adequate. Plans are presently
underway to add a sixth panel in a month or so to
provide additional heating for the office area and to
further reduce dependency on the propane fired make-
up boiler, but overall, the heating from the sun has been
sufficient to handle most of the heating needs in the
equipment bays.
Conclusion
The Four Mile Emergency Service Building’s PV system
has been up and running for ten months now. It has
survived winds in excess of 100 mph and periods of
extreme cold weather. The output has been equal to or
better than expected and, (knock on wood), there have
been no equipment malfunctions. A standby propane
generator will be installed later this year to provide
additional power to run such loads as a portable welder
and other heavy duty power tools. By being practical,
analyzing their needs and installing the right equipment
for the job, the Four Mile Emergency Service volunteers
have a fully functional off-grid power system they can
be proud of.
Access
Author: Rich Hunter, Discover Solar Engineering, 453
Ridge Drive, PO Box 621, Divide, CO 80814
Phone: 719-687-7808
Above: solar water panels provide about fifty percent of
the space heating through hydronic sub-floor loops.
MAPLE STATE BATTERY
Lowest Prices — Delivered Anywhere
Panels • Controllers • Inverters
Servel & Sun Frost Refrigeration
Jesus said, “I am the way, the truth
and the life…” John 14:6
(802) 467-3662
Sutton, Vermont 05867
ANANDA POWER TECHNOLOGIES
full page, bled
four color on film
this is page 17
18
Home Power #57 • February / March 1997
Wind
I have lived with wind machines since 1984 and I do not
regret one minute of it. I now have three machines
running and am in the process of installing a fourth on
our property. My wife says that four is enough. I
personally do not agree since we all know that you can
never have too much power. Sometimes it is an
adventure and other times it is pure joy. If you sit back
and do nothing, soon the wind machine will become a
costly monument in your yard that will bring you nothing
but grief.
I
once heard Michael Hackleman say
that if you own a wind generator
your life is an adventure. Sometimes
that is an understatement.
Left: Dan with
appropriate tower
climbing gear:
Safety belt with
two lanyards,tool
pouches, and
work gloves.
LIVING
WITH A
WIND MACHINE
LIVING
WITH A
WIND MACHINE
Dan Whitehead ©1997 Dan Whitehead
19
Home Power #57 • February / March 1997
Wind
Do It Yourself
If at all possible, you need to perform your own
maintenance on your wind machine. This way you will
learn all about your particular wind system and you will
become much in “tune” with your machine. For
instance, if your machine starts to make an unfamiliar
sound you will immediately recognize it and possibly
avoid a major problem before it happens.
If you cannot climb, help out the person you contract to
do the work. Another ground crew person is always
welcome during the job. This way you can stay in touch
with the machine and keep an eye on the work that is
being done. Use binoculars to watch the service work
being performed. This way you can be assured that the
work is being done to your satisfaction.
Proper Tools a Must
First and most important is to get a good safety belt. Do
not ever climb the tower without it. Inspect and test the
safety belt before you go up. Once you are up at the
top, tie yourself off with the lanyard. You now can lean
back and have the use of both hands to work. If you still
have some fear of letting go with both hands, try using
two lanyards. You do not really need two, but your mind
will be more at ease knowing there is a backup if one
breaks. This should make it much easier to let go with
both hands and be at ease to work without the fear of
falling off.
Next you will need some rope, about 2 1/2 times the
height of your tower. Spend some money and get good
quality rope. I use rock climbing rope. You can get this
from any army surplus store. You will need a good
quality pulley to attach up top. Leather gloves for you
and the ground crew are a must. The first time you try
hoisting tools up or down without gloves will show you
why you need them. The rope will burn you in a hurry.
Use a 5 gallon bucket and one of those Bucket Boss
tool organizers. The Bucket Boss fits into the bucket
and holds all types of tools neatly. Get an assortment of
wrenches, sockets, screwdrivers, pliers, and anything
else that you need for your particular machine. Use
another 5 gallon bucket for hoisting parts, oil, grease,
etc., up and down the tower.
One thing that I have found to be quite handy is a set of
two-way radios for communicating with your ground
crew. It is often difficult to communicate with people on
the ground from 100 feet up in the air. I use a voice-
activated headset for hands-free operation. Just talk
and it works. It makes the job much easier.You can get
these radios from any electronics catalog or Radio
Shack. My radios are Maxon brand and they came from
the Damark catalog.
Time for the Climb
After the equipment has all been laid out and the
ground crew briefed about the job, it is time for the
climb. The words here are slow and easy. There is no
need to race to the top. Also, this is not the time to sight
Below: The right tools (including voice activated two-
way radios) can make all the difference.
Above: It’s a long way up and a long way down;
work safely!
20
Home Power #57 • February / March 1997
Wind
see—keep your mind focused on
the climb. There will be plenty of
time to take in the view once you
are tied off at the top. If an accident
is going to happen, this is the most
likely time. The climb up and down
is when you are most at risk so be
extra careful and keep your mind on
what you are doing.
Things to Check
I like to take a check list with me so I
do not miss anything. First, take a
general look at everything. Look for
anything unusual like bolts loose or
missing. Check all moving parts
making sure they move freely and
look for signs of wear.
Next, start your scheduled
maintenance. Grease bearings,
change oil, etc. As you perform
these tasks pay close attention to
every detail. Check every single bolt up there making
sure they are tight. This is very important. Use Loctite or
self-locking nuts on everything.
Next give the rotor a detailed inspection. Check each
blade from top to bottom for nicks, cracks, and excess
dirt and bugs. A heavily soiled rotor can lose up to 15%
efficiency. It is difficult to do, but washing the blades can
really help your yearly production. Grab the blade and
rock it in and out from the tower checking for worn
bearings in the generator or gearbox. There should be
little or no noticeable play in the bearings.
Check the wiring for loose connections, but make sure
the power is off first. When you think you are done, take
a break and enjoy the view for a few minutes. Go back
one last time and check everything again to make sure
that you did not miss anything the first time through.
When everything looks good, send the tools back down
and prepare to come down. This is the time to check all
the tower bolts. Descend one section at a time and
carefully inspect the tower for loose bolts, cracked or
broken bracing, etc. If you find a problem, tie off first
then work on the problem. Do not try to tighten bolts
and hang on to the tower at the same time. Once you
are on the ground, check any wiring connections at the
tower base and back in the house at the control center.
Things to Keep It Running
Listen to the machine every day. Get used to the way it
sounds in all types of wind conditions. This way if it
makes a new sound you will immediately be aware of it
and be able to spot small problems before they become
big expensive ones. A lot of times a new noise is
Left: Look Ma Lanyards provide a hands free yet safe
way to work on your tower and bird.
Below: check the system top to bottom,
including the wiring and connections from genny to house.
21
Home Power #57 • February / March 1997
Wind
something that is working loose up there. If caught right
away, you can quickly repair the problem and in 30
minutes be running again. But if you let that bolt fall out,
you could have a catastrophic failure that might set you
back thousands of dollars.
Storm Coming?
Lightning is a wind generator’s biggest enemy. I advise
my customers to watch the weather and shut down the
machine during a thunderstorm. This means locking the
brake and disconnecting the inverter from the grid. Most
of the time lightning-induced power surges come back
from the utility side and cause havoc with the
electronics in our systems. Once in a while a tower will
get hit or a nearby strike can induce a surge into the
generator. This can destroy the inverter or the
generator. The little bit of electricity that you will make
during a thunderstorm is not worth the risk that you
take. Also, the winds in a thunderstorm are violent and
usually well above the maximum running speed of any
machine. This puts extra stress on your machine and
tower. A major rebuild can set you back thousands of
dollars. It is just not worth the risk. There are plenty of
windy days without the storms.
Tower work does not have to be intimidating. Have an
experienced tower worker help you the first time. I am
always willing to help anyone who wants to learn how to
safely work on their machine. Experienced tower
workers can offer advice and encouragement during
this time.
Servicing your wind machine is a great Sunday project
in the spring and fall for the whole family. While you are
up there, take in the view, it is spectacular. With a little
care and attention to details your wind generator will
last for many years. These machines will work their
heart out for you if you pay them a little attention.
These are the basics to keeping your life with a wind
machine a pleasant adventure.
Access
Author, Dan Whitehead, Illowa Windworks, 12197
Nelson Rd., Morrison, IL 61270 • 815-772-4403.
Read about Dan’s wind system in HP #53, page 6.
Below: The view is great, but work while you’re working
and set aside time for sightseeing.
Above: Dan checks the bearings by wiggling
the blades in and out.
22
Home Power #57 • February / March 1997
World Power Technologies
camera ready on film
four color
7.125 wide
4.5 high
2225 E. Loop 820 N.–Ft. Worth, TX 76118-7101 voice: 817.595.4969 fax: 817.595.1290
toll free: 800.886.4683 email address:
For Course Information & Catalog
voice: (970) 963-8855 • fax: (970) 963-8866
e-mail:
web: www.solarenergy.org
P.O. Box 715, Carbondale, Colorado, USA 81623
Solar EnergySolar Energy
Solar EnergySolar Energy
International
KnowsKnows
Wind PowerWind Power
KnowsKnows
Wind PowerWind Power
SUNELCO
full page
four color
on negatives
this is page 23
24
Home Power #57 • February / March 1997
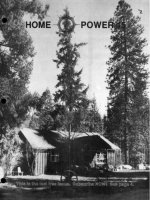
his is one of the more
interesting projects my wife
and I, here at Sunpower in
Eastern Ontario, have put together. We
have worked with our Federal and
Provincial Governments to provide an
alternative water sources for livestock
through the CURB Program (Clean Up
Rural Beaches). This program is
designed to entice farmers to fence
livestock out of the waterways by
funding up to 75% of the fencing cost
and providing another water source.
Previously these projects were
limited to summer use only, which is
relatively easy. When local farmer,
Andy Roy, expressed an interest in a
year-round system, I did some
research to see how feasible this
was given our severe winters here in
the “great white north.” My
investigations were discouraging.
Local farmers had tried insulated
water bowls and had them freeze.
Recommendations from one of our
suppliers involved a propane heated
building with large mud flaps on the
doorway which the cattle could push
aside to enter the building and
access the water bowls.
Our own self-designed and
constructed home is buried 15 feet
into the south side of a hill in a V
shape to utilize ground heat and
funnel in sunlight. Ground
temperature below the 4 foot frost
line is around 50˚F year round,
regardless of the outside
temperature. In the winter if the sun
is shining the house heats itself. I
figured that by using the same
principles, ground source heat and
sunshine, we could make this water
pumping station work.
Part of ensuring that the water in the
bowl did not freeze was determining
the water temperature in the well.
Without access to a high-tech
temperature sensor, as used to find
Leigh & Pat Westwell ©1997 Leigh & Pat Westwell
Below: The well head is visible in the center of the soon
to be poured concrete slab foundation.
PPC
SMARTLIGHT
Plus
APT
CAP F5 Submersible Pump
72 Watts at 50 feet
40 Watt Light Bulb
in top of well casing
for freeze protection
Float Activated
Mercury Switch
Ground Rod
APT Smartlight
State of Charge Indicator
3.6 Watt light bulb
for battery box heating
Temperature Sensor
Four L-16
6 Volt Lead Acid Batteries
700 amp hours at 12 Volt
(in insulated battery box)
Southwest Windpower, Air 303
300 Watts at 12 Volt DC
Four Siemens M-75
Photovoltaic Modules
192 Watts at 12 Volt
SCI Charge Controller
30 Amp
Two APT, LA100V
Lightning Arrestors
25
Home Power #57 • February / March 1997
Water Pumping
thermoclines in lakes, I used a thermometer in a
weighted can with small holes in the bottom. I left the
unit at the depth the pump would be (50 feet) and
letting it sit for a bit. I pulled the can out quickly so that
the water would not leak out the small holes in the can
by the time I could read the thermometer. We did
several tests and found the water temperature to be
around 48˚ F. This seemed acceptable because we
were worried that if the water was any colder that it
would freeze in the tank if the cattle did not drink for a
few hours. Part of the design was sizing the water bowl
so that when the livestock were drinking a good
percentage of the water, warmer water replaces the
colder water in the bowl regularly.
At this point we approached the government agencies
funding the CURB Program. They were very interested
because they had been having problems getting the
farmers interested in the program even with 75%
funding. (Rule #1 of farming—don’t spend any money!).
We designed a system that would have all of the “bells
and whistles” so the agencies could show farmers that
alternative energy works! Hopefully more will see
applications for their own farms and help to clean up
our creeks and rivers.
The project began by adding fill around the old well
casing so that we had 6 feet of dirt before bedrock. We
installed a 6 foot insulated tube around the casing and
2 inches of board type insulation around the top where
the water bowl would sit. A 3 inch reinforced concrete
pad was poured for the building to keep runoff away
from the well. Andy produced the lumber for the building
on his sawmill. We bolted the building securely to the
pad and buried the front posts deeply to keep the south
facing open end from catching the wind.
The pitch of the roof was designed to let in maximum
sun in the cold months when the sun is low in the sky.
As the weather warms and the sun rises in the sky, the
inside of the shelter is shaded and will keep the water
cool and fresh. Another function of the building is to
shelter the water bowl from the cold winds of winter.
The temperature might be -20˚F but a stiff breeze could
lower that to -60˚F. Nothing stays unfrozen for long
then. The weather is not that bad very often but once
frozen it is a long time until spring to be without water.
Fortunately, our coldest days are sunny and clear (no
clouds to keep the heat down near the earth) and the
sun keeps the shelter quite comfortable, especially
when combined with ground heat from the well itself as
Andy’s Water Hole