adobe photoshop elements 3 0 a z tools and features illustrated ready reference may 2005
Bạn đang xem bản rút gọn của tài liệu. Xem và tải ngay bản đầy đủ của tài liệu tại đây (23.13 MB, 192 trang )
Adobe
Photoshop
Elements 3.0
A–Z
Tools and features
illustrated ready reference
Philip Andrews
AMSTERDAM • BOSTON • HEIDELBERG • LONDON • NEW YORK • OXFORD
PARIS • SAN DIEGO • SAN FRANCISCO • SINGAPORE • SYDNEY • TOKYO
Focal Press is an imprint of Elsevier
Focal Press
An imprint of Elsevier
Linacre House, Jordan Hill, Oxford OX2 8DP
30 Corporate Drive, Burlington MA 01803
First published 2005
Copyright © 2005, Philip Andrews. All rights reserved
The right of Philip Andrews to be identifi ed as the author of this work has been asserted in accordance with
the Copyright, Designs and Patents Act 1988
No part of this publication may be reproduced in any material form (including photocopying or storing
in any medium by electronic means and whether or not transiently or incidentally to some other use of
this publication) without the written permission of the copyright holder except in accordance with the
provisions of the Copyright, Designs and Patents Act 1988 or under the terms of a licence issued by the
Copyright Licensing Agency Ltd, 90 Tottenham Court Road, London, England W1T 4LP. Applications for
the copyright holder’s written permission to reproduce any part of this publication should be addressed to
the publisher
Permissions may be sought directly from Elsevier’s Science and Technology Rights
Department in Oxford, UK: phone: (+44) (0) 1865 843830; fax: (+44) (0) 1865 853333;
e-mail: You may also complete your request on-line via the
Elsevier homepage (www.elsevier.com), by selecting ‘Customer Support’ and then ‘Obtaining Permissions’
British Library Cataloguing in Publication Data
A catalogue record for this book is available from the British Library
Library of Congress Cataloguing in Publication Data
A catalogue record for this book is available from the Library of Congress
ISBN 0 240 51989 2
For information on all Focal Press publications visit our website at: www.focalpress.com
Printed and bound in Italy
Layout and design by the author in Adobe InDesign CS
Picture credits
With thanks to the great guys at www.ablestock.com and Hamera for their generous support in supplying
the tutorial images for this text. Copyright © 2005 Hamera and its licensors. All rights reserved.
All other images and illustrations by the author © Philip Andrews 2005. All rights reserved.
Author’s Acknowledgements
Always for Kassy-Lee and my great kids Adrian and Ellena.
Thanks also to the enthusiastic and very supportive staff at Focal Press including Marie Hooper, Christina
Donaldson, Margaret Denley, Georgia Kennedy and Stephanie Barrett.
My appreciation goes to Don Day at Adobe for his support, technical advice and kind introduction. And
thanks once more to Adobe for bringing image enhancement and editing to us all through their innovative
and industry-leading products, and the other hardware and software manufacturers whose help is an
essential part of writing any book of this nature. In particular I wish to thank technical and marketing staff
at Adobe, Microsoft, Canon, Nikon, and Epson. Also to Manfred ‘Grids Rule!’ Huber for his design guidance.
And fi nally my thanks to all the readers who continue to inspire and encourage me with their generous
praise and great images. Keep emailing me to let me know how your imaging is going.
A-Z
Photoshop Elements 3.0
www.ElementsA-Z.com
Accented Edges fi lter – Automation Tools 1
Background color – Burn tool 11
Calibrate monitor – Cutout fi lter 23
Darken blend mode – Dust & Scratches fi lter 43
Effects – Eyedropper tool 53
Facet fi lter – Freehand selection 59
Gaussian Blur fi lter – Grow, selection 70
Halftone Pattern fi lter – Hue/Saturation, adjust 76
ICC profi les – JPEG2000 82
Labels, print – LZW compression 87
Magic Eraser tool – Multi-Page PDF to PSD 100
Navigator – Note Paper fi lter 109
Ocean Ripple fi lter – Organizer work space 112
Page Setup – Quick Fix Editor 118
Radial Blur fi lter – Rulers 140
Sample Size, Eyedropper tool – Swatches palette 152
Tags – Type Masks 169
Underlining type – Unsharp Mask fi lter 177
Vanishing Point tool – Vivid Light blending mode 180
Wall Calendar – Wind fi lter 182
ZigZag fi lter – Zoom tool 187
A B C D E GF IJKH L XYZWVUTSRPQONM
Contents
Foreword
As much as the developers might try to create the perfect
software, no application can be completely intuitive for every
user. At some point you will need to seek help in completing
a project or for accomplishing a task. The Help system that
is included with Photoshop Elements 3 contains lots of good
information (yes, you should always try there fi rst), but it
may not cover the entire breadth of the application as well
as you’d like.
Adobe Photoshop Elements 3.0 A–Z provides a valuable
service for the digital editing newcomer or hobbyist. It
alphabetically covers all aspects of the entire application
(including versions 1.0, 2.0, and 3.0) with easily accessible
tabs and lots of explanatory graphics and screen shots. This
book can be a quick reference for those times when you need
to know ‘What does this tool do?’. It is very thorough and
Introduction
Now in its third release Photoshop Elements has developed
into a sophisticated and complete photo-editing and now,
with the new features in this release, photo-management
program.
It seems that the software’s popularity grows almost as
quickly as its impressive list of editing and enhancement
features. More and more digital photographers are
awakening to the pure imaging power that hides beneath
the deceptively simple front end.
But rather than sitting back and basking in the refl ected
glory of the success of the fi rst two editions of Elements
(versions 1.0 and 2.0), Adobe has been hard at work
improving what was already a great product. Version 3.0,
just like the releases before it, is a state-of-the-art image-
editing program full of the features and functions that
digital photographers and desktop image makers desire
the most.
In fact, the program has become so comprehensive that
producing an illustrated A–Z book like this one is not just
a nicety, but has became a necessity. The software covers so
many areas that Elements users need a quick ready reference
guide to all the major tools and features. Here I provide
such a guide but I don’t stop at simply describing the tool
or feature, I accompany the text with illustrations of the
software in action together with before and after pictures
of the applied changes. All entries include shortcut keys,
menu locations and are cross-referenced to other Elements
features that relate. Many features also include step-by-step
guides to their usage and extended visual examples of the
effects of using different settings on your pictures.
Keep this ready reference handy for all those occasions
when you ask yourself ‘What does that do?’.
But most of all keep enjoying your digital photography!
Philip Andrews
every section is cross-referenced to other similar tools to give you
the information you need to make an informed decision.
Why buy yet another book on Elements? Photoshop Elements 3 is a
major step forward from the previous versions in that it now contains
both an Editor and an Organizer component. Those of you familiar
with Elements may need some help coming up to speed with the
asset management features of the Organizer. Conversely, those of
you who are familiar with Photoshop Album may not be aware of
all the image correction and manipulation features of the Editor.
With Adobe Photoshop Elements 3.0 A–Z at your side, you’ll be up to
speed in both components in no time.
Don Day
Photoshop Elements QE
Adobe Systems Inc.
A-Z
www.ElementsA-Z.com
IV
Photoshop Elements 3.0
How to use this book
Feature summary
Before and after examples
The before and after examples illustrate
how features, tools and techniques can be
used to change the way that your pictures
look.
Step-by-step application
Selected features include step-by-step
guides designed to demonstrate how
to use the tool or feature. These mini-
tutorials can be used to extend your
understanding as well as build your editing
and enhancement skills.
Edge tabs
The colored edge tabs change for each letter
section. They can be used in conjunction
with the contents page to quickly thumb
through the book to locate a particular
group of entries.
Online extensions
Don’t forget about the book’s website –
www.elementsa-z.com. Here you will
fi nd video tutorials on how to use the top
new features in Photoshop Elements 3.0,
the example pictures used in the step-by-
step guides, links to all the featured plug-
in vendors and much more.
Tips and Reminders
Important ideas and techniques are
highlighted with the ‘Remember’ icon
and the tips and tricks used by working
professionals are noted with the ‘Pro’s Tip’
ticked box.
Each feature and tool entry is headed with
a summary table that details the menu
where the feature can be found, any
keyboard shortcuts associated with the
tool, the version of Photoshop Elements
that contains the feature and any other
features that are linked to the feature.
In order to make the most out of this book, take a couple of minutes to read the following.
This will let me introduce a few of the special features that I have included to help you fi nd
the information that you need fast. Apart from the basic A–Z structure that lists the topics,
features and tools alphabetically, I have also used the following design devices to make
‘search and locate’ missions speedier and more productive.
A-Z
1
Photoshop Elements 3.0
www.ElementsA-Z.com
A
Accented Edges fi lter
Menu: Filters > Brush Strokes > Accented Edges
Shortcut: Ctrl F OS: Mac, Windows
Version: 1.0, 2.0, 3.0 See also: Ink Outlines fi lter
The Accented Edges fi lter searches out
the edges within a picture and then
highlights them with a line. The size of
the line is controlled by the Edge Width
slider (1) in the fi lter’s dialog. The dark
or lightness of the line is determined by
the Edge Brightness slider (2). A high
value produces a lightly colored edge that
appears like chalk and a low value, like the
one used in the illustration here, creates
an ink-like outline. The Smoothness slider
(3) is used to even out the rough of jagged
edges of the line.
2
3
1
ABCDEFGHIJKLMNOPQRSTU-
VWXYZABCDEFGHIJKLM-
NOPQRSTUVWXYZABCDEFGHIJKLMNOPQRSTUVWX-
YZABCDEFGHIJKLMNOPQRSTUV
WXYZABCDEFGHIJKLMNOPQRSTUVWXYZA-
BCDEFGHIJKLMNOPQRSTUVWX-
YZABCDEFGHIJKLMNOPQRSTU-
VWXYZABCDEFGHIJKLMNOPQR
STUVWXYZABCDEFGHIJKLM-
NOPQRSTUVWXYZABCDEFGHI-
JKLMNOPQRSTUVWXYZABCDEF-
GHIJKLMNOPQRSTUVWXYZABCDEFGHIJKLMN
OPQRSTUVWXYZABCDEFGHI-
JKLMNOPQRSTUVWXYZABCDEF-
GHIJKLMNOPQRSTUVWXYZABC-
DEFGHIJKLMNOPQRSTUVWXYZABCDEFGHIJ
KLMNOPQRSTUVWXYZABCDEFGHIJKLMNOPQRSTU-
VWXYZABCDEFGHIJKLM-
NOPQRSTUVWXYZABCDEFGHI-
JKLMNOPQRSTUVWXYZABCDEF-
GHIJKLMNOPQRSTUVWXYZABC-
DEFGHIJKLMNOPQRSTUVWXYZABCDEFGH-
IJKLMNOPQRSTUVWXYZABCDE-
FGHIJKLMNOPQRSTUVWXYZAB-
CDEFGHIJKLMNOPQRSTUVWX-
YZABCDEFGHIJKLMNOPQRSTU-
VWXYZABCDEFGHIJKLM-
aAaA
© www.ablestock.com 2005
Active layer
Menu: Window > Layers (to show the Layers palette)
Shortcut: - OS: Mac, Windows
Version: 1.0, 2.0, 3.0 See also: Layers palette, Layers
The Layers feature is great for creating
pictures that are made up of a variety of
parts. Each section is stored on its own
layer and can be easily altered independent
of the rest of the photograph.
But the way in which the feature works
means that it is only possible to edit or
enhance one layer at a time. You must
select or activate the layer fi rst before
applying the changes. To select the layer
click on its thumbnail in the Layers palette.
At this point the layer will change to a
different color from the rest in the stack.
This layer is now the selected or active
layer and can be edited in isolation from
the others that make up the picture.
With the Move tool selected,
you can also choose or change
the active layer from the
context menu via a Control-
click (Mac) or right mouse-
click (Win).
© www.ablestock.com 2005
A-Z
www.ElementsA-Z.com
2
Photoshop Elements 3.0
A
Add Noise fi lter
Menu: Editor: Filter > Noise > Add Noise
Shortcut: Ctrl F OS: Mac, Windows
Version: 1.0, 2.0, 3.0 See also: Grain fi lter, Texturizer fi lter
Many photographers like to replicate
the look of fi lm grain in their digital
photographs. The grittiness provides a
texture that is reminiscent of fast (high
ISO), big grain fi lms. Using the Add Noise
fi lter is one way to introduce this texture
into your digital pictures. Applying the
fi lter adds random speckled pixels to your
picture. Another common use for the fi lter
is to add small amounts of noise to gradients
to prevent banding when printed.
The fi lter uses a single Amount slider
(1) to control the strength of the texture
effect. The higher the setting the more
obvious the results will be. Two different
types of texture are provided – Uniform
and Gaussian (2). The Uniform option (6)
adds the noise evenly across all the tones
in the picture. In contrast the Gaussian
setting (5) concentrates the noise in the
midtones with less changes being applied
to the highlight and shadow areas.
Selecting the Monochrome option (3)
restricts the noisy pixels added to white,
black and gray only.
Be sure to view the preview
at 100% when applying this
fi lter to ensure that you have
a good balance of texture
and detail and always keep
a copy of the original picture
without the noise added.
1
2
3
>>> Add Noise examples: (4) Original
picture detail, (6) Uniform setting, (5)
Gaussian setting and (7) Gaussian and
Monochrome setting.
4 5
6 7
Adjust Smart Fix
Menu: Editor: Enhance > Adjust Smart Fix
Shortcut: Shft Ctrl M OS: Mac, Windows
Version: 3.0 See also: Auto Smart Fix
The Adjust Smart Fix version of the Auto
Smart Fix feature provides the same
control over color, shadow and highlight
detail but with the addition of a slider
control that determines the strength of
the enhancement changes.
Moving the slider from left to right
will gradually increase the amount of
correction applied to your picture. This
approach provides much more control
over the enhancement process and is a
preferable way to work with all but the
most general photos.
The Auto button, also located in the dialog,
automatically applies a fi x amount of 100%
and provides a similar result to selecting
Enhance > Auto Smart Fix.
© www.ablestock.com 2005
Adjust Backlighting
Menu: Editor: Enhance > Adjust Lighting > Adjust Backlighting
Shortcut: - OS: Mac, Windows
Version: 1.0, 2.0 See also: Shadows/Highlights
The Adjust Backlighting feature found in
versions 1 and 2 of Elements is designed
to darken the lighter tones in the image
without fl attening the highlights or
moving the black point.
Moving the Darker slider (1) to the right
will reduce the value of these tones.
This feature along with Fill Flash has
been replaced in version 3.0 with the new
Shadow/Highlights feature.
After
Before
1
© www.ablestock.com 2005
A-Z
3
Photoshop Elements 3.0
www.ElementsA-Z.com
A
Adjustment layers
Menu: Editor: Layer > New Adjustment Layer
Shortcut: Layers palette button OS: Mac, Windows
Version: 1.0, 2.0, 3.0 See also: Fill Layer
These special layers alter the look of the
layers that are arranged below them in the
stack. They act as a fi lter through which
the lower layers are viewed. You can use
adjustment layers to perform many of
the enhancement tasks that you would
normally apply directly to an image layer
without changing the image itself.
Elements contains eight different types
of adjustment layers which are grouped
together with the Fill layers under the
Create Adjustment Layer button in the
Layers palette. They are:
Levels – Adjusts the tones in the picture.
Brightness/Contrast – Lightens, darkens
and controls contrast.
Hue/Saturation – Changes the color and
strength of color in photos.
Gradient Map – Changes the photo so
that all the tones are mapped to the values
of a selected gradient.
Invert – Reverses all the tones in a picture,
producing a negative effect.
Threshold – Converts the picture to pure
black and white with no grays present at
all.
Photo Filter – Reproduces the color
changes of traditional photo fi lters.
Posterize – Reduces the total number of
colors in a picture and creates a fl at paint
(or poster)-like effect.
Placing an adjustment layer at the top of a
stack of layers will ensure that the editing
changes will be applied to the content of
all the layers beneath.
1
Non-destructive editing
Changing the way that your
image looks using adjustment
layers is called ‘non-destructive’
editing. This means that the appearance
of the picture changes but the original
photograph still remains intact. Most
professionals prefer to apply non-
destructive changes to their images
wherever possible.
Brightness/Contrast
Hue/Saturation Posterize
Threshold
Invert
Gradient Map
Levels
Original
Photo Filter
<<< To restrict the adjustment layer changes
to the layer immediately beneath, add the
adjustment layer and then click the border
line between the two layers whilst holding
down the Alt/Opt key. This groups the
adjustment layer with the picture layer. To
ungroup repeat the process.
© www.ablestock.com 2005
A-Z
www.ElementsA-Z.com
4
Photoshop Elements 3.0
A
Aliasing
Menu: -
Shortcut: - OS: Mac, Windows
Version: 1.0, 2.0, 3.0 See also: Anti-aliasing
Even though the lettering system
in Photoshop Elements is based on
smooth-edged (vector) technology,
when type layers are fl attened into the
background, or the PSD fi le is saved in the
JPEG format, the type is converted to pixels.
One of the drawbacks of using a system that
is based on pixels is that circles, diagonal
lines and curves are made up of a series of
pixel steps. When viewed closely, or printed
very large, these steps can become obvious
and appear as a saw-tooth pattern. This is
called ‘aliasing’.
Anti-aliasing is a system where the effects
of these ‘jaggies’ are made less noticeable
by partially fi lling in the edge pixels. This
technique produces smoother looking
type overall and should be used in all print
circumstances and web applications.
The only exceptions to this rule are where
fi le size is critical, as anti-aliased web text
creates larger fi les than the standard text
equivalent and when you are using font
sizes less than 10 points for web work.
Advanced Blending
Menu: Editor: File > New > Photomerge Panorama
Shortcut: - OS: Mac, Windows
Version: 1.0, 2.0, 3.0 See also: Photomerge
The Advanced Blending option in the
Photomerge work space provides an
automatic approach to balancing the
color and tone of sequential pictures in a
composition.
The feature is designed to even out slight
exposure or color differences that can
occur when creating source images. When
used in conjunction with the Preview
button the results can be reviewed on
screen before proceeding to the creation
of the full panorama.
On some occasions it is diffi cult to assess
the accuracy of the blending action via the
preview. If this occurs then create several
different panoramas applying different
Blending, Perspective and Mapping
settings for each.
Anti-aliased text
Aliased text
Aligning type
Menu: -
Shortcut: - OS: Mac, Windows
Version: 1.0, 2.0, 3.0 See also: -
The terms alignment and justifi cation are
often used interchangeably and refer to
the way that a line or paragraph of text is
positioned on the image.
The left align feature will arrange all text
to the left of text frame. When applied to
a group of sentences the left edge of the
paragraph is organized into a straight
vertical line whilst the right-hand edge
remains uneven or ragged.
Right align works in the opposite fashion,
straightening the right-hand edge of the
paragraph and leaving the left ragged.
Selecting the center text option will align
the paragraph around a central line and
leave both left and right edges ragged.
Center align Left align Right align
The align text option in the Elements
options bar provides three options for
laying out text. The sentences can be
arranged with a straight edge on the left,
right or by centering each line around its
middle.
A-Z
5
Photoshop Elements 3.0
www.ElementsA-Z.com
A
Angle option – Brush
Menu: -
Shortcut: B (Brush tool) OS: Mac, Windows
Version: 2.0, 3.0 See also: Brush Options
One of the strengths of Photoshop Elements
as a drawing package is the fl exibility of its
brush engine. Rather than just supplying a
series of pre-made brushes Adobe includes
the ability to create and save custom
brushes.
The More Options dialog, which is opened
with the More Options button on the
Angled Strokes Filter
Menu: Editor: Filter > Brush Strokes > Angled Strokes
Shortcut: Ctrl F OS: Mac, Windows
Version: 1.0, 2.0, 3.0 See also: -
The Angled Strokes fi lter, as one of the
group of Brush Strokes fi lters, repaints the
picture using diagonal strokes. The brush
strokes in the light area of the photo are
drawn in one direction and those in the
darker parts in the opposite direction.
The Direction Balance (1), Stroke Length
(2) and Sharpness (3) of the brush effect
are controlled by the sliders in the fi lter
dialog.
Angle gradient tool
Menu: -
Shortcut: G (Gradient tool) OS: Mac, Windows
Version: 1.0, 2.0, 3.0 See also: Gradients
Photoshop Elements has no less than fi ve
gradient types for you to play with. All the
gradient options gradually change color
and tone from one point in the picture to
another.
The Angle gradient (1) gradually changes
the color in a counter-clockwise direction
around the starting point.
1
1
2
3
Brushes options bar, contains controls
for changing seven different brush
characteristics. The brush angle is one of
these custom characteristics.
Changing the angle will rotate the brush
tip resulting in a diagonal stroke when
dragged across canvas (3). To make the
brush tip slant, alter the angle value (1).
The change in brush shape is previewed
on the bottom left of the dialog (2).
1
2
3
All command
Menu: Editor: Select > Select All
Shortcut: Ctrl A OS: Mac, Windows
Version: 1.0, 2.0, 3.0 See also: Selection
The Select All command, found under
the Select menu, encompasses the whole
picture with a selection marquee. This
command is the fi rst step in a simple
border creation technique that also uses
the Stroke feature. See below.
Open a suitable photo into the Editor work
space. Use the Select > All command to
place a marquee around the whole
canvas.
1
With the selection still active choose Edit >
Stroke (Outline) Selection. In the Stroke
dialog that appears, pick the width of the
stroke (line) and its color. Next select the
Inside option as the location. Click OK to
draw the colored border.
2
After
© www.ablestock.com 2005
Before
A-Z
www.ElementsA-Z.com
6
Photoshop Elements 3.0
A
Animated GIFs
Menu: Editor: File > Save for Web
Shortcut: Alt/Opt Shft Ctrl/Cmd S
(Save for Web)
OS: Mac, Windows
Version: 1.0, 2.0, 3.0 See also: GIF format
One of the characteristics of the GIF fi le
format is that it is capable of storing and
displaying simple animations. To take
advantage of this feature Adobe has
merged traditional techniques with the
multi-layer abilities of its PSD fi le structure
to give Elements users the chance to
produce their own animations.
Essentially, the idea is to make an image
fi le with several layers, the content of
each being a little different from the one
before.
The fi le is then saved in the GIF format.
In the process, each layer is made
into a separate frame in an animated
sequence.
As the GIF is a format used for small
animations on the Net, the moving
masterpiece can be viewed with any web
browser, or placed on the website to add
some action to otherwise static pages.
The easiest way to save a GIF fi le is via the
Save for Web feature. The Save for Web
dialog contains the original image and a
GIF compressed version of the picture.
By ticking the Animate check box you
will be able to change the frame delay
setting and indicate whether you want
the animation to repeat (loop) or play a
single time only. This dialog also provides
you with the opportunity to preview your
fi le in your default browser. The fi nal step in
the process is to click OK to save the fi le.
Anti-aliasing, fonts
Menu: -
Shortcut: - OS: Mac, Windows
Version: 1.0, 2.0, 3.0 See also: Aliased
To make the edge of text appear less jagged,
switch on the anti-aliasing feature via the
button in the Type tool option bar. This
feature smooths out the saw-tooth edges
that appear on letter shapes that have
diagonal or circular sides.
Create an Elements fi le with several layers
of differing content. Select Editor: File >
Save for Web. Ensure that the GIF setting
is selected in the Settings section of the
dialog. Tick the Animate check box.
1
Adjust the Frame Delay option to control
the length of time each individual image
is displayed. Tick the Loop check box if you
want the animation to repeat.
2
Preview the animation by clicking the
browser preview button. Close the browser
to return to the Save for Web dialog. Select
OK to save the fi le.
3
Frame 3 Frame 2
Frame 1
Animation
preview
Anti-aliasing, selections
Menu: -
Shortcut: - OS: Mac, Windows
Version: 1.0, 2.0, 3.0 See also: Feather, Aliased
Selections can be created with sharp
or soft edges. You can soften the edge in
two ways – by feathering, or by using the
anti-aliasing feature in the selection tool’s
options bar (which is activated by default
when the tool is fi rst selected).
Like the anti-aliasing effect for type-
faces this feature softens the edges of the
selection by smoothing the transition
between selected and non-selected areas.
The option must be selected before making
the selection. Unlike feathering it cannot
be applied later on. Use this feature to help
conceal the edges of pasted picture parts
in newly created compositions.
A-Z
7
Photoshop Elements 3.0
www.ElementsA-Z.com
A
Arrangement menu
Menu: Photo Browser: View > Arrangement
Shortcut: - OS: Windows
Version: 3.0 See also: -
The Photo Browser provides several ways
in which to view the thumbnails of the
photos you have imported into Elements.
They are:
Date (Newest First) – Displays the most
recently taken or imported photos fi rst.
Date (Older First) – Shows the oldest
photos fi rst or in chronological order.
Import Batch – Displays pictures based on
the batches or groups in which they were
imported (‘Get Photos’). This option also
shows where the pictures were imported
from.
Folder Location – Shows the thumbnails
alongside the folders where they are
stored. This view option is similar to the
File Browser in the standard editor work
space.
The arrangement view can also be changed
via the drop-down menu at the bottom left
of the screen.
Arrowhead options
Menu: -
Shortcut: U (Line tool) OS: Mac, Windows
Version: 1.0, 2.0, 3.0 See also: Shape tools
The Line tool is one of the vector-based
or sharp-edged shape tools in Elements.
Along with settings for color, weight
and style the Line tool’s option bar also
contains a drop-down menu with controls
for creating arrowheads on the lines you
draw.
From within the dialog you can select to
apply the head to the start or end of the
line, adjust the width and length of the
arrow as well as control its concavity. The
percentages used here are based on the
line weight.
These options need to be set before drawing
the line on the canvas surface. The example
arrows below are drawn with the following
settings:
(1) End, Width 500%, Length 1000%
(2) End, Width 500%, Length 1000%,
Concavity 50%
(3) Start and End, Width 500%, Length
1000%, Concavity 50%
Date (Newest First)
Folder Location
Import Batch
Date (Oldest First)
1
2
3
A-Z
www.ElementsA-Z.com
8
Photoshop Elements 3.0
A
Aspect ratio
Menu: -
Shortcut: - OS: Mac, Windows
Version: 1.0, 2.0, 3.0 See also: Constrain Proportions
The aspect ratio or Constrain Proportions
option is usually found in dialog boxes
concerned with changes of image size and
refers to the relationship between width and
height of a picture.
The maintaining of an image’s aspect ratio
means that this relationship will remain
the same even when the image is enlarged
or reduced.
For example, failing to select the Constrain
Proportions option in the Image > Resize
> Image Size dialog will result in pictures
that are squashed or stretched out of
proportion.
Attach to E-mail
Menu:
Editor: File > Attach to E-mail or
Photo Browser: File
Shortcut: - OS: Windows
Version: 2.0, 3.0 See also: Slide show
Starting with Elements version 2.0 Adobe
included a special Attach to E-mail function
designed to add your photos to e-mails with
a few simple mouse clicks. The original
feature opened your default mail program
and attached your current image to a new
e-mail document ready for you to address
and send.
During the attachment process you could
choose to send the image ‘as is’ using its
current settings or allow Elements to auto
convert the picture to a fi le with medium
JPEG compression. For pictures with
large pixel dimensions, selecting the Auto
Convert option ensured that the attached
image was small enough to be able to be
sent, received and opened by most email
users.
With Elements 3.0 for Windows the feature
has been upgraded to include a brand new
Attach Selected Items to E-mail dialog.
Unlike in previous versions, here you can
attach photographs as individual fi les (the
way you do through your e-mail program),
as a PDF slide show (that Elements makes
on the fl y for you) or you can add the
photos to an HTML e-mail complete with
choice of a range of fancy backgrounds
and borders.
The images to be attached to the email can
be selected in the Photo Browser before
opening the feature or can be added or
removed via the thumbnail listing on the
left of the dialog.
You can elect to use a photo that is currently
open in the Editor work space or multi-
select images from inside the Photo
Browser. Select the File > Attach to E-mail
to start the feature and display the new
dialog.
1
Add or delete photos from the thumbnail
list of those to include with the buttons at
the bottom left of the dialog.
2
Select an existing recipient from the
contacts list or add a new contact. Choose
the format that the pictures will appear in
from the drop-down menu.
3
For the Photo Mail (HTML) option select
the stationery to use as a background for
the e-mail. Add in your message and click
OK. When your e-mail program displays
the new message, click Send to E-mail in
the usual manner.
4
© www.ablestock.com 2005
A-Z
9
Photoshop Elements 3.0
www.ElementsA-Z.com
A
Auto Color Correction
Menu: Editor: Enhance > Auto Color Correction
Shortcut: Shft Ctrl B OS: Mac, Windows
Version: 2.0, 3.0 See also: Auto Levels
The Auto Color Correction feature, fi rst
seen in version 2.0 of the program, works
in a similar way to tools like Auto Levels
and Auto Contrast, providing a one-click
fi x for most color problems.
Unlike these other tools it concentrates
correcting the color in the midtones of
the picture and adjusting the contrast
by reassigning the brightest and darkest
pixels to white and black.
Sometimes such automatic fi xes do not
produce the results that you expect. In
these scenarios use the Undo (Edit > Undo)
command to reverse the changes and try
one of the manual correction tools.
Auto Contrast
Menu: Editor: Enhance > Auto Contrast
Shortcut: Alt/Opt Shft
Ctrl/Cmd L
OS: Mac, Windows
Version: 1.0, 2.0, 3.0 See also: Auto Levels
Auto Contrast is designed to correct images
that are either too contrasty (black and
white) or too fl at (dull and lifeless). Unlike
the Auto Levels feature, Auto Contrast
ensures that the brightest and darkest
pixels in the picture (irrespective of their
colors) are converted to pure white and
black. In doing so all the tones in between
are expanded or contracted to fi t. Apply
Auto Contrast to grayscale photos like the
example or pictures whose contrast needs
improving but have a strong color tint that
you wish to retain. This feature is a good
correction option if Auto Levels creates
more color cast problems than it corrects.
Auto Erase, pencil
Menu: -
Shortcut: N (Pencil) OS: Mac, Windows
Version: 1.0, 2.0, 3.0 See also: Pencil tool
The Pencil tool draws hard-edged lines
using the foreground color. Selecting
the Auto Erase feature in the option bar
changes the way that the tool applies this
color. When drawing on any color other
than the foreground color the pencil will
draw in the foreground color. In Auto Erase
mode starting a drawing on a picture part
that is the foreground color will cause the
pencil to switch to the background color.
After
Before
After
Before
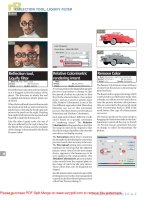
Auto Fix window
Menu: Photo Browser: Edit > Auto Fix Window
Shortcut: - OS: Windows
Version: 3.0 See also:
Auto Levels, Auto Contrast,
Auto Smart Fix
The Auto Fix Window feature is made up
of two different sections – General fi xes (1)
and Crop controls (2).
Four General fi xes are available with the
resultant changes being refl ected in the
preview image.
A u t o S m a r t F i x – This command
corrects general color problems and also
adjusts shadow and highlight areas of the
picture.
A u t o L e v e l s – Use this button to increase
the overall contrast of the picture and
correct any color cast present in the
image.
A u t o C o n t r a s t – This command limits
the changes to the picture to contrast only
and ignores any color cast present in the
photograph.
A u t o S h a r p e n – Applies a general
sharpening of all the details in the picture.
This is equivalent to applying a sharpening
fi lter to your photograph. This ‘fi x’ should
be applied once and as a last enhancement
step before saving and printing.
The Crop options give you a choice of a
customized crop or a preset crop that is
designed to suit the format (and size) of a
range of specifi c printing papers.
To remove unwanted changes, click
the Reset Image button. Apply the Auto
Sharpen command as the last step in the
process when you are happy with the other
picture alterations.
1
2
© www.ablestock.com 2005
© www.ablestock.com 2005
© www.ablestock.com 2005
A-Z
www.ElementsA-Z.com
10
Photoshop Elements 3.0
A
Auto Levels
Menu: Editor: Enhance > Auto Levels
Shortcut: Shft Ctrl L OS: Mac, Windows
Version: 1.0, 2.0, 3.0 See also: Auto Contrast
The Auto Levels command is similar to
Auto Contrast in that it maps the brightest
and darkest parts of the image to white and
black. It differs from the previous technique
because each individual color channel is
treated separately.
In the process of mapping the tones
(adjusting the contrast) in the Red, Green
and Blue channels, dominant color casts
can be neutralized. This is not always the
case; it depends entirely on the make-up
of the image. In some cases the reverse
is true; when Auto Levels is put to work
on a neutral image a strong cast results.
If this occurs, undo (Edit > Undo) the
command and apply the Auto Contrast
feature instead.
Auto Select Layer
Menu: -
Shortcut: V (Move tool) OS: Mac, Windows
Version: 1.0, 2.0, 3.0 See also: Bounding Box
Auto Smart Fix
Menu: Editor: Enhance > Auto Smart Fix
Shortcut: Ctrl M OS: Windows
Version: 3.0 See also: Adjust Smart Fix
The new Auto Smart Fix feature enhances
both the lighting and color in your picture
automatically. The command is used to
balance the picture hues and improve the
overall shadow and highlight detail.
Most images are changed drastically using
this tool. In some cases the changes can
be too extreme. If this occurs, the effect
should be reversed using the Edit > Undo
command and the more controllable
version of the tool – Adjust Smart Fix –
used instead.
Automation Tools
Menu: Editor: File > Automation Tools
Shortcut: - OS: Mac, Windows
Version: 3.0 See also:
Multi-Page PDF to PSD,
PDF Slide Show
In the Windows version (1) of Photoshop
Elements 3.0 the Automation Tools menu
has one option only – Multi-Page PDF to
PSD. This feature imports the individual
pages of the PDF fi le, converts these to
pictures and then saves them as separate
picture fi les.
In contrast, the Macintosh version (2) of
the release contains the Multi-Page PDF
to PSD option along with a presentation
creator called PDF Slide Show.
After
Before
After
Before
The Move tool is often used for repositioning
contents of different layers. The layer to be
moved is fi rst selected in the layer stack and
then the tool is clicked and dragged to move
the layer contents. Picking the Auto Select
Layer mode from the Move tool’s options
bar can make the layer selection process
easier and more interactive.
Clicking onto the picture surface whilst
in this mode will automatically select the
uppermost layer that has a picture part
under the pointer.
1
2
© www.ablestock.com 2005
© www.ablestock.com 2005
A-Z
11
Photoshop Elements 3.0
www.ElementsA-Z.com
B
ABCDEFGHIJKLMNOPQRSTU-
VWXYZABCDEFGHIJKLM-
NOPQRSTUVWXYZABCDEFGHIJKLMNOPQRSTUVWX-
YZABCDEFGHIJKLMNOPQRSTUV
WXYZABCDEFGHIJKLMNOPQRSTUVWXYZA-
BCDEFGHIJKLMNOPQRSTUVWX-
YZABCDEFGHIJKLMNOPQRSTU-
VWXYZABCDEFGHIJKLMNOPQR
STUVWXYZABCDEFGHIJKLM-
NOPQRSTUVWXYZABCDEFGHI-
JKLMNOPQRSTUVWXYZABCDEF-
GHIJKLMNOPQRSTUVWXYZABCDEFGHIJKLMN
OPQRSTUVWXYZABCDEFGHI-
JKLMNOPQRSTUVWXYZABCDEF-
GHIJKLMNOPQRSTUVWXYZABC-
DEFGHIJKLMNOPQRSTUVWXYZABCDEFGHIJ
KLMNOPQRSTUVWXYZABCDEFGHIJKLMNOPQRSTU-
VWXYZABCDEFGHIJKLM-
NOPQRSTUVWXYZABCDEFGHI-
JKLMNOPQRSTUVWXYZABCDEF-
GHIJKLMNOPQRSTUVWXYZABC-
DEFGHIJKLMNOPQRSTUVWXYZABCDEFGH-
IJKLMNOPQRSTUVWXYZABCDE-
FGHIJKLMNOPQRSTUVWXYZAB-
CDEFGHIJKLMNOPQRSTUVWX-
YZABCDEFGHIJKLMNOPQRSTU-
VWXYZABCDEFGHIJKLM-
bBbB
Background color
Menu: -
Shortcut: - OS: Mac, Windows
Version: 1.0, 2.0, 3.0 See also: Foreground color, Eyedropper
Photoshop Elements bases many of its
drawing, painting and fi lter effects on two
colors – the foreground and background
colors. The currently selected foreground
and background colors are shown at
the bottom of the toolbox as two colored
swatches. The topmost swatch (1)
represents the foreground color, the one
beneath (2) the hue for the background.
The default for these colors is black and
white but it is possible to customize the
selections at any time. Click the swatch
and then select a new color from the color
picker window (5).
To switch foreground and background
colors click the double-headed curved
arrow at the top right (3) and to restore
the default (black and white) click the mini
swatches bottom left (4).
Background Eraser tool
Menu: -
Shortcut: E OS: Mac, Windows
Version: 1.0, 2.0, 3.0 See also: Eraser
T h e B a c k g r o u n d E r a s e r i s u s e d t o d e l e t e
pixels around the edge of an object. This
tool is very useful for extracting objects
from their surrounds. The tool pointer is
made of two parts – a circle and a cross
hair. The circle size is based on the brush
size.
To use the tool, the cross hair is positioned
and dragged across the area to be erased,
whilst at the same time the circle’s edge
overlaps the edge of the object to be kept.
The success of this tool is largely based
on the contrast between the edge of the
object and the background. The greater the
contrast, the more effective the tool.
The Tolerance slider is used to control how
different pixels need to be in order to be
erased. The Limits options set the tool to
erase only those pixels that are linked, or
sitting side by side (Contiguous) or all the
pixels within the circle that are a similar
color.
1
2
3
4
5
© www.ablestock.com 2005
A-Z
www.ElementsA-Z.com
12
Photoshop Elements 3.0
B
Background layer
Menu: -
Shortcut: - OS: Mac, Windows
Version: 1.0, 2.0, 3.0 See also: Layers, Layers palette
An image can only have one background
layer. It is the bottom-most layer in the
stack. No other layers can be moved or
dragged beneath this layer. You cannot
adjust this layer’s opacity or its blending
mode. The background layer is locked (1)
from these changes.
You can convert background layers to
standard image layers by double-clicking
the layer in the Layers palette, setting your
desired layer options in the dialog provided
and then clicking OK.
If the document that you are working
on doesn’t contain a background layer,
it is possible to change any layer into a
background layer by selecting the Layers
palette and then choosing Editor: Layer
> New > Layer From Background. If the
selected layer is not the bottom-most layer
changing it to a background layer will force
it to the bottom of the stack and this could
dramatically alter the look of the image.
Background matting
Menu: -
Shortcut: - OS: Mac, Windows
Version: 1.0, 2.0, 3.0 See also: Save for Web
Most photos that are optimized for use on
the Internet are saved in the JPEG format.
As part of the construction process of a web
page, the pictures are then placed on top
of a colored background. The JPEG format
does not contain a transparency option
and so when an irregularly shaped graphic
is saved as a JPEG and placed onto a web
page it is surrounded by a plain colored
box, usually white (1).
Background matting is a technique
for adding the web page color to the
background of the object at the time of web
optimization. When the matted object is
then used to create the web page, it appears
to be sitting on the background as if it was
surrounded by transparency (2). The
transparent pixels surrounding the object
are replaced with the matte color and the
semi-transparent pixels are blended.
The Matte option is located in the settings
area of the Editor: File > Save for Web
feature (3).
Backup
Menu: Photo Browser: File > Backup
Shortcut: - OS: Windows
Version: 3.0 See also: Burn
As well as the traditional save options
available in the previous releases of the
program, Adobe has also introduced a new
Backup feature in the Windows version of
Elements 3.0 that is designed for copying
your pictures (and catalog fi les) onto DVD
or CD for archiving purposes.
Follow the steps in the wizard to make a
copy or backup of all the photos you have
currently listed in your Photo Browser.
The wizard includes the option to backup all
the photos you currently have catalogued
in the Photo Browser along with the ability
to move selected fi les from your hard disk
to CD or DVD to help free up valuable hard
disk space. Simply activate the feature and
follow the wizard’s step-by-step prompts to
create your own backup.
1
1 2
3
To create a matted web image, choose the
web page color and then create a picture
with a transparent background.
1
Choose Editor: File > Save for Web. In the
dialog select the JPEG option as the fi le
format. Select the web page color from the
Matte pop-up menu. Click OK to save.
2
Now construct the web page and add in
the new matted graphic. When the page
is displayed the background of the object
will seamlessly merge with the page
color.
3
© www.ablestock.com 2005
A-Z
13
Photoshop Elements 3.0
www.ElementsA-Z.com
B
Bas Relief fi lter
Menu: Editor: Filter > Sketch > Bas Relief
Shortcut: - OS: Mac, Windows
Version: 1.0, 2.0, 3.0 See also: Emboss fi lter
The Bas Relief fi lter, as one of the group of
Sketch fi lters, simulates the surface texture
of the picture using the current foreground
and background colors. Changing the
colors will result in dramatically different
results (1).
The edges in the picture are used as the
basis for the effect with the three settings
in the dialog providing control over how
the colors are applied.
The Detail slider (2) alters the amount of
the original photo detail used to create the
end result. Higher numbers create more
detailed results. The Smoothness slider (3)
alters the sharpness of the detail and the
Light menu (4) contains a series of options
for the direction of the light that is used
to create the textured look of highlights
and shadows.
Batch Processing
Menu: Editor: File > Batch Processing
Shortcut: - OS: Mac, Windows
Version: 2.0 See also:
Process Multiple Files,
Batch Rename
In Elements 3.0 the Batch Processing
command has been replaced with the
enhanced Process Multiple Files feature.
In earlier versions of the program the Batch
Processing feature enabled actions like fi le
format conversions (1), image size changes
(2) and fi le renaming (3) to be applied to a
folder full of images. The pictures would
then be saved to a different folder after the
changes had been applied.
The same functions are provided in the
new Process Multiple Files feature (4) along
with the Quick Fix enhancement options of
Auto Levels, Auto Contrast, Auto Color and
Sharpen and a special labeling feature.
Batch Rename
Menu: File Browser: Automate > Batch Rename (Mac)
File Browser: File > Rename Multiple Files (Win)
Shortcut: - OS: Mac, Windows
Version: 3.0 See also: Process Multiple Files
Several fi les can be renamed in a single
action using the Batch Rename (Mac) or
Rename Multiple Files (Win) options in the
Standard Editor’s File Browser.
After multi-selecting the fi les in the browser
choose File > Rename Multiple Files – Win
(1) or Automate > Batch Rename – Mac (2),
add in the name and destination settings in
the Batch Rename dialog and click OK.
The new Process Multiple Files also
contains an option for renaming complete
folders of fi les automatically.
After opening the dialog select source
and destination folders and then choose
the File Naming option (3). Add in the
Document Name and select an additional
naming label (i.e. date, sequential
number, alphabetical code). Lastly select
the computer systems that the fi le names
need to be compatible with. Click OK to
apply the name changes.
1
2
3
4
1
2
3
4
3
1
2
A-Z
www.ElementsA-Z.com
14
Photoshop Elements 3.0
B
Bicubic interpolation
Menu: Editor: Image > Resize > Image Size
Shortcut: - OS: Mac, Windows
Version: 1.0, 2.0, 3.0 See also: Bilinear, Nearest Neighbor
Digital photos are made up of pixels.
These are discrete blocks of color and tone
arranged in a grid fashion. The number
of pixels in a picture is determined when
the photo is taken or the print scanned.
Occasionally it is necessary to change the
number of pixels in the picture to either
make it bigger or smaller. This task is
usually handled by the Image Size feature
where there are controls to increase or
decrease the pixel dimensions (1).
The process is often called resampling or
interpolating the picture, and makes use
of a mathematical algorithm to generate
the newly sized picture.
Bicubic is one of the algorithms you can
select to resize your picture. It takes the
longest to process the fi le, but provides
smooth graduations in the fi nal photo.
Bicubic – Sharper
interpolation
Menu: Editor: Image > Resize > Image Size
Shortcut: - OS: Mac, Windows
Version: 3.0 See also: Bicubic - Smoother
Adobe added two new interpolation
methods to Photoshop Elements 3.0:
Bicubic – Sharper and Bicubic – Smoother.
Bicubic – Sharper is specifi cally designed
for occasions when you are reducing the
size of a picture. It retains the detail of the
original image and sharpens the picture as
it resizes. If the sharpening results are too
harsh then Edit > Undo the process and
try the standard Bicubic approach.
Bicubic – Smoother
interpolation
Menu: Editor: Image > Resize > Image Size
Shortcut: - OS: Mac, Windows
Version: 3.0 See also: Bicubic - Sharper
Photoshop Elements 3.0 has two new
approaches for increasing and decreasing
the size of your pictures. Both options
are based on the Bicubic algorithm but
they have been optimized for different
picture resizing operations. The Bicubic
– Smoother option should be used for
increasing the size of photographs, whereas
the Bicubic – Sharper option is for making
pictures smaller.
Bilinear interpolation
Menu: Editor: Image > Resize > Image Size
Shortcut: - OS: Mac, Windows
Version: 1.0, 2.0, 3.0 See also: Bicubic, Nearest Neighbor
Apart from the Bicubic options examined
here Photoshop Elements can also resize
pictures using two other interpolation
options – Bilinear and Nearest Neighbor.
Nearest Neighbor is the fastest to apply but
produces the coarsest results. Bilinear is a
compromise in speed and quality between
Bicubic and Nearest Neighbor.
Low resolution original Bicubic
Bicubic - Sharper
Bicubic - Smoother
Bilinear
Nearest Neighbor
1
2
3
Interpolation Quick Guide:
Action Original Method
Enlarge (Quality) Photo Bicubic – Smoother
Reduce (Quality) Photo Bicubic – Sharper
Enlarge (Speed) Photo Bilinear
Reduce (Speed) Photo Bilinear
Enlarge Screen shot Nearest Neighbor
Reduce Screen shot Bicubic – Sharper
© www.ablestock.com 2005
A-Z
15
Photoshop Elements 3.0
www.ElementsA-Z.com
B
Black and white points
Menu: Editor: Enhance > Adjust Lighting > Levels
Shortcut: Ctrl L OS: Mac, Windows
Version: 1.0, 2.0, 3.0 See also: Shadows/Highlights
If you want to take more control of
adjusting the brightness and contrast in
your pictures than the auto features allow,
open the Levels dialog.
Looking very similar to the Histogram, this
feature allows you to interact directly with
the pixels in your image. As well as a graph,
the dialog contains two slider bars. The
one directly beneath the graph has three
triangle controls for black, midtones and
white, and represents the input values of
the picture. The slider at the bottom of the
box shows output settings, and contains
black and white controls only.
To adjust the pixels, drag the input shadow
(left end) and highlight (right end) controls
until they meet the fi rst set of pixels at
either end of the graph. When you click
OK, the pixels in the original image are
redistributed using the new white and
black points.
Altering the midtone control will change
the brightness of the middle values of the
image, and moving the output black and
white points will fl atten, or decrease, the
contrast. Clicking the Auto button is like
selecting Editor: Enhance > Adjust Lighting
> Auto Levels from the menu bar.
Bitmap color mode
Menu: Editor: Image > Mode > Bitmap
Shortcut: - OS: Mac, Windows
Version: 1.0, 2.0, 3.0 See also: Mode, Threshold
It is possible to change the color mode of
your picture by selecting a different mode
from the Image > Mode menu. When
converting a color photograph to Bitmap
mode in Elements 3.0 the fi le is changed
to a grayscale picture fi rst and from there
to pure black and white. In the process
you can choose the approach used for this
conversion via the Method pop-up menu.
50% Threshold – Creates broad areas of
fl at black and white with a 50% tone used
as the separation point.
Pattern Dither – Uses a black and white
dot pattern to simulate tones.
Diffusion Dither – Examines each pixel
in the picture before converting it to black or
white, resulting in a grain-fi lled photo.
After - 50% Threshold
Before
After - Pattern Dither
After - Diffusion Dither
Bitmap images
Menu: -
Shortcut: - OS: Mac, Windows
Version: 1.0, 2.0, 3.0 See also: Pixels
Confusingly the term bitmap images
does not refer to the pure black and white
pictures that result from converting your
photos to Bitmap mode. Instead a bitmap
picture i s one that is made up of re ctangula r
pixel blocks which could just as easily be in
color or grayscale.
In this way all digital photographs are
bitmap images as their color, brightness
and detail are created from a grid of pixels.
In most applications the pixel structure
of the photograph is not apparent as the
individual blocks are so small that they
become invisible to the viewer’s gaze.
To see the underlying bitmap structure
of your pictures magnify the image on
screen using the Editor: View > Zoom In
command until the photo is at 1600%
magnifi cation.
Bitmap pixel detail
© www.ablestock.com 2005
© www.ablestock.com 2005
A-Z
www.ElementsA-Z.com
16
Photoshop Elements 3.0
B
Black and white
photos, creating
Menu: Editor: Image > Mode > Grayscale
Shortcut: - OS: Mac, Windows
Version: 1.0, 2.0, 3.0 See also: Mode
The simplest way to lose the colors in
your picture is to convert the image to
a grayscale. This process changes the
photograph from having three color
channels (red, green and blue) to being
constructed of a single channel that
contains the picture’s detail only.
Sometimes this conversion produces a fl at
and lacklustre photograph and so a little
manipulation of the tones is in order to
restore the contrast.
The fi rst point of call to help solve this
problem should always be the Levels dialog
(Enhance > Adjust Lighting > Levels).
Using this control it is possible to make sure
that your image tones are spread across the
grayscale spectrum.
Most grayscale conversion images
can benefi t from a general contrast
increase. You can achieve this by
moving the black and white input sliders
towards the center of the dialog.
Preview the clipping
Holding the Alt key (Windows)
or Option key (Macintosh)
down whilst you are moving
the slider will enable you to
preview the pixels that are being converted
to pure black or pure white. Your aim is
to map the darkest pixels in the picture to
black and the lightest ones to white.
Before
After
Select the Image > Mode > Grayscale option
and then click on the OK button in the
Discard Color warning box.
1
Using the Levels control, map the dark
pixels to black by dragging the black point
slider to the right.
2
Correct the highlights by dragging the
white point slider to the left.
3
Blend modes
Menu: -
Shortcut: - OS: Mac, Windows
Version: 1.0, 2.0, 3.0 See also: -
The way that layers interact with other
layers in the stack is determined by the
blending mode of the upper layer. By
default the layer’s mode is set to normal
which causes the picture content on the
upper layer to obscure the picture parts
beneath, but Photoshop Elements has
many other ways (modes) to control how
these pixels interact.
Called blend modes, the different options
provide a variety of ways to control the
mixing, blending and general interaction
of the layer content .
The modes are grouped into several
different categories based on the type of
changes that they make (1).
The layer blend modes are located in the
drop-down menu at the top left of the
Layers palette (2). Blend modes can also
be applied to the painting and drawing
tools via a drop-down menu in the tool’s
options bar (3).
Darken
Lighten
Overlay
Difference
Hue
Standard
1
2
3
© www.ablestock.com 2005
A-Z
17
Photoshop Elements 3.0
www.ElementsA-Z.com
B
The pixels in the top layer are
opaque and therefore block the
view of the bottom layer.
Adjusting the opacity of the top
layer will make it semi-transparent
causing it to blend with the top
layer.
Normal
Combines the top layer with the
bottom using a pattern of pixels.
There is no effect if the top layer
is at 100% opacity. Reduce the
opacity to see the effect. Example
set to 80% opacity.
Dissolve
Compares the color of the top and
bottom layers and blends the
pixels where the top layer is darker
than the bottom.
Darken
Multiplies the color of the bottom
layer with the top layer producing
an overall darker result. There is
no image change when the top
layer is white.
Multiply
Darkens or ‘burns’ the image
using the contents of the top
layer. There is no image change if
the top layer is white.
Color Burn
Uses the same approach as the
Color Burn mode but produces a
stronger darkening effect. There
is no image change when the top
layer is white.
Linear Burn
Compares the color in the top and
bottom layers and blends the
pixels if the top layer is lighter
than the bottom.
Lighten
The opposite to the Multiply
mode as it multiplies the inverse
of the top layer with the bottom
layer producing a much lighter
image.
Screen
Makes the picture lighter using
the top layer to dodge the bottom
layer. There is no effect if the top
layer is black.
Color Dodge
Similar to the Screen mode but
produces a much stronger
lightening effect. There is no
effect if the top layer is black.
Linear Dodge
Combines the effect of both the
Multiply and Screen modes whilst
blending the top layer with the
bottom. There is no effect if the
top layer is 50% gray.
Overlay
>>> In the following blend mode
examples the picture has two
layers – ‘Top’ (1) and ‘Bottom’ (2).
In each example the blend mode
of the top layer has been changed
to illustrate how the two layers
blend together.
1
2
© www.ablestock.com 2005
A-Z
www.ElementsA-Z.com
18
Photoshop Elements 3.0
B
Uses the same approach as the
Overlay mode but the change is
more dramatic. Here the top layer
is either Screened or Multiplied
depending on its color. There is
no effect if the top layer is 50%
gray.
Hard Light
Combines the effects of both
Color Burn and Color Dodge
modes and applies the blend
based on the color of the top
layer. There is no effect if the top
layer is 50% gray.
Vivid Light
Similar to the Vivid Light mode
but produces a more dramatic
result. There is no effect if the top
layer is 50% gray.
Linear Light
Blends the light colors in the top
layer using the Lighten mode and
blends the dark colors using the
Darken mode. There is no effect
if the top layer is 50% gray.
Pin Light
Creates a fl at toned picture with
limited colors and lots of
posterization. The luminosity of
the top layer is blended with the
color of the bottom.
Hard Mix
Displays the tonal difference
between the contents of the two
layers by subtracting the lighter
pixels from either of the layers.
This results in a dark and
sometimes reversed image.
Difference
Similar to the Difference mode
but produces less dramatic
effects.
Exclusion
Combines the Hue (color) of the
top layer with the Saturation
(color vibrancy) and Luminance
(tones) of the bottom layer.
Hue
Combines the Saturation (color
vibrancy) of the top layer with the
Hue (color) and Luminance (tones)
of the bottom layer.
Saturation
Combines the Hue (color) and
Saturation (color vibrancy) of the
top layer with the Luminance
(tones) of the bottom layer.
Color
Combines the Luminance (tones)
of the top layer with the Saturation
(color vibrancy) and Hue (color)
of the bottom layer.
Luminosity
Similar to the Overlay mode but
produces a more subtle effect.
There is no change if the top layer
is 50% gray.
Soft Light
A-Z
19
Photoshop Elements 3.0
www.ElementsA-Z.com
B
Bloat tool, Liquify fi lter
Menu: Editor: Filter > Distort > Liquify
Shortcut: B (whilst in Liquify fi lter) OS: Mac, Windows
Version: 2.0, 3.0 See also: Liquify fi lter
The Bloat tool is one of several tools in the
Liquify fi lter that allows you to stretch,
twist, push and pull your pictures. It
spreads the pixels apart in the center of
a circle the size of the current brush tip.
The result is like the picture part has been
blown up or ‘bloated’.
To bloat your pictures, select the tool, then
adjust the brush size so that it is the same
dimensions as the area to be changed and
then hold down the mouse button until the
picture has changed the required amount.
You can drag the mouse across the canvas
bloating the pixels as you go.
To reverse the tool’s effect either select the
Revert button (top right) or paint over the
surface with the Reconstruct tool.
Blur fi lters
Menu: Editor: Filter > Blur
Shortcut: - OS: Mac, Windows
Version: 1.0, 2.0, 3.0 See also:
Gaussian Blur, Motion Blur,
Radial Blur, Smart Blur
Photoshop Elements 3.0 has no less than
seven different fi lters that are designed to
blur the content of images. It might seem
strange for image makers to actually want
to destroy the sharpness of their photos
but many interesting enhancement effects
make use of these fi lter options.
Average – Averages all the color in the
picture and then fi lls the canvas with this
color.
Blur and Blur More – Smooth transitions
and soften details. Blur More is stronger.
Gaussian Blur – Sl ider controlled blurring
based on the Gaussian distribution of pixel
changes.
Motion Blur – Blurs the image in a specifi c
direction. Great for speed enhancing
effects.
Radial Blur – Creates either spinning or
zooming blur effects.
Smart Blur – Provides more control
over the type and placement of blur using
Radius, Threshold, Quality and Mode
adjustments.
Before applying a blur fi lter to a
layer with transparency, make
sure that the Lock Transparency
option is turned off.
Blur tool
Menu: -
Shortcut: R OS: Mac, Windows
Version: 1.0, 2.0, 3.0 See also: Blur fi lters
Along with the extensive range of blur
fi lters available in Elements, the program
also includes a Blur tool. The tool is used
like a paintbrush but instead of laying
down color on the canvas the image is
blurred. The Size (brush tip), Mode (blend
mode) and Strength settings for the tool are
all controlled in the options bar.
Bounding box, Move
tool
Menu: -
Shortcut: V (Move tool) OS: Mac, Windows
Version: 1.0, 2.0, 3.0 See also: Move tool, Free Transform
The Show Bounding Box setting is located
on the options bar for the Move tool.
Selecting this setting displays a bounding
box complete with edge and side handles
(small boxes) around the currently selected
layer. The handles can be used to scale,
distort, skew, rotate and apply perspective
changes interactively. See Free Transform
tool for the keystroke combinations for
these changes.
After
Before
After
Before
© www.ablestock.com 2005
© www.ablestock.com 2005
A-Z
www.ElementsA-Z.com
20
Photoshop Elements 3.0
B
Borders, printing
Menu: File > Print, File > Print Multiple Photos
Shortcut: Ctrl P, Ctrl/Cmd Alt/Opt P OS: Mac, Windows
Version: 2.0, 3.0 See also: Print
You can add a colored border ‘on the fl y’
when making prints with Elements. The
Border option is part of the extended print
features found in both the Print Preview
dialog (2) in both Mac and Windows
versions of the program and the Print
Multiple Photos window (1) (displayed via
the More Options button) in the Windows
edition.
The size and color of the border can be
set and the fi nal result previewed in each
feature.
Brightness/Contrast
Menu: Editor: Enhance > Adjust Lighting > Brightness/Contrast
Shortcut: - OS: Mac, Windows
Version: 1.0, 2.0, 3.0 See also: Shadows/Highlights
The Brightness/Contrast command helps
you make basic adjustments to the spread
of tones within the image.
When opened you are presented with a
dialog containing two slider controls. Click
and drag the slider to the left to decrease
brightness or contrast, to the right to
increase the value.
Keep in mind that you are trying to adjust
the image so that the tones are more evenly
distributed between the extremes of pure
white and black. Too much correction
using either control can result in pictures
where highlight and/or shadow details
are lost.
As you are making your changes, watch
these two areas in particular to ensure that
details are retained.
Bring Forward
Menu: Editor: Layer > Arrange > Bring Forward
Shortcut: Ctrl ] OS: Mac, Windows
Version: 1.0, 2.0, 3.0 See also: Layers Palette
To change the order of layers in the layer’s
stack you can either click on the layer in
the palette and drag it to the new position
or make use of the commands in the
Layer > Arrange menu.
Layers can be moved up and down the
stack using these options. Here we selected
the Bottom layer and then chose Bring
Forward. The layer then moves up one
place in the stack, positioning the layer in
between the Top and Middle layers.
Bring to Front
Menu: Editor: Layer > Arrange > Bring to Front
Shortcut: Shft Ctrl } OS: Mac, Windows
Version: 1.0, 2.0, 3.0 See also: Layers Palette
As well as options for moving layers up
or down one position at a time, the Layer
> Arrange menu also contains items for
placing the selected layer at the very top
(or bottom) of the stack. Here the Bring to
Front option was used to move the Bottom
layer to the top of the stack, effectively
making it above both the Middle and Top
layers.
After
Before
1
2
Before
After Bring Forward
After Bring to Front
© www.ablestock.com 2005
© www.ablestock.com 2005
A-Z
21
Photoshop Elements 3.0
www.ElementsA-Z.com
B
Browse Folders
Menu: Editor: File > Browse Folders
Shortcut: Shft Ctrl O OS: Mac, Windows
Version: 1.0, 2.0, 3.0 See also: Photo Browser
This option is available for both Macintosh
and Windows users and takes the user
directly to the Elements File Browser,
which displays thumbnail versions of
images that you have created at another
time and have saved to disk.
Users can navigate between image
directories using the folder tree in
the top left-hand corner of the dialog.
Camera, or scanner, settings and image
information can be viewed on the bottom
left of the browser in the scrollable text box.
Sometimes called EXIF data, these details
are stored in the picture fi le together with
the image information.
Users can add their own caption, copyright,
author and title information for individual
images through the File Info dialog box
(File > File Info).
Images can be renamed and folders added
or deleted directly in the dialog using the
extra options found in the menus in the top
left of the dialog box (File, Edit, etc.).
Double-clicking a thumbnail in the browser
will open the selected image directly into
the program.
The Mac version of the File Browser includes
an ‘Automate’ menu from which you can
apply various featuress found in Elements,
such as PDF Slide Show, Contact Sheet II,
Picture Package and Photomerge.
Brush Options
Menu: -
Shortcut: B (Brush) OS: Mac, Windows
Version: 3.0 See also: Brush tool
The Additional Brush Options palette,
displayed via the More Options button, is
used to creatively control the following
brush characteristics or dynamics:
Spacing determines the distance between
paint dabs, with high values producing
dotty effects.
The Fade setting controls how quickly the
paint color will fade to nothing. Low values
fade more quickly than high ones.
Hue Jitter controls the rate at which
the brushes’ color switches between
foreground and background hues. High
values cause quicker switches between
the two colors.
H a r d n e s s sets the size of the hard-edged
center of the brush. Lower values produce
soft brushes.
The Scatter setting is used to control the
way that strokes are bunched around the
drawn line. A high value will cause the
brush strokes to be more distant and less
closely packed.
Angle controls the inclination of an
elliptical brush.
The Roundness setting is used to
determine the shape of the brush tip. A
value of 100% will produce a circular
brush, whereas a 0% setting results in a
linear brush tip.
Brush tool
Menu: -
Shortcut: B OS: Mac, Windows
Version: 1.0, 2.0, 3.0 See also: Airbrush, Pencil, Paint Bucket
The Elements Brush tool lays down color
in a similar fashion to a traditional paint
brush. The color of the paint is set to the
current foreground color. The size and
shape of the brush can be selected from
the list in the Brush Presets list (versions
3.0 and 2.0) or Brush palette (version 1.0)
in the options bar. Changes to the brush
characteristics can be made by altering
the settings in the options bar and the More
Options palette.
In addition to changes to the size, blend
mode and opacity of the brush, which are
made via the options bar, you can also alter
how the Paint Brush behaves via the new
Additional Brush Options palette.
To draw a straight line click to
start the line and hold down
the Shift key then click the
mouse button a second time
to mark the end of the line.