Pro Entity Framework 4.0 - Apress_4 pot
Bạn đang xem bản rút gọn của tài liệu. Xem và tải ngay bản đầy đủ của tài liệu tại đây (1.15 MB, 26 trang )
CHAPTER 7
■
RELATIONSHIPS AND ASSOCIATIONS
115
Figure 7-6. Entities defined in EF 4.0
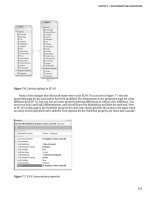
Many of the changes that Microsoft made were to the EDM. You can see in Figure 7-7 that the
properties page for the association has been modified. The information in the properties page isn’t that
different from EF 3.5, but you can see some property naming differences as well as a few additions. You
now have End1 and End2 differentiation, and you still have the Multiplicity and Role for each end. New
to EF 4.0 on this page is the OnDelete property for each end, which specifies the action to be taken when
an entity on this specified end is deleted. Your options for the OnDelete property are None and Cascade.
Figure 7-7. EF 4.0 association properties
CHAPTER 7
■
RELATIONSHIPS AND ASSOCIAATIONS
116
Microsoft also added a couple of new visual items to the UI to help define and manage relationships
between entities. These items and features are discussed in the following sections.
Defining Referential Constraints
Back in the EDM Designer, double-click the association between the two entities. In EF 4.0, a new
Referential Constraint dialog opens, showing the foreign key properties for the relationship (see Figure
7-8).
Figure 7-8. Referential Contstraint Dialog
The Referential Constraint dialog allows you to define the foreign key (FK) constraint between the
source entity and the target entity. How do you know which is the target and which is the source? If it
isn’t obvious, click Cancel in the Referential Constraint dialog, and hold your mouse cursor over the
association line between the two entities. As you hover your mouse over the association line, a small
pop-up window displays, showing you which entity is the source and which entity is the target.
Double-click the association line again to display the Referential Constraint dialog. This dialog
contains FK information. The Principle field displays the source entity and is a drop-down listing the
entities defined in the relationship. By default, it lists the source entity in the relationship.
The Dependent field shows the source entity. This field isn’t editable. The Principle Key and
Dependent Property fields show the two fields that are used in the FK relationship.
Adding an Association
In your EDM Designer, drag a new entity from the toolbox, and drop it onto the designer surface. Next,
right-click the new entity, and select Add
➤ Association from the context menu. Doing so displays the
Add Association dialog box, shown in Figure 7-9. This dialog isn’t new to the EF, but Microsoft did make
some changes to it, the biggest being the “Add foreign key properties to the entityname Entity” check
box.
CHAPTER 7
■
RELATIONSHIPS AND ASSOCIATIONS
117
Figure 7-9. Add Association in EF 4.0
When you create an association, this check box lets you specify this association as a FK association.
Can you specify a typical (non-FK) association? Absolutely: uncheck the “Add foreign key properties to
the entityname Entity” check box. What does this do? I know I’ve been saying this for a few pages now,
but bear with me—I’ll explain shortly.
Also new in the Add Association dialog are the Navigation Property check boxes.
Looking at XML Differences
Before I get into the “I’ll get to that shortly” topics, I want to cover the XML differences between EF 3.5
and 4.0. Close the EDM Designer, right-click the EDM, and select Open With from the context menu. In
the Open With dialog, select XML Editor, and click OK.
Let’s first look at the conceptual schema definition language (CSDL) XML for your EF 3.5 project.
The XML fragment for the independent association looks like this:
<Association Name="FK_Employee_Contact_ContactID">
<End Role="Contact" Type="AdventureWorksModel.Contact" Multiplicity="1" />
<End Role="Employee" Type="AdventureWorksModel.Employee" Multiplicity="*" />
</Association>
<Association Name="FK_Employee_Employee_ManagerID">
<End Role="Employee" Type="AdventureWorksModel.Employee" Multiplicity="0 1" />
<End Role="Employee1" Type="AdventureWorksModel.Employee" Multiplicity="*" />
</Association>
The mapping for the association tells the EF how to negotiate the relationship. In EF 3.5 MSL, that
mapping looks as follows:
CHAPTER 7
■
RELATIONSHIPS AND ASSOCIAATIONS
118
<AssociationSetMapping Name="FK_Employee_Contact_ContactID" TypeName=
"AdventureWorksModel.FK_Employee_Contact_ContactID" StoreEntitySet="Employee">
<EndProperty Name="Contact">
<ScalarProperty Name="ContactID" ColumnName="ContactID" />
</EndProperty>
<EndProperty Name="Employee">
<ScalarProperty Name="EmployeeID" ColumnName="EmployeeID" />
</EndProperty>
</AssociationSetMapping>
<AssociationSetMapping Name="FK_Employee_Employee_ManagerID" TypeName=
"AdventureWorksModel.FK_Employee_Employee_ManagerID" StoreEntitySet="Employee">
<EndProperty Name="Employee">
<ScalarProperty Name="EmployeeID" ColumnName="ManagerID" />
</EndProperty>
<EndProperty Name="Employee1">
<ScalarProperty Name="EmployeeID" ColumnName="EmployeeID" />
</EndProperty>
<Condition ColumnName="ManagerID" IsNull="false" />
</AssociationSetMapping>
Now, let’s look at the EF 4.0 XML. The CSDL XML has two sections. The top of the CSDL contains the
AssociationSet element:
<EntityContainer Name="AdventureWorksEntities3" annotation:LazyLoadingEnabled="true">
<EntitySet Name="Employees" EntityType="AdventureWorksModel.Employee" />
<EntitySet Name="Contacts" EntityType="AdventureWorksModel.Contact" />
<AssociationSet Name="FK_Employee_Contact_ContactID" Association=
"AdventureWorksModel.FK_Employee_Contact_ContactID">
<End Role="Contact" EntitySet="Contacts" />
<End Role="Employee" EntitySet="Employees" />
</AssociationSet>
<AssociationSet Name="FK_Employee_Employee_ManagerID" Association=
"AdventureWorksModel.FK_Employee_Employee_ManagerID">
<End Role="Employee" EntitySet="Employees" />
<End Role="Employee1" EntitySet="Employees" />
</AssociationSet>
</EntityContainer>
At the end of the CSDL is the following XML fragment, which contains the ReferentialConstraint
element. The contents of this element define the FK. In other words, the data within the
ReferentialConstraint element defines functionality that is similar to a database constraint. Notice that
the element contains the entities and associated properties that make up the FK:
<Association Name="FK_Employee_Contact_ContactID">
<End Role="Contact" Type="AdventureWorksModel.Contact" Multiplicity="1" />
<End Role="Employee" Type="AdventureWorksModel.Employee" Multiplicity="*" />
<ReferentialConstraint>
<Principal Role="Contact">
<PropertyRef Name="ContactID" />
</Principal>
<Dependent Role="Employee">
<PropertyRef Name="ContactID" />
</Dependent>
CHAPTER 7
■
RELATIONSHIPS AND ASSOCIATIONS
119
</ReferentialConstraint>
</Association>
<Association Name="FK_Employee_Employee_ManagerID">
<End Role="Employee" Type="AdventureWorksModel.Employee" Multiplicity="0 1" />
<End Role="Employee1" Type="AdventureWorksModel.Employee" Multiplicity="*" />
<ReferentialConstraint>
<Principal Role="Employee">
<PropertyRef Name="EmployeeID" />
</Principal>
<Dependent Role="Employee1">
<PropertyRef Name="ManagerID" />
</Dependent>
</ReferentialConstraint>
</Association>
Keep in mind that ReferentialConstraint also existed in EF 3.5, but the behavior was different. In
EF 3.5, the ReferentialConstraint element was used in the conceptual model (CSDL) to specify the
principle role and dependent role of an association.
Let’s look at the mapping specification language (MSL) for a minute. Notice that no XML fragment
maps the relationship. This is because all the important and pertinent information is contained in the
CSDL.
Understanding Approaches to Foreign Keys in EF 4.0
I mentioned earlier that associations in EF 3.5 were considered first-class citizens, and I explained the
reasoning for this. It’s because the EF treats associations at the same level as entities and other objects.
Microsoft wanted to know whether putting foreign keys in a conceptual and object model was necessary.
So, Microsoft asked, and the company learned that some people thought it was a great idea and some
thought it would muddy the waters.
The solution Microsoft came up with was to support both approaches. Although While Microsoft
put FK support in the EDM, it also kept support for EF 3.5–style associations. The key to remember is
that the old-style EF 3.5 associations are now called independent associations. They can still be used in
EF 4.0.
Independent associations are those whose lifetime and representation are independent of any
entity instances. An association relates two entities, as you’ve learned; but looking at it from a
conceptual point of view, an association has a life of its own in a conceptual model. For example, let’s
consider the database perspective. An association in terms of the database most likely takes the form of a
FK that exists on one of the two tables (entities)—but how do you tell which entity it belongs to by
looking at the conceptual model?
On the other hand, a FK association in the conceptual model is represented by a FK that is part of
one of the entities. This is important because it means the association has the same lifetime as the entity,
is always retrieved when the entity is retrieved, and has the same concurrency-control mechanism as the
entity. Independent associations are just that: independent. They have their own lifetime and their own
concurrency control, and they aren’t necessarily automatically returned when you retrieve an entity.
This information should answer the questions regarding why and how to use FK associations.
Microsoft is convinced that when people start using FK associations, this will be the default choice going
forward, because FK associations simplify key coding patterns considerably. Many of the things that
were difficult to accomplish via independent associations are much easier using FK associations,
including data binding, N-Tier, concurrency, and dynamic data.
Looking at the previous examples, you should be able to tell that the EF handles the two association
types differently. You’ll see that a little more in the next section as you look at some code examples using
the EF 4.0 project you’ve created.
CHAPTER 7
■
RELATIONSHIPS AND ASSOCIAATIONS
120
Using FK Associations in Code
The next few pages go through examples of how to code using FK associations. Each example takes a
different approach and looks at how you can utilize FK associations to enhance your code. I introduce
each example, show you the code, and then explain how the example uses the foreign keys.
Adding Dependent Objects
For this first example, add a button to the form, and add the following code behind the button. I’ll
explain the code shortly:
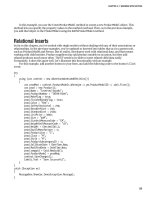
using (AdventureWorksEntities context = new AdventureWorksEntities())
{
try
{
DateTime Birthdt = new DateTime(1965, 9, 26);
DateTime Hiredt = new DateTime(2010, 1, 1);
Contact con = new Contact { Title = "Geek", FirstName = "Scott", LastName = "Klein",
EmailAddress = "", EmailPromotion = 0, Phone =
"555-55-5555",
PasswordHash = "", PasswordSalt = "", rowguid = System.Guid.NewGuid(),
ModifiedDate = DateTime.Now };
Employee emp = new Employee { NationalIDNumber = "1234567890", LoginID = "sklein",
ManagerID = 1, Title = "Geek", BirthDate = Birthdt, MaritalStatus = "M",
Gender = "M", HireDate = Hiredt, SalariedFlag = true, VacationHours = 80,
SickLeaveHours = 40, CurrentFlag = true, rowguid = System.Guid.NewGuid(),
ModifiedDate = DateTime.Now };
con.Employees.Add(emp);
context.Contacts.AddObject(con);
context.SaveChanges();
Messagebox.Show("Items saved");
}
catch (Exception ex)
{
MessageBox.Show(ex.Message);
}
}
This code does several things. In addition to opening a connection to the database and creating a
few datetime variables, it does the following:
1. Creates a Contact object
2. Creates an Employee object
3. Adds the Employee object to the Contacts object’s Employee collection
4. Adds the new Contact object to the context
5. Saves the changes
CHAPTER 7
■
RELATIONSHIPS AND ASSOCIATIONS
121
You may notice that this process doesn’t use the FK association, and that is correct. This example
illustrates that it’s possible to work without using FK associations and that it’s the recommended
method when you’re adding new dependent objects together (the key word being new). You can use the
navigation properties when the Employee object is added to the Employee collection of the Contact object,
allowing you to navigate between the Contact and Employee objects.
When you run the project and click the button, two records are saved; you can see that by querying
the two tables. Figure 7-10 shows the two records added to the Contact table (top) and the Employee
table (bottom).
Figure 7-10. Example 1 results
Manually Setting the Foreign Key Property
The next two examples use FK associations and illustrate how to set the FK property manually. Add
another button to the form, and behind it add the following code:
using (AdventureWorksEntities context = new AdventureWorksEntities())
{
try
{
DateTime Birthdt = new DateTime(1965, 9, 26);
DateTime Hiredt = new DateTime(2010, 1, 1);
Contact con = new Contact { Title = "Geek", FirstName = "Scott", LastName = "Klein",
EmailAddress = "", EmailPromotion = 0, Phone =
"555-55-5555",
PasswordHash = "", PasswordSalt = "", rowguid = System.Guid.NewGuid(),
ModifiedDate = DateTime.Now };
Employee emp = new Employee { ContactID = 19983, NationalIDNumber = "12345678901",
LoginID = "sklein1", ManagerID = 1, Title = "Geek", BirthDate = Birthdt,
MaritalStatus = "M", Gender = "M", HireDate = Hiredt, SalariedFlag = true,
VacationHours = 80, SickLeaveHours = 40, CurrentFlag = true,
rowguid = System.Guid.NewGuid(), ModifiedDate = DateTime.Now };
context.Employees.AddObject(emp);
context.Contacts.AddObject(con);
context.SaveChanges();
Messagebox.Show("Items saved");
CHAPTER 7
■
RELATIONSHIPS AND ASSOCIAATIONS
122
}
catch (Exception ex)
{
MessageBox.Show(ex.Message);
}
}
This code looks similar to the first example, but here you manually set the ContactID FK property
instead of adding it to the Contact Employees collection. You also change a few values so that no check
constraints are violated.
This example also differs from the first in another significant way: because the context doesn’t know
about the parent object yet, the navigation properties on the two objects aren’t mapped to each other
until after SaveChanges() is called. This is because you add each object to the context, whereas in the first
example you added the Employee object to the Contacts object’s Employee collection.
When you run the project and click button2, two records are again saved; you can see that by
querying the two tables. Figure 7-11 shows the two records added to the Contact table (top, top row) and
Employee table (bottom, top row).
Figure 7-11. Example 2 results
Setting the Foreign Key Automatically
A last example for this section illustrates how the FK is applied automatically. Add a third button to the
form, and, in the button’s Click event, add the following code:
using (AdventureWorksEntities context = new AdventureWorksEntities())
{
try
{
DateTime Birthdt = new DateTime(1965, 9, 26);
DateTime Hiredt = new DateTime(2010, 1, 1);
Employee emp = new Employee { ContactID = 19983, NationalIDNumber = "12345678902",
LoginID = "sklein2", ManagerID = 1, Title = "Geek", BirthDate = Birthdt,
MaritalStatus = "M", Gender = "M", HireDate = Hiredt, SalariedFlag = true,
VacationHours = 80, SickLeaveHours = 40, CurrentFlag = true,
rowguid = System.Guid.NewGuid(), ModifiedDate = DateTime.Now };
CHAPTER 7
■
RELATIONSHIPS AND ASSOCIATIONS
123
context.Employees.AddObject(emp);
context.SaveChanges();
Messagebox.Show("Items saved");
}
catch (Exception ex)
{
MessageBox.Show(ex.Message);
}
}
In this example, you never load the contact into memory. You know that ContactID is a valid ID, and
you can set the ContactID property for the Employee object directly. Because the Contact object already
exists in the context, your Employee.Contact navigation property becomes effective the second the FK
property is set. Very nice.
Querying the Employee table again, you see the addition of the third record shown in Figure 7-12
(second row).
Figure 7-12. Example 3 results
This type of FK associations come in handy in data binding: in situations where you have data-
bound grids and you have the new value of the FK in the grid but don’t have the related object. Because
you have the FK value, you don’t have to bear the burden of getting the parent (principle) object.
You can also use the FK property to change relationships between objects—for example, changing
the Employee ContactID to point to another contact. You also don’t incur the overhead of getting the
parent object.
The key takeaway from these examples is that the EF takes on the responsibility of keeping related
references and FKs in sync and thus removes this burden from you.
Building the Sample Project
The last thing you do in this chapter is build a sample project that will be used in the remaining chapters
of the book. You can also work with this data project on your own.
The downloads for this book include a SQL Server script called EF40CreationScript.sql. This script
creates a database called EF40 and all the necessary objects that this project uses. Open the script in SQL
Server Management Studio, and run it. This script assumes that you have the AdventureWorks database,
so be sure to download that database prior to running the script.
Next, create a new Visual Studio Class Library project, and name it EF40Data (see Figure 7-13).
CHAPTER 7
■
RELATIONSHIPS AND ASSOCIAATIONS
124
Figure 7-13. New EF40Data project
Delete the Class1.cs file (or Class1.vb if you choose to do this in Visual Basic.NET). Add a new
ADO.NET EDM to the project, and name it EF40Model. Select Generate from Database in the Choose
Model Contents dialog, and select all the tables and stored procedures in the Choose Your Database
Objects dialog, as shown in Figure 7-14.
CHAPTER 7
■
RELATIONSHIPS AND ASSOCIATIONS
125
Figure 7-14. Selecting the tables for the project
Make sure you keep the “Pluralize or singularize generated object names” and “Include foreign key
columns in the model” options checked. Click Finish. When your model is built, it should look like
Figure 7-15.
CHAPTER 7
■
RELATIONSHIPS AND ASSOCIAATIONS
126
Figure 7-15. The finished model
You use many of the objects in the model in future chapters. In addition, you can see from Figure 7-
15 that the model has plenty of tables and relationships around which you can design a nice application
to start experimenting with the new FK associations.
Summary
In this chapter, you learned about the new ADO.NET Entity Framework 4.0 FK associations. You began
by creating a simple example using EF 3.5 in order to provide a foundation for the discussion of EF 4.0.
You then built the same example using EF 4.0, to illustrate the improvements and changes Microsoft has
made. Significant changes were made to the UI alone to allow for better handling and support for FK
associations without giving up EF 3.5 functionality by independent associations.
I spent the remainder of the chapter discussing how the new FK associations affect your queries and
navigation between objects and how these changes simplify many things used in projects, such as data
binding and concurrency.
C H A P T E R 8
■ ■ ■
127
T4 Code Generation
Up until now, this book has focused primarily on enhancements to the ADO.NET 4.0 Entity Framework
(EF), including improved stored procedure support (such as those that return unknown types), complex
types, using ObjectSet versus ObjectQuery, and more. Some of the new features were discussed in
previous chapters, such as complex types and stored procedure improvements. But Microsoft also spent
a lot of time adding many great new features to the EF. Although V1 of the EF was groundbreaking, it
lacked enough fundamental features that developers complained quite loudly. Microsoft listened, and
EF4 is the result.
Starting with this chapter, the remainder of this book focuses on the new features that have been
added to version 4 of the EF and that require chapters of their own. These topics include Text Template
Transformation Toolkit (T4) support, model-first design, Plain Old Class Objects (POCO) support, and
others. This chapter begins with T4 support and how it’s utilized within the EF.
T4 Template Overview
T4 templates are a means of creating a code-generation artifact with the goal of saving developers a lot of
time. T4 has been around since Visual Studio 2005. Even though you’ve had it for almost half a decade,
it’s one of those technologies that most developers still don’t know exists. When told about it, the
response is generally, ”Really? What is it? Not that Microsoft has intentionally been keeping T4 secret
since VS 2005; but many of the latest technologies, such as LINQ to SQL, MVC, and now EF, use T4 as
their foundation and framework for code generation.
Adding a Template Using Visual Studio 2008
I hope you have VS 2008. Fire up an instance, and create a new C# console application. This example is
to help you understand a little about how T4 templates work, so I didn’t change the project name. Feel
free to give your project a better name than ConsoleApplication1.
Add a new item to the project. When the Add New Item dialog appears, select the Text File template
type. Looking through the list of templates, notice that there is no T4 template item. The trick to utilize
T4 templates is to select the Text File template type but change the extension. The default name for the
text file is TextFile1.txt; but in order to use the T4 template functionality, change the extension from
.txt to .tt. In this example, change the name to TextTemplate.tt, as shown in Figure 8-1.
CHAPTER 8
■
T4 CODE GENERATION
128
Figure 8-1. Adding a new template
Click Add in the Add New Item dialog. Looking in Solution Explorer, your T4 template is added to
your solution along with its associated code file, as shown in Figure 8-2.
Figure 8-2. T4 template in Solution Explorer
Installing a T4 Editor
When you clicked Add in the Add New Item dialog, the TextTemplate.tt file as also opened in the Visual
Studio IDE. It’s just a blank text file, so you can do some text editing. The problem is, unless you know
how to write T4 code, it’s easy to get lost. If you’ve seen T4 code prior to now, you know that it looks a lot
like ASP classic syntax with the brackets. But where do you begin? Luckily, the people at Clarius created a
nifty utility called Visual T4 to alleviate some of the guesswork and pain. Visual T4 provides T4
CHAPTER 8
■
T4 CODE GENERATION
129
IntelliSense and template editing. You can download this nifty tool from the following site:
www.visualt4.com.
On the website, click the Downloads link in the upper-right corner. On the Downloads page are
multiple versions. At the time of this writing, there isn’t a version for VS 2010, which is why you’re doing
this example in VS 2008. Download the Visual T4 Editor Community Edition for VS 2008. The file you
download is called T4EditorForVS2008-Community.msi. Just to be safe, close all instances of Visual Studio
prior to installing this utility.
With the T4 editor installed, open Visual Studio 2008 again as well as the TextTemplate.tt file. To get
an idea of how IntelliSense works, type a less-than sign (<). Immediately you see a list of directives, as
shown in Figure 8-3.
Figure 8-3. T4 IntelliSense with listed directives
These directives are essentially instructions to the T4 generator. There are more than are shown in
Figure 8-3, as you see shortly. This chapter isn’t a tutorial on T4 syntax; you can find books or articles to
help with that. However, you use some of these directives in the following examples, and when you do, I
explain what they mean.
Writing Some T4 Code
The first two T4 directives you use are template and output. The template directive allows you to specify
instructions regarding this specific template. Notice as you type that this directive has several attributes,
such as language, debug, and inherits. For this example, you use the language attribute, which specifies
that you’re creating your template using C# and that the generator must use the C# compiler.
The next directive you use is output. This directive has only one attribute: extension. This directive
and its associated attribute specify the type of output your template will generate. For example, you can
specify that you’ll use the C# language in your template but that you want the resulting output to be
Visual Basic:
<#@ template language="C#" #>
<#@ output extension=".vb" #>
When you save the template, notice that the extension of the associated source code file in Solution
Explorer has changed from .cs to .vb. Looking at the properties of the file shows that the extension has
changed on the actual file, as shown in Figure 8-4.
CHAPTER 8
■
T4 CODE GENERATION
130
Figure 8-4. Output file properties
This example is simple and keeps everything C#. Add the language and extension directives to the
top of the file. Also add a little code to the template, as follows:
<#@ template language="C#" #>
<#@ output extension=".cs" #>
namespace ConsoleApplication1
{
public class CountStuff
{
public void DoCounter()
{
//
}
}
}
The act of saving the template initiates the T4 code-generation engine, which generates the output
source code. Looking at the .cs file, you can see that the code has been generated:
namespace ConsoleApplication1
{
public class CountStuff
{
public void DoCounter()
{
//
}
}
}
As is, this code doesn’t do you much good. You need to add more T4 code; and again, this is where
the T4 editor IntelliSense comes in very handy. Going back to the template, delete the two forward
slashes, and type the less-than sign again. This time, notice that you get three entirely different
directives, as shown in Figure 8-5.
CHAPTER 8
■
T4 CODE GENERATION
131
Figure 8-5. Inline code directives
These three directives apply solely to inline code. The first directive applies to inline code that is
executed directly within the template. The second directive lets you write out results as is. The third
directive allows you to create additional source, such as functions and methods that are called from
another location. You use the first two directives in this example.
Use the top directive to add a for loop, as shown in the code that follows. Add a second line that
uses the Console.WriteLine method to write the value to the console window. This example loops five
times and writes the counter out to the console:
<#@ template language="C#" #>
<#@ output extension=".cs" #>
namespace ConsoleApplication1
{
public class CountStuff
{
public void DoCounter()
{
<# for (int i = 1; i < 6; i++) #>
System.Console.WriteLine(i.ToString());
}
}
}
Save the template, and look at the generated code. No, the code you’re looking at here isn’t a
copy/paste error. This layout is how it shows up in your .cs file:
namespace ConsoleApplication1
{
public class CountStuff
{
public void DoCounter()
{
System.Console.WriteLine(i.ToString());
}
}
} System.Console.WriteLine(i.ToString());
}
}
} System.Console.WriteLine(i.ToString());
}
}
} System.Console.WriteLine(i.ToString());
}
CHAPTER 8
■
T4 CODE GENERATION
132
}
} System.Console.WriteLine(i.ToString());
}
}
}
Everything below the for loop was executed for each iteration—meaning WriteLine and the three
closing braces (}) were executed each time. This example shows that you need to clearly understand the
scope of your code and how the inline code directives can help you.
Scoping Your Code
The fix to the scoping problem is simple: you need to tell the code generator the scope of your code. You
can do that by using the first derivative again. You need to include an open bracket ({) in your first line
and then add the closing braces (}) within the first derivative, as shown here:
<# for (int i = 1; i < 6; i++) { #>
System.Console.WriteLine(i.ToString());
<# } #>
Save the template, and look at the code again. It still isn’t quite correct, because you should see a
handful of build errors stating that the name i doesn’t exist; but you’re getting closer. The format is still
off, as well. But in this example, you can see how the derivatives are used to define the scope of the code
appropriately:
namespace ConsoleApplication1
{
public class CountStuff
{
public void DoCounter()
{
System.Console.WriteLine(i.ToString());
System.Console.WriteLine(i.ToString());
System.Console.WriteLine(i.ToString());
System.Console.WriteLine(i.ToString());
System.Console.WriteLine(i.ToString());
}
}
}
You’re not finished: you need the WriteLine code to show the write information. For this, you use
the second directive, as shown here:
System.Console.WriteLine(<#= i.ToString() #>);
Now, when you save the file and look at the output code again, the format is still off but your code is
correct (you look at fixing the format in a bit):
namespace ConsoleApplication1
{
public class CountStuff
{
CHAPTER 8
■
T4 CODE GENERATION
133
public void DoCounter()
{
System.Console.WriteLine(1);
System.Console.WriteLine(2);
System.Console.WriteLine(3);
System.Console.WriteLine(4);
System.Console.WriteLine(5);
}
}
}
Example 1: Running the Project
Let’s write some code that uses your generated code, with the end goal being to create a project that you
can execute. Your console project automatically includes a Program.cs file. Open Program.cs, and add
the following code to the Main method:
CountStuff count = new CountStuff();
count.DoCounter();
Console.ReadLine();
Your Program.cs should now look like the following:
using System;
using System.Collections.Generic;
using System.Linq;
using System.Text;
namespace ConsoleApplication1
{
class Program
{
static void Main(string[] args)
{
CountStuff count = new CountStuff();
count.DoCounter();
Console.ReadLine();
}
}
}
The code in your Main method simply creates an instance of the T4-generated CounterStuff class
and then calls the DoCounter method. This last line executes a ReadLine so the console window stays
open until you press the Enter key.
Run the project by pressing F5. When the console window appears, it writes the numbers 1 through
5 to the window, exactly as you wanted. Press the Enter key to terminate the program. You can see the
result of the execution in Figure 8-6.
CHAPTER 8
■
T4 CODE GENERATION
134
Figure 8-6. Console output
Although this example isn’t terribly exciting, it gives you an idea of how T4 templates work and a
brief introduction to the T4 template syntax.
Example 2: Returning Your Computer’s Processes
Let’s work through two more examples that are more useful. In this example, you modify your template
to use .NET classes that return all the processes on your computer. This illustrates how easy it is to use T-
4 templates integrated with .NET code. Modify the template file to look like the following:
<#@ template language="C#" #>
<#@ output extension=".cs" #>
using System.Diagnostics;
namespace ConsoleApplication1
{
public class CountStuff
{
public void DoCounter()
{
Process[] procs = Process.GetProcesses();
foreach (Process proc in procs)
System.Console.WriteLine(proc.ProcessName);
}
}
}
This code is a little different from the first example. Here you use straight inline code, so you don’t
need the second derivative. The output, shown here, matches the template exactly:
using System.Diagnostics;
namespace ConsoleApplication1
{
public class CountStuff
{
CHAPTER 8
■
T4 CODE GENERATION
135
public void DoCounter()
{
Process[] procs = Process.GetProcesses();
foreach (Process proc in procs)
System.Console.WriteLine(proc.ProcessName);
}
}
}
When you run this, the output is a list of all the processes on the computer that is running the
application (see Figure 8-7).
Figure 8-7. Process output results
Example 3: Listing Your SQL Databases
Here’s a final example to illustrate T4. For this example, you need to add the following references to your
project:
• Microsoft.SqlServer.ConnectionInfo
• Microsoft.SqlServer.Management.Sdk.Sfc
• Microsoft.SqlServer.Smo
Next, in your template, you need to reference these classes. In T4, you do this by using one of the
directives shown in Figure 8-3: the assembly directive. This directive identifies an assembly to be
referenced so that you can use types within that assembly from code in the text template. This is
equivalent to using Add Reference in Visual Studio.
You also need to use the namespace directive, which allows you to refer to types in a text template
without providing a fully qualified name.
Modify your template to look like the following (be sure to change the server name to your actual
SQL server instance name):
CHAPTER 8
■
T4 CODE GENERATION
136
<#@ template language="C#" #>
<#@ output extension=".cs" #>
<#@ assembly name="Microsoft.SqlServer.Smo, Version=10.0.0.0, Culture=neutral,
PublicKeyToken=89845dcd8080cc91" #>
<#@ assembly name="Microsoft.SqlServer.Management.Sdk.Sfc, Version=10.0.0.0,
Culture=neutral, PublicKeyToken=89845dcd8080cc91" #>
<#@ assembly name="Microsoft.SqlServer.ConnectionInfo, Version=10.0.0.0,
Culture=neutral, PublicKeyToken=89845dcd8080cc91" #>
<#@ import namespace="System" #>
<#@ import namespace="Microsoft.SqlServer.Management.Smo" #>
<#@ import namespace="Microsoft.SqlServer" #>
using Microsoft.SqlServer.Management.Smo;
using Microsoft.SqlServer.Server;
namespace ConsoleApplication1
{
public class CountStuff
{
public void DoCounter()
{
Server srv = new Server("servername");
foreach (Database db in srv.Databases)
System.Console.WriteLine(db.Name);
}
}
}
This example references some new namespaces because you use some of the classes in the code.
You then use Server Management Objects (SMO) to query for all the databases on that server.
When run, your results are output in the console window as shown in Figure 8-8.
Figure 8-8. Database output results
CHAPTER 8
■
T4 CODE GENERATION
137
That’s enough of an introduction to T4. Let’s get to the real reason for this chapter and discuss how
T4 is used on the EF.
T4 Templates and the Entity Framework
After all you learned in the previous 10 pages, the question becomes, how are T4 templates used in the
EF? Just as important is how you can use T4 to customize the classes from your EDM.
Let’s start from the beginning and look at what the EF uses to build the classes from the entities
defined in the model. Realistically, you could do the same thing you did in the first example at the
beginning of the chapter: you could add a .tt file to the project and start from scratch. VS 2010 has a
template for adding T4 templates, called the ADO.NET EntityObject Generator, shown in Figure 8-9.
Adding a T4 template this way requires you to know where to find it in the list of templates and items.
Figure 8-9. ADO.NET EntityObject Generator item
But simply adding a blank text template doesn’t gain you anything. Again, you’re faced with a blank
page, waiting for you to type something in. Why do that when the EF can do much of the work for you?
Open the EF40Data project for Chapter 8, and open the EDM. Open the properties for the EDM and
locate the Custom Tool property, shown in Figure 8-10.
CHAPTER 8
■
T4 CODE GENERATION
138
Figure 8-10. EntityModelCodeGenerator
The EntityModelCodeGenerator is the built-in tool that automatically generates an object layer
based on your conceptual schema definition language (CSDL) in the .edmx file.
You don’t want to delete the value of this property directly. Let’s let EF do it properly for you. To do
that, open the EDM; on the EDM surface, right-click, and select Add Code Generation Item from the
context menu as shown in Figure 8-10. Selecting this menu option opens the all-too-familiar Add New
Item dialog, shown in Figure 8-12.
CHAPTER 8
■
T4 CODE GENERATION
139
Figure 8-11. Add Code Generation Item menu option
Figure 8-12. Add New Item dialog
The difference this time is that the Add New Item dialog knows exactly what you’re looking for and
presents you with the single item you want. Give it a good name, and click Add.