CLINICIAN’S POCKET REFERENCE - PART 5 pptx
Bạn đang xem bản rút gọn của tài liệu. Xem và tải ngay bản đầy đủ của tài liệu tại đây (669.82 KB, 77 trang )
Technique
1. Examine the fundus for evidence of papilledema, and review the CT or MRF of the
head if available. Discuss the relative safety and lack of discomfort to the patient to dis-
pel any myths. Some clinicians prefer to call the procedure a “subarachnoid analysis”
rather than a spinal tap. As long as the procedure and the risks are outlined, most pa-
tients will agree to the procedure. Have the patient sign an informed consent form.
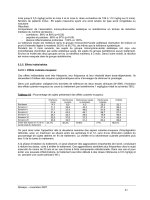
2. Place the patient in the lateral decubitus position close to the edge of the bed or table.
The patient (held by an assistant, if possible) should be positioned with knees pulled up
toward stomach and head flexed onto chest (Fig. 13–16). This position enhances flex-
ion of the vertebral spine and widens the interspaces between the spinous processes.
Place a pillow beneath the patient’s side to prevent sagging and ensure alignment of the
spinal column. In an obese patient or a patient with arthritis or scoliosis, the sitting po-
sition, leaning forward, may be preferred.
3. Palpate the supracristal plane (see under Background) and carefully determine the loca-
tion of the L4–L5 interspace.
4. Open the kit, put on sterile gloves, and prep the area with povidone–iodine solution in a
circular fashion and covering several interspaces. Next, drape the patient.
5. With a 25-gauge needle and 1idocaine, raise a skin wheal over the L4–L5 interspace.
Anesthetize the deeper structures with a 22-gauge needle.
6. Examine the spinal needle with a stylet for defects and then insert it into the skin wheal
and into the spinous ligament. Hold the needle between your index and middle fingers,
with your thumb holding the stylet in place. Direct the needle cephalad at a 30–45-de-
gree angle, in the midline and parallel to the bed (see Fig. 13–16).
7. Advance through the major structures and pop into the subarachnoid space through the
dura. An experienced operator can feel these layers, but an inexperienced one may need
to periodically remove the stylet to look for return of fluid. It is important to always re-
place the stylet prior to advancing the spinal needle. The needle may be withdrawn,
however, with the stylet removed. This technique may be useful if the needle has
passed through the back wall of the canal. Direct the bevel of the needle parallel to the
long axis of the body so that the dural fibers are separated rather than sheared. This
method helps cut down on “spinal headaches.”
8. If no fluid returns, it is sometimes helpful to rotate the needle slightly. If still no fluid
appears, and you think that you are within the subarachnoid space, inject 1 mL of air
because it is not uncommon for a piece of tissue to clog the needle. Never inject saline
or distilled water. If no air returns and if spinal fluid cannot be aspirated, the bevel of
the needle probably lies in the epidural space; advance it with the stylet in place.
9. When fluid returns, attach a manometer and stopcock and measure the pressure. Nor-
mal opening pressure is 70–180 mm water in the lateral position. Increased pressure
may be due to a tense patient, CHF, ascites, subarachnoid hemorrhage, infection, or a
space-occupying lesion. Decreased pressure may be due to needle position or ob-
structed flow (you may need to leave the needle in for a myelogram because if it is
moved, the subarachnoid space may be lost).
10. Collect 0.5–2.0-mL samples in serial, labeled containers. Send them to the lab in this
order:
• First tube for bacteriology: Gram’s stain, routine C&S, AFB, and fungal cultures
and stains
• Second tube for glucose and protein: If a work-up for MS, order electrophoresis to
detect oligoclonal banding and assay for myelin basic protein characteristic of MS
• Third tube for cell count: CBC with differential
284 Clinician’s Pocket Reference, 9th Edition
13
13 Bedside Procedures 285
13
Subarachnoid space
Cauda equina
L4
L5
S1
L5L4
L4
FIGURE 13–16 When performing a lumbar puncture, place the patient in the lat-
eral decubitus position, and locate the L4–L5 interspace. Control the spinal needle
with two hands, and enter the subarachnoid space.
• Fourth tube for special studies as clinically indicated:
VDRL neurosyphilis
CIEP (counterimmunoelectrophoresis) for bacterial antigens such as H. influenzae, S. Pneu-
moniae, N. meningitidis)
PCR assay for tuberculous meningitis or herpes simplex encephalitis (allows rapid diagno-
sis)
If Cryptococcus neoformans is suspected (most common cause of meningitis in AIDS pa-
tients) India ink preparation and cryptococcal antigen (latex agglutination test)
Note: Some clinicians prefer to send the first and last tubes for CBC because this procedure
permits a better differentiation between a subarachnoid hemorrhage and a traumatic
tap. In a traumatic tap, the number of RBCs in the first tube should be much higher than
in the last tube. In a subarachnoid hemorrhage, the cell counts should be equal, and
xanthochromia of the fluid should be present, indicating the presence of old blood.
11. Withdraw the needle and place a dry, sterile dressing over the site.
12. Instruct the patient to remain recumbent for 6–12 h, and encourage an increased fluid
intake to help prevent “spinal headaches.”
13. Interpret the results based on Table 13–4.
Complications
• Spinal headache: The most common complication (about 20%), this appears within
the first 24 h after the puncture. It goes away when the patient is lying down and is
aggravated when the patient sits up. It is usually characterized by a severe throbbing
pain in the occipital region and can last a week. It is thought to be caused by in-
tracranial traction caused by the acute volume depletion of CSF and by persistent
leakage from the puncture site. To help prevent spinal headaches, keep the patient re-
cumbent for 6–12 h, encourage the intake of fluids, use the smallest needle possible,
and keep the bevel of the needle parallel to the long axis of the body to help prevent
a persistent CSF leak.
• Trauma to nerve roots or to the conus medullaris: Much less frequent (some
anatomic variation does exist, but it is very rare for the cord to end below L3). If the
patient suddenly complains of paresthesia (numbness or shooting pains in the legs),
stop the procedure.
• Herniation of either the cerebellum or the medulla: Occurs rarely, during or after
a spinal tap, usually in a patient with increased intracranial pressure. This complica-
tion can often be reversed medically if it is recognized early.
• Meningitis.
• Bleeding in the subarachnoid/subdural space can occur with resulting paralysis es-
pecially if the patient is receiving anticoagulants or has severe liver disease with a
coagulopathy.
ORTHOSTATIC BLOOD PRESSURE MEASUREMENT
Indication
• Assessment of volume depletion
Materials
• Blood pressure cuff and stethoscope
286 Clinician’s Pocket Reference, 9th Edition
13
13
TABLE 13–4
Differential Diagnosis of Cerebrospinal Fluid
Opening Protein
Glucose
Pressure (mg/
(mg/
Cells
Condition
Color
(mm H
2
O) 100 mL) 100 mL) (#/mm
3
)
NORMAL
Adult
Clear
70–180
15–45
45–80
0–5 lymphocytes
Newborn
Clear
70–180
20–120
2/3 serum 40–60
lymphocytes
INFECTIOUS
Viral infection
Clear or
Normal or Normal or Nor
mal
10–500
(“aseptic meningitis”) opalescent
slightly
slightly
lymphocytes
increased increased
PMNs
Bacterial
Opalescent
Increased 50–10,000 Increased,
25–10,000
infection
yellow, may
usually Ͻ20 PMNs
clot
Granulomatous Clear or
Often
Increased, Decreased,
10–500
infection
opalescent
increased but usually usually
lymphocytes
(TB, fungal)
Ͻ500
Ͻ20–40
NEUROLOGIC
Guillain–Barré
Clear or
Normal
Markedly
Normal
Normal or
Syndrome
Cloudy
increased
increased
lymphocytes
(continued
)
287
13
TABLE 13–4
(Continued)
Opening Protein
Glucose
Pressure (mg/100 (mg/100 Cells
Condition
Color
(mm H
2
O) mL)
mL)
(#/mm
3
)
Multiple sclerosis Clear
Normal
Normal or Normal
0–20 lymphocytes
increased
Pseudotumor cerebri Clear
Increased Normal
Normal
Normal
MISCELLANEOUS
Neoplasm
Clear or
Increased Normal or Nor
mal or Normal or
xanthochromic
increased
decreased increased
lymphocytes
Traumatic tap
Bloody, no
Normal
Normal
SI increased RBC = peripheral
xanthochromia
blood; Less RBC
in tube 4 than in
tube 1
Subarachnoid
Bloody or
Usually
Increased
Normal
WBC/RBC
hemorrhage
xanthochromic increased
ratio same
after 2–8 h
as blood
Abbreviations:
WBC = white blood cell; RBC = red blood cell; PMNs = polymorphonuclear neutrophils.
288
Procedure
1. Changes in blood pressure and pulse when a patient moves from supine to the upright
position are very sensitive guides for detecting early volume depletion. Even before a
person becomes overtly tachycardic or hypotensive because of volume loss, the demon-
stration of orthostatic hypotension aids in the diagnosis.
2. Have the patient assume a supine position for 5–10 min. Determine the BP and pulse.
3. Then have the patient stand up. If the patient is unable to stand, have the patient sit at
the bedside with legs dangling.
4. After about 1 min, determine the BP and pulse again.
5. A drop in systolic BP greater than 10 mm Hg or an increase in pulse rate greater than
20 (16 if elderly) suggests volume depletion. A change in heart rate is more sensitive
and occurs with a lesser degree of volume depletion. Other causes include peripheral
vascular disease, surgical sympathectomy, diabetes, and medications (prazosin, hy-
dralazine, or reserpine).
PELVIC EXAMINATION
Indications
• Part of a complete physical examination in the female
• Used to assist in the diagnosis of diseases and conditions of the female genital tract
Materials
• Gloves
• Vaginal speculum and lubricant
• Slides, fixative (Pap aerosol spray, etc), cotton swabs, endocervical brush and cervi-
cal spatula prepared for a Pap smear
• Materials for other diagnostic tests: Culture media to test for gonorrhea, Chlamy-
dia, herpes; sterile cotton swabs, plain glass slides, KOH, and normal saline solu-
tions, as needed
Procedure
1. The pelvic exam should be carried out in a comfortable fashion for both the patient and
physician. A female assistant must be present for the procedure. The patient should be
draped appropriately with her feet placed in the stirrups on the examining table. Pre-
pare a low stool, a good light source, and all needed supplies before the exam begins.
In unusual situations examinations are conducted on a stretcher or bed; raise the pa-
tients buttocks on one or two pillows to elevate the perineum off the mattress.
2. Inform the patient of each move in advance. Glove hands before proceeding.
3. General inspection:
a. Observe the skin of the perineum for swelling, ulcers, condylomata (venereal
warts), or color changes.
b. Separate the labia to examine the clitoris and vestibule. Multiple clear vesicles on
an erythematous base on the labia suggest herpes.
c. Observe the urethral meatus for developmental abnormalities, discharge, neo-
plasm, and abscess of Bartholin’s gland at the 4 or 8 o’clock positions.
d. Inspect the vaginal orifice for discharge, or protrusion of the walls (cystocele, rec-
tocele, urethral prolapse).
e. Note the condition of the hymen.
13 Bedside Procedures
289
13
4. Speculum examination:
a. Use a speculum moistened with warm water not with lubricant (lubricant will in-
terfere with Pap tests and slide studies). Check the temperature on the patient’s leg
to see if the speculum is comfortable.
b. Because the anterior wall of the vagina is close to the urethra and bladder, do not
exert pressure in this area. Pressure should be placed on the posterior surface of
the vagina. With the speculum directed at a 45-degree angle to the floor, spread the
labia and insert the speculum fully, pressing posteriorly. The cervix should pop
into view with some manipulation as the speculum is opened.
c. Inspect the cervix and vagina for color, lacerations, growths, nabothian cysts, and
evidence of atrophy.
d. Inspect the cervical os for size, shape, color, discharge.
e. Inspect the vagina for secretions and obtain specimens for a Pap smear, other
smear, or culture (see tests for vaginal infections and Pap smear in item 7).
f. Inspect the vaginal wall; rotate the speculum as you draw it out to see the entire
canal.
5. Bimanual examination:
a. For this part, stand up. It is best to use whichever hand is comfortable to do the in-
ternal vaginal exam. Remove the glove from the hand that will examine the ab-
domen.
b. Place lubricant on the first and second gloved fingers, and then, keeping pressure
on the posterior fornix, introduce them into the vagina.
c. Palpate the tissue at 5 and 7 o’clock between the first and second fingers and the
thumb to rule out any abnormality of Bartholin’s gland. Likewise, palpate the ure-
thra and paraurethral (Skene’s) gland.
d. Place the examining fingers on the posterior wall of the vagina to further open the
introitus. Ask the patient to bear down. Look for evidence of prolapse, rectocele,
or cystocele.
e. Palpate the cervix. Note the size, shape, consistency, and motility, and test for ten-
derness (the so-called chandelier sign or marked cervical tenderness, which is
positive in PID).
f. With your fingers in the vagina posterior to the cervix and your hand on the ab-
domen placed just above the symphysis, force the corpus of the uterus between the
two examining hands. Note size, shape, consistency, position, and motility.
g. Move the fingers in the vagina to one or the other fornix, and place the hand on the
abdomen in a more lateral position to bring the adnexal areas under examination.
Palpate the ovaries, if possible, for any masses, consistency, and motility. Unless
the fallopian tubes are diseased, they usually are not palpable.
6. Rectovaginal examination:
a. Insert your index finger into the vagina, and place the well-lubricated middle fin-
ger in the rectum.
b. Palpate the posterior surface of the uterus and the broad ligament for nodularity,
tenderness, or other masses. Examine the uterosacral and rectovaginal septum.
Nodularity here may represent endometriosis.
c. It may also be helpful to do a test for occult blood if a stool specimen is available.
7. Papanicolaou (Pap) smear:
The Pap smear is helpful in the early detection of cervical intraepithelial neoplasia and
carcinoma. Endometrial carcinoma is occasionally identified on routine Pap smears. It is
recommended that low-risk patients have routine Pap smears done every 2–3 y, but only
after three annual Pap smears are negative. High-risk patients such as those exposed to in
utero DES, patients with HPV infections, history of cervical dysplasia or cervical intraep-
290 Clinician’s Pocket Reference, 9th Edition
13
ithelial neoplasia, more than two sexual partners in the patient’s lifetime, and intercourse
prior to age 20 should obtain an annual Pap smear.
a. With the unlubricated speculum in place, use a wooden cervical spatula to obtain a
scraping from the squamocolumnar junction. Rotate the spatula 360 degrees
around the external os. Smear on a frosted slide that has the patient’s name written
on it in pencil. Fix the slide either in a bottle of fixative or with commercially
available spray fixative. The slide must be fixed within 10 s or a drying artifact
may occur.
b. Next, obtain a specimen from the endocervical canal using a cotton swab or com-
mercial available endocervical brush and prepare the slide as described in part a.
c. Using a wooden spatula, an additional specimen should be obtained from the pos-
terior/lateral vaginal pool of fluid and smeared on a slide.
d. Complete the appropriate lab slips. Forewarn the patient that she may experience
some spotty vaginal bleeding following the Pap smear.
8. Tests for cervical/vaginal infections:
a. GC culture: Use a sterile cotton swab to obtain a specimen from the endocervical
canal and plate it out on Thayer–Martin medium.
b. Vaginal saline (wet) prep: Helpful in the diagnosis of Trichomonas vaginalis or
Gardnerella vaginalis. A thin, foamy, white, pruritic discharge is associated with a
Trichomonas infection. Mix a drop of discharge with a drop of NS on a glass
slide and cover the drop with a coverslip. It is important to observe the slide while
it is still warm to see the flagellated, motile trichomonads. If a patient has a thin,
watery, gray, malodorous discharge, an infection with Gardnerella vaginalis may
be present. Bacterial vaginosis is most often caused by G. vaginalis and can be di-
agnosed by the presence of “clue cells,” which represent polymorphonuclear white
cells dotted with the G. vaginalis bacteria, a vaginal pH of > 4.5 and a fishy amine
odor with addition of KOH to the secretions. Alternatively, these can be seen by
using a hanging drop of saline and a concave slide. Lactobacillus is normally the
predominant bacteria in the vagina in the absence of specific infection and the nor-
mal pH is usually < 4.5.
c. Potassium hydroxide prep: If a thick, white, curdy discharge is present, the pa-
tient may have a Candida albicans (monilial) yeast infection. Prepare a slide with
one drop of discharge and one drop of aqueous 10% KOH solution. The KOH dis-
solves the epithelial cells and debris and facilitates viewing of the hyphae and
mycelia of the fungus that causes the infection.
d. Gram’s stain: Material can easily be stained in the usual fashion (Chapter 7, page
122). Gram-negative intracellular diplococci (so-called GNIDs) are pathogno-
monic of Neisseria gonorrhoeae. The most commonly found bacteria in Gram’s
stains are large gram-positive rods (lactobacilli), which are normal vaginal flora.
e. Herpes cultures: A routine Pap smear of the cervix or a Pap smear of the herpetic
lesion (multiple, clear vesicles on a painful, erythematous base) may demonstrate
herpes inclusion bodies. A herpes culture may be done by taking a viral culture
swab of the suspicious lesion or of the endocervix.
f. Chlamydia cultures: Special swabs can be obtained from the microbiology lab for
Chlamydia cultures.
PERICARDIOCENTESIS
Indications
• Emergency treatment of cardiac tamponade
• Diagnose the cause of pericardial effusion
13 Bedside Procedures
291
13
Contraindications
• Minimal pericardial effusion (< 200 mL)
• After CABG due to risk of injury to grafts
• Uncorrected coagulopathy
Materials
• Electrocardiogram machine
• Prepackaged pericardiocentesis kit or Procedure and instrument tray (page 240)
with pericardiocentesis needle or 16–18-gauge needle 10 cm long
Background
Cardiac tamponade results in decreased cardiac output, increased right atrial filling pres-
sures, and a pronounced pulsus paradoxus.
Procedure
1. If time permits, use sterile prep and draping with gown, mask, and gloves.
2. Draining the pericardium can be approached either through the left para xiphoid or the
left parasternal fourth intercostal space. The para xiphoid is safer, more commonly
used, and described here (Fig. 13–17).
3. Anesthetize the insertion site with lidocaine. Connect the needle with an alligator clip
to lead V on the ECG machine. Attach the limb leads, and monitor the machine.
4. Insert the pericardiocentesis needle just to the left of the xiphoid and directed upward
45 degrees toward the left shoulder.
5. Aspirate while advancing the needle until the pericardium is punctured and the effusion
is tapped. If the ventricular wall is felt, withdraw the needle slightly. Additionally, if the
needle contacts the myocardium, pronounced ST segment elevation will be noted on
the ECG.
6. If performed for cardiac tamponade, removal of as little as 50 mL of fluid dramatically
improves blood pressure and decreases right atrial pressure.
7. Blood from a bloody pericardial effusion is usually defibrinated and will not clot,
whereas blood from the ventricle will clot.
8. Send fluid for hematocrit, cell count, or cytology if indicated. Serous fluid is consistent
with CHF, bacterial infection, TB, hypoalbuminemia, or viral pericarditis. Bloody fluid
(HCT >10%) may result from trauma; be iatrogenic; or due to MI, uremia, coagulopa-
thy, or malignancy (lymphoma, leukemia, breast, lung most common)
9. If continuous drainage is necessary, use a guidewire to place a 16-gauge intravenous
catheter.
Complications
Arrhythmia, ventricular puncture, lung injury
PERIPHERALLY INSERTED CENTRAL CATHETER (PICC LINE)
Indications
• Home infusion of hypertonic or irrigating solutions and drugs
• Long-term infusion of medications (antibiotics, chemotherapeutics)
• TPN
• Repetitive venous blood sampling
292 Clinician’s Pocket Reference, 9th Edition
13
Contraindications
• Infection over placement site
• Failure to identify veins in an arm with a tourniquet in place
Materials
• PICC catheter kit (contains most items necessary including the silastic long arm
line)
• Tourniquet, sterile gloves, mask, sterile gown, heparin flush, 10-mL syringes
13 Bedside Procedures
293
13
7
Parasternal
approach
Paraxyphoid
approach
To
ECG,
V lead
To
ECG,
V lead
1
2
3
4
5
6
FIGURE 13–17 Techniques for pericardiocentesis. The paraxiphoid approach is
the most popular. (Reprinted, with permission, from: Stillman RM [ed]: Surgery, Diag-
nosis, and Therapy, Appleton & Lange, Norwalk CT, 1989.)
Background
Installation of a PICC allows for central venous access through a peripheral vein. Typically,
a long-arm catheter is placed into the basilic or cephalic vein (See Fig. 13–12) and is
threaded into the subclavian vein/superior vena cava. PICCs are useful for long-term home
infusion therapies. The design of PICC catheters can vary, and the operator should be famil-
iar with the features of the device (attached hub or detachable hub designs).
Procedure
1. Explain the procedure to the patient and then obtain informed consent. Position the pa-
tient in a sitting or reclining position with the elbow extended and the arm in a depen-
dent position. The arm should be externally rotated.
2. Using a measuring tape, determine the length of the catheter required. Measure from
the extremity vein insertion site to the subclavian vein.
3. Wear mask, gown, protective eyewear, and sterile gloves. Prep and drape the skin in the
standard fashion. Set up an adjacent sterile working area.
4. Anesthetize the skin at the proposed area of insertion. Apply a tourniquet above the
proposed IV site.
5. Trim the catheter to the appropriate length. Most PICC lines have an attached hub, and
the distal end of the catheter is cut to the proper length. Flush with heparinized saline.
6. Insert the catheter and introducer needle (usually 14-gauge) into the chosen arm vein as
detailed in the section on IV techniques (page 279). Once the catheter is in the vein, re-
move the introducer needle.
7. Place the PICC line in the catheter and advance (use a forceps if provided by the manu-
facturer of the kit to advance the PICC line). Remove the tourniquet and gradually ad-
vance the catheter the requisite length. Remove the inner stiffening wire slowly once
the catheter has been adequately advanced.
8. Peel away the introducer catheter. Attach the Luer-lock, and flush the catheter again
with heparin solution. Attempt to also aspirate blood to verify patency.
9. Attach the provided securing wings, and suture in place. Apply a sterile dressing over
the insertion site.
10. Confirm placement in the central circulation with a chest x-ray. Always document the
type of PICC, the length inserted, and the site of its radiologically confirmed place-
ment.
11. If vein cannulation is difficult, a surgical cutdown may be necessary to cannulate the
vein. If the catheter will not advance, fluoroscopy may be helpful.
12. Instruct the patient on the maintenance of the PICC. The PICC should be flushed with
heparinized saline after each use. Dressing changes should be performed at least every
7 d under sterile conditions. Patient must be instructed to evaluate the PICC site for
signs and symptoms of infection. Patient must also be instructed to come to the emer-
gency room for evaluation of any fevers.
13. For venous samples, a specimen of at least the catheter volume (1–3 mL) must first be
withdrawn and then discarded. The PICC must always be flushed with heparinized
saline after each blood draw.
PICC Removal
Position the patient’s arm at a 90-degree angle to his body. Remove the dressing and gently
pull the PICC out. Apply pressure to site for 2–3 min. Always measure the length of the
catheter and check prior documentation to ensure that the PICC line has been removed in its
294 Clinician’s Pocket Reference, 9th Edition
13
entirety. If a piece of a catheter is left behind, an emergency interventional radiology consult
is in order.
Complications
Site bleeding, clotted catheter, subclavian thrombosis, infection, broken catheter (leakage or
embolization), arrhythmia (catheter inserted too far)
PERITONEAL LAVAGE
Indications
• Diagnostic peritoneal lavage (DPL) is used in the evaluation of intraabdominal
trauma (bleeding, perforation) (Note: Spiral CT of the abdomen has largely replaced
this as an initial screening for intraabdominal trauma in the emergency setting.)
• Acute peritoneal dialysis and the treatment of severe pancreatitis
Contraindications
• None are absolute. Relative contraindications include multiple abdominal proce-
dures, pregnancy, known retroperitoneal injury (high false-positive rates) cirrhosis,
morbid obesity and any coagulopathy.
Materials
• Prepackaged diagnostic peritoneal lavage or peritoneal dialysis tray
Procedure
1. A Foley catheter and a nasogastric or oro gastric tube must be in place. Prep the ab-
domen from above the umbilicus to the pubis.
2. The site of choice is in the midline 1–2 cm below the umbilicus. Avoid the site of old
surgical scars (danger of adherent bowel). If a subumbilical scar or pelvic fracture is
present, a supraumbilical approach is recommended.
3. Infiltrate the skin with 1idocaine with epinephrine. Incise the skin in the midline verti-
cally, and expose the fascia.
4. Either pick up the fascia and incise it, or puncture it with the trocar and peritoneal
catheter. Caution is needed to avoid puncturing any organs. Use one hand to hold the
catheter near the skin and to control the insertion while using the other hand to apply
pressure to the end of the catheter. After entering the peritoneal cavity, remove the tro-
car and direct the catheter inferiorly into the pelvis.
5. During a diagnostic lavage, gross blood indicates a positive tap. If no blood is encoun-
tered, instill 10 mL/kg (about 1 L in adults) of lactated Ringer’s solution or NS into the
abdominal cavity.
6. Gently agitate the abdomen to distribute the fluid and after 5 min, drain off as much
fluid as possible into a bag on the floor. (Minimum fluid for a valid analysis is 200 mL
in an adult.) If the drainage is slow, try instilling additional fluid, carefully reposition-
ing the catheter.
7. Send the fluid for analysis (amylase, bile, bacteria, hematocrit, cell count). See Table
13–5 for interpretation.
8. Remove the catheter and suture the skin. If the catheter is inserted for pancreatitis or
peritoneal dialysis, suture it in place.
13 Bedside Procedures
295
13
9. A negative DPL does not rule out retroperitoneal trauma. A false-positive DPL can be
caused by a pelvic fracture or bleeding induced by the procedure (eg, laceration of an
omental vessel).
Complications
Infection/peritonitis or superficial wound infection, bleeding, perforated viscus (bladder,
bowel)
PERITONEAL (ABDOMINAL) PARACENTESIS
Indications
• To determine the cause of ascites
• To determine if intraabdominal bleeding is present or if a viscus has ruptured (Diag-
nostic peritoneal lavage is considered a more accurate test. See preceding proce-
dure.)
• Therapeutic removal of fluid when distention is pronounced or respiratory distress is
associated with it (acute treatment only)
Contraindications
• Abnormal coagulation factors
• Bowel obstruction, pregnancy
296 Clinician’s Pocket Reference, 9th Edition
13
TABLE 13–5
Criteria for Evaluation of Peritoneal Lavage Fluid
Positive >20 mL gross blood on free aspiration (10 mL in children)
≥100,000 RBC/mL
≥500 WBC/mL (if obtained >3 h after the injury)
≥175 units amylase/dL
Bacteria on Gram’s stain
Bile (by inspection or chemical determination of bilirubin
content)
Food particles (microscopic analysis of strained or spun
specimen)
Intermediate Pink fluid on free aspiration
50,000–100,000 RBC/mL in blunt trauma
100–500 WBC/mL
75–175 units amylase/dL
Negative Clear aspirate
≤ 100 WBC/mL
≤ 75 units amylase/dL
Source: Reprinted, with permission, from: Way L (ed): Current Surgical Diagnosis and
Treatment, 10e. Appleton and Lange, Norwalk CT. 1994.
Abbreviations: RBC = red blood cells; WBC = white blood cells.
• Uncertainty if distention is due to peritoneal fluid or to a cystic structure (ultrasound
can usually differentiate)
Materials
• Minor procedure tray (see page 240)
• Catheter-over-needle assembly (Angiocath, Insyte 18–20-gauge with a 1¹₂-in.
needle)
• 20–60-mL syringe
• Sterile specimen containers
Procedure
Peritoneal paracentesis is surgical puncture of the peritoneal cavity for the aspiration of
fluid. Ascites is indicated by abdominal distention, shifting dullness, and a palpable fluid
wave.
1. Explain the procedure and have the patient sign an informed consent form. Have the
patient empty the bladder, or place a Foley catheter if voiding is impossible or if signif-
icant mental status changes are present.
2. The entry site is usually the midline 3–4 cm below the umbilicus. Avoid old surgical
scars because the bowel may be adhering to the abdominal wall. Alternatively, the entry
site can be in the left or right lower quadrant midway between the umbilicus and the
anterior superior iliac spine or in the patient’s flank, depending on the percussion of the
fluid wave (Fig. 13–18).
3. Prep and drape the patient appropriately. Raise a skin wheal with the lidocaine over the
proposed entry site.
4. With the catheter mounted on the syringe, go through the anesthetized area carefully at
an oblique angle while gently aspirating. You will meet some resistance as you enter
the fascia. When you get free return of fluid, leave the catheter in place, remove the
needle, and begin to aspirate. Sometimes it is necessary to reposition the catheter be-
cause of abutting bowel.
5. Aspirate the amount of fluid needed for tests (20–30 mL). If the tap is therapeu-
tic, 10–15 L can be safely removed. This large volume must be removed relatively
slowly.
6. Quickly remove the needle, apply a sterile 4 × 4 gauze square, and apply pressure with
tape.
7. Depending on the clinical picture of the patient, send samples for total protein, specific
gravity, LDH, amylase, cytology, culture, stains, or CBC.
Complications
Peritonitis, perforated viscus, hemorrhage, precipitation of hepatic coma if patient has se-
vere liver disease, oliguria, hypotension
Diagnosis of Ascitic Fluid
A complete listing is found in Chapter 3, page 43. Transudative ascites is found with cir-
rhosis, nephrosis, and CHF. Exudative ascites is found with tumors, peritonitis (TB, perfo-
rated viscus), hypoalbuminemia. See Table 13–6 to interpret the results of fluid analysis.
13 Bedside Procedures
297
13
PULMONARY ARTERY CATHETERIZATION
(See Chapter 20, page 399)
PULSUS PARADOXUS MEASUREMENT
(See also Chapter 20, page 393)
Indication
• Used in the evaluation of cardiac tamponade and other diseases
Materials
• Blood pressure cuff and stethoscope
298 Clinician’s Pocket Reference, 9th Edition
13
FIGURE 13–18 Preferred sites for abdominal (peritoneal) paracentesis. Be sure to
avoid old surgical scars. (Reprinted, with permission, from: Krupp MA [ed]: The
Physician’s Handbook, 21st ed. Lange Medical Publications, Los Altos CA, 1985.)
Background
Pulsus paradoxus is an exaggeration of the normal inspiratory drop in arterial pressure. Inspi-
ration decreases intrathoracic pressure. The result is increased right atrial and right ventricu-
lar filling with an increase in right ventricular output. Because the pulmonary vascular bed
also distends, these changes lead to a delay in left ventricular filling and subsequently a de-
creased left ventricular output. This drop in systolic blood pressure is usually <10 mm Hg.
In the case of cardiac compression (eg, acute asthma or pericardial tamponade), the
right side of the heart fills more with inspiration and decreases the left ventricular volume to
even greater degree as a result of compression of the pericardial sac. This exaggerated
13 Bedside Procedures
299
13
TABLE 13–6
Differential Diagnosis of Ascitic of Pleural Fluid
Lab Value Transudate Exudate
Appearance Clear yellow Clear or turbid
Specific gravity Ͻ1.016 Ͼ1.016
Absolute protein Ͻ3 g/100 mL Ͼ3 g/100 mL
Protein (ascitic or pleural to Ͻ0.5 Ͼ0.5
serum ratio)
LDH (ascitic or pleural to Ͻ0.6 Ͼ0.6
serum ratio)
Absolute LDH Ͻ200 IU Ͼ200 IU
Glucose (serum to ascitic or Ͻ1 Ͼ1
pleural ratio)
Fibrinogen (clot) No Yes
WBC (ascitic) Ͻ500/mm
3
Ͼ1000/mm
3
WBC (pleural) Very low Ͼ2500/mm
3
Differential (pleural) PMNs early,
monocytes later
RBC (ascitic) Ͼ100 RBC/mm
3
OTHER SELECTED TESTS
Cytology: Bizarre cells with large nuclei may represent reactive mesothelial
cells and not a malignancy. Malignant cells suggest a tumor.
pH (pleural): Generally Ͼ7.3. If between 7.2 and 7.3, suspect TB or ma-
lignancy or both. If Ͻ7.2, suspect empyema.
Glucose (pleural): Normal pleural fluid glucose is ²₃ serum glucose.
Pleural fluid glucose is much lower than serum glucose in effusions due to
rheumatoid arthritis (0–16 mg/100 mL); low Ͻ40 mg/100 mL in empyema.
Triglycerides and positive Sudan stain (pleural fluid): Chylothorax.
Food fibers (ascitic): Perforated viscus.
Abbreviations: LDH = lactate dehydrogenase; WBC = white blood cells; RBC = red blood
cells; PMNs = polymorphonuclear neutrophils; TB = tuberculosis.
decrease in left ventricular output drops the systolic pressure >10 mm Hg. See Figure 20–1
(page 394) for a graphic representation of a paradoxical pulse.
Procedure
1. A simple, qualitative method involves palpating the radial pulse, which “disappears”
on normal inspiration.
2. A more precise quantitative method requiring that the patient take a breath, let it out,
and hold it. Determine the systolic BP.
3. Ask the patient to breathe again. Once the patient is breathing normally, drop the pres-
sure in the cuff slowly until you hear the pulse during inspiration.
4. The difference in systolic pressure should be <10 mm Hg. If not, a so-called paradox
exists.
5. Differential diagnosis includes pericardial effusion, cardiac tamponade, pericarditis,
COPD, bronchial asthma, restrictive cardiomyopathies, hemorrhagic shock
SIGMOIDOSCOPY (RIGID)
Indications
• Diagnosis and treatment of lower gastrointestinal problems
• Part of the standard work-up of blood in the stool
Materials
• Examination gloves, lubricant, tissues
• Occult blood stool test kit (Hemoccult paper and developer)
• Sigmoidoscope with obturator and light source
• Insufflation bag
• Long (rectal) swabs and suction catheter
• Proctologic examination table (helpful but not essential)
Procedure
1. Several techniques can be used to examine the distal large bowel. These include rigid
sigmoidoscopy (endoscopic examination of the last 25 cm of the GI tract), flexible sig-
moidoscopy (examination up to 40 cm from the end of the GI tract), proctoscopy
(roughly synonymous to sigmoidoscopy, but technically means examination of the last
12 cm), and anoscopy (examination of the anus and most distal rectum).
2. Enemas and cathartics are not routinely given before sigmoidoscopy, although some
people prefer to give a mild prep such as a Fleet’s enema just before the exam. Explain
the procedure, and have the patient sign a consent form.
3. Sigmoidoscopy can be performed with the patient in bed lying on side in the
knee–chest position, but the best results are obtained with the patient in the “jackknife”
position on the procto table. Do not position the patient until all materials are at hand
and you are ready to start.
4. Converse with the patient to create distraction and to relieve apprehension. Announce
each maneuver in advance. Glove before proceeding.
5. Observe the anal region for skin tags, hemorrhoids, fissures, and so on. Do a careful
rectal exam with a gloved finger and plenty of lubricant, and check for fecal occult
blood (Hemoccult test) on the stool recovered on the glove.
300 Clinician’s Pocket Reference, 9th Edition
13
6. Lubricate the sigmoidoscope well with water-soluble jelly, and insert it with the obtura-
tor in place. Aim toward the patient’s umbilicus initially. Advance 2–3 cm past the in-
ternal sphincter, and remove the obturator.
7. Always advance under direct vision and make sure that the lumen is always visible
(Fig. 13–19). Insufflation (introducing air) may be used to help visualize the lumen,
but remember this may be painful. It is necessary to follow the curve of the sigmoid to-
ward the sacrum by directing the scope more posteriorly toward the back. A change
from a smooth mucosa to concentric rings signifies entry into the sigmoid colon. The
scope should reach 15 cm with ease. Use suction and the rectal swabs as needed to
clear the way.
8. At this point, the sigmoid curves to the patient’s left. Warn the patient that he or she
may feel a cramping sensation. If you ever have difficulty negotiating a curve, do not
force the scope.
9. After advancing as far as possible, slowly remove the scope; use a small rotary motion
to view all surfaces. Observation here is critical. Remember to release the air from the
colon before withdrawing the scope.
10. Inform the patient that he or she may experience mild cramping after the procedure.
13 Bedside Procedures
301
13
Umbilicus
A
B
Sacrum Sigmoid
colon
Rectum
FIGURE 13–19 The sigmoidoscope is advanced under direct vision as shown.
Complications
• Bleeding, bowel perforation (rare)
SKIN BIOPSY
Indications
• Any skin lesion or eruption for which the diagnosis is unclear
• Any refractory skin condition
Contraindications
• Any skin lesion that is suspected to be a malignancy (eg, melanoma) should be referred
to a plastic surgeon or dermatologist for excisional biopsy rather than a punch biopsy.
Materials
• 2-, 3-, 4-, or 5-mm skin punch
• Minor procedure tray (page 240)
• Curved iris scissors and fine-toothed forceps (Ordinary forceps may distort a small
biopsy specimen and should not be used.)
• Specimen bottle containing 10% formalin
• Suturing materials (3-0 or 4-0 nylon)
Procedure
1. If more than one lesion is present, choose one that is well developed and representative
of the dermatosis. For patients with vesiculobullous disease, an early edematous lesion
should be chosen rather than a vesicle. Avoid lesions that are excoriated or infected.
2. Mark the area to be biopsied with a skin-marking pen. Inject the lidocaine to form a
skin wheal over the site of the biopsy.
3. After putting on sterile gloves and preparing a sterile field, take the punch biopsy speci-
men. First, immobilize the skin with the fingers of one hand, applying pressure perpen-
dicular to the skin wrinkle lines with the skin punch. Core out a cylinder of skin by
twirling the punch between the fingers of the other hand. As the punch enters into the
subcutaneous fat, resistance will lessen. At this point, the punch should be removed.
The core of tissue usually pops up slightly and can be cut at the level of the subcuta-
neous fat with curved iris scissors without using forceps. If a tissue core does not pop
up, it may be elevated by use of a hypodermic needle or fine-toothed forceps. Be sure
to include a portion of the subcutaneous fat in the specimen.
4. Place the specimen in the specimen container.
5. Hemostasis can be achieved by pressure with the gauze pad.
6. Defects from 1.5 and 2-mm punches usually do not require suturing and heal with very
minimal scarring. Punch defects that are 2–4 mm can generally be closed with a single
suture.
7. A dry dressing should be applied and removed the following day.
8. Sutures can be removed as early as 3 d from the face and 7–10 d from other areas.
Complications
Infection (unusual); hemorrhage (usually controlled by simple application of pressure);
keloid formation, especially in a patient with a prior history of keloid formation
302 Clinician’s Pocket Reference, 9th Edition
13
SKIN TESTING
Indications
• Screening for current or past infectious agent (TB, coccidioidomycosis, etc)
• Screening for immune competency (so-called anergy screen) in debilitated patients
Materials
• Appropriate antigen (usually 0.1 mL)(eg, 5 TU PPD)
• A small, short needle (25-, 26-, or 27-gauge)
• 1-mL syringe
• Alcohol swab
Procedure
1. Skin tests for delayed type hypersensitivity (type IV, tuberculin) are the most com-
monly administered and interpreted. Delayed hypersensitivity (so called because a lag
time of 12–36 h is required for a reaction) is caused by the activation of sensitized lym-
phocytes after contact with an antigen. The inflammatory reaction results from direct
cytotoxicity and the release of lymphokines. Allergy tests (immediate wheal and flare)
are rarely performed by the student or house officer.
2. The most commonly used site is the flexor surface of the forearm, approximately 4 in.
below the elbow crease.
3. Prep the area with alcohol. With the bevel of the 27-gauge needle up, introduce the nee-
dle into the upper layers of skin, but not into the subcutis. Inject 0.1 mL of antigen such
as the PPD. The goal is to inject the antigen intradermally. If done properly, you will
raise a discrete white bleb, approximately 10 mm in diameter (known as the Mantoux
test). The bleb should disappear soon, and no dressing is needed. If a bleb is not raised,
move to another area and repeat the injection.
4. Mark the test site with a pen, and if multiple tests are being administered, identify each
one. Also, document the site in the patient’s chart.
5. To interpret the skin test, examine the injection site at 48–72 h. If nonreactive, check
again at 72 h. Measure the area of induration (the firm raised area), not the erythe-
matous area. Use a ballpoint pen held at approximately a 30-degree angle and bring it
lightly toward the raised area. Where the pen touches is the area of induration. Measure
two diameters and take the average.
6. It is important to check the PPD and other tests at intervals. If the patient develops a se-
vere reaction to the skin test, apply hydrocortisone cream to prevent skin sloughing.
Specific Skin Tests
TST (Tuberculin Skin Testing):
Routine TST in low-risk individuals is not currently
recommended. High-risk individuals should undergo periodic TST (CXR findings suspi-
cious for TB, recent contact of known or suspected TB cases, [includes health care work-
ers], high-risk immigrants [Asia, Africa, Middle East, Latin America] , medically
underserved (IV drug abusers, alcoholics, homeless), chronically institutionalized, HIV-in-
fected or immunosuppression)
The Mantoux test is the standard technique for TST and relies on the intradermal injec-
tion of PPD. The tine test for TB is no longer recommended by the CDC. The PPD comes
in three tuberculin unit “strengths”: 1 TU (“first”), 5 TU (“intermediate”), and 250 TU
(“second”). 1 TU is used if the patient is expected to be hypersensitive (history of a positive
13 Bedside Procedures
303
13
skin test); 5 TU is the standard initial screening test. A patient who has a negative response
to a 5-TU test dose may react to the 250-TU solution. A patient who does not respond to the
250-TU is considered nonreactive to PPD. A patient may not react if he or she has not been
exposed to the antigen or if the patient is anergic and unable to respond to any antigen chal-
lenge. A positive TST indicates the presence of M. tuberculosis infection, either active or
past (dormant) and an intact cell-mediated immunity.
Interpretation of a positive PPD test is based on the clinical scenario. Patients who
have been previously immunized with percutaneous BCG may give a false-positive
PPD, usually 10 mm or less.
• 0–5 mm induration: Negative response
• ≥5 mm: Considered positive in contacts of known TB cases, CXR findings consis-
tent with TB infection, HIV infection or in patients who are immunosuppressed, oc-
casionally in non-TB mycobacterial infection due to cross reactivity
• ≥10 mm induration: Considered positive in patients with chronic diseases (diabetics,
alcoholics, IV drug abusers, other chronic diseases), homeless, immigrants from
known TB regions, children <4 y
• >15 mm induration: Positive in individuals who are healthy and otherwise do not
meet the preceding risk categories
Anergy Screen (Anergy Battery): An anergy screen is based on the assumption that
a patient has been exposed in the past to certain common antigens and a healthy patient is
able to mount a reaction to them. To perform the screen, antigens such as mumps, or Can-
dida. These are generally applied and read just like the PPD test (a reaction of >5 mm in-
duration is considered a positive test and indicates intact cellular immunity). Anergy screens
are sometimes used to evaluate a patient’s immunological status and in the following spe-
cific situations: If you suspect a patient is PPD-positive, and the patient does not react to the
test, do an anergy screen along with the PPD test to see if the patient has any cellular
immune response.
THORACENTESIS
Indications
• Determining the cause of a pleural effusion
• Therapeutically removing pleural fluid in the event of respiratory distress
• Aspirating small pneumothoraces where the risk of recurrence is small (ie, postoper-
ative without lung injury)
• Instilling sclerosing compounds (eg, tetracycline) to obliterate the pleural space
Contraindications
• None are absolute (pneumothorax, hemothorax, or any major respiratory impairment
on the contralateral side, or coagulopathy)
Materials
• Prepackaged thoracentesis kit with either needle or catheter (preferred)
or
• Minor procedure tray (page 240)
• 20–60 mL syringe, 20- or 22-gauge needle 1¹₂-in. needle, three-way stopcock
• Specimen containers
304 Clinician’s Pocket Reference, 9th Edition
13
Procedure
Thoracentesis is the surgical puncture of the chest wall to aspirate fluid or air from the
pleural cavity. The area of pleural effusion is dull to percussion with decreased whisper or
breath sounds. Pleural fluid causes blunting of the costophrenic angles on chest x-ray.
Blunting usually indicates that at least 300 mL of fluid is present. If you suspect that less
than 300 mL of fluid is present or you suspect that the fluid is loculated (trapped and not
free-flowing), a lateral decubitus film is helpful. Loculated effusions do not layer out. Tho-
racentesis can be done safely on fluid visualized on lateral decubitus film if at least 10 mm
of fluid is measurable on the decubitus x-ray. Ultrasound may also be used to localize a
small or loculated effusion.
1. Explain the procedure, and have the patient sign an informed consent form. Have the
patient sit up comfortably, preferably leaning forward slightly on a bedside tray table.
Ask the patient to practice increasing intrathoracic pressure using the Valsalva maneu-
ver or by humming.
2. The usual site for thoracentesis is the posterior lateral aspect of the back over the di-
aphragm but under the fluid level. Confirm the site by counting the ribs based on the x-
ray and percussing out the fluid level. Avoid going below the eighth intercostal space
because the risk of peritoneal perforation is great.
3. Use sterile technique, including gloves, povidone–iodine prep, and drapes. Thoracente-
sis kits come with an adherent drape with a hole in it.
4. Make a skin wheal over the proposed site with a 25-gauge needle and 1idocaine.
Change to a 22-gauge, 1¹₂-in. needle and infiltrate up and over the rib (Fig. 13–20); try
13 Bedside Procedures
305
13
Neurovascular bundle
(nerve, artery, vein)
Rib
Pleura
Local
anesthetic
Lung tissue
Effusion
1
2
FIGURE 13–20 When performing a thoracentesis, the needle is passed over the
top of the rib to avoid the neurovascular bundle.
to anesthetize the deeper structures and the pleura. During this time, you should be as-
pirating back for pleural fluid. Once fluid returns, note the depth of the needle and
mark it with a hemostat. This gives you an approximate depth. Remove the needle.
5. Use a hemostat to measure the 14–18-gauge thoracentesis needle to the same depth as
the first needle. Penetrate through the anesthetized area with the thoracentesis needle.
Make sure that you “march” over the top of the rib to avoid the neurovascular bun-
dle that runs below the rib (see Fig. 13–20). With the three-way stopcock attached, ad-
vance the thoracentesis catheter through the needle, withdraw the needle from the
chest, and place the protective needle cover over the end of the needle to prevent injury
to the catheter. Next, aspirate the amount of pleural fluid needed. Turn the stopcock,
and evacuate the fluid through the tubing. Never remove more than 1000–1500 mL
per tap! This may result in hypotension or the development of pulmonary edema due
to reexpansion of compressed alveoli.
6. Have the patient hum or do the Valsalva maneuver as you withdraw the catheter. This
maneuver increases intrathoracic pressure and decreases the chances of a pneumotho-
rax. Bandage the site.
7. Obtain a chest x-ray to evaluate the fluid level and to rule out a pneumothorax. An ex-
piratory film may be best because it helps reveal a small pneumothorax.
8. Distribute specimens in containers, label slips, and send them to the lab. Always order
pH, specific gravity, protein, LDH, cell count and differential, glucose, Gram’s stain
and cultures, acid-fast cultures and smears, and fungal cultures and smears. Optional
lab studies are cytology if you suspect a malignancy, amylase if you suspect an effusion
secondary to pancreatitis (usually on the left) or esophageal perforation, and a Sudan
stain and triglycerides (>110 mg/dL) if a chylothorax is suspected.
Complications
• Pneumothorax, hemothorax, infection, pulmonary laceration, hypotension, hypoxia
due to ventilation–perfusion mismatch in the newly aerated lung segment
Differential Diagnosis of Pleural Fluid
For a more complete differential, see Chapter 3. Transudate is usually associated with
nephrosis, CHF, cirrhosis; an exudate is associated with infection (pneumonia, TB), malig-
nancy, empyema, peritoneal dialysis, pancreatitis, chylothorax. See Table 13–6, page 299,
for the differential diagnosis.
URINARY TRACT PROCEDURES
Bladder Catheterization
Indications
• Relieving urinary retention
• Collecting an uncontaminated urine specimen for diagnostic purposes
• Monitoring urinary output in critically ill patients
• Performing bladder tests (cystogram, cystometrogram)
Contraindications
• Urethral disruption, often associated with pelvic fracture
• Acute prostatitis (relative contraindication)
306 Clinician’s Pocket Reference, 9th Edition
13
Materials
• Prepackaged bladder catheter tray (may or may not include a Foley catheter)
• Catheter of choice (see Fig. 13–21):
Foley: Balloon at the tip to keep it in the bladder. Use a 16–18 French for adults (the higher
the number, the larger the diameter). Irrigation catheters (“three-way Foley”) should be
larger (20–22 French).
Coudé (pronounced “COO-DAY”): An elbow-tipped catheter useful in males with prostatic
hypertrophy (the catheter is passed with the tip pointing to 12 o’clock).
Red rubber catheter (Robinson): Plain rubber or latex catheter without a balloon, usually
used for “in-and-out catheterization” in which urine is removed but the catheter is not
left indwelling.
Procedure
1. Each insertion of a catheter implants bacteria into the bladder, so strict aseptic tech-
nique is mandatory.
2. Have the patient lie supine in a well-lighted area; females with knees flexed wide and
heels together to get adequate exposure of the meatus.
3. Get all the materials ready before you attempt to insert the catheter. Open the kit, and
put on the gloves. Open the prep solution, and soak the cotton balls. Apply the sterile
drapes.
13 Bedside Procedures
307
13
FIGURE 13–21 Types of bladder catheters include (from the top) the straight
“Robinson” catheter [or red rubber catheter], Foley catheter with standard 5-mL bal-
loon, the Coudé catheter, and “three-way” irrigating catheter with 30-mL balloon.
Catheters have been shortened for illustrative purposes.
4. Inflate and deflate the balloon of the Foley catheter to ensure its proper function. Coat
the end of the catheter with lubricant jelly.
5. In females, use one gloved hand to prep the urethral meatus in a pubis-toward-anus di-
rection; hold the labia apart with the other gloved hand. With uncircumcised males, re-
tract the foreskin to prep the glans; use a gloved hand to hold the penis still.
6. The hand used to hold the penis or labia should not touch the catheter to insert it; a dis-
posable forceps in the kit can be used to insert it. Or the forceps can be used to prep,
then the gloved hand can insert the catheter.
7. In the male, stretch the penis upward perpendicular to the body to eliminate any inter-
nal folds in the urethra that might lead to a false passage. Use steady, gentle pressure
to advance the catheter. The bulbous urethra is the most likely part to tear. Any signifi-
cant resistance encountered may represent a stricture and requires urological consulta-
tion. In males with BPH, a Coudé tip catheter may facilitate passage. Some tricks used
to get a catheter to pass in a male are to make sure that the penis is well stretched and to
instill 30–50 mL of sterile water-based surgical lubricant (K-Y jelly) into the urethra
with a catheter-tipped syringe prior to passage of the catheter. Viscous lidocaine jelly
for urologic use can help lubricate and relieve the discomfort of difficult catheter place-
ment. Allow at least 5 min after instillation of the lidocaine jelly for the anesthetic ef-
fect to take place.
8. In both males and females, insert the catheter to the hilt of the drainage end. Compress
the penis toward the pubis. These maneuvers ensure that the balloon inflates in the
bladder and not in the urethra. Inflate the balloon with 5–10 mL of sterile water or, oc-
casionally, air. After inflation, pull the catheter back so that the balloon comes to rest
on the bladder neck. There should be good urine return when the catheter is in place. If
a large amount of lubricant jelly was placed into the urethra, the catheter may need to
be flushed with sterile saline to clear the excess lubricant. A catheter that will not irri-
gate is in the urethra, not the bladder.
9. Any male who is uncircumcised should have the foreskin repositioned to prevent mas-
sive edema of the glans after the catheter is inserted.
10. Catheters in females can be taped to the leg. In males, the catheter should be taped to
the abdominal wall to decrease stress on the posterior urethra and help prevent stricture
formation. The catheter is usually attached to a gravity drainage bag or some device for
measuring the amount of urine. Many new kits come with the catheter already secured
to the drainage bag. These systems are considered “closed” and should not be opened if
at all possible.
“In-and-Out” Catheterized Urine
1. If urine is needed for analysis or for culture and sensitivity, especially in a female pa-
tient, a so-called in-and-out cath can be done. This is also useful for measuring residual
urine in males or females. The incidence of inducing infection with this procedure is
about 3%.
2. The procedure is identical to that described for bladder catheterization. The main dif-
ference is that a red rubber catheter (no balloon) is often used and is removed immedi-
ately after the specimen is collected.
Clean-Catch Urine Specimen
1. A clean-catch urine is useful for routine urinalysis, is usually good for culturing urine
from males, but is only fair for culturing urine from females because of the potential
for contamination.
308 Clinician’s Pocket Reference, 9th Edition
13