Post processing with lightroom cc Giáo trình photography basic Arena Multimedia
Bạn đang xem bản rút gọn của tài liệu. Xem và tải ngay bản đầy đủ của tài liệu tại đây (17.49 MB, 119 trang )
POST-PROCESSING WITH
LIGHTROOM CC
Onlinevarsity
Post-Processing with Lightroom CC
© 2020 Aptech Limited
All rights reserved.
No part of this book may be reproduced or copied in any form or by
any means — graphic, electronic or mechanical, including photocopying,
recording, taping, or storing in information
transferred without the prior written
retrieval system or sent or
permission
Aptech Limited.
All trademarks acknowledged.
APTECH LIMITED
LERRN
ANYWHERE
ANYTIME
www.aptech-worldwide.com
Contact E-mail:
Edition 1 - July 2020
DEED
Unleash your potential
ARENA |
of copyright owner
Preface
Arena
Design Team
Post processing gives photographers the ability to enhance
images before they publish their work. It is not always necessary
to post-process photos, but it definitely helps to produce better
images.
This
book,
Post-Processing
with
Lightroom
CC,
introduces
you to various features of Adobe Lightroom Classic CC that
fulfils almost all your requirements of photography and
post processing. Adobe Lightroom is mainly used for photo
processing and organizing images. This software can be used
for better digital photography workflow. Users can quickly
import, manage, process, and display images.
The ARENA Design team has designed this course keeping
in mind that motivation coupled with relevant training and
met odology can bring out the best. The team will be glad to
receive your feedback, suggestions, and recommendations for
improvement of the book.
| Please feel free to send your feedback to the ARENA Design
team at the Head Office, Mumbai.
Acknowledgement:
We gratefully acknowledge copyrights for the published work
that we have used as reference material.
“Allcopyrights belongto respective
brand owners/companies/
agencies.”
2
The Library Module
Introduction to Lightroom CC
Introduction
Twa Versions of Lightroom CC
Post-Processing Workflow in Lightroom CC
Lightroom CC Catalog
Und
ding the Work:
ede hee
anelsof
of| Import Wind
Window
Panels
2
Library Module Overview
Overview of Various Panels in Library Window
Keywarding
TABLE
0
i
CONTENTS
The Develop Module
A
ap, Book, Slideshow, Print and Web Module
Map Module
Book Module
Develop Module Overview
Develop Module Toolbar
Slideshow Module
Exploring Various Panels of Develop Module
Print Module
Web Module
Exporting Edited Files
Essential Keyboard Shortcuts
Develop Tools
41119,
Online
“BLACK AND WHITE ARE THE
COLORS OF PHOTOGRAPHY.
TO ME THEY SYMBOLIZE THE
ALTERNATIVES OF HOPE
AND DESPAIR TO WHICH
MANKIND IS FOREVER
SUBJECTED”
— ROBERT FRANK
Douuload from Google Play Store
In this session, you will be able to:
¢ Explain the use of Lightroom CC
:
đ Explain
Intrndurtinn
tn
.
 Explain
Lightroom
CE
lu
the two versions o Lightroom CC
post processing workflow in Lightroom CC
¢ Explain the concept of catalog in Lightroom CC
¢ Describe the workspace of Lightroom CC
¢ Describe the Import window
¢ Explain how to import photos in Lightroom CC
9,
Adobe Lightroom CC — a software developed by Adobe systems for photographers. It is an excellent tool to manipulate and
organize images. Lightroom CC is an easy to use software that lets you import, manage, edit, and share digital photographs quickly
and effectively.
Here are some reasons to use Lightroom:
Specially built for photographers: Photoshop
has many
features
rendering,
features,
you
but there are some
don’t
vector
need,
graphics,
such
as 3D
video
tools,
and so on. These extra features
more disk and memory space.
mean
Lighter processing: Lightroom works fineon
a lower end machine or laptop. However,
it will run better on a faster computer.
Excellent image management: The import
feature in Lightroom can make duplicates
of your images — one for the catalog and
another as backup, even when you are
working with different image formats.
Applying metadata and keywords to your
images on import is simple and even you
can apply processing presets as well.
Excellent searching and organization: The
Lightroom catalog is a database file,
so it is easy to find your images using
keywords,
or
metadata
such
as
ISO,
camera type, and so on. It also lets you
to create collections making it easier to
group similar images together. This smart
collection will automatically add pictures
to the collection based on the criterias
like metadata or keywords.
Logical workflow: Lightroom has a modular
organization—Library,
Develop, Slideshow,
Web, and Print are the seven modules in
Lightroom. You can only see the features
that make sense for that particular
module, which makes Lightroom easy and
quick to learn and faster in performance.
Compatibility and conversion: It uses the
same
RAW
processing
routines
as used
in Adobe camera Raw, it means most
digital cameras are supported, and the
conversion options provided have been
through a good number of improvement.
Non-destructive workflow: None of the edit
doneinLightroomwillpermanentlymodify
the original image. Regardless of the file
type, all editing done in the Lightroom is
ES
non-destructive.
The changes
done
are
either stored in an external XMP file, or
in the Lightroom catalog file as the list of
modifications. You can anytime adjust or
undo those modifications.
Virtual
copies:
Instead
of
creating
a
makes
it
duplicate of a file for creating a different
version, Lightroom uses virtual copies,
which are a list of adjustment instructions
and a thumbnail image reducing the disk
space.
Compare
images:
Lightroom
simple and easy to view similar images
side-by-side for making selections or
even you can view the same image in a
side-by-side mode for evaluating your
adjustments. The most useful feature of
the compare view is the ability to pick or
select the better of similar images when
doing a review of all the imported images.
Presets: Lightroom has presets, a feature
which is absent in Photoshop. They can
make spine go and can be easily
modified as required. You can
also change presets by the type of
adjustment such as black and white
presets,
portraits,
and
raw
pre-
processing. Along with adjustment
presets, you can also create
layout and output presets, which is
truly a flexible tool.
Process RAW files: Lightroom uses
the same Adobe camera raw engine
found in bridge and Photoshop,
only with a better interface and
a much better design. You can
quickly adjust important settings
such
as contrast,
saturation,
and
exposure. You can also perform
noise reduction, sharpening, add
vignettes, split, crop, toning, apply
creative burning,
and
dodging
effects with adjustment brush.
System Requirements
Intel® or AMD processor with 64-bit support*; 2 GHz or faster processor
Microsoft Windows 7 with Service Pack 1 (64-bit) or Windows 10
2 GB of available hard-disk space for program installation.
AMD: Radeon GPU with DirectX 12 or OpenGL 3.3 support.
Intel: Skylake or newer GPU with DirectX 12 support.
NVIDIA: GPU with DirectX 12 or OpenGL 3.3 support.
OpenGL 3.3 and DirectX 10-capable video adapter for GPU-related
functionality.
1 GB Video RAM (VRAM). 2 GB of dedicated VRAM (4 GB recommended)
for large, high-resolution monitors, such as 4K- and 5K-resolution
monitors.
Internet connection and registration are necessary for required software
activation, validation of subscriptions, and access to online services.
Onlinevarsity
Onlinevarsity
TEGHHO=iSsE
THE TECHN0L06IES OF TOMDEROW
TIPS
& TRICKS
ON YOUR FINGERTIPS
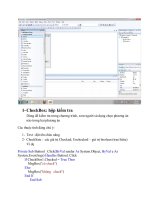
Two Versions of Lightroom CC
Lightroom Classic CC (Desktop program)
Lightroom Classic CC is fully-featured desktop
program. Photographs are stored locally on your
computer’s hard drive or external drive. This version
was formerly known as Lightroom CC.
Lightroom CC (Cloud based)
Lightroom CC is the cloud based portable editing option
which stores everything - photos, information about
the photos, and all adjustments in the cloud. As a result
you can access all your work from any device - laptop,
desktop, tablet, or smartphone that runs Lightroom.
Co
Onlinevarsity
SUSU eR COMTI eASUIT D AU TOT AES] oa
22
= =
GROUPS = 8
Onlinevarsity
COLLABORAATIVE LEARNING A ; BF
Onlinevarsity
TS 6 TRICKS
ai,
WORKING
PROFESSIONAL
Post-Processing Workflow in Lightroom CC
When starting to use Lightroom, the first thing you would think of is where to start? What to do first? How to organize the catalogs and keep them uncluttered? The answer to these basic questions can be very extensive, but here you will get to know the
simple and basic workflow to get you kick started.
Process
The Lightroom
begins
with
images in your
or memory
bring them in
interface.
workflow
_ finding
hard drive
card and
Lightroom
Organize
and
choose
images that you want
to work with. You can
also add metadata and
keywords which makes
Crop,
adjust,
Export
correct,
retouch,
and
apply
effects to your images.
images
your
edited
in a variety of
digital file formats.
it easy to search images.
You can also rate
color code images.
and
Lightroom CC Catalog
Acatalog in Lightroom Classic is a database
that stores all the information of your
photos such as:
e Location of all the photos.
* Records of every edits and adjustments
done to the photos.
¢ Metadata like ratings and keywords you
added to your photos to help you find
or organize them.
When
you
install Lightroom
Classic,
the software automatically creates the
Lightroom folder within the Pictures
folder on your system. By default, the
catalog is stored in the Lightroom folder.
it applies the changes, to a copy of the
photo so that everyone can see them.
In this folder you will find catalog file with
Creating catalogs
extension .ircat and preview cache with
extension .irdata.
You
can
create
separate
catalogs
for
different purposes, such as home photos
When photos are imported in Lightroom and business photos. Even though you can
Classic,
alink is created between the photo create multiple catalogs, you can open
and the record of the photo in the catalog. only one catalog at a time in Lightroom.
Hence, when you perform any edits or You can also move catalogs and photos,
add keywords to the photo it is stored in put photosin multiple catalogs, and merge
the catalog as additional metadata.
catalogs. However, this should be avoided
When working with photos in Lightroom, it otherwise it will be confusing and links
never changes the actual photos. Instead between catalog and photos may break.
lS
Understanding the Workspace
Library module
It is the digital asset management module
where you import, organize, compare, and
select photos.
Develop module
This module is used for adjusting color and
tone or creatively processing photos.
Library
None
Ue
Panels
co
These modules are used for presentation purpose.
ee
8
Panels are unique to the module. The information will change in the panels depending on the module you are in. Within the
panels are sub panels they are also called as tabs.
Onlinevarsity
1. None of the edits done in Lightroom will permanently
modify the original image.
a. True
b. False
2. Destination folder in Import window is not available
when
a. Copy
b. Copy As DNG
c. Move
d. Add
option is selected.
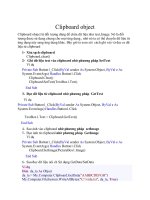
Understanding the Import Window
Importing photos is the first step
Apply During Import
in Lightroom. You can import photos
from
hard disk, from
your camera,
from external storage, or from your
memory card. There are two ways
to import photos: By clicking the
Import button in the Library module
or by selecting File > Import Photos
and Videos command.
This
panel
allows
you
Choose COPY if you are importing photos
fram your memory card. Choose COPY AS
ONG to convert RAWs to compatible and
smaller ONG files. Choose ADD if you are
importing photos directly from hard drive.
Choose MOVE to move the RAWs to a new
location and add them to a catalog.
These options allow you to choose all the photos in
your source folder or just the new ones that are
yet to be imported. Choose Destination Folders
option to group photos by their destination folder.
Destination folder is not available when Add option
is selected.
Various options in the File Handling
panel lets you build the size of
previews, preventing duplicates,
copying photos to second location,
and adding photos.
File Renaming
This panel allows you to
rename files and add date
sequence.
This panel allows you to
This
section —_ displays
thumbnails of the photos
from the Source folder.
Ticked photos will be
imported when you press
Import button.
choose destination folder
to save all your photos.
Import or Cancel
Import button will let
you import all the photos
Grid View
and take you to Library
module, Cancel button
will cancel all the changes
made while importing.
Select this option to view
images as thumbnails.
Check All/Uncheck ALL
Select this option to
time.
File Handling
bai
to
select folder of images that
you want to import. Any hard
drives and storage media
devices will be shown here.
view image
This panel lets you apply basic edits
and add metadata to your photos.
one at a
Check
All button will show
a tick in all the thumbnails
so that they all will be imparted. Uncheck All button
will remove tick from the thumbnails and lets you
select the photos to be imported.
Sort
This option lets you sort images by time,
state, file name, media type, and file
type. This option is available in Grid View.
—ễễ—_ễễ
Zoom Slider
Zoom Slider lets you zoom in and zoom out of
thumbnails when working in Grid view or Loupe view.
Panels of Import Window
File Handling Panel
File Handling panelis usedto set the sizeof
the previews, smart previews, preventing
the duplicates, copying the photo to
second location, and adding photos to a
collection. The options available in this
panel are:
Build Previews: The Build Preview dropdown list lets you set the previews.
Minimalis the default option. This option
has the quickest import speed. It quickly
imports images in the Lightroom, but
takes longer time to render on switching
from one picture to another or zooming
in. Embedded & Sidecar options grabs
photos that has a larger or full-size
preview embedded within their files. 1:1
option takes longer time to import. It
actually imports full resolution preview
file of every single image, but it takes less
time to render. Standard option will take
longer time to import photos but takes
less time to render.
Build Smart Previews: On selecting
this option, Lightroom creates a smart
preview (smaller version) of a photo. It is
a compressed, lossy DNG file. Lightroom
stores this file inside the folder named
Smart Previews.lrdatd. In this way you can
disconnect external hard drive containing
images and you can still organize and edit
your photos in Lightroom.
When you
preview files are small as compared to
the original files.
again
imported twice. By default, this option is
selected.
connect
the
external
hard
drive,
Lightroom synchronizes the changes
done to photos. This option is most useful
when you are travelling and do not want
to carry your hard drive. The size of Smart
Minimal
Pam One 2000100220001
121(-
Don’t Import Suspected Duplicates:
When this option is selected, Lightroom
ensures
that
same
photos
are
not
Make a Second Copy To: This option
allows you to take a backup of photos
when you import from a memory card.
Select this option and choose a location
to backup your files.
Add to Collection: Select this option to
create a new collection or add photos to
an existing collection.
File Renaming panel
File Renaming panel lets you rename
files when you copy or move photos
during import. The options available in
this panel are:
wˆ Rename Files
Custom Name
Rename Files: Select this option to enable
various options under the File Renaming
panel.
Template:
Template
drop-down - list
shows various file renaming presets. For
example, selecting Date-Filename preset
will simply add the date to the original
filename. Asample file name is displayed
at the bottom of the panel to show you
how rename file will look. Selecting the
Edit option from the drop-down list
opens Filename Template Editor window
that lets you specify various options to
rename files the way you want.
metadata
for your photos. You can
create a new metadata preset or apply
the existing one.
copy or move photos into a subfolder of
the destination folder. Click the option
and enter the name of the subfolder.
Keywords:
add
Organize:
Use
how you want to organize photos in the
relevant
In the
keywords
keywords
to
box,
photos.
commas to separate keywords.
This
option
lets you
subfolder. From the drop-down list select
Custom Text: This option gets highlighted
when you select custom presets from
Template drop-down list. Custom Text
option lets you specify the name of the
shoot.
¥ Into Subfolder
Travel
By date
2020/2!
Start Number: lf you do not want custom
numeric sequence then, click this option
Windows S:
and enter the value to set the numeric
sequence.
Extensions: This option is used to set the
file extension in lower case or upper case.
Apply During Import Panel
This panel allows you to do basic editing,
personalizing and adding keywords and
metadata to your photos. Any changes
you do at this stage will be applied to
all the imported photos. The options
available in this panel are:
Data (D:)
Destination Panel
Destination panel allows you to specify
where you want to save the photos. You
can choose the location on your hard
drive or external drive or network drive. If
you do not choose the destination folder,
Lightroom copies the files in the Picture
folder.
Develop Settings: This option is used to
apply saved Develop module adjustments
to all the imported photos.
Plus Sign: The little plus sign on the
Destination panel is used to create folder
where you may want to store imported
photos.
Metadata:
Into Subfolder: This option
Use
this option
to include
decide
is used
—ễễ—ễễ
to
»
8
Arena
&»
@
Drivers
Y
8
NPDATA
>
m
202003
>
m
20:
»
#8
2020-05
BACKUP
By date option if you want to create subfolders by date. Select Into one
folder option if you want to put all photos in one folder. Date Format option |
lets you choose the format for dates.
Choose the location where you want to put your subfolder. As shown in|
figure, subfolder ‘Travel’ is seen in the Photos folder in the hard drive. This
is where all the photos will be stored.
Windows-SSD (C:)
Data (D:)
a.
a)
For detailed step-by-step procedure, refer demo Import Photos from eResources
Á Me>> My Varsity>> Pnst-Prnressing with Linhtrnnm [>> Shnw Me Hnw.
Onlinevarsity
1. Minimal option in Build Preview takes less time to render.
a. True
b. False
2. Copy option in Import window is used to convert RAWs
to compatible and smaller DNG files.
a. True
b. False
In this session, Introduction to Lightroom CC, you learnt that:
' Adobe Lightroom CC program is used to import, manage, edit,
: and share digital photographs quickly and effectively.
a Lightroom Classic CC (Desktop program) and Lightroom CC (Cloud
: based) are the two versions of Lightroom CC.
8 The Lightroom workflow begins with importing images then
¡ organizing images and then, editing images and exporting in a
: variety of file formats.
mA catalog in Lightroom Classic is a database that stores all the
: information of your photos.
„ Library module is the digital asset management module where
: you import, organize, compare, and select photos.
a Develop module is used for adjusting color and tone or creatively
i processing photos.
a Map,
Book,
Slideshow,
Print, and
Web
modules
are
used
for
: presentation purpose.
The Import window not only lets you import photos but also let
= you rename files, add copyright information or apply a creative
: preset to your images as they’re being imported.
MANY
COURSES
ONE
PLATFORM
in Lightroom Classic is a database that stores all the information of your photos.
a. Catalog
b. Preview
c. lImport
d. Develop
option is used if you are importing photos from
a. Copy AS DNG
b. Copy
c. Move
your memory card.
d. Add
is the first step in Lightroom workflow.
a. Organizing Photos
b. Importing photos
c. Editing Photos
d. Presentation of Photos
Which of the following module is used for adjusting color and tone or creatively processing photos?
a. Library module
b. Develop module
c. Map module
d. Book module
c. Map module
d. Book module
is the digital assessment module.
a. Library module
b. Develop module
option in takes longer time to import but takes less time to render.
a. Minimal
b. Embedded & Sidecar
C11
d. Standard
- Answer Key
BE AHEAD OF EVERYONE ELSE
READ ARTICLES
Knowledge Check - 1
1. True
Knnwledge
DỤ)
2. Add
Knowledge Check - 2
1. False
2. False
1. Catalog
2. Copy
3. Importing Photos
4. Develop
5. Library
6.1:1
:
moi
|
In this session, you will be able to:
¢ Explain the use of Library module
The
Library
¢ Describe Library module interface
° Explain the use of various panels of Library module
Module
¢ Explain how to filter photos using Library Filter bar
¢ Explain how to create collections
 Explain the use of Keywording photos
â Explain how to add keywords to photos
—ễ——ễ
Library Module Overview
There are two core modules in Lightroom CC: Library module and Develop module. When you first launch Lightroom, it will take
you to the Library module. The main purpose of this module is to import and organize photographs. All the photos we import
appears first in the Library module. You can then browse these photos, sort them, add ratings, and keywords to them. With
Library module, you can export images and also publish them on social media.
Library Filter
Library Filter tab is used to filter and find photos.
The left side
is used to
to source
collections and
You can also
images to
services.
panels
navigate
folders,
catalog.
publish
online
Displays thumbnails of images in your current
import folder.
Displays images depending on the view selected: Grid view or Loupe view.
Right Panel
The right side panels
is used to apply quick
develop
settings
and add keywords &
metadata.
Displays options related to the module you are in. In Library module, Toolbar displays set of tools
related to organizational task such as ratings, changing the sort order, and comparing views.
Far tetailed step-by-step prncedure, refer damn Flagging, Rating, and Applying Dnlnr' Labels ta Phntns Írnm sÏtesnurces 4 Me>> My
Varsity>> Post-Processing with Lightroom CE>> Show Me How.
Overview of Various Panels in Library Window
Library Filter bar
photographer. Searchable metadata option is a combination of
EXIF and IPTC data.
The Library Filter bar is used to filter photos. It provides three
modes for filtering photos: Text, Attribute, and Metadata.
Any searchable plug-in field option is used to search based on
the data added by any plugins you may have used.
IA) Any Searchable Fes
Faename
|fynu dnt see the Filter bar press Barkslash (\) key in thø Library
mntlulE nr chnse View > Shaw Filter Bar.
Text: The Text filter provides options for what to search and
how to search.
To use the Text filter:
1. Click to select a source from the Folders panel, catalog panel
or from the Collections panel. Your selections will appear in
the Filmstrip.
2. Next click Text in the Library Filter bar.
The Text filter displays two drop-down menus and a search
field which is used to specify the search criteria.
Copy Name
Title
Caption
Keywords
Searchable Metadata
Seorchadle IPTC
Searchable EXIF
‘Any Searchable Plug’ in Field
From the next drop-down list, select a search rule.
Contains - This option lets you search for the specified text you
enter in the Search field, including partial words. For example,
if you enter ‘win’ in the Search field, it will yield results such as
Window, Winter, Wings, and so on.
This first drop-down list which is the Search Target dropdown list allows you to search photos by keywords, filename,
copyname, captions, title, or by EXIF and IPTC metadata.
Searchable EXIF option in the list is used to search
Contains
Contains All
IBA contains Words
oes Conran
‘Starts With
Ends With
photos
based on data embedded (such as filename, camera settings,
camera model, lens type, and so on) into the photo’s metadata
by the camera.
Searchable IPTC is used to search based on data (such as
Creator, your address, caption, and image title) added by the
Contains All - This option is useful if you want to search for more
than one term For example - if you enter ‘bird’ and ‘King’ in the
ES
Search field it will find photos that have both
the words. For example, ‘Kingfisher bird’ or
Bird Kingfisher’.
Contains Words - This option lets you search
for whole words. For example - if you enter
‘Window’
in the Search field, then the word
‘Blue Window’ will not be included in search
results.
Doesn’t Contain - This option excludes files
that match the text that is entered in the
Search field.
Starts With - This option lets you search text
that begins with the specified word in the
Search field.
Ends With - This option lets you search text
that ends with the text entered in the Search
field.
Enter Search Text - This field is used to type the
text you want to search. Add an exclamation
point (!) before any word to exclude
it from the
results. Add a plus sign (+) before any word to
apply the Starts With rule to that word. Adda
plus sign (+) after any word to apply the Ends
With rule to that word.
As you type in the search field, Lightroom will
display photos that match to the search text.
Clicking the down arrow icon in the Enter
Search Text field will open a menu that
contains combined options of Search Target
and Search Rules options.
Far dEtailsd step-by-step prnredure, refer demn TExt Filter frnm sResnurres Á
Me>> My Varsity>> Post-Processing with Lightroom CC>> Show Me How.
Attribute
The Attribute filter lets you filter images by flag type, star rating, color label,
master copies, virtual copies, or photos.
a
Atribute
+
Flag: This option filters based on the three flag status - Flagged, Unflagged,
and Rejected. To find images that have flags turned ON, click the first flag icon
and you will notice that all the images that are flagged will be displayed in the
filmstrip and display area. To search images that do not have a flag, click the
second flag icon. Similarly, clicking the third flag icon will display images that are
rejected. To further refine the criteria, you can select multiple flags. To remove
the flag from the criteria, click the flag icon again.
Edits: This option lets you filter based on edits done to the photos. Click the
first icon to find images that have some kind of editing. Click the second icon to
display images that are not edited.
Ratings: This option filters based on the stars given to photos. The greater than
sign after the word Rating lets you select qualifier options such as Rating is
greater than or equal to, Rating is less than or equal to, and Rating is equal to.
For example, if you want to view images with a 5-star ratings, click the greater
than sign next to Rating and select Rating is equal to from the drop-down. Then,
click the five stars. All the images with five star ratings will appear in the display
area and filmstrip. To turn off the star rating click on stars again.
Color: This option filters images based on color labels given to images. For
example, click the Red color label and all the images that have Red color label
will be displayed.
EE
ood
Kind: This option filter images
Virtual Photos, and Video.
based
on three options - Master
photos,
Master Photo option will show all the images
that are actually images. Virtual Photos option will show all the virtual
copies within the Lightroom catalog. Virtual copies are copies of develop
Navigator
Panel
The Navigator panel is located at the top left side of
the Library panel. This panel is one of the few tool
available in all the Lightroom modules.
| Fnr detailatl step-by-step prnretlurs, refar damu Âttribute Filter Írnm sflesnuirres
Á Me>> My Varsity>> Hnst-Frncessing with Linhtrnnm >> shnw Me llnw.
Metadata Filter: Metadata filter lets you filter photos based on wide range
of information embedded in photos by a digital camera, such as capture
date, aspect ratio, file type,
location, shutter speed, which
camera
used
and many more. All these information are displayed in respective columns.
The default columns are Date, Camera,
Lens, and Label.
The drop-down
menu on the right side lets you select different metadata options. For
example, selecting Camera Info from the drop-down will show a bunch of
filters related to camera such as the type of camera used, focal length, lens,
and flash state. Similarly, selecting Exposure info will give filters related to
camera exposure such as Focal length, ISO Speed, Aperture, and Shutter
Speed.
The Navigator panel is a small preview of a selected
image. It is used to navigate the photograph
when zoomed in. It contains options to adjust the
magnification of the zoom - FIT, FILL, 1:1, and Change
zoom level.
1:1 is the standard zoom level (100%).
The individual columns can be customized by clicking the column heading
and selecting available metadata search criteria. By default, Metadata filter FILL option fills the image in the entire screen.
section displays four columns. However, you can add up to Eight columns
FIT option is used to fit the image to the screen. This
by clicking the button in the top-right corner of each column and selecting
is the default option.
Add column.
Fnr detailstl sten-by-step nrnredure, refer demn Metadata Filter fram sllesnurres
4 Me>> My Varsity>> Post-Processing with Lightroom CC>> Show Me How.
i
Level - See the arrows will let you
Specity.durerent zoom levels.
eS