Adobe® Photoshop® CS4 Studio Techniques pptx
Bạn đang xem bản rút gọn của tài liệu. Xem và tải ngay bản đầy đủ của tài liệu tại đây (29.02 MB, 481 trang )
Adobe
®
Photoshop
®
CS4
Ben Willmore and Dan Ablan
STUDIO TECHNIQUES
Adobe
®
Photoshop
®
CS4 Studio Techniques
Ben Willmore and Dan Ablan
This Adobe Press book is published by Peachpit.
For information on Adobe Press books, contact:
Peachpit
1249 Eighth Street
Berkeley, CA 94710
(510) 524-2178
Fax: (510) 524-2221
To report errors, please send a note to
Peachpit is a division of Pearson Education
Copyright © 2009 Ben Willmore and Dan Ablan
For the latest on Adobe Press books, go to www.adobepress.com
Project Editor: Nikki Echler McDonald
Development Editor/Copy Editor: Robin Drake
Production Editor: Hilal Sala
Technical Editors: Daniel Giordan, Rob Sylvan
Composition: David Van Ness
Indexer: James Minkin
Cover design: Peachpit/Charlene Will
Cover illustration: Regina Cleveland
Notice of Rights
All rights reserved. No part of this book may be reproduced or transmitted in any form by any means, electronic,
mechanical, photocopying, recording, or otherwise, without the prior written permission of the publisher. For
information on getting permission for reprints and excerpts, contact
Notice of Liability
The information in this book is distributed on an “As Is” basis, without warranty. While every precaution has
been taken in the preparation of the book, neither the authors nor Peachpit shall have any liability to any
person or entity with respect to any loss or damage caused or alleged to be caused directly or indirectly by the
instructions contained in this book or by the computer software and hardware products described in it.
Trademarks
Many of the designations used by manufacturers and sellers to distinguish their products are claimed as
trademarks. Where those designations appear in this book, and Peachpit was aware of a trademark claim,
the designations appear as requested by the owner of the trademark. All other product names and services
identifi ed throughout this book are used in editorial fashion only and for the benefi t of such companies with
no intention of infringement of the trademark. No such use, or the use of any trade name, is intended to
convey endorsement or other affi liation with this book.
ISBN 13: 978-0-321-61310-3
ISBN 10: 0-321-61310-4
9 8 7 6 5 4 3 2 1
Printed and bound in the United States of America
iii
Contents
Introduction xi
Part I Working Foundations 1
Chapter 1 Tools and Panels Primer 3
Preparing Your Workspace 4
Navigating Your Document 13
Picking Colors 18
Basic Editing Tools 21
The Next Step 41
Chapter 2 Selection Primer 43
Using Adobe Bridge 44
What Is a Selection? 60
Basic Selection Tools 61
Refi ning a Selection 70
Using the Select Menu 72
Quick Mask Mode 82
The Next Step 85
Part II Production Essentials 87
Chapter 3 Layers and Curves 89
How Do Layers Work? 90
Meet the Layers 91
The Power of Curves 115
Taking Curves for a Test Drive 125
The Histogram Panel 138
Shadows/Highlights 144
The Next Step 148
Chapter 4 Using Camera Raw 5.0 149
What Is Raw Format? 150
The Camera Raw 5.0 Dialog 152
Adjusting Multiple Images 183
Finishing Touches 184
The Next Step 184
Chapter 5 Adjustment Layers 185
Adjusting Methods 186
Adjustment Layer Features 189
Limiting Adjustments 197
Histograms and Automatic Adjustments 206
Potential Problems 208
iv
Limitations of Adjustment Layers 209
Final Notes on the Adjustments Panel 210
The Next Step 210
Chapter 6 Sharpening 211
Removing Film Grain and Scanner/Camera Noise 213
How Sharpening Works 221
Tricks of the Trade 232
The Next Step 236
Part III Grayscale, Color, and Print 237
Chapter 7 Setting Up Images for Final Output 239
Brightness and Contrast 240
Adjusting Levels 242
Prepping for Print 249
Working with Color 256
The Next Step 270
Chapter 8 Color Manipulation 271
At the Core Is the Color Wheel 272
Hue/Saturation Changes 274
Color/Grayscale Conversions 282
Replacing Color 287
Variations 288
Color Balance 289
Levels/Curves and Color 290
Selective Color 294
Match Color 296
Red Eye Tool 299
Color Replacement Tool 299
Channel Mixer 301
Gradient Map 305
The Next Step 306
Part IV Creative Techniques 307
Chapter 9 Enhancements and Masking 309
Blending Modes 310
Choosing the Right Masking Tool 338
The Background Eraser 339
The Blending Sliders 344
Channels 346
Creating Paths with the Pen Tool 350
Layer Masks 352
The Next Step 355
v
Chapter 10 Collage Effects 357
Familiar Techniques 358
Cool Borders and Photo Frames 360
Creating a Panoramic Image with Photomerge 363
Vector Masks 364
Working with Smart Objects 369
Warping Images 378
Creating Complex Collages 380
The Next Step 388
Chapter 11 Retouching Techniques 391
Patch Tool 392
Healing Brush 397
Spot Healing Brush 400
Clone Stamp 401
Vanishing Point 408
Dodge and Burn Tools 414
Sponge Tool 418
Blurring and Sharpening 419
Lens Correction Filter 425
Liquify Filter 428
Content-Aware Scaling 439
The Next Step 440
Index 441
3D Garage.com Bonus Videos
Located online at www/DanAblan.com/photoshop:
Chapter 12 Workfl ow
Bonus Video 1 Line Art Scanning
Bonus Video 2 Channels
Bonus Video 3 Shadows
Bonus Video 4 Type and Background Effects
Bonus Video 5 Resolution Solutions
vi
About the Authors
Ben Willmore
A senior engineer from NASA once said that Ben Willmore
gave the best technical seminar he ever attended. That
same year, a computer-phobic who had been struggling with
Photoshop for years proclaimed, “He takes the bogeyman
out of Photoshop!” This seems to be Ben’s special gift; he
has an ability to connect with users of every level and mind-
set, whether it’s fi rst-timers taking their fi rst sniff of Photo-
shop, or razor-sharp nerds who are on the fast track to
technical illumination. The common echo that Ben leaves
in his wake seems to be, “Aha! I fi nally get Photoshop!”
Known for revealing the simplicity that lies within Photo-
shop’s complexity, Ben has personally taught over 60,000
Photoshop users on four continents. He is coauthor (with
Jack H. Davis) of the best-seller How to Wow: Photoshop for
Photography, as well as Adobe Photoshop CS4: Up to Speed.
Ben speaks at publishing conferences and events world-
wide, including Photoshop World, the American Society
of Media Photographers (ASMP), and Professional Pho-
tographers of America (PPA). He writes for numerous
digital imaging and photography publications, including
a monthly column for Photoshop User magazine. In 2004,
he was inducted into the Photoshop Hall of Fame at
Photoshop World. His reputation as the “expert’s expert”
prompted NAPP’s president, Scott Kelby, to say, “When we
get stuck, we call Ben!” In 2006, Ben took his Photoshop
adventures on the open road in a giant touring bus. His
home/offi ce on wheels has enabled him to rekindle his
great passion for photography; while many of us are hitting
the snooze button, Ben is likely to be prowling around in
the pre-dawn hours waiting for the perfect light. To see
Ben’s photos from the road, and to keep track of him while
he’s exploring America, visit www.WhereIsBen.com.
vii
Dan Ablan
On Dan Ablan’s LinkedIn page, a colleague from NASA
Ames Research wrote, “His work has reliably exceeded all
expectations, and has focused on satisfying the customer
without concern for changes requested along the way.
He is a professional: technically and as a businessman.”
Throughout a 20-year career in the digital arts, Dan’s cli-
ents have proclaimed similar sentiments. Dan has the abil-
ity to explain a complex program in simple terms, whether
it’s 3D modeling and animation software, photography
applications, or Photoshop. His knack for fi nding a com-
mon denominator with coworkers and students translates
to the subjects he teaches.
Primarily known for his 3D books on NewTek’s LightWave
and Luxology’s modo, such as the popular Inside LightWave
series from New Riders Publishing, Dan’s true passion is
the photographic arts. With today’s advancements in digi-
tal photography, it has been a natural progression for Dan
to bring his years of photography and digital imaging skills
to the Photoshop community.
Dan Ablan is president of AGA Digital Studios, Inc., a 3D
animation and imaging company in the Chicago area. AGA
Digital has produced 3D visuals for broadcast, corporate,
and medical clients since 1994, and is also home to Ablan
Gallery, Dan’s portrait art business. Dan is the author of
the international best-selling Inside LightWave books from
New Riders Publishing (covering LightWave versions 6, 7,
8, and 9), LightWave Power Guide (version 5.0), Inside Light-
Wave 3D (version 5.5), LightWave 6.5 Magic, and coauthor
of LightWave 8 Killer Tips. He also is the author of Digital
Cinematography & Directing, served as technical editor for
Digital Lighting & Rendering, and was a contributor to Adobe
After Effects 5.5 Magic. His latest books are Inside LightWave
v9, The Offi cial Luxology modo 301 Guide, and Digital Pho-
tography for 3D Imaging and Animation. Adobe Photoshop CS4
Studio Techniques marks Dan’s 13th book.
Dan is the founder of 3D Garage.com, a website dedicated
to high-quality video training. He has written columns
and articles for LightWave Pro magazine, Video Toaster User
viii
magazine, 3D Design magazine, 3D World magazine, and
Computer Graphics World, while also serving as editor in
chief of Keyframe magazine (now HDRI 3D magazine) for
two years. Dan has taught workshops since 1995 across the
country on 3D and digital imaging, and recently started a
Chicago-based, two-day one-on-one personal Photography
& Photoshop workshop. Some of the companies Dan has
trained include Reebok, Fox Television, ABC-TV, CBS-TV,
WTTW PBS Chicago, Lockheed Martin, and many others.
An active member of the Professional Photographers of
America, as well as Wedding & Portrait Photographers
International (WPPI), Dan is always looking for new and
exciting opportunities to capture that perfect image. Visit
Dan’s main site at www.DanAblan.com to see what’s new,
and view his photography at www.AblanGallery.com.
ix
Thank You!
First and foremost, I have to thank Ted Waitt at Peachpit
Publishing for making me a part of this book. Victor Gavenda
introduced me to Ted over a year ago, probably because I
wouldn’t stop harassing him with ideas! I think Victor fi nally
had enough of my incessant email messages and referred
me to Ted. Not knowing any better, Ted answered my email.
We started a dialogue and continued for nearly fi ve months
before the opportunity came about to revise this book. So,
thanks to both of you!
What’s interesting about this book is that just days after attend-
ing Ben Willmore’s Photoshop seminar in Chicago, Ted
emailed me about Ben’s Adobe Photoshop CS3 Studio Techniques
book. Peachpit was looking for someone to revise the series for
the upcoming release of Photoshop CS4. So I have to thank
Ben Willmore for the opportunity to work with your outstand-
ing text, while still being able to add my own voice and imagery
throughout the pages. Keep up the great work, Ben!
From there, my appreciation and thanks go out to Nikki
McDonald and Robin Drake. These two have been the driving
force behind the book, working many late nights, while tack-
ling holidays, kids, and illness. Thanks for making this process
so smooth, and making the book what it is.
Thanks also to Daniel Giordan for helping out as technical
editor while he could. A bigger thanks goes to Peachpit’s
Lightroom Reference Guide host and all-around superhero,
Rob Sylvan, for stepping in literally at the last minute to pick
up the slack for our technical editing needs. Thanks, Rob! We
owe you one.
There are always key people behind the scenes who really
make these books come to life, such as Hilal Sala. Thank you,
Hilal, for making all the “other” stuff happen so we could
concentrate on content!
Thanks to all of you who have emailed, twitted, and blogged
during my months of sinking my teeth into this book. Your
support does not go unnoticed and is greatly appreciated.
Finally, thank you to my fantastic wife, Maria, and amazing
daughter, Amelia. Your support is what keeps me going.
—Dan Ablan
This page intentionally left blank
I
Introduction
xii
Introduction
S
taring at a shelf full of Photoshop books at the local
bookstore, it seems that there are more special-effect
“cookbooks” and technical tomes than anyone would ever
care to read. The problem is that none of those “cook-
books” provide enough detail to really let you feel like you
understand the program (blindly following the listed steps
just doesn’t do it), and all of the technical books are deep
into terms like rasters, vectors, and bit-depth settings. That’s
the primary reason that most people aren’t truly comfort-
able with Photoshop. They either get the 1-2-3 steps (but
no real understanding), or they get so many technical
terms that Photoshop becomes impossible to grasp.
So how is this book different? Our approach is to use the
same language that you use in everyday life, to explain
everything from the simplest feature to the most advanced
techniques. Ben Willmore acquired this approach as a
result of teaching tens of thousands of people in hundreds
of seminars and hands-on workshops. We still provide a fair
share of step-by-step techniques, and we delve into some
rather advanced features, but through it all we use meta-
phors and examples that make everything easy to under-
stand and digest.
Our mission is to help you graduate from “I’m just going
through the motions” to “At last, I really understand Photo-
shop.” Once you’ve made that leap, you’ll experience an
incredible ripple effect. Your effi ciency will skyrocket.
Your costs will decrease. Your creative genius will come out
of the closet like gangbusters, and your clients (or boss)
will be thrilled. But what’s most important to us is that,
through learning how to master Photoshop, you’ll fi nd the
passion and energy that come from knowing you’re really
good at something.
xiii
Introduction
Will I Understand It?
Photoshop can be complex if you want it to be. But rather
than boring you with technical terms and theories, this
book will help you get results. It will demonstrate areas
of the program that once eluded you. This book is much
more than a set of recipes, and in the coming pages you’ll
fi nd that mastering Photoshop CS4 is easier than you
might think.
Does It Start at My Level?
If you’re generally comfortable with your computer, you
should be able to comprehend the information in this
book, no matter how advanced the topic. We assume that
you’ve installed Photoshop and you’re using the Photoshop
User Guide to fi gure out your way around the program.
If you’re an advanced user, don’t worry. This book is very
understandable, but we also get into the real meat of
Photoshop and the powerful tools of version CS4.
Mac or Windows?
From a functionality standpoint, Photoshop is pretty close
to identical on Mac and Windows platforms. Anything
you can do on one platform, you can do on the other. But
those darn keyboards are different. You can put your wor-
ries aside, because both Mac and Windows keyboard com-
mands are integrated right into the text. For screen shots,
we had to pick one platform and run with it, and we chose
Mac OS X.
What’s Missing?
This book doesn’t come with a CD, and there is much
more in Photoshop to discover than we could possibly fi t
into the allotted page count. Dan Ablan has created a num-
ber of training videos through 3D Garage.com that will
help you to take your learning further. Visit www.danablan.
com/photoshop to view Chapter 12, “Workfl ow,” and a
series of bonus videos on assorted useful topics.
xiv
Introduction
As with Adobe Photoshop CS3, Adobe Photoshop CS4 has
a hybrid version called “Extended.” It has all the features
of regular Photoshop, plus some features designed for
more technical users (engineers, scientists, medical profes-
sionals, architects, television/fi lm folks, 3D artists, and so
on). This book is intended for photographers and graphic
designers, and because the extended features are beyond
the scope of that audience, we don’t cover them here.
What’s New in CS4?
Whether you have a previous edition of this book or you
just want to jump right into the new features, it’s still a
good idea to start at the beginning. This entire book has
been updated from Adobe Photoshop CS3 Studio Techniques.
The text has been streamlined, and new examples and the
new features of CS4 have been covered throughout the
chapters where appropriate.
Ready to Get Started?
If you’ve read this far, you’re the right person to use this
book. (Most people don’t read the introductory stuff—
they just skip right to the good stuff.) So what are you
waiting for? Turn the page and start understanding Adobe
Photoshop CS4!
Chapter 1 Tools and Panels Primer 3
Chapter 2 Selection Primer 43
Working Foundations
I
PA
PA
R
R
T
T
This page intentionally left blank
CHAPTER
1
Tools and Panels Primer
4
The secret of all victory lies in the organization
of the non-obvious.
—Marcus Aurelius
Tools and Panels Primer
W
hen you fi rst open Photoshop CS4, the newly
designed interface is unassuming. As you explore deeper
into the tools and panels, however, you might fi nd that the
interface can quickly become cluttered, if not downright
confusing. If you’ve worked in Photoshop previously, you
might be aware that all of those panels can take up much
of your screen, unless you’re fortunate enough to have a
second monitor to expand your workspace. This chapter
will help you to become familiar with Photoshop’s tools
and panels so that you can manage the updated CS4 work-
space effectively.
Preparing Your Workspace
With previous versions of Photoshop, you might have
ended up shifting and nudging panels around the screen
in order to work on a graphic or image. Along came Photo-
shop CS2 and CS3, packed with a huge number of panels,
and adding even more tools. With CS4, the interface has
been streamlined to help you work. You can easily make
any panel visible—or not visible—based on your needs,
organizing the clutter into an elegant arrangement in just
a few seconds.
Panels and Docks
To assist you in maximizing your screen real estate, CS4
provides panel docks, special interface elements that allow
you to collapse and expand entire groups of panels easily
(Figures 1.1a and 1.1b).
5
I: Working Foundations
Figure 1.1a Photoshop’s CS4 interface is less cluttered than previous versions, but still very customizable.
Figure 1.1b The PC version of Photoshop CS4 looks and works the same as the Mac version. You’ll notice, however,
that the menu bar is slightly different.
6
Chapter 1 Tools and Panels Primer
By default, all panels are docked. Those gray borders
around the panels are actually the docks, and they are
permanently stuck to the sides of the Photoshop window.
Clicking and dragging the gray boundaries doesn’t move
a panel dock (Figure 1.2), but you can expand the dock
vertically or horizontally.
If you want to move a panel to a different part of the
screen, grab the title tab of the panel and drag it out of the
dock (Figure 1.3).
Figure 1.3 Move a panel out of the dock by clicking its title tab and dragging it.
When a panel is undocked, you can place it wherever you want.
You can resize the width of any dock by clicking its edge
and dragging. If you move your mouse pointer over the
edge of a panel, the cursor changes to a small arrow. When
you see this arrow, just click and drag to expand the panel.
Within a dock, you can click the border between panels to
change the size of any panel. As you enlarge one panel, its
neighbors will shrink.
The panel well that was found in
previous versions of Photoshop is
no longer available. It has been
completely replaced by the docking
system.
Figure 1.2 Panels are enclosed in
docks—special constructs attached
to the edge of the screen. You can’t
move a dock, but you can resize or
collapse it.
If you really mess things up, you
can easily set all the panels back to
their default locations. To do this,
reselect the current Workspace by
choosing Window > Workspace >
Essentials.
7
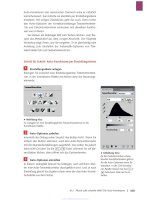
I: Working Foundations
The Tools Panel
By default, Photoshop’s Tools panel, found on the left side
of the interface, is now a single-column array of tools. This
arrangement frees up a little bit of screen space, but if you
prefer the traditional two-column Tools panel, just click
the top of the Tools panel dock to toggle between the new
single-column Tools panel and the old two-column version
(Figure 1.4).
Another change from CS3: The Quick Mask control is now
a single button (Figure 1.5) that toggles between Quick
Mask and Standard Screen Mode, and no longer includes
access to the Full Screen selector via pop-up menu. Full
Screen Mode options are found under View > Screen
Mode, as well as from the Application bar.
Figure 1.4 Toggle the main Tools
panel between one-column and two-
column layout by clicking its title bar.
Figure 1.5 The Quick Mask toggle is
now a single button at the bottom of
the Tools panel.
Photoshop CS4 no longer includes
a launch button in the Tools panel
for ImageReady (the Web graphics
application that came bundled with
Photoshop), because ImageReady
has been discontinued. Some of its
functionality has been rolled into
Photoshop, and the rest is now
included in Adobe Fireworks.
8
Chapter 1 Tools and Panels Primer
Working with Screen Modes
While panel docks make it simple to hide and show panels,
your image still doesn’t use all of the available screen
space. You can use the Screen Mode pop-up menu in the
Application bar to solve this problem.
Standard Screen Mode
By default, Photoshop uses the Standard Screen Mode
(Figure 1.6). You’re probably used to working with this
mode, with the name of your document at the top of the
document window, and possibly scroll bars on the side and
bottom of that window.
Figure 1.6 The Standard Screen Mode is Photoshop’s default. (©2008 Dan Ablan.)
Screen Arrangements
The new CS4 Application bar resides just below Photoshop’s
menu bar. (On Windows, the Application bar is part of the
menu bar; on a Mac, it’s separate.) The Application bar
offers a few new tools, but for now we’ll concentrate on the
two tools that most affect the workspace.
If you click and hold down the Arrange Documents icon
in the Application bar, Photoshop displays a set of options.
The fi rst option is Consolidate All, which is how you can
Pressing Shift-F cycles through the
screen modes.
If you can’t see the Application bar,
make sure that it’s enabled: Choose
Window > Application Bar.
9
I: Working Foundations
maximize an image’s size onscreen. If you have multiple
images open, choose one of the other options, such as
Tile All in Grid, Tile All Vertically, or Tile All Horizontally
(Figure 1.7).
Figure 1.7 You can quickly arrange your windows by choosing Tile All in Grid or one of the other
options. (©2008 Dan Ablan.)
Next to the Arrange Documents pop-up menu in the
Application bar is the Screen Mode pop-up menu. Here,
you can choose from Standard Screen Mode (shown in
Figure 1.6), Full Screen Mode with Menu Bar, and Full
Screen Mode. Another option in the Arrange Documents
pop-up menu is Float All in Windows. How does this
option differ from using Consolidate All? Good question!
If you’re using the new Application Frame (found in the
Window menu), loaded images are docked into neat tabs
across the top of the screen (Figure 1.8). Choosing Float
All in Windows automatically pulls these images out of
their docks and fl oats them individually. If you’d like to
return an image from fl oating to docked position, drag the
image’s title bar until it becomes transparent as you move
it near the menu bar. At that point, drop the image to dock
it. Conversely, you can drag an image out of its docked
state to make it fl oat. One more thing to note: If you have
10
Chapter 1 Tools and Panels Primer
an image fl oating and not docked, you can drag and drop
images into that particular image window.
Figure 1.8 With multiple images loaded, Photoshop neatly arranges the images in tabbed
windows. (©2008 Dan Ablan.)
Full Screen Mode with Menu Bar
Using Full Screen Mode with Menu Bar lets the image
fl ow all the way across the screen and slip right under the
panels (Figure 1.9). If you choose this mode, the scroll bars
disappear, so you’ll have to use the Hand tool to navigate
around your document. But that’s okay because you can
hold down the spacebar at any time to use the Hand tool
temporarily. If you zoom out of a document so that it
doesn’t take up the entire screen, Photoshop fi lls the area
around the image with gray.
Full Screen Mode
Full Screen Mode is a longtime favorite of serious Photo-
shop users. In this mode, Photoshop even turns off the
menu bar! Now an image can take over the entire screen.
You can still use many of the menu commands, as long as
you know their keyboard shortcuts. If you zoom out while
in this mode, Photoshop fi lls the area around the image
with black. To select a new color, Control-click (Windows:
right-click) somewhere in the black area.