C++ Programming for Games Module I pot
Bạn đang xem bản rút gọn của tài liệu. Xem và tải ngay bản đầy đủ của tài liệu tại đây (15.56 MB, 259 trang )
C++ Programming for Games
Module I
e-Institute Publishing, Inc.
1
©Copyright 2004 e-Institute, Inc. All rights reserved. No part of this book may be reproduced or
transmitted in any form or by any means, electronic or mechanical, including photocopying, recording,
or by any information storage or retrieval system without prior written permission from e-Institute Inc.,
except for the inclusion of brief quotations in a review.
Editor: Susan Nguyen
Cover Design: Adam Hoult
E-INSTITUTE PUBLISHING INC
www.gameinstitute.com
Frank Luna, Game Institute Faculty, C++ Programming for Games
All brand names and product names mentioned in this book are trademarks or service marks of their
respective companies. Any omission or misuse of any kind of service marks or trademarks should not be
regarded as intent to infringe on the property of others. The publisher recognizes and respects all marks
used by companies, manufacturers, and developers as a means to distinguish their products.
E-INSTITUTE PUBLISHING titles are available for site license or bulk purchase by institutions, user
groups, corporations, etc. For additional information, please contact the Sales Department at
2
Table of Contents
CHAPTER 1: INTRODUCING C++ 9
INTRODUCTION 10
CHAPTER OBJECTIVES 10
1.1 GETTING STARTED—YOUR FIRST C++ PROGRAM 10
1.1.1 Creating the Project 10
1.1.2 Adding A .CPP File to the Project 12
1.1.3 Writing the Code 13
1.1.4 Compiling, Linking, and Executing 14
1.2 THE “PRINT STRING” PROGRAM EXPLAINED 16
1.2.1 Comments 16
1.2.2 White Space 17
1.2.2 Include Directives 18
1.2.3 Namespaces 18
1.2.4 The main{ } Function 20
1.2.5 std::string 20
1.2.6 Input and Output with std::cin and std::cout 20
1.3 VARIABLES 21
1.3.1 Variable Declarations and Definitions 24
1.3.2 Variable Names 25
1.3.3 The sizeof Operator 25
1.3.4 The unsigned Keyword 26
1.3.5 Literal Assignments 27
1.3.6 Type Conversions 27
1.3.7 Typedefs 30
1.3.8 Const Variables 30
1.3.9 Macros 30
1.4 ARITHMETIC OPERATIONS 31
1.4.1 Unary Arithmetic Operations 32
1.4.2 Binary Arithmetic Operations 33
1.4.3 The Modulus Operator 34
1.4.4 Compound Arithmetic Operations 35
1.4.5 Operator Precedence 36
1.5 SUMMARY 37
1.6 EXERCISES 38
1.6.1 Arithmetic Operators 38
1.6.2 Cin/Cout 38
1.6.3 Cube 38
1.6.4 Area/Circumference 39
1.6.5 Average 39
1.6.6 Bug Fixing 39
CHAPTER 2: LOGIC, CONDITIONALS, LOOPS AND ARRAYS 41
INTRODUCTION 41
CHAPTER OBJECTIVES: 42
2.1 THE RELATIONAL OPERATORS 42
2.2 THE LOGICAL OPERATORS 44
2.3 CONDITIONAL STATEMENTS: IF, IF…ELSE 48
2.3.1 The If Statement 49
2.3.2 The Else Clause 50
2.3.3 Nested If…Else Statements 51
2.3.4 The Switch Statement 53
2.3.5 The Ternary Operator 55
3
2.4 REPETITION 56
2.4.1 The for-loop 56
2.4.2 The while Loop 58
2.4.3 The do…while Loop 60
2.4.4 Nesting Loops 61
2.4.5 Break and Continue Keywords 62
2.5 ARRAYS 63
2.5.1 Array Initialization 64
2.5.2 Iterating Over an Array 64
2.5.3 Multidimensional Arrays 65
2.6 SUMMARY 67
2.7 EXERCISES 68
2.7.1 Logical Operator Evaluation 68
2.7.2 Navigator 68
2.7.3 Average 69
2.7.4 Factorial 69
2.7.5 Matrix Addition 70
2.7.6 ASCII 71
2.7.7 Linear Search 71
2.7.8 Selection Sort 73
CHAPTER 3: FUNCTIONS 75
INTRODUCTION 75
3.1 USER DEFINED FUNCTIONS 78
3.1.2 Functions with One Parameter 80
3.1.3 Functions with Several Parameters 82
3.2 VARIABLE SCOPE 83
3.2.1 Example 1 83
3.2.2 Example 2 85
3.2.3 Example 3 86
3.3 MATH LIBRARY FUNCTIONS 87
3.4 RANDOM NUMBER LIBRARY FUNCTIONS 88
3.4.1 Specifying the Range 91
3.5 FUNCTION OVERLOADING 92
3.5.1 Default Parameters 94
3.6 SUMMARY 96
3.7 EXERCISES 97
3.7.1 Factorial 97
3.7.2 ToUpper; ToLower 97
3.7.3 3D Distance 98
3.7.4 Arc Tangent 2 99
3.7.5 Calculator Program 100
3.7.6 Slot Machine 101
3.7.7 Binary Search 102
3.7.8 Bubble Sort 103
CHAPTER 4: REFERENCES AND POINTERS 107
INTRODUCTION 108
CHAPTER OBJECTIVES 108
4.1 REFERENCES 108
4.1.1 Constant References 110
4.2 POINTERS 111
4.2.1 Computer Memory Primer 111
4.4.2 Pointer Initialization 112
4.4.3 Dereferencing 114
4.3 ARRAYS REVISITED 117
4
4.3.1 Pointer to the Beginning of an Array 117
4.3.2 Pointer Arithmetic 118
4.3.1 Passing Arrays into Functions 120
4.4 RETURNING MULTIPLE RETURN VALUES 122
4.4.1 Returning Multiple Return Values with Pointers 122
4.4.2 Returning Multiple Return Values with References 124
4.5 DYNAMIC MEMORY 125
4.5.1 Allocating Memory 126
4.5.2 Deleting Memory 127
4.5.3 Memory Leaks 127
4.5.4 Sample Program 128
4.6 STD::VECTOR 132
4.7 FUNCTION POINTERS 135
4.7.1 The Uses of Function Pointers 136
4.7.2 Function Pointer Syntax 137
4.8 SUMMARY 138
4.9 EXERCISES 139
4.9.1 Essay Questions 139
4.9.2 Dice Function 140
4.9.3 Array Fill 140
4.9.4 Quadratic Equation 141
CHAPTER 5: CLASSES AND OBJECT ORIENTED PROGRAMMING 144
INTRODUCTION 144
CHAPTER OBJECTIVES 145
5.1 OBJECT ORIENTED PROGRAMMING CONCEPTS 145
5.2 CLASSES 146
5.2.1 Syntax 146
5.2.2 Class Access: The Dot Operator 148
5.2.3 Header Files; Class Definitions; Class Implementations 150
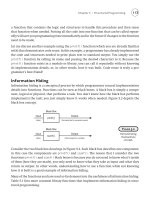
5.2.2.1 Inclusion Guards 152
5.2.4 DATA HIDING: PRIVATE VERSUS PUBLIC 153
5.2.5 Constructors and Destructors 155
5.2.6 Copy Constructors and the Assignment Operator 157
5.3 RPG GAME: CLASS EXAMPLES 158
5.3.1 The Range Structure 158
5.3.2 Random Functions 159
5.3.3 Weapon Class 159
5.3.4 Monster Class 160
5.3.5 Player Class 165
5.3.6 Map Class 173
5.4 THE GAME 177
5.4.1 Segment 1 179
5.4.2 Segment 2 180
5.4.3 Segment 3 180
5.4.4 Segment 4 182
5.5 SUMMARY 183
5.6 EXERCISES 184
5.6.1 Gold Modification 185
5.6.2 Character Races 185
5.6.3 Leveling Up 185
5.6.4 Magic Points 185
5.6.5 Random Encounters During Rest 186
5.6.6 A Store 186
5.6.7 Items 187
5.6.8 Multiple Enemies 187
5
CHAPTER 6: STRINGS AND OTHER TOPICS 188
INTRODUCTION 189
CHAPTER OBJECTIVES 189
6.1 CHAR STRINGS 189
6.1 STRING LITERALS 191
6.2 ESCAPE CHARACTERS 192
6.2 C-STRING FUNCTIONS 193
6.2.1 Length 193
6.2.2 Equality 194
6.2.3 Copying 195
6.2.4 Addition 195
6.2.7 Formatting 196
6.3 STD::STRING 199
6.3.1 Length 199
6.3.2 Relational Operators 200
6.3.3 Addition 201
6.3.4 Empty Strings 201
6.3.5 Substrings 202
6.3.6 Insert 203
6.3.7 Find 204
6.3.8 Replace 204
6.3.9 Bracket Operator 205
6.3.10 C-String Equivalent 205
6.3.11 getline 206
6.4 THE THIS POINTER 208
6.5 FRIENDS 211
6.5.1 Friend Functions 211
6.5.2 Friend Classes 212
6.6 THE STATIC KEYWORD 212
6.6.1 Static Variables in Functions 212
6.6.2 Static Data Members 213
6.6.3 Static Methods 214
6.7 NAMESPACES 215
6.7.1 Variations of the “using” Clause 217
6.8 ENUMERATED TYPES 218
6.9 SUMMARY 219
6.10 EXERCISES 220
6.10.1 String Reverse 220
6.10.2 To-Upper 220
6.10.3 To-Lower 220
6.10.4 Palindrome 221
CHAPTER 7: OPERATOR OVERLOADING 222
INTRODUCTION 223
CHAPTER OBJECTIVES 224
7.1 VECTOR MATHEMATICS 224
7.2 A VECTOR CLASS 232
7.2.1 Constructors 233
7.2.2 Equality 233
7.2.3 Addition and Subtraction 234
7.2.4 Scalar Multiplication 234
7.2.5 Length 235
7.2.6 Normalization 235
7.2.7 The Dot Product 235
7.2.8 Conversion to float Array 236
6
7.2.9 Printing 237
7.2.10 Inputting 237
7.2.11 Example: Vector3 in Action 237
7.3 OVERLOADING ARITHMETIC OPERATORS 240
7.3.1 Operator Overloading Syntax 241
7.3.2 Overloading the Other Arithmetic Operators 242
7.3.3 Example using our Overloaded Operators 243
7.4 OVERLOADING RELATIONAL OPERATORS 244
7.5 OVERLOADING CONVERSION OPERATORS 246
7.6 OVERLOADING THE EXTRACTION AND INSERTION OPERATORS 247
7.7 A STRING CLASS; OVERLOADING THE ASSIGNMENT OPERATOR, COPY CONSTRUCTOR, AND BRACKET OPERATOR 250
7.7.1 Construction and Destruction 250
7.7.2 Assignment Operator 251
7.7.3 Copy Constructor 253
7.7.4 Overloading the Bracket Operator 254
7.8 SUMMARY 254
7.9 EXERCISES 255
7.9.1 Fraction Class 255
7.9.2 Simple float Array Class 256
CHAPTER 8: FILE INPUT AND OUTPUT 259
INTRODUCTION 260
CHAPTER OBJECTIVES 260
8.1 STREAMS 260
8.2 TEXT FILE I/O 261
8.2.1 Saving Data 261
8.2.2 Loading Data 262
8.2.3 File I/O Example 263
8.3 BINARY FILE I/O 268
8.3.1 Saving Data 268
8.3.2 Loading Data 269
8.3.3 Examples 270
8.4 SUMMARY 273
8.5 EXERCISES 274
8.5.1 Line Count 274
8.5.2 REWRITE 274
CHAPTER 9: INHERITANCE AND POLYMORPHISM 275
INTRODUCTION 276
CHAPTER OBJECTIVES 276
9.1 INHERITANCE BASICS 277
9.2 INHERITANCE DETAILS 284
9.2.1 Repeated Inheritance 284
9.2.2 isa versus hasa 284
9.2.3 Moving Between the Base Class and Derived Class 285
9.2.4 Public versus Private Inheritance 287
9.2.5 Method Overriding 288
9.3 CONSTRUCTORS AND DESTRUCTORS WITH INHERITANCE 290
9.4 MULTIPLE INHERITANCE 292
9.5 POLYMORPHISM 292
9.5.1 First Attempt (Incorrect Solution) 293
9.5.2 Second Attempt (Correct Solution) 296
9.6 HOW VIRTUAL FUNCTIONS WORK 300
9.7 THE COST OF VIRTUAL FUNCTIONS 302
9.8 ABSTRACT CLASSES 303
9.9 INTERFACES 305
7
9.10 SUMMARY 307
9.11 EXERCISES 308
9.11 Employee Database 308
C++ MODULE I CONCLUSION 313
8
Chapter 1
Introducing C++
9
Introduction
C++ is a powerful language that unifies high-level programming paradigms, such as object oriented
programming, with low-level efficiencies, such as the ability to directly manipulate memory. For these
reasons, C++ has been embraced as the language of choice among game developers. C++ fulfills the
need for high-level language constructs which aid in the organization of building complex virtual
worlds, but is also able to perform low-level optimizations in order to squeeze out extra performance for
such things as sophisticated special effects, realistic physics, and complex artificial intelligence.
Chapter Objectives
• Create, compile, link and execute C++ programs.
• Find out how C++ code is transformed into machine code.
• Learn some of the basic C++ features necessary for every C++ program.
• Discover how to output and input text information to and from the user.
• Understand the concept of variables.
• Perform simple arithmetic operations in C++.
1.1 Getting Started—Your First C++ Program
A program is a list of instructions that directs the computer to perform a series of operations. An
operation could be adding two numbers together or outputting some data to the screen. In this section
you will learn, step-by-step, how to create, compile, link and execute a C++ program using Visual C++
.NET (either the 2002 or 2003 edition). We recommend that you actually perform these steps as you
read them in order to fully understand and absorb all that you are learning. If you are not using Visual
C++ .NET, consult your particular C++ development tool’s documentation for information on how to
create, compile, link and execute a C++ program.
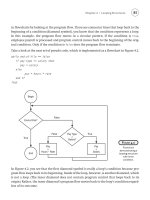
1.1.1 Creating the Project
After you launch Visual C++ .NET, go to the menu and select File->New->Project. The following
dialog box appears:
10
Figure 1.1: The “New Project” dialog box.
Enter a name of your choosing for the project and the location to which you wish to save it on your hard
drive. Then press the OK button. A new Overview dialog box now appears, as seen in Figure 1.2.
Selecting th Application Settings
e button displays the dialog box shown in Figure 1.3
Figure 1.2: The “Overview” dialog box. Select the "Application Settings" button from the blue column on the left.
11
Figure 1.3: The “Application Settings” dialog box. Be sure to select “Console application” and check “Empty
rward, press the “Finish” project.” Afte button.
lication for the Application type setting, and have checked Empty
project for the Additional options setting, press the Finish button. At this point, we have successfully
created a C++ project. The next step is to add a C++ source code file (.CPP) to the project; that is, a file
.CPP File to the Project
dd New
(.cpp).
n select Open. A blank .CPP file should automatically be opened in
Once you have selected Console app
in which we will actually write our C++ code.
1.1.2 Adding A
To add a .CPP file to your project, go to the menu and select Project->Add New Item… An A
em dialog box appears (Figure 1.4). From the right category, Templates, select a C++ FileIt
Give the .CPP file a name, and the
Visual C++ .NET.
12
gure 1.4: The “Add New Item” dialog box. Select the file type you wish to add to the project. In this caseFi we want
.1.3 riting the Code
Program 1.1: Print String.
to add a C++ File (.cpp).
W1
You should now see a blank .CPP file where we can begin to write our code. Type or copy the
llowing C++ code, exactly as it is, into your .CPP file. fo
//===================================================================
// print_string.cpp By Frank Luna
//===================================================================
#include <iostream>
#include <string>
int main()
{
std::string firstName = "";
std::cout << "Enter your first name and press Enter: ";
std::cin >> firstName;
std::cout << std::endl;
std::cout << "Hello, " << firstName << std::endl << std::endl;
}
13
1.1.4 Compiling, Linking, and Executing
After the C++ code is completed, it must be translated into a language the computer understands—that
is, machine language—in order that it can be executed. There are two steps to this translation process:
1) Compilation
2) Linking
In the compilation step, the compiler co ore
complex projects will contain more than and generates an object file (.OBJ) for
ach one. An object file is said to contain object code.
le. It is the executable file which will run on your platform.
he fir rogram. To compile the program, go to the
enu a NET, the results of your compilation should
mpiles each source code file (.CPP) in your project (m
one source code file)
e
In the next step, called linking, the linker combines all the object files, as well as any library files
(.LIB), to produce an executable fi
Note: A library file is a set of object code that usually stores the object code of many object files in one
compact file. In this way, users do not have to link numerous object files but can merely link one library
file.
T st step towards generating an .EXE is to compile the p
nd select Build->Compile. At the bottom of VC++ .m
be displayed in the Output window—see Figure 1.5.
Figure 1.5: Compilation Output.
Observe that we have zero errors and zero warnings; this means we have written legal C++ code, and
laying various errors
r warnings. For example, if you removed one of the ending semicolons from Program 1.1 and tried to
compil
identifi
revent ul compile.
Once we have fixed any compiler errors and there are zero errors or warnings, we can proceed to the
next step—the build step (also called linking). To build the program, select the Build->Build Solution
therefore our program has compiled successfully. If we had written any illegal C++ code (e.g., we made
typos or used incorrect C++ punctuation), the compiler would let us know by disp
o
e it, you would get the following error message: “error C2146: syntax error: missing ';' before
er 'cout'”. You can use these error messages to help pinpoint the problems in your code that are
ing a successfp
14
item from the menu. Similarly to the compilation process, the results of you
in the Output window—see Figure 1.6.
r build should be displayed
Figure 1.6: Build Output.
Observe that we have zero errors and zero warnings; this means we have written legal C++ code, and
therefore our program has linked successfully. As with compilation, there would be error messages if we
had written any illegal C++ code.
At post-build we have an executable file generated for a program. We can now execute the program
V going to the menu and selecting Debug->Start Without Debugging. Doing so
unche
rst name and press enter. (Note that we bold
is output.) The
from
la
C++ .NET by
s our console application, which outputs the following:
Enter your first name and press Enter:
Doing as the application instructs, you will input your fi
input text in this book so that it is clear which text is entered as input and which text
rogram then displays the following: p
Program 1.1: Output.
Enter your first name and press Enter: Frank
Hello, Frank
Press any key to continue
Note that by choosing Start without Debugging, the compiler automatically adds the “Press any key to
continue” functionality.
Before continuing with this chapter, spend some time studying the ouput of Program 1.1 and the code
used to create it. Based on the output, can you guess what each line of code does?
Note: If your program has not been compiled or built, you can still go directly to the “Start without
Debugging” menu command, and VC++ .NET will automatically compile, build, and execute the program
in one step.
15
1.2 The “Print String” Program Explained
The following subsections explain Program 1.1 line-by-line.
1.2.1 Comments
//=========================================================
// print_string.cpp By Frank Luna
//=========================================================
The first three lines in Program 1.1 are comments. A single lined comment is designated in C++ with
e double forward slashes ‘//’—everything on the same line that follows the ‘//’ is part of the comment.
ent, where everything between a ‘/*…*/’ pair is part of the
he ‘/*…*/’ style comment, you can comment out parts of a line, whereas ‘//’
mment the entire line. For example,
rint firstName*/ firstName << endl;
mment (/*print firstName*/) in the middle of a code line. In general, ‘/*…*/’
mments are highlighted in
omments are strings that are ignored by the compiler. That is, when the compiler compiles the code, it
. For example, at some
ts ou can write a clear
coworker from using your code incorrectly and
asting , the code that was obvious to you three months ago might not be so obvious
day. ul comments can be beneficial to you as well.
writing “clear” and “useful”
omments, as opposed to “bad” comments. “Good” comments are clear, concise, and easy to
th
C++ also supports a multi-line comm
comment. For example:
/* This is
a multi-
line comment */
lso that by using tNote a
comments always co
cout << "Hello, " << /*p
ere we have inserted a coH
style comments comment out only what is between them. Observe that co
green in VC++ .NET.
C
skips over any comments. Their main purpose is to make notes in a program
oint you may write some tricky code that is difficult to follow. With commen , yp
English (or some other natural language) explanation of the code.
Writing clear comments becomes especially important when working in teams, where other
programmers will need to read and modify your code. For instance, you might have a piece of code that
expects a certain kind of input, which may not be obvious to others. By writing a comment that explains
he kind of input that is expected, you may prevent yourt
w time. Furthermore
So maintaining usefto
ote that throughout the above discussion, we state that the goal is N
c
16
understand. “Bad” comments are inconsistent, out of date, ambiguous, vague, or superfluous and are of
no use to anyone. In fact, bad comments can even increase the confusion of the reader. As Bjarne
Stroustrup, the inventor of the C++ language, states in his text, The C++ Programming Language:
Special Edition: “Writing good comments can be as difficult as writing the program itself. It is an art
ts and the #include lines, we have a blank line. Blank lines and spaces are called
hite space, for obvious reasons. The important fact about white space is that the compiler ignores it
(alt u spaces, multiple spaces
bet e piler’s point of view,
the following code is equivalent to Program 1.1 from Section 1.1.3:
ro m ace.
well worth cultivating.”
1.2.2 White Space
Between the commen
w
ho gh there are some exceptions). We very well could have multiple line
we n words, and multiple C++ statements all on the same line. From the com
P gra 1.2: Playing with the white sp
//===================================================================
// print_string.cpp By Frank Luna
//===================================================================
#include <iostream>
#include <string>
int
main ){ (
std::string
firstName =
"";
std::cout << "Enter your first name and press Enter: ";
std::cin >> firstName; std::cout << std::endl;
std::cout<<"Hello, "<<firstName<<std::endl<<std::endl; }
You should try to compile the above program to verify that it still works correctly.
(e.g., “s p a c e s”) are not ignored, as they are actually considered space
keywords cannot simply be broken up and expected to mean the same
thing. For example, you cannot write “
firstName” as
Note that spaces inside a string
characters. Additionally, C++
fir st Name
Symbols that have actual meaning must be kept intact as they are defined.
17
Finally, the #include directives, which we discuss in the next section, are special kinds of statements and
they must be listed on their own line.
Code for outputting and inputting data to and from the console window
s such as sine and cosine
more functionality to the standard library than just described, and we will
ith it as we progress through this course. (Note that there are entire volumes
we will be using code from the C++ standard library, but in order to do so, we must
our code. To do this, we use an include directive (
#include
>) rogram 1, we invoked two include directives:
#
e fir instructs the compiler to take all the code in the specified file (the file in
twee s), “iostream,” and include it (i.e., copy and paste it) into our .CPP file.
milar e code in “string” and include
into der files, which contain C++
andard library code. Note that in addition to including C++ standard library header files, your program
.2.3
lashes, namespaces are used to organize groups of related code and
prevent code name clashes. For instance, the entire C++ standard library is organized in the standard
(
std) namespace. That is why we had to prefix most of our code in Program 1.1. Essentially, the
1.2.2 Include Directives
In the programs we write, we will need to use some code that we did not write ourselves. For this
course, most of this “other” code will be found in the C++ standard library, which is a set of C++
utility code that ships with your C++ compiler. Some examples of useful code which the C++ standard
library includes are:
Functions for computing various math operation
Random number generators
from the hard drive Code for saving and loading files to and
Code to work with strings
There is, of course, much
become more familiar w
dedicated to just the C++ standard library functionality.)
We know that
ude some standard library code into incl
<
file . In our first example program, P
include <iostream>
#include <string>
Th st include directive
n the angle bracketbe
Si ly, the second include directive instructs the compiler to take all th
our .CPP file. iostream and string are C++ standard library heait
ts
links with standard library files as well; however, this is done automatically—the C++ standard libraries
are linked by default when you create a new C++ project.
1 Namespaces
Namespaces are to code as folders are to files. That is to say, as folders are used to organize groups of
related files and prevent file name c
18
std:: prefix tells the compiler to search the standard
code we need.
namespace (folder) to look for the standard library
espace. The following revision of Program 1.1 includes a
using namespace std clause,
hich moves the code in the
std namespace to the global namespace, and as such, we no longer need to
Of course, prefixing all of your code library with
std::, or some other namespace can become
cumbersome. With the
using namespace X clause, you can move code in some particular
namespace to the global namespace, where X is some namespace. Think of the global namespace as the
“working folder”. You do not need to specify the folder path of a file that exists in the folder you are
currently working in, and likewise, you do not need to specify a namespace when accessing code in the
global nam
w
prefix our standard library code with the
std:: prefix:
Program 1.3: Print String with “using namespace std” clause.
//===================================================================
// print_string.cpp By Frank Luna
//===================================================================
#include <iostream>
#include <string>
using namespace std;
int main()
{
string firstName = "";
cout << "Enter your first name and press Enter: ";
cin >> firstName;
cout << endl;
cout << "Hello, " << firstName << endl << endl;
}
he namespace/folder analogy, pref
using namespace X clause
re, such as creating your own namespaces, but we will defer a more
detailed discussion until Chapter 5.
Note that you can “use” more than one namespace. For example, if you had defined another namespace
called
math, you could write:
using namespace math;
using namespace std;
ixing Standard Library code, and the T
are all you need to know about namespaces for now. Note, however, that there is much more to
namespaces than we covered he
19
1.2.4
ust have a main function.
or now,
e ecuted by the
main main ’
enotes
Braces m
.2.5 std::string
std::s
charact
string”
library, rite the include directive
#include <string>.
In our example program, we declare a
std::string variable called firstName (the variable name
e want with a few exceptions—see Section 1.3.2) and define it to be an empty
string (i.e. “”). This std::string variable firstName will be used to store (i.e., save) the first name
the user enters into the program.
std::string is a powerful variable type, and we will return to it in
t with std::cin and std::cout
e might guess that “
std::cout <<” outputs data to the
ole window and “
o use them we
std::cout << "Enter your first name and press Enter: ";
We prompt the user to enter his/her name with the following line:
The main{ } Function
The main{ } function is special because it is the entry point for every C++ program; that is, every
++ program starts executing at
main. Consequently, every C++ program m
C
The code inside a function’s corresponding curly braces is called the function body or function
efinition. We will discuss in more detail what we mean by the term function in Chapter 3. Fd
just understand that the first instruction in main’s function body is the first instruction x
rogram. p
In C++, the curly braces {} are used to define the beginning and the end of a logical code unit. For
xample, the code inside the braces of
defines the unit (function) . The opening brace ‘{
e
d the beginning of a code block, and the closing brace ‘}’ denotes the end of the code block.
ust always be paired together; a beginning brace must always have an ending brace.
1
tring is a C++ variable type (more on variables in Section 1.3) that represents a string of
ers (i.e., text used for constructing words and sentences). For example, “hello,” and “this is a
are both strings. As you can tell by the std:: prefix, std::string is part of the C++ standard
and in order to use it we must w
can be almost anything w
detail in Chapter 6, but for now it suffices to know that it is used to store text strings.
1.2.6 Input and Outpu
Program 1.1 is able to output and input data to and from the console window. By examining the code of
Program 1.1 and its corresponding output, w
cons
std::cin >>” inputs information from the console window. This guess is, in
fact, correct. Observe that
std::cout and std::cin exist in the std namespace, and t
must write the include directive
#include <iostream>.
For example, in Program 1.1 we display the text “Enter your first name and press Enter:” to the console
window with the following line:
20
firstName;
The sta
ut << std::endl;” instruc s a result,
the pro e cursor to the next line for
Finally, we can chain outputs together with separate i
std::cout << "Hello, " << firstName
Here we output “Hello, ” followed by the string val
wed by
two “new line” commands. We can also chain inputs
Note: The symbol ‘<<’ is called the
insertion o
extraction
operator
. These names make sense when we ut into an
outbound stream of data, and ‘>>’ is used to extr
most every line of code in Program 1.1 ples of
ts. A statement in C++ instructs th reate a
perform some arithmetic, or output so a statement
h a semicolon (not a new line). A semic iod ends an
English sentence. We could very well have st readability
this usually is not done.
1.3 Variables
In Prog we ask the user to enter his/her name. e. The
computer knows what name to say “Hello” to becaus the line:
std::cin >> firstName;
The command
std::cin >> prompted the user to e it, the program
ved what was entered in a string variable called
firstName has been saved, we
arizes the
std::cin >>
tement “
std::co
gram will move th
ts the computer to output a new line. A
either input or output.
l: nsertions per line, as we do with this cal
<< std::endl << std::endl;
ue stored in the variable
firstName, follo
together, but this will be discussed later.
perator
. And the symbol ‘>>’ is called the
consider that ‘<<’ is used to insert outp
act input from an inbound stream of data.
Important Note!
So far, al
statemen
has ended with a semicolon. These are exam
e computer to do a specific action, such as c
me text. variable,
ends wit
Of particular importance is that
olon ends a C++ statement much like a per
atements that span multiple lines, but for
purposes,
ram 1.1 The program then says “Hello” to that nam
e we saved the name the user entered with
nter some text and when he entered
. Because the string
sa
can output the string with the following line:
std::cout << "Hello, " << firstName << std::endl << std::endl;
A variable occupies a region of physical system memory and stores a value of some type. There are
several built-in C++ variable types which allow you to store different types of values, and as you will
earn in later chapters, you can even make your own variable types. The following table summl
C++ variable types:
21
Table1.1: C++ Types.
Variable Type Description
std::string
Used to store string variables. Note that
std::string is not part of the core
language, but part of the standard library.
char
Used to store single character variables
such as ‘a’, ‘b’, ‘c’, etc. Usually this is an
8-bit value so that it can store up to 256
values—enough to represent the Extended
A for
a table of the Extended ASCII Character
Set. Observe from the ASCII table, that
characters are actually represented with
, thus a
char type is really an
interpreted as a character.
ASCII Character Set. See Appendix
integers
integer, but
int
The primary type used to store an integer
value.
short
Typically stores a shorter range of integers
than int.
long
A signed integer ty
store a longer range
pe that typically can
of integers than int.
float
Used to sto
is, number
re floating point numbers; that
s with decimals like 1.2345 and
–32.985.
double
Similar to a float, but typically stores
oint numbers with greater
than float.
floating p
precision
bool
Used to store truth-values; that is, true or
false. Note that true and false are
C++ keywords. Also note that, in C++,
zero is also considered false, and any non-
zero value, negative or positive, is
considered to be true.
The exact range of values each type can hold or the amount of memory that each type occupies is not
ecause these values are largely platform-dependent. A char may be 8-bits (1 byte) on
ay be 32-bits on another platform. Thus, you would usually like to avoid making
n your code, in order that your code remain portable (i.e., works on
ther platforms). For example, if you assume in your code that
chars are 8-bits, and then move
development to a platform with 32-bit chars, you will have errors which will need to be fixed.
ote that you can use
std::cout and std::cin to output and input these other types as well. For
example, consider the following program.
noted in the table b
some platforms, but m
assumptions about the C++ types i
o
N
22
Program 1.4: Type Input/Output.
// Program asks user to enter different types of values, the
// program then echoes these values back to the console window.
#include <iostream>
#include <string>
using namespace std;
int main()
{
// Declare variables and define them to some default value.
char letter = 'A';
int integer = 0;
float dec = 0.0f;
cout << "Enter a letter: "; // Output
cin >> letter; // Get input
cout << "Enter an integer: ";// Output
cin >> integer; // Get input
Output cout << "Enter a float number: "; //
cin >> dec; // Get input
cout << endl; // Output another new line
// Now output back the values the user entered.
cout << "Letter: " << letter << endl;
cout << "Integer: " << integer << endl;
cout << "Float: " << dec << endl;
}
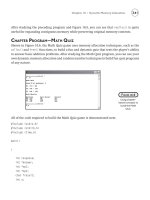
Program 1.4: Output.
Enter a letter: F
Enter an integer: 100
Enter a float number: -5.987123
Letter: F
Integer: 100
Float: -5.98712
Press any key to continue
23
1.3.1 Variable Declarations and Definitions
W e write the following code, w
hen w e say that we are declaring a variable:
int myVar; // Variable Declaration.
alled
myVar of type int. Although myVar has been declared, it is
undefined; that is, the value it stores is unknown. Consequently, it is common to say that the variable
In particular, we declare a variable c
contains garbage. Try compiling and executing this small program to see what value myVar contains:
#include <iostream>
using namespace std;
int main()
{
int myVar;
cout << myVar << endl;
}
hen we assign a value to a variable we are defining or initializing the variable:
he r. Note that the assignment operator assigns
alu mparative sense. This is often
onfusi
We can d le at the same time:
eclaration and Definition.
Because variables that contain garbage are useless and prone to introducing errors, it is advisable to
comma
as this next code snippet shows:
j = 2.0f, k = 3.0f;
vised for readability purposes, to make one declaration or definition
line
W
myVar = 10; // Variable Definition.
T ‘=’ symbol, in C++, is called the assignment operato
es to variables—it says nothing about equality in a purely cov
c ng to new C++ students so be sure to try to remember this.
also declare an define a variab
int myVar = 10; // Variable D
always define your variables at the time of declaration to some default value. Typically, zero is a good
default value for numeric values, and an empty string, “”, is a good default value for strings.
t is possible to make multiple declarations and/or definitions in one statement using the I
operator
int x, y, z;
x = 1, y = 2, z = 3;
float i = 1.0f,
ore compact, it is adDespite being m
per .
24
Finally, we can also chain assignments together (assigned values flow from right to left):
float a, b, c, d;
a = b = c = d = num;
mes
when we declare/define a variable we must give it a name (identifier) so that
le within the program. Variable names can be almost anything, with some
with a letter. The variable name
2VarName is illegal. However, the
t use symbols like ‘!’, ‘@’, ‘#’, ‘$’, ‘%’ in your variable names.
Variable names cannot be C++ keywords (Appendix B). For instance, you cannot name a
variable “float” since t the C++ type
float.
Variable names cannot
ote: C++ is case sensiti . For example, these identifiers are all unique because they differ by case:
llo, Hello, HELLO, heLLo.
C++ types and the amount of memory they occupy is
platform-dependent. In order to get the size of a type, in bytes, on the current platform, you use the
float num = 0.0f;
1.3.2 Variable Na
As shown in Program 1.3,
we can refer to that variab
exceptions:
1. Variable names must begin
underscore is considered a letter, and therefore, the identifier
_myVar is legal.
2. Variable names can include the underscore (‘_’), letters, and numbers, but no other symbols. For
instance, you canno
3.
hat is a C++ keyword that specifies
4. have spaces between them.
N ve
he
1.3.3 The sizeof Operator
As stated in Section 1.3, the range of values of the
sizeof operator. Consider the following program, written on a 32-bit Windows platform:
Program 1.5: The “sizeof” Operator.
// Program outputs the size of various types.
#include <iostream>
using namespace std;
int main()
{
cout << "sizeof(b sizeof(bool) << endl; ool) = " <<
cout << "sizeof(c sizeof(char) << endl; har) = " <<
cout << "sizeof(s sizeof(short) << endl; hort) = " <<
cout << "sizeof(int) = " << sizeof(int) << endl;
25