Writing Enterprise Applications with Javaä 2 SDK, Enterprise Edition doc
Bạn đang xem bản rút gọn của tài liệu. Xem và tải ngay bản đầy đủ của tài liệu tại đây (575.87 KB, 123 trang )
SEPTEMBER 27, 2000
Writing Enterprise Applications with
Java 2 SDK, Enterprise Edition
by Monica Pawlan
SEPTEMBER 27, 2000
copyright 1995-99 Sun Microsystems, Inc.
As used in this document, the terms “Java virtual machine” or “Java VM” mean a virtual machine for the Java
platform.
PREFACE
SEPTEMBER 27, 2000 III
Preface
This tutorial introduces you to the APIs, tools, and services provided in the Java 2 Enter-
prise Edition (J2EE) Software Developer Kit (SDK). You can get the free J2EE SDK
( to use for demonstrations, prototyping,
educational use, and verifying J2EE application portability.
To support these uses the J2EE SDK comes with J2EE development and deployment tools, a
Web server, Cloudscape database, Java Software application server, Extensible Markup Lan-
guage (XML) support, the J2EE APIs, and Java Plug-In. Java Plug-In lets you run Java 2
applets in browsers that support an earlier release of the Java Runtime Environment (JRE).
Note: This is a work in progress. Links to new lessons are turned on when they become
available. Submit comments and suggestions to
PREFACE
IV SEPTEMBER 27, 2000
CONTENTS
SEPTEMBER 27, 2000 V
Contents
Preface. . . . . . . . . . . . . . . . . . . . . . . . . . . . . . . . . . . . . . . . . . iii
Lesson 1
A Simple Session Bean. . . . . . . . . . . . . . . . . . . . . . . . . . . . . .1
Example Thin-Client Multitiered Application 2
J2EE Software and Setup 3
Unix: 3
Windows: 3
Path and ClassPath Settings 3
Path Settings 3
Class Path Settings 4
J2EE Application Components 4
Create the HTML Page 5
HTML Code 6
Create the Servlet 6
Import Statements 7
init Method 7
doGet Method 7
Servlet Code 9
Create the Session Bean 10
CalcHome 11
Calc 12
CalcBean 12
Compile the Session Bean and Servlet 13
Compile the Session Bean 13
Compile the Servlet 13
Start the J2EE Application Server 14
Unix: 14
Windows: 14
Start the Deploy Tool 14
Unix: 14
Windows: 14
Deploy Tool 15
Assemble the J2EE Application 16
Create J2EE Application 16
Create Session Bean 16
Create Web Component 19
Specify JNDI Name and Root Context 22
CONTENTS
SEPTEMBER 27, 2000 VI
Verify and Deploy the J2EE Application 23
Run the J2EE Application 25
Updating Component Code 26
Lesson 2
A Simple Entity Bean . . . . . . . . . . . . . . . . . . . . . . . . . . . . .27
Create the Entity Bean 28
BonusHome 28
Bonus 29
BonusBean 30
Change the Servlet 32
Compile 34
Compile the Entity Bean 34
Compile the Servlet 35
Start the Platform and Tools 35
Unix 35
Windows 35
Assemble and Deploy 35
Update Application File 36
Create Entity Bean 36
Verify and Deploy the J2EE Application 42
Run the J2EE Application 43
Lesson 3
Cooperating Enterprise Beans . . . . . . . . . . . . . . . . . . . . . .45
Change the Session Bean 46
CalcHome 46
Calc 47
CalcBean 47
Change the Servlet 49
Compile 50
Compile the Session Bean 51
Compile the Servlet 51
Start the Platform and Tools 51
Unix 52
Windows 52
Assemble the Application 52
Create New J2EE Application 52
Create New Web Component 53
Bundle Session and Entity Beans in one JAR File 54
Verify and Deploy the J2EE Application 58
Run the J2EE Application 60
Lesson 4
JavaServer Pages Technology. . . . . . . . . . . . . . . . . . . . . . .61
CONTENTS
SEPTEMBER 27, 2000 VII
Create the JSP Page 62
Comments 64
Directives 64
Declarations 64
Scriptlets 65
Predefined Variables 65
Expressions 65
JSP-Specific Tags 66
Change bonus.html 66
Start the Platform and Tools 67
Unix 67
Windows 67
Remove the WAR File 67
Create New WAR FIle 67
Verify and Deploy the J2EE Application 68
Run the J2EE Application 70
More Information 71
Lesson 5
Adding JavaBeans Technology to the Mix . . . . . . . . . . . .73
About the Example 74
Create bonus.jsp 76
Specify the JavaBean 78
Get the Data 78
Pass the Data to the JavaBean 78
Retrieve Data from the JavaBean 78
Create the JavaBeans Class 79
Bean Properties 81
Constructor 81
Set Methods 81
Get Methods 82
Start the Platform and Tools 84
Unix 84
Windows 84
Remove the WAR File 85
Create New WAR FIle 85
Verify and Deploy the J2EE Application 86
Run the J2EE Application 87
More Information 87
Lesson 6
Extensible Markup Language (XML) . . . . . . . . . . . . . . . .89
Marking and Handling Text 90
CONTENTS
VIII SEPTEMBER 27, 2000
Change the JavaBean Class 90
XML Prolog 91
Document Root 91
Child Nodes 91
Other XML Tags 91
JavaBean Code 92
The APIs 95
SAX and DOM 95
J2EE 95
Update and Run the Application 96
More Information 96
Lesson 7
JDBC Technology and Bean-Managed Persistence . . . . 97
Bean Lifecycle 98
Change the BonusBean Code 99
Import Statements 99
Instance Variables 100
Business Methods 100
LifeCycle Methods 100
Change the CalcBean and JBonusBean Code 106
Create the Database Table 107
createTable.sql 107
cloudTable.bat 108
cloudTable.sh 108
Remove the JAR File 109
Verify and Deploy the Application 111
Run the Application 112
More Information 113
Index . . . . . . . . . . . . . . . . . . . . . . . . . . . . . . . . . . . . . . . . . 115
LESSON 1 A SIMPLE SESSION BEAN
SEPTEMBER 27, 2000 1
Lesson 1
A Simple Session Bean
This lesson introduces you to J2EE applications programming, and the J2EE SDK by show-
ing you how to write a simple thin-client multitiered enterprise application that consists of
an HTML page, servlet, and session bean.
The J2EE SDK is a non-commercial operational definition of the J2EE platform and specifi-
cation made freely available by Sun Microsystems for demonstrations, prototyping, and edu-
cational uses. It comes with the J2EE application server, Web server, database, J2EE APIs,
and a full-range of development and deployment tools. You will become acquainted with
many of these features and tools as you work through the lessons in this tutorial.
• Example Thin-Client Multitiered Application (page 2)
• J2EE Software and Setup (page 3)
• Path and ClassPath Settings (page 3)
• J2EE Application Components (page 4)
• Create the HTML Page (page 5)
• Create the Servlet (page 6)
• Create the Session Bean (page 10)
• Compile the Session Bean and Servlet (page 13)
• Start the J2EE Application Server (page 14)
• Start the Deploy Tool (page 14)
• Deploy Tool (page 15)
• Assemble the J2EE Application (page 16)
• Verify and Deploy the J2EE Application (page 23)
• Run the J2EE Application (page 25)
• Updating Component Code (page 26)
Browser/HTML
Page
Servlet
Session Bean
LESSON 1 A SIMPLE SESSION BEAN
2 SEPTEMBER 27, 2000
Example Thin-Client Multitiered Application
The example thin-client multitiered application for this lesson accepts user input through an
HTML form that invokes a servlet. The servlet uses Java Naming and Directory Interface
(JNDI) APIs to look up a session bean to perform a calculation on its behalf. Upon receiving
the results of the calculation, the servlet returns the calculated value to the end user in an
HTML page.
This example is a thin-client application because the servlet does not execute any business
logic. The simple calculation is performed by a session bean executing on the J2EE applica-
tion server. So, the client is thin because it does not handle the processing; the session bean
does.
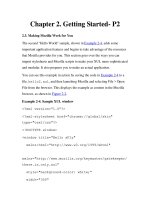
Multitiered applications can consist of 3 or 4 tiers. As shown in Figure 1, the multitiered
example for this tutorial has four tiers. Three-tiered architecture extends the standard two-
tier client and server model by placing a multithreaded application server between the non-
web-based client application and a backend database. Four-tiered architecture extends the
three-tier model by replacing the client application with a Web browser and HTML pages
powered by servlet/JavaServer Pages technology.
Figure 1 Multitiered Architecture
Web Server
(Thin-Client
Servlet
)
Database
Server
Network
Enterprise Beans
Application
Server
Network
Web Browser
HTML Pages
Network
Tier 1:
Client Tier
Tier 2:
Web Tier
Tier 3:
Business Tier
Tier 4:
EIS Tier
LESSON 1 A SIMPLE SESSION BEAN
SEPTEMBER 27, 2000 3
While this lesson uses only three of the four tiers, Lesson 2 expands this same example to
access the database server in the fourth tier. Later lessons adapt the example to use JavaSer-
ver Pages and Extensible Markup Language (XML) technologies.
J2EE Software and Setup
To run the tutorial examples, you need to download and install the Java 2 SDK Enterprise
Edition (J2EE), Version 1.2.1 Release (
and
Java 2 SDK, Standard Edition (J2SE), Version 1.2 or later (
/>index.html
).
The instructions in this tutorial assume J2EE and J2SE are both installed in a J2EE directory
under monicap's home directory.
Note: Everywhere
monicap is used in a path name, please change it to your own user
name.
Unix:
/home/monicap/J2EE/j2sdkee1.2.1
/home/monicap/J2EE/jdk1.2.2
Windows:
\home\monicap\J2EE\j2sdkee1.2.1
\home\monicap\J2EE\jdk1.2.2
Path and ClassPath Settings
The download has the J2EE application server, Cloudscape database, a Web server using
secure socket layer (SSL) also known as HTTP over HTTPS, development and deployment
tools, and the Java APIs for the Enterprise. To use these features, set your path and class path
environment variables as described here.
Path Settings
Path settings make the development and deployment tools accessible from anywhere on your
system. Make sure you place these path settings before any other paths you might have for
other older JDK installations.
Unix:
/home/monicap/J2EE/jdk1.2.2/bin
/home/monicap/J2EE/j2sdkee1.2.1/bin
LESSON 1 A SIMPLE SESSION BEAN
4 SEPTEMBER 27, 2000
Windows:
\home\monicap\J2EE\jdk1.2.2\bin
\home\monicap\J2EE\j2sdkee1.2.1\bin
Class Path Settings
Class path settings tell the Java 2 development and deployment tools where to find the vari-
ous class libraries they use.
Unix:
/home/monicap/J2EE/j2sdkee1.2.1/lib/j2ee.jar
Windows:
\home\monicap\J2EE\j2sdkee1.2.1\lib\j2ee.jar
J2EE Application Components
J2EE applications programmers write J2EE application components. A J2EE component is a
self-contained functional software unit that is assesmbled into a J2EE application and inter-
faces with other application components. The J2EE specification defines the following
application components:
• Application client components
• Enterprise JavaBeans components
• Servlets and JavaServer Pages components (also called Web components)
• Applets
In this lesson, you create a J2EE application and two J2EE components: a servlet and ses-
sion bean. The servlet is bundled with its HTML file into a Web Archive (WAR) file, and the
session bean interfaces and classes are bundled into a JAR file. The WAR and JAR files are
added to the J2EE application and bundled into an Enterprise Archive (EAR) file for verifi-
cation testing and deployment to the production environment.
While you do all of these steps for this lesson, you are actually performing several different
functions. Writing the servlet and session bean code is a developer function, while creating a
J2EE application and adding J2EE components to an application assembly function. In real-
ity, these functions would be performed by different people in different companies.
LESSON 1 A SIMPLE SESSION BEAN
SEPTEMBER 27, 2000 5
Create the HTML Page
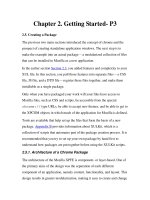
The HTML page for this lesson is called bonus.html. It’s HTML code is after Figure 2,
which shows how the HTML page looks when displayed to the user. The
bonus.html file
has two data fields so the user can enter a social security number and a multiplier. When the
user clicks the
Submit button, BonusServlet retrieves the end user data, looks up the ses-
sion bean, and passes the user data to the session bean. The session bean calculates a bonus
and returns the bonus value to the servlet. The servlet then returns another HTML page with
the bonus value for the end user to view.
Figure 2 HTML Page
Figure 3 shows how data flows between the browser and the session bean. The session bean
executes in the J2EE application server.
Figure 3 Data Flow
HTML Form
Browser
bonus.html
Servlet
(Web Server)
BonusServlet.class
Session Bean
(Application Server)
CalcBean.class
Calc.class
CalcHome.class
Component Component
LESSON 1 A SIMPLE SESSION BEAN
6 SEPTEMBER 27, 2000
HTML Code
The interesting thing about the HTML form code is the alias used to invoke BonusServlet.
When the user clicks the Submit button on the HTML form,
BonusServlet is invoked
because it is mapped to the
BonusAlias during application assembly described in Assemble
the J2EE Application (page 16).
The example assumes
bonus.html is in the /home/monicap/J2EE/ClientCode directory on
Unix. Here and hereafter, Windows users can reverse the slashes to get the correct directory
pathname for their platform.
<HTML>
<BODY BGCOLOR = "WHITE">
<BLOCKQUOTE>
<H3>Bonus Calculation</H3>
<FORM METHOD="GET"
ACTION="BonusAlias">
<P>
Enter social security Number:
<P>
<INPUT TYPE="TEXT" NAME="SOCSEC"></INPUT>
<P>
Enter Multiplier:
<P>
<INPUT TYPE="TEXT" NAME="MULTIPLIER"></INPUT>
<P>
<INPUT TYPE="SUBMIT" VALUE="Submit">
<INPUT TYPE="RESET">
</FORM>
</BLOCKQUOTE>
</BODY>
</HTML>
Create the Servlet
The example assumes the BonusServlet.java file is in the /home/monicap/J2EE/Client-
Code
directory on Unix. At run time, the servlet code does the following:
• Retrieves the user data
• Looks up the session bean
• Passes the data to the session bean
• Upon receiving a value back from the session bean, creates an HTML page to display
the returned value to the user.
The next sections describe the different parts of the servlet code. The servlet code is shown
in its entirety in Servlet Code (page 9).
LESSON 1 A SIMPLE SESSION BEAN
SEPTEMBER 27, 2000 7
Import Statements
The servlet code begins with import statements for the following packages:
•
javax.servlet, which contains generic (protocol-independent) servlet classes. The
HTTPServlet class uses the ServletException class in this package to indicate a
servlet problem.
•
javax.servlet.http, which contains HTTP servlet classes. The HttpServlet class
is in this package.
•
java.io for system input and output. The HttpServlet class uses the IOException
class in this package to signal that an input or output exception of some kind has
occurred.
•
javax.naming for using the Java Naming and Directory Interface (JNDI) APIs to
look up the session bean home interface.
•
javax.rmi for looking up the session bean home interface and making its remote
server object ready for communications.
init Method
The BonusServlet.init method looks up the session bean home interface and creates its
instance. The method uses the JNDI name specified during component assembly (
calcs)to
get a reference to the home interface by its name. The next line passes the reference and the
home interface class to the
PortableRemoteObject.narrow method to be sure the reference
can be cast to type
CalcHome.
InitialContext ctx = new InitialContext();
Object objref = ctx.lookup("calcs");
homecalc = (CalcHome)PortableRemoteObject.narrow(obj
ref, CalcHome.class);
doGet Method
The parameter list for the doGet method takes a request and response object. The browser
sends a request to the servlet and the servlet sends a response back to the browser. The
method implementation accesses information in the
request object to find out who made
the request, what form the request data is in, and which HTTP headers were sent, and uses
the
response object to create an HTML page in response to the browser's request.
The
doGet method throws an IOException if there is an input or output problem when it
handles the request, and a
ServletException if the request could not be handled. To calcu-
late the bonus value, the
doGet method creates the home interface and calls its calcBonus
method.
LESSON 1 A SIMPLE SESSION BEAN
8 SEPTEMBER 27, 2000
public void doGet (HttpServletRequest request,
HttpServletResponse response)
throws ServletException, IOException {
String socsec = null;
int multiplier = 0;
double calc = 0.0;
PrintWriter out;
response.setContentType("text/html");
String title = "EJB Example";
out = response.getWriter();
out.println("<HTML><HEAD><TITLE>)
out.println(title);
out.println("</TITLE></HEAD><BODY>");
try{
//Retrieve Bonus and Social Security Information
String strMult = request.getParameter(
"MULTIPLIER");
Integer integerMult = new Integer(strMult);
multiplier = integerMult.intValue();
socsec = request.getParameter("SOCSEC");
//Calculate bonus
double bonus = 100.00;
theCalculation = homecalc.create();
calc = theCalculation.calcBonus(
multiplier, bonus);
}catch(Exception CreateException){
CreateException.printStackTrace();
}
//Display Data
out.println("<H1>Bonus Calculation</H1>");
out.println("<P>Soc Sec: " + socsec + "<P>");
out.println("<P>Multiplier: " +
multiplier + "<P>");
out.println("<P>Bonus Amount: " + calc + "<P>");
out.println("</BODY></HTML>");
out.close();
}
LESSON 1 A SIMPLE SESSION BEAN
SEPTEMBER 27, 2000 9
Servlet Code
Here is the full code.
import javax.servlet.*;
import javax.servlet.http.*;
import java.io.*;
import javax.naming.*;
import javax.rmi.PortableRemoteObject;
import Beans.*;
public class BonusServlet extends HttpServlet {
CalcHome homecalc;
public void init(ServletConfig config)
throws ServletException{
//Look up home interface
try{
InitialContext ctx = new InitialContext();
Object objref = ctx.lookup("calcs");
homecalc =
(CalcHome)PortableRemoteObject.narrow(
objref,
CalcHome.class);
} catch (Exception NamingException) {
NamingException.printStackTrace();
}
}
public void doGet (HttpServletRequest request,
HttpServletResponse response)
throws ServletException, IOException {
String socsec = null;
int multiplier = 0;
double calc = 0.0;
PrintWriter out;
response.setContentType("text/html");
String title = "EJB Example";
out = response.getWriter();
out.println("<HTML><HEAD><TITLE>");
out.println(title);
out.println("</TITLE></HEAD><BODY>");
try{
Calc theCalculation;
//Get Multiplier and Social Security Information
String strMult =
request.getParameter("MULTIPLIER");
Integer integerMult = new Integer(strMult);
multiplier = integerMult.intValue();
socsec = request.getParameter("SOCSEC");
//Calculate bonus
LESSON 1 A SIMPLE SESSION BEAN
10 SEPTEMBER 27, 2000
double bonus = 100.00;
theCalculation = homecalc.create();
calc =
theCalculation.calcBonus(multiplier, bonus);
} catch(Exception CreateException){
CreateException.printStackTrace();
}
//Display Data
out.println("<H1>Bonus Calculation</H1>");
out.println("<P>Soc Sec: " + socsec + "<P>");
out.println("<P>Multiplier: " +
multiplier + "<P>");
out.println("<P>Bonus Amount: " + calc + "<P>");
out.println("</BODY></HTML>");
out.close();
}
public void destroy() {
System.out.println("Destroy");
}
}
Create the Session Bean
A session bean represents a transient conversation with a client. If the server or client
crashes, the session bean and its data are gone. In contrast, entity beans are persistent and
represent data in a database. If the server or client crashes, the underlying services ensure
the entity bean data is saved.
Because the enterprise bean performs a simple calculation at the request of
BonusServlet,
and the calculation can be reinitiated in the event of a crash, it makes sense to use a session
bean in this example.
Figure 4 shows how the servlet and session bean application components work as a complete
J2EE application once they are assembled and deployed. The container, shown in the shaded
box, is the interface between the session bean and the low-level platform-specific functional-
ity that supports the session bean. The container is created during deployment.
LESSON 1 A SIMPLE SESSION BEAN
SEPTEMBER 27, 2000 11
Figure 4 Application Components
The next sections show the session bean code. The example assumes the CalcBean.java,
Calc.java, and CalcHome.java files are placed in the /home/monicap/J2EE/Beans direc-
tory on Unix. The
package Beans statement at the top of the CalcBean interface and class
files is the same name as the name of this directory. When these files are compiled, they are
compiled from the directory above
Beans and the Beans package (or directory) name is
prepended with a slash to the interface and class files being compiled. See Compile the Ses-
sion Bean (page 13).
Note:
While this example shows how to write the example session bean, it is also pos-
sible to purchase enterprise beans from a provider and assemble them into a J2EE
application.
CalcHome
BonusServlet does not work directly with the session bean, but creates an instance of its
home interface. The home interface extends
EJBHome and has a create method for creating
the session bean in its container.
CreateException is thrown if the session bean cannot be
created, and
RemoteException is thrown if a communications-related exception occurs dur-
ing the execution of a remote method.
package Beans;
import java.rmi.RemoteException;
import javax.ejb.CreateException;
import javax.ejb.EJBHome;
public interface CalcHome extends EJBHome {
Calc create() throws CreateException,
RemoteException;
}
Text
HTML Form
Browser
Servlet
Home
Interface
Remote
Interface
Session
Bean
Application Server
Container
LESSON 1 A SIMPLE SESSION BEAN
12 SEPTEMBER 27, 2000
Calc
When the home interface is created, the J2EE application server creates the remote interface
and session bean. The remote interface extends
EJBObject and declares the calcBonus
method for calculating the bonus value. This method is required to throw javax.rmi.Remo-
teException
, and is implemented by the CalcBean class.
package Beans;
import javax.ejb.EJBObject;
import java.rmi.RemoteException;
public interface Calc extends EJBObject {
public double calcBonus(int multiplier,
double bonus)
throws RemoteException;
}
CalcBean
The session bean class implements the SessionBean interface and provides behavior for the
calcBonus method. The setSessionContext and ejbCreate methods are called in that
order by the container after
BonusServlet calls the create method in CalcHome.
The empty methods are from the
SessionBean interface. These methods are called by the
bean's container. You do not have to provide behavior for these methods unless you need
additional functionality when the bean is, for example, created or removed from its con-
tainer.
package Beans;
import java.rmi.RemoteException;
import javax.ejb.SessionBean;
import javax.ejb.SessionContext;
public class CalcBean implements SessionBean {
public double calcBonus(int multiplier,
double bonus) {
double calc = (multiplier*bonus);
return calc;
}
//These methods are described in more
//detail in Lesson 2
public void ejbCreate() { }
public void setSessionContext(
SessionContext ctx) { }
public void ejbRemove() { }
public void ejbActivate() { }
public void ejbPassivate() { }
public void ejbLoad() { }
public void ejbStore() { }
}
LESSON 1 A SIMPLE SESSION BEAN
SEPTEMBER 27, 2000 13
Compile the Session Bean and Servlet
To save on typing, the easiest way to compile the session bean and servlet code is with a
script (on Unix) or a batch file (on Windows).
Compile the Session Bean
Unix
#!/bin/sh
cd /home/monicap/J2EE
J2EE_HOME=/home/monicap/J2EE/j2sdkee1.2.1
CPATH=.:$J2EE_HOME/lib/j2ee.jar
javac -d . -classpath "$CPATH" Beans/CalcBean.java
Beans/CalcHome.java Beans/Calc.java
Windows
cd \home\monicap\J2EE
set J2EE_HOME=\home\monicap\J2EE\j2sdkee1.2.1
set CPATH=.;%J2EE_HOME%\lib\j2ee.jar
javac -d . -classpath %CPATH% Beans/CalcBean.java
Beans/CalcHome.java Beans/Calc.java
Compile the Servlet
Unix
#!/bin/sh
cd /home/monicap/J2EE/ClientCode
J2EE_HOME=/home/monicap/J2EE/j2sdkee1.2.1
CPATH=.:$J2EE_HOME/lib/j2ee.jar:
/home/monicap/J2EE
javac -d . -classpath "$CPATH" BonusServlet.java
Windows
cd \home\monicap\J2EE\ClientCode
set J2EE_HOME=\home\monicap\J2EE\j2sdkee1.2
set CPATH=.;%J2EE_HOME%\lib\j2ee.jar;
\home\monicap\J2EE
javac -d . -classpath %CPATH% BonusServlet.java
LESSON 1 A SIMPLE SESSION BEAN
14 SEPTEMBER 27, 2000
Start the J2EE Application Server
You need to start the J2EE application server to deploy and run the example. The command
to start the server is in the
bin directory under your J2EE installation. If you have your path
set to read the
bin directory, go to the J2EE directory (so your live version matches what you
see in this text) and type:
j2ee -verbose
Note: Sometimes the J2EE server will not start if Outlook is running.
If that does not work, type the following from the
J2EE directory:
Unix:
j2sdkee1.2.1/bin/j2ee -verbose
Windows:
j2sdkee1.2.1\bin\j2ee -verbose
The verbose option prints informational messages to the command line as the server starts
up. When you see
J2EE server startup complete, you can start the depoloyer tool. For
now, you can ignore the other messages that scrolled by.
Start the Deploy Tool
To assemble and deploy the J2EE application, you have to start the deploy tool. If you have
your path set to read the
bin directory, go to the J2EE directory (so your live version matches
what you see in this text) and type:
deploytool
If that does not work, do the following from the J2EE directory:
Unix:
j2sdkee1.2.1/bin/deploytool
Windows:
j2sdkee1.2.1\bin\deploytool
Notes: If a memory access error is encountered when starting deploytool, add an
environment variable called
JAVA_FONTS and set the path to c: \<font directory>.
For example
c:\winnt\fonts. Also, If a NullPointerException for BasicFi-
LESSON 1 A SIMPLE SESSION BEAN
SEPTEMBER 27, 2000 15
leChooserUI is encountered when starting deploytool, be sure you are not starting
the tool from the root directory (i.e.
c:\). If you run it somewhere else, such as the bin
directory for your j2sdkee1.2 installation, you will not encounter the problem.
Deploy Tool
The Deploy tool shown in Figure 5 has four main windows. The Local Applications window
displays J2EE applications and their components. The Inspecting window displays informa-
tion on the selected application or components. The Servers window tells you the application
server is running on the local host. And the Server Applications window tells you which
applications have been installed. As you go through the steps to assemble the example J2EE
application, you will see the Local Applications, Inspecting, and Server Applications win-
dows display information.
Figure 5 Deploy Tool
Note: To the right of the Server Applications window is a grayed Uninstall button.
After you deploy the application, you will see the application listed in the Server
Applications window. You can click
Uninstall to uninstall the application, make
changes, and redeploy it without having to stop and restart the application server.
LESSON 1 A SIMPLE SESSION BEAN
16 SEPTEMBER 27, 2000
Assemble the J2EE Application
Assembling a J2EE application involves creating a new application, and adding the applica-
tion components to it. Here is a summary of the assembly steps, which are discussed in more
detail below.
1. Create a new J2EE application (
BonusApp.ear).
2. Create a new enterprise bean (
CalcBean.jar).
3. Create a new web component (
Bonus.war).
4. Specify JNDI name for the enterprise bean (
calcs).
5. Specify the Root Context for the J2EE application (BonusRoot).
Create J2EE Application
J2EE components are assembled into J2EE application Enterprise Archive (EAR) files.
File menu: Select New Application.
New Application dialog box,:
• Type
BonusApp.ear for the Application File Name.
• Click the right mouse button in the Application Display Name field.
BonusApp
appears as the display name.
• Click the Browse button to open the file chooser to select the location where you want
the application
EAR file to be saved.
New Application file chooser:
• Locate the directory where you want to place the application
EAR file
• In this example, that directory is
/home/monicap/J2EE.
• In the File name field, type BonusApp.ear.
• Click New Application.
• Click OK.
The
BonusApp display name is now listed in the Local Applications window, and the Inspec-
tor window to the right shows the display name, location, and contents information for
BonusApp. The meta information shown in the contents window describes the JAR file and
J2EE application, and provides runtime information about the application.
Create Session Bean
Enterprise beans (entity and session beans) are bundled into a Java Archive (JAR) file.
File menu: Select New Enterprise Bean. The New Enterprise Bean Wizard starts and
displays an Introduction dialog box that summarizes the steps you are about to take. After
reading it over, click
Next.
EJB JAR dialog box: Specify the following information:
LESSON 1 A SIMPLE SESSION BEAN
SEPTEMBER 27, 2000 17
• Enterprise Bean will go in: BonusApp
Display name: CalcJar
Description: A simple session bean that
calculates a bonus. It has one method
• Click Add. There are two Add buttons on this screen. Make sure you click the second
one down that is next to the Contents window.
Add Files to .JAR dialog box: go to the
J2EE directory. You can either type the path name or
use the browser to get there. Once at the
J2EE directory, double click on beans to display the
contents of the
beans directory.
• Select
Calc.class.
• Click
Add.
• Select
CalcHome.class.
• Click
Add.
• Select
CalcBean.class.
• Click
Add.
Important Note: The Add Contents to .JAR dialog box should look like the one in
Figure 6. The Enterprise Bean JAR classes must show the
Beans directory prefixed
to the class names.