Doing Lesson with Customer Maintenance pptx
Bạn đang xem bản rút gọn của tài liệu. Xem và tải ngay bản đầy đủ của tài liệu tại đây (36.25 KB, 11 trang )
An Example—Customer Maintenance
As an example, consider a simple scenario. You have been asked to build a Customer
Maintenance application. Part of the application needs to record the essential details of a
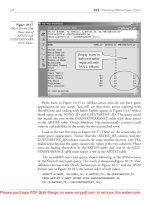
customer, including title, name, and gender. You decide to create a form like the one
shown in the following graphic.
You need to ensure that the user's input is consistent; the title (Mr, Mrs, Miss, or Ms)
must match the selected gender (Male or Female), and vice versa.
A First Attempt at Performing Validation
In the following exercises, you will examine the Customer Maintenance application and
run it to see how easily you can get validation wrong.
Examine the program
1. Open the CustomerDetails project, located in the \Microsoft Press\Visual CSharp
Step By Step\ Chapter 22\CustomerDetails folder in your My Documents folder.
2. In the Solution Explorer, double-click CustomerForm.cs to display the Customer
Details form in Design View.
3. Click the Title combo box on the form, and then click the Items property in the
Properties window. It should appear as (Collection). Click the Ellipses button to
display the strings in the collection.
You can see from this collection that the list box contains four titles: Mr, Mrs,
Miss, and Ms. Click Cancel to close the String Collection Editor window.
4. Examine the Gender group box and radio buttons. The group box contains two
radio buttons called Male and Female.
The application enforces the business rule that the gender and the title must match.
If the title is Mr, the gender must be male, and if the title is Mrs, Miss, or Ms, the
gender must be female.
5. On the View menu, click Code to switch to the Code And Text Editor window
displaying CustomerForm.cs. Look at the checkTitleAndGender method situated
immediately below the CustomerForm constructor:
6. // Cross check the gender and the title to make sure they correspond
7. private bool checkTitleAndGender()
8. {
9. if (title.Text == "Mr")
10. {
11. // Check that gender is Male
12. if (!male.Checked)
13. {
14. MessageBox.Show("If the title is Mr the gender must be male", "Error",
15. MessageBoxButtons.OK, MessageBoxIcon.Error);
16. return false;
17. }
18. }
19. else
20. {
21. // Check that the gender is Female
22. if (!female.Checked)
23. {
24. MessageBox.Show("If the title is Mrs, Miss, or Ms
25. the gender must be female", "Error",
MessageBoxButtons.OK, MessageBoxIcon.Error);
26. return false;
27. }
28. }
29.
30. // Title and gender match
31. return true;
}
This method performs a simple cross-check between the contents of the Title
combo box and the radio buttons in the Gender group box. If the title is “Mr,” the
business rule states that the gender must be male, and the method checks to ensure
that the Male radio button is selected. If this option is not selected, the method
displays an error message and returns false. Likewise, if the title is one of the other
values (Mrs, Miss, or Ms), the business rule states that the gender must be female,
and the method looks at the Female radio button to ensure it is selected. Again, if
this is not the case, a different error message is displayed and the method returns
false. If the title and the gender match, the method returns true.
32. Look at the titleValidating and genderValidating methods at the end of the file.
These are implementations of the Validating event handler for the Title combo box
and the Gender group box. They both call the checkTitleAndGender method, and
then set the Cancel property of the CancelEventArgs parameter to true if the
checkTitleAndGender method returns false:
33. private void titleValidating(object sender,
34. CancelEventArgs e)
35. {
36. if (!checkTitleAndGender())
37. {
38. e.Cancel = true;
39. }
40. }
41.
42. private void genderValidating(object sender, CancelEventArgs e)
43. {
44. if (!checkTitleAndGender())
45. {
46. e.Cancel = true;
47. }
}
48. Examine the remaining methods, exitClick and saveClick. The form has a menu
strip with a File menu, containing Save and Exit items. These two methods are
called when the user clicks either of these two menu items. The exitClick method
closes the form and exits the application. The saveClick method displays the
message “Customer Saved” (this is just a prototype form—the production version
would actually save the information somewhere).
Now you'll run the application and see what happens when it tries to validate the user's
input.
Run the application
1. On the Debug menu, click Start Without Debugging to run the application.
The Customer Details form appears. Notice that the default gender is Male.
2. Select Mrs from the Title combo box and tab to or click the first Name text box.
Notice that the checkTitleAndGender method generates and displays an error
message because the title and the gender don't agree.
3. Click OK in the Error dialog box to close it, and then try to click the Female radio
button in the group box.
You will fail, as the CausesValidation property of the group box makes the
Validating event run again, causing the error message to be displayed once more.
4. Click OK in the Error dialog box. Set the title to Mr and click the Female radio
button.
Remember that the Validating event fires just before the focus is passed to the
Female radio button. When the checkTitleAndGender method is called, the title
(Mr) and the gender (male) will agree. You are successfully able to set the gender
to female.
5. Now that you have now set the gender to female, try to save the customer's details
by clicking Save in the File menu. This action works without error and the
message Customer Saved appears in a message box. Confused? Click OK.
6. Correct the (non-reported) error by trying to set the title to Mrs.
The Validating event (this time for the Gender group box) runs, spots that the
gender and title don't match, and then displays an error. You will not be able to
escape until you set the Gender to Male again (but then you are back to square
one).
7. Exit the application.
The validation strategy failed because the Validating event fires only when you move to
another control on the same form (and not to a control in a toolbar or a menu bar, for
example). Developers often put much effort into getting it all to work. The next sections
explain how to get it to work by using the tools properly.
TIP
Use the Validating event to validate controls in isolation only; don't use it to check the
contents of one control against another.
Being Unobtrusive
The issue with the Customer Maintenance application is that the validation is performed
at the wrong time, is inconsistently applied, and interferes too much. The actual logic is
fine though. We just need an alternative approach to handling the validation.
A better solution would be to check the user's input when the user saves the data. This
way you can ensure that the user has finished entering all the data and that it is consistent.
If there are any problems, an error message will appear and prevent the data from being
saved until the data is corrected. In the following exercise, you will change the Customer
Maintenance application to postpone validation until the customer information is saved.
Change the point where data is validated
1. Return to the Design View window displaying CustomerForm. Click the Title
combo box.
2. In the Properties window, click the Events button. Scroll down to the Validating
event, and then delete the titleValidating method.
This unsubscribes the Title combo box from the Validating event.
3. On the CustomerForm, select the Gender group box.
4. In the Properties window, click the Events button. Find the Validating event, and
then delete the genderValidating method.
IMPORTANT
Unsubscribing from an event in this way detaches the event method from the event
itself but does not delete the event method—if you no longer need the method, you
can remove it manually in the Code And Text Editor window.
5. Display the file CustomerForm.cs in the Code And Text Editor window. Delete
the title-Validating and genderValidating methods. You are going to call the
checkTitleAndGender method when the Save menu item is clicked.
6. Locate the saveClick method. This is where you are going to place the validation
code. Modify this method as shown below:
7. private void saveClick(object sender, EventArgs e)
8. {
9. if (checkTitleAndGender())
10. {
11. // Save the current customer's details
12. MessageBox.Show("Customer saved", "Saved");
13. }
14. else
15. {
16. MessageBox.Show("Customer title and gender are inconsistent" +
17. " – please correct and save again", "Error",
18. MessageBoxButtons.OK, MessageBoxIcon.Error);
19. }
}
The if statement calls the checkTitleAndGender method. If the method returns
true, the saveCustomerForm method displays the “Customer Saved” message box.
If the checkTitleAndGender method returns false, an error message box is
displayed and the customer's details are not saved.
Test the application again
1. Build and run the application. When the Customer Details form appears, set the
Title combo box to Mrs, and then click in the first Name text box. This should
work without error because the Validating event is no longer trapped by the Title
combo box.
2. Verify that the Male radio button is selected, and then click the Save item in the
File menu. At this point, the checkTitleAndGender method is called and the
inconsistency is reported. Click OK.
3. Notice that another message box occurs—this is the message reported by the
saveClick method. Click OK again.
4. Select the Female radio button, and then click the Save Customer button on the
toolbar.
This time no errors are reported and Customer Saved message box is displayed.
5. Click OK, and exit the application.
Using an ErrorProvider Control
Postponing validation is good and makes the form less frustrating to use. But what
happens if there are several validation errors reported when the data is saved? If you use
message boxes to present error information, you might end up displaying several of them
in succession if there are multiple errors. Additionally, the user will have to remember
each error so that it can be corrected. This can get tedious for a user after more than two
or three errors are reported. A much better technique is to use an ErrorProvider control as
shown in the following exercise.
Add an ErrorProvider control
1. Return to CustomerForm in the Design View window.
2. In the Toolbox, expand the Components category. Click the ErrorProvider control
and drop it anywhere on the form.
It appears under the form.
3. Click the errorProvider1 control, and select the Properties window. Change the
(Name) property to errorProvider and verify that the BlinkStyle property is set to
BlinkIfDifferentError.
When an error is reported by a control, an error icon (which you can select by
setting the Icon property) appears by the control in error and blinks for a short
while and then remains static. You can change the BlinkRate property if you want
to make it blink faster or slower—the default rate is 250 milliseconds (four times a
second). If a subsequent error is reported, the icon blinks only if the error is
different from the current one. If you want the icon to blink every time, you can
set its BlinkStyle to AlwaysBlink.
On the CustomerForm, select the Title combo box. If you look at the Properties
window, you will discover a new property called Error on errorProvider. This
property only appears when an ErrorProvider control has been added to a form,
and is titled accord- ing to the name of the ErrorProvider control. If you type a
message here (such as “Testing”), an error icon appears next to the Title combo
box. If you hold the mouse pointer over the error icon, a ToolTip appears
displaying the error message.
If you leave this property set as it is, the error icon is always displayed, which is
not what you want. The icon should be displayed (with a meaningful error
message) only in the event of an error, so delete the text “Testing” from the Error
on errorProvider property. You will write some code to dynamically use the
errorProvider control shortly.
4. Switch to the Code And Text Editor window for CustomerForm. Locate the
checkTitleAndGender method and replace the statements that call
MessageBox.Show with invocations of the errorProvider.SetError method, as
shown here:
5. // Cross check the gender and the title to make sure they correspond
6. private bool checkTitleAndGender()
7. {
8. if (title.Text == "Mr")
9. {
10. // Check that gender is Male
11. if (!male.Checked)
12. {
13. errorProvider.SetError(gender, "If the title is Mr " +
14. "the gender must be male");
15. errorProvider.SetError(title, "If the gender is " +
16. "female the title must be Mrs, Miss, or Ms");
17.
return false;
18. }
19. }
20. else
21. {
22. // Check that the gender is Female
23. if (!female.Checked)
24. {
25. errorProvider.SetError(gender, "If the title is Mrs, " +
26. "Miss, or Ms the gender must be female");
27. errorProvider.SetError(title, "If the gender is male " +
28. "the title must be Mr");
29. return false;
30. }
31. }
32.
33. // Title and gender match - clear any errors
34. errorProvider.SetError(gender, "");
35. errorProvider.SetError(title, "");
36. return true;
}
The SetError method of the ErrorProvider control specifies which control to mark
with an error icon and the message to be displayed as a ToolTip. If you provide an
empty string as the second parameter, as the code does at the end of the method,
the error icon is removed.
Test the ErrorProvider control
1. Build and run the application.
2. Select Mrs in the Title combo box, and then verify that the Male radio button is
selected.
3. On the File menu, click Save. A message box appears indicating that the save
failed, and error icons are displayed next to the controls that are in error. Click
OK. If you hover the mouse pointer over each of the error icons, you see the error
message, as shown in the graphic on the next page.
This is a much less intrusive but more reliable and consistent type of validation
than the original application contained.
4. Select the Female gender radio button and click the Save item on the File menu.
As the data is now consistent, you will see the Customer Saved message box and
the error icons will disappear.
5. Exit the application.
Adding a Status Bar
Although some of the message boxes have disappeared, some still remain—a message
box appears when customer information is successfully saved or if an error occurs. This
is feedback that the user needs to be able to see, but it is annoying to the user to have to
click the OK button to acknowledge the messages. A better way to inform the user of
these situations is to display the messages in a status bar at the bottom of the form; the
user can still see them, but does not have to click anything to move them out of the way.
In the final exercise in this chapter, you will implement a status bar in the CustomerForm
form by using a StatusStrip control.
Add a StatusStrip control
1. Return to CustomerForm in the Design View window.
2. In the Toolbar, expand the Menus & Toolbars category. Drag a StatusStrip control
from the Toolbar onto the form.
The control appears underneath the form, and a status bar is added to the base of
the form.
3. Click the statusStrip1 control, and select the Properties window. Change the
(Name) property to statusStrip.
4. In the status bar on the form, click the drop-down arrow as shown in the following
graphic, and click StatusLabel.
This action adds a ToolStripStatusLabel control to the status bar. This is a version
of the Label control that is intended for use in tool strips and status bars.
5. Click the toolStripStatusLabel1 control in the status bar. Using the Properties
window, change its name to statusMessages. Clear the Text property.
The control shrinks in size, but is still present in the status bar.
6. Switch to the Code And Text Editor window for CustomerForm. Find the
saveClick method. This method contains the MessageBox statements that you
need to convert into status bar messages.
7. Change the first MessageBox statement (in the if statement) to display a message
in the status bar instead, as follows:
8. statusMessages.ForeColor = Color.Black;
statusMessages.Text = "Customer Saved";
You will see why you need to set the text color to black in the next step.
9. Change the second MessageBox statement (in the else statement) to display the
following error message in the status bar:
10. statusMessages.ForeColor = Color.Red;
statusMessages.Text = "Customer title and gender are inconsistent. Changes not
saved";
The error message is displayed in red to make it stand out. When an ordinary
information message (such as “Customer Saved”) is displayed, the color should be
reset back to black.
Test the status bar
1. Build and run the application. (A finished version is available in the \Microsoft
Press\Visual CSharp Step By Step\Chapter 22\CustomerDetails Complete folder in
your My Documents folder, if you need it.)
2. Select Mrs in the Title combo box, and then verify that the Male radio button is
selected.
3. On the File menu, click Save.
A red error message appears in the status bar indicating that the save failed. The
error icons are displayed next to the controls that are in error, as before.
4. Select the Female gender radio button and click the Save item on the File menu.
You will see the Customer Saved message in the status bar (in black) and the error
icons will disappear.
5. Exit the application.
• If you want to continue to the next chapter
Keep Microsoft Visual Studio 2005 running and turn to Chapter 23.
• If you want to exit Visual Studio 2005 for now
On the File menu, click Exit. If you see a Save dialog box, click Yes.


![Tài liệu [ Team LiB ] Configuring Printing Options Outlook comes preconfigured with print styles pptx](https://media.store123doc.com/images/document/14/nu/zu/medium_zuv1390245650.jpg)