Adobe Dreamweaver CS3 Unleashed- P13 ppt
Bạn đang xem bản rút gọn của tài liệu. Xem và tải ngay bản đầy đủ của tài liệu tại đây (524.99 KB, 50 trang )
3.
Within the Local Info category, we'll want to make one change. We'll change the Local root folder to
point to C:\VectaCorp\Chapter11\Local\. After you've made that change, the screen will resemble
Figure 11.3.
Figure 11.3. Define the Local root folder within the Local Info category to point to the
location where you want local files to be stored while in development.
[View full size image]
Tip
If you're implementing the first model, where your local and remote files are located on
two separate machines, your Local root folder would point to
C:\VectaCorp\Chapter11\.
4.
With the Local root folder set, you can switch over to the Remote Info category. Select the
Local/Network option from the Access list. More options will become available. Within the Remote
folder text box, enter or browse to the path of the fictitious company's remote server. In our case, the
remote files are located in C:\VectaCorp\Chapter11\Remote\.
Tip
If you're implementing the first model, where your local and remote files are located on
two separate machines, your Remote folder might point to the organization's web folder
on the network using the following model: \\<servername>\<webfolder>. This path will
work, assuming that your site is shared on the network. If it's not, you'll need to contact
your system administrator for further details.
5.
Your next step will be to click the Enable File Check In and Check Out check box.
6.
With the check box enabled, we can now set other options for identifying the person checking files in
and out. Specifically, we can enter the name and email address of the user (you). We can also click the
Check Out Files When Opening check box. Doing this guarantees that whenever we open a file that has
already been checked in on the local side, the file will automatically be checked out on the remote side.
After you've finished setting the final three options, your Remote Info screen should resemble mine,
shown in Figure 11.4.
Figure 11.4. Set the properties to identify the person checking files in and out.
[View full size image]
7.
Click OK to close the Site Definition for Vecta Corp window.
8.
Click Done to close the Manage Sites dialog.
You're now ready to start checking out files. Before we do, however, we'll want to synchronize the local
folder with the files contained in the remote folder. This will ensure that the files in the local folder are exact
copies of those within the remote. You can synchronize the files by following these steps:
1.
Select Site, Synchronize Sitewide.
2.
When the Synchronize Files dialog appears, select the Entire Vecta Corp Site option from the
Synchronize menu. Also, choose the Get Newer Files from Remote option from the Direction menu.
3.
Click Preview.
4.
When the Synchronize preview window appears, click OK to proceed with the synchronization.
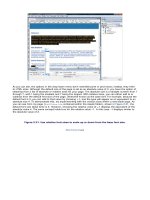
Now you can click the Expand/Collapse icon in the Files panel to expand it, if necessary. As you can see from
Figure 11.5, the remote files (located in the C:\VectaCorp\Chapter11\Remote\ folder) appear in the left
pane, and the local files (located in the C:\VectaCorp\Chapter11\Local\ folder) appear on the right.
Figure 11.5. Expanding the Files panel reveals the remote files on the left and the local files on
the right.
[View full size image]
You'll also notice that the local files appear with small lock icons next to them. Because we've enabled Check
In and Check Out functionality in the Site Definition process, these files will be locked by default. And
because we haven't checked these files out, opening them in their current state would result in
Dreamweaver opening these files for viewing purposes in read-only mode. To edit these files, we'll have to
check them out. Let's do that now.
Checking Files In and Out
Now that you've enabled the Check In and Check Out feature, you can begin using it for the defined Vecta
Corp site. To do so, right-click (Control+click) a file within the Local Files list and choose the Check Out
option from the context menu (see Figure 11.6).
Figure 11.6. Select the Check Out option from the context menu of the file you want to check out.
[View full size image]
Next, Dreamweaver asks if you want to include dependent files when checking out the HTML file. Because
we have read-only copies in our local folder, we'll select No. As you can see from Figure 11.7, the file is
checked out to you.
Figure 11.7. The file is checked out to you. You can tell by the icon change and the user's name in
the Checked Out By file view column.
[View full size image]
Tip
When we defined our site in Chapter 3, "Dreamweaver Site Management," we enabled the Check Out
Files When Opening check box. Because this is the case, we need only to open the local file (by
double-clicking to open it) in Dreamweaver. As soon as we do this, the file is automatically checked
out.
You can tell the file is checked out to you because the file's icon changes from a lock icon to a green check
mark icon. This means the file is checked out. Furthermore, your name appears in the Checked Out By file
view column. As you can see, these properties are set in both the Remote and Local panes. This means that
when a member of your collaborative team defines a site to the same remote folder, your name will appear
as the user who has checked out the file. If the other user tries to check out the same file, that user won't
be able to. The other user will be able only to view the file, not write to it. Now that the file has been
checked out to you, you can open it and make any necessary changes. When you've finished, you can check
it back in by right-clicking (Control+clicking) the file within the Local Files list and choosing the Check In
option. Furthermore, if you check out a file and aren't happy with the changes that you've made, you can
also select the Undo Check Out option from the context menu. Doing this replaces the local file with the last
version that was checked in from the remote.
Maintaining Design Notes
One of the most underused features available in Dreamweaver is that of associating Design Notes with web
pages. As an individual web developer, you can create Design Notes in an effort to keep tabs on progress
and to write general notes to yourself, or others, about a particular file. When you go to open the file, you
can have the Design Note automatically open and remind you of what needs to get done. From a team
collaborative standpoint, you can associate Design Notes with your web pages as a way to alert other
developers in your team about changes made, changes to be made, or specific items within the file that
require attention.
Enabling Design Notes
Enabling Design Notes for your web pages is as simple as opening the site definition for the particular site
you're working with and clicking a check box. In our scenario, we'll want to enable Design Notes for the
defined Vecta Corp site. To do this, follow these steps:
1.
Open the Manage Sites dialog by choosing Site, Manage Sites. The Manage Sites dialog appears.
2.
Now select the Vecta Corp site and click the Edit button. The Site Definition for Vecta Corp dialog
appears.
3.
Select the Design Notes category. The Design Notes screen appears.
4.
Within the Design Notes screen you can do three things. The first check box enables Design Notes.
Make sure to check this box to enable Design Notes for the Vecta Corp site. The Clean Up button next
to this option deletes all existing Design Notes within the site. The third and final option at the bottom
of the screen ensures that Design Notes, located within a _notes folder in the defined site, are
automatically uploaded to the remote server when you check in a file or upload it manually to the
remote server. Make sure this option is enabled so that others in your collaborative team can see the
Design Notes you create and vice versa. After you've finished making the changes, click OK to close the
Site Definition dialog.
Tip
It's important to note that Dreamweaver uses Design Notes for launching and editing
features when integrating with Flash and Fireworks. Design Notes are also used to store
settings when you're working with Design-Time style sheets and the Live Data view. For
this reason, it's generally a good idea to leave these options enabled even if you don't
plan to work with Design Notes.
5.
Click Done to close the Manage Sites dialog.
Design Notes have now been enabled for your site.
Setting the Status of Files with Design Notes
After you've enabled Design Notes, you're ready to start working with them. One ideal usage for Design
Notes would be for writing notes to yourself about a particular file. It's important to realize that Design
Notes are associated with particular files within a site, not with the site as a whole. To associate a Design
Note with a file, you can do one of two things. First, you can choose the Design Notes option by right-
clicking (Control+clicking) on the checked out file in the Local Files list that you want to create a Design
Note for. I'll choose index.html. Second, you can open the checked out file (index.html) by double-clicking
it in the Local Files list. With the file open, you can choose the Design Notes option from the File menu.
Either method opens the Design Notes dialog shown in Figure 11.8.
Figure 11.8. The Design Notes dialog allows you to associate Design Notes with a particular file.
[View full size image]
As you can see from Figure 11.8, the dialog is separated into two parts: the Basic Info and All Info tabs.
We'll discuss the All Info tab in the next section; for now let's discuss how you can set the status of and
write notes about a particular file using the Basic Info tab. As you can see from Figure 11.8, the screen is
divided into the following segments:
File— This read-only text label displays the name of the file that the Design Note will be associated
with.
Location— This read-only text label displays the path to the file location on the local computer.
Status— Choose an option from this menu to set the status of the file. Options include Draft,
Revision1, Revision2, Revision3, Alpha, Beta, Final, and Needs Attention. For our example, choose the
Needs Attention option.
Insert date— Clicking this icon inserts a date stamp into the Notes text box. Click this button now to
insert a date stamp.
Notes— Use this multiline text box to enter any notes to yourself or members of your team about the
file. The text you enter here is completely up to you, but you'll generally want to associate the note
with the status option you select. For our example, add the text: We still need to update our
solution offerings for this month, preferably just to the right of the date stamp.
Show when file is opened— Enabling this check box assures that the Design Note appears
automatically when the file is opened each time. For our example, check this box.
Click OK to create the Design Note. Initially, you won't notice any additions to the folder or file structure of
the site. However, opening the Local folder (C:\VectaCorp\Chapter11\Local) reveals the new _notes
folder that Dreamweaver adds for you. Within the _notes folder, you'll see the index.html.mno file. This
XML-based file represents the Design Note for index.html.
Note
By default, Dreamweaver creates one MNO file per web page document. That's not to say that
multiple users can't create multiple notes for a single MNO file. When new notes are created, they
are appended to the MNO file. Furthermore, the MNO file keeps track of which users open the file.
Creating Customized Design Notes
In the previous section, we examined the Basic Info tab of the Design Notes dialog. For the most part, a
large majority of the functionality that you'll need to interact with as it relates to Design Notes can be found
within that tab. Other times, however, you'll want to create custom Design Notes that relate to specific
aspects of your project. For instance, you may want to define various resources (such as graphic designer,
project manager, lead developer) related to a project so that when users open the Design Note, they know
who to contact if they have a question. Or you may want to create a custom note that defines how many
man hours have been dedicated to a specific file. As you'll see in the next section, you can then associate
specific file view columns with a particular Design Note. Even better, you can enable file view column
sharing so that everyone in the team can see the custom Design Notes directly from within the Site
Management window.
All this begins with the All Info tab of the Design Notes dialog. To demonstrate the functionality within this
screen, reopen the Design Notes dialog by either choosing the Design Notes option from the File menu
(assuming the index.html file is already open) or choose the Design Notes option from the context menu
when you right-click (Control+click) the index.html file in the Files panel. When the Design Notes dialog
opens, click the All Info tab. As you can see from Figure 11.9, the All Info tab displays all the information
you entered within the Basic Info tab line by line.
Figure 11.9. Initially, the All Info tab displays notes created within the Basic Info tab.
[View full size image]
The All Info tab is divided into the following features:
File— This read-only text label displays the name of the file that the Design Note will be associated
with.
Location— This read-only text label displays the path to the file location on the local computer.
Info— This list box displays notes defined in the Basic Info tab as well as custom notes you specify in
this screen. You can add a new note by clicking the Add (+) icon located just above the Info list box.
Do that now.
Name— Use this text box to enter the custom name of the new note. Enter the text ManHours here.
Value— Use this text box to enter the value associated with the name of the new note. Let's assume
that we have eight billable hours accrued for index.html so far. Because that's the case, enter 8 in
this text box.
When you've finished making the necessary additions within the All Info pane (also shown in Figure 11.9),
click OK. Again, you won't notice too much of a difference. To see the notes, you either have to reopen this
screen (which isn't very intuitive), or you can create custom view columns within the Site Management
window. This process is discussed in the next section.
Viewing Design Notes
The easiest way to view Design Notes is to right-click (Control+click) the file within the Files panel and
choose the Design Notes option from the contextual menu. Doing this opens the Design Notes dialog and
displays notes for the specific file. This process is great if you're an individual developer and you remember
which files have Design Notes and which don't. If you're working in a team, however, this process isn't very
intuitive. A better method of viewing Design Notes is by enabling the Notes file view column within the Site
Management window. Remember that in Chapter 3 we turned the Notes column off. To view Design Notes
for particular files within the Site Management window, we'll need to turn that column back on. To do that,
follow these steps:
1.
Select Site, Manage Sites.
2.
When the Manage Sites dialog appears, select the Vecta Corp site and click Edit.
3.
Select the File View Columns category.
4.
Within the File View Columns screen, select the Notes column from the list and click the Show check
box.
5.
Click OK to close the Site Definition dialog.
6.
Click Done in the Manage Sites dialog.
To view the Design Notes now, click the Expand/Collapse icon within the Files panel to expand it, if
necessary. As you can see from Figure 11.10, files that have note associations display a small note icon.
Figure 11.10. Files that have Design Notes associated with them display a small note icon.
[View full size image]
When you check the file back in, the Design Note will go with it. From a collaborative standpoint, this allows
other members of your team to see which files do and don't have notes associated with them. Now, to view
the note, double-click the icon. The Design Notes dialog appears.
Beyond the simplicities of viewing Design Notes within file view columns lies the ability to view custom
Design Notes within a custom file view column. For instance, we may want to share with the team how
many billable hours have been accrued by people working on the particular file, in which case we'd want to
create a custom file view column to display that Design Note (created in the previous section). To do this,
follow these steps:
1.
Select Site, Manage Sites.
2.
When the Manage Sites dialog appears, select the Vecta Corp site and click Edit.
3.
Select the File View Columns category.
4.
Within the File View Columns screen, click the Add (+) icon to create a new custom file view column.
By default, the file view column is initially populated with the name "untitled".
5.
With the new file view column selected in the list, change the column name to ManHours.
6.
Enter the text ManHours in the Associate with Design Note text box. After you've made the additions,
the screen will resemble Figure 11.11.
Figure 11.11. Create a new custom file view column and associate it with our custom
ManHours Design Note.
[View full size image]
7.
Click OK.
8.
Click Done within the Manage Sites dialog.
To view the new file view column, click the Expand/Collapse icon within the Files panel, if necessary, to
expand it. As you can see from Figure 11.12, the ManHours file view column appears and displays the value
8 (relating to 8 billable man hours) for index.html.
Figure 11.12. The custom file view column appears with the numeric value 8 for index.html.
[View full size image]
Again, to prove that Dreamweaver uses the _notes folder for more than just Design Notes, open the folder
that contains your files and examine the _notes folder. As you may notice, a new file called
dwSiteColumnsAll.xml is created and represents any custom file view columns we create.
File View Column Sharing
In the previous couple of sections, you saw how easy it was to create custom Design Notes and custom file
view columns. You also saw how easy it was to associate the custom file view column with the Design Note
so that the note becomes viewable within the columns in the Files panel. Unfortunately, our current
configuration limits the file view column's visibility to only you. This becomes obvious when you open the
expanded Files panel. As you'll notice, the ManHours value displays 8 on the local side but not on the remote
side.
To share the value of the custom file view column, we must enable file view column sharing. You can do this
by following these steps:
1.
Select Site, Manage Sites.
2.
When the Manage Sites dialog appears, select the Vecta Corp site and click Edit.
3.
Select the File View Columns category. As you'll see, the Enable Column Sharing check box is not
enabled. Enable it now. This will share all columns with your collaborative team.
4.
Although the Enable Column Sharing check box enables you to share columns with a collaborative
team, values for custom columns aren't automatically shared. To share them, you must select the
custom column and enable the Share with All Users of This Site check box. I'll do that for the ManHours
custom column. When you've finished making the adjustment, the File View Columns screen will
resemble Figure 11.13.
Figure 11.13. The Enable Column Sharing check box enables us to share all column
names with other users of the team.
[View full size image]
5.
Click OK to close the Site Definition dialog.
6.
Click Done within the Manage Sites dialog.
When you click Done, the Local and Remote panes refresh and the 8 value also appears within the ManHours
file view column on the remote side.
Generating Workflow Site Reports
In Chapter 3, we covered Site Reports. Site Reports offer a quick and visual method of generating reports
on various aspects of your site, including files that have been recently modified, files that have poorly
written HTML, and so on. For the most part, we discussed HTML-based reports and briefly skimmed over
workflow reports. Because workflow reports relate specifically to team collaboration in that they allow you to
create reports on files that are checked out, files that have Design Note associations, and files that have
been recently modified, we'll take the time to discuss the topic in greater detail here.
To begin using Site Reports, choose Site, Reports. The Reports dialog appears, similar to Figure 11.14.
Figure 11.14. Use the Workflow options in the Reports dialog to generate visual reports on files
that have been checked out by someone, files that have Design Note associations, and so on.
As you can see, the Reports dialog is split into two distinct sections: Workflow and HTML Reports. For this
chapter, we'll consider the Workflow options. If you want more information on HTML Reports, refer back to
Chapter 3. As you can see from Figure 11.14, Workflow reports are divided into three options: Checked Out
By, Design Notes, and Recently Modified. Let's discuss each in depth.
Checked Out By Reports
As a web manager, you can use the Checked Out By option as a way of generating reports for files that are
checked out by anyone or by a specific user. Although the impact that this option has on small sites is
minimal, it can be extremely useful for collaborative teams that deal with sites that contains thousands of
folders, nested folders, and files. To generate a Checked Out By report, follow these steps:
1.
If you haven't opened the Site Reports dialog, do that now by choosing Site, Reports.
2.
Select the Entire Current Local Site option from the Report on menu.
3.
Click the Checked Out By check box.
4.
Click Run.
As you'll notice, Dreamweaver displays one file (index.html) within the Site Reports tab of the Results
panel (as discussed in Chapter 3) because this is the only file that is currently checked out.
In this scenario, we enabled the Checked Out By option and clicked Run. Doing this gives us a list of all the
files checked out by anyone within the defined site. To run a report filtered by a particular user, follow these
steps:
1.
With the Site Reports tab still in focus in the Results panel, click the Play icon to relaunch the Reports
dialog.
2.
Select the Entire Current Local Site option from the Report On menu.
3.
This time, enable the Checked Out By check box and click the Report Settings button to open the
Checked Out By dialog similar to Figure 11.15.
Figure 11.15. The Checked Out By dialog allows you to filter results by a specific
user.
4.
With the dialog open, enter the name Zak (or a name that you know has a file checked out) and click
OK.
5.
Click Run.
This time, the Site Reports tab in the Results panel displays the name of the user that matches the filtered
query and lists only the files checked out by that user.
Design Notes Reports
Another Site Report option available to you is that of generating reports on files that have Design Note
associations. You may decide to use this option to filter by files in a site that have their status set to Needs
Attention. You may also decide to check on custom Design Notes, for instance, checking files where the
ManHours are greater than 8. This would allow you to track development progress and restrict development
on files where the development time is getting out of hand. To generate a Design Notes Report, follow these
steps:
1.
With the Reports dialog open, select the Entire Current Local Site option from the Report on menu.
2.
Click the Design Notes check box.
3.
Click Run.
As you can see from Figure 11.16, Dreamweaver displays the only file that has a Design Note associated
with it (index.html).
Figure 11.16. Files that have Design Note associations are displayed within the Site Reports tab
of the Results panel.
[View full size image]
You'll also notice that the Description column displays the attributes of the Design Note. Unfortunately, the
content is too long to fit within our small screen. To view all the information associated with the Design
Note, right-click (Control+click) the specific result and choose More Info from the context menu.
Dreamweaver displays the entire description in the Description dialog. You can click OK to close it.
In this scenario, we checked the Design Notes option and clicked Run. Doing this gives us all files that have
Design Note associations within the defined site. To run a report filtered by a specific property within a
Design Note, follow these steps:
1.
With the Site Reports tab still in focus in the Results panel, click the Play (Reports) icon to relaunch the
Reports dialog.
2.
Select the Entire Current Local Site option from the Report On menu.
3.
This time, enable the Design Notes check box and click the Report Settings button to open the Design
Notes dialog, similar to Figure 11.17.
Figure 11.17. The Design Notes dialog allows you to filter by a specific property
within a Design Note.
[View full size image]
4.
With the dialog open, enter the text ManHours into the first text box, choose the matches regex
option from the menu, and enter the text >=8 into the last text box. Click OK.
5.
Click Run.
Again, the Site Reports tab in the Results panel displays the results of the filtered query. In this case,
because man hours (ManHours) are (matches regex) greater than or equal to the numeric value of 8 (>=8),
the index.html file is shown within the Results window.
Recently Modified Reports
The final Workflow Report available to you is that of generating reports on files that have been recently
modified. To generate a Recently Modified report, follow these steps:
1.
With the Reports dialog open, select the Entire Current Local Site option from the Report On menu.
2.
Click the Recently Modified check box.
3.
Click Run.
As you'll see, the Results panel will display files that have been modified within the past seven days. Notice
that a web page containing a list of files that that have been recently modified also appears (see Figure
11.18). The nice part of this page is that it's sortable, allowing you to sort based on files within the page.
Even better, you can print this page out and file it for your records.
Figure 11.18. Files that have been modified within the past seven days are displayed within the
Results window and on a new HTML page.
[View full size image]
In this scenario, we checked the Recently Modified option and clicked Run. Doing this gives us all files that
have been modified within the defined site in the past seven days. To run a report filtered by a different
date range, follow these steps:
1.
With the Site Reports tab still in focus in the Results panel, click the Play (Reports) icon to relaunch the
Reports dialog.
2.
Select the Entire Current Local Site option from the Report On menu.
3.
This time, click the Recently Modified check box and click the Report Settings button to open the
Recently Modified dialog in Figure 11.19.
Figure 11.19. The Recently Modified dialog allows you to filter by a specific date
range.
4.
With the Recently Modified dialog open, select the Files Created or Modified in the Last option and
enter 1 into the Days text box. Click OK.
5.
Click Run.
In this case, the requested report returns no results because nothing was modified in the last day. Other
options available in the Recently Modified dialog include the following:
Files Created or Modified in the Last— Enter a number in this text box to report on all files
modified within the number of days you specify.
Files Created or Modified Between— Select a month, day, and year range to report on all files that
have been modified within a specific time frame. As an option, you can also enter a user name to limit
your search to specific Contribute users who have recently modified files. This text box becomes
enabled only when the site has been configured to run with Contribute. We'll discuss Contribute in
more detail in the next chapter.
Report View— Select one of these option buttons to indicate where you want to view files listed in
the report. Options include Local Machine (default) and Testing Server.
Implementing Source Control with Visual SourceSafe
As you saw in the beginning of this chapter, Dreamweaver outlines functionality that allows you to use file
Check In and Check Out within its framework. The functionality and implementation is simple; you check out
a file within Dreamweaver and then the program automatically locks it by creating a duplicate of the file
name with an LCK extension.
This LCK file contains the username and email address of the user who has checked out the file. This way,
when someone else defines the same site, the LCK file is read into Dreamweaver and the user is alerted to
the file's checked-out status in the expanded Files panel. Although this process works well if your
organization exclusively uses Dreamweaver, it wouldn't be the ideal solution if you work in large, enterprise-
level environments where different departments could potentially be using programs other than
Dreamweaver.
For instance, whereas the marketing and web development departments could be using Dreamweaver, the
engineering group could be using something different in Microsoft's Visual Studio. Executives and admins
could be making simple edits to web pages using Microsoft Word, and network administrators might wind up
using Microsoft Expression Web to edit web-based network documentation and FAQs. You can begin to see
that a train wreck is imminent. A company executive might dislike the wording on his/her bio and instruct
the admin to edit the page. With Microsoft Word in hand, the admin could open the page and make edits.
Word, not recognizing the LCK file association, would proceed with the modification. Even worse, anyone
with access to the web server could easily go into the folder that contains the LCK files and delete them. To
avoid a scenario such as this, you and your organization might decide to integrate a more robust,
enterprise-level source control and versioning software package such as Microsoft's Visual SourceSafe.
Available for a relatively low price of $50-$100, SourceSafe is an excellent third-party source control and
versioning package that you can easily tie right into Dreamweaver. At its heart, SourceSafe functions much
like Dreamweaver in that you can check out, make changes to, and then check in files. Beyond the
simplicities of Dreamweaver, however, SourceSafe also integrates versioning, so that at any time during
development, you can revert back to an older version of the same file, also known as rolling back.
Furthermore, SourceSafe uses its own proprietary database, effectively preventing prying eyes from viewing
and making changes to files. On top of these benefits, SourceSafe includes features for comparing code (line
by line) for one version of a file to any older checked-in version of the same file.
With all this said, you still might be a bit foggy as to whether or not you need source control and versioning
software. In general, keep the rules outlined in Table 11.1 in mind when making decisions about about
purchasing source control and versioning software.
Table 11.1. Keep These Rules in Mind When Deciding to Use Source Control
in Your Organization
Organization Size
Rule
1 developer
Source control is not immediately necessary.
2–6 developers
Dreamweaver's integrated source control will suffice.
6 or more developers
You might want to think about purchasing a product such
as Visual SourceSafe.
Note
The most popular versioning software for OS X is Concurrent Versions System (CVS), which is an
open-source (read: free) alternative to Microsoft's Visual SourceSafe for Mac users. There are many
places on the Internet to obtain CVS but the most convenient method is by installing the Xcode tools
located on your OS X Install DVD. Every copy of OS X ships with CVS. Just like SourceSafe, you can
roll back to past versions of files you're working on and restore them should you make a modification
that you later realize was unwanted. For detailed information on setting up CVS on OS X, with a
strong slant towards both static and interpreted web development (HTML, PHP, Perl, and so on), look
no further than />Dreamweaver's integration with SourceSafe is simple. Although you'll still be required to set a Local folder
path, the Remote path will be set up to point to your SourceSafe database.
Note
This book isn't intended to cover the installation procedure for SourceSafe. Instead, it's assumed that
your organization already has SourceSafe installed and that you have read/write access to the
organization's main SourceSafe database.
To configure Dreamweaver to work with SourceSafe, let's start by configuring SourceSafe on the server. You
can do this by following these steps:
1.
Start by logging in to the SourceSafe database. When the Visual SourceSafe Login dialog appears,
enter your credentials and click OK.
2.
Right-click the database root ($/) and select the Create Project option, as shown in Figure 11.20.
Figure 11.20. Create a new project in the database root.
[View full size image]
3.
When the Create Project dialog appears, enter the name VectaCorp and click OK. The new VectaCorp
project will appear under the root.
4.
Open the folder that contains the remote files either for your organization or for VectaCorp and drag all
the files (the Assets folder, Images folder, and root files) into the project within SourceSafe.
5.
When the Add File dialog appears, click OK.
6.
When the Add Folder dialog appears, enable the Recursive check box (see Figure 11.21). This option
adds all folder and files within that folder to SourceSafe without your having to add everything one by
one.
Figure 11.21. Add files and folders into the project in SourceSafe.
7.
Right-click the VectaCorp project in SourceSafe and choose the Check Out option. The Check Out
VectaCorp dialog appears. Enable the Recursive check box (Figure 11.22) and click OK.
Figure 11.22. Check out all the files within SourceSafe.
8.
Now that all the files are checked out, we'll check them back in, but we'll remove the local copy from
the remote folder. This will ensure that all file references are contained within SourceSafe exclusively.
To do this, right-click the project in SourceSafe and click the Check In option.
9.
When the Check In dialog appears, enable both the Recursive and Remove Local Copy check boxes, as
illustrated in Figure 11.23, and click OK.
Figure 11.23. Check all the files back in using recursion and remove the local copy.
With that done, the files are removed from the file system and are stored exclusively within SourceSafe.
We're now ready to move back to the local development machine and start configuring Dreamweaver to use
SourceSafe. Before we do, however, make note of the SourceSafe database path. Mine is as follows (but
yours will differ): C:\Program Files\Microsoft Visual SourceSafe\Databases\srcsafe.ini. This is the
path that you will need when defining the site within Dreamweaver.
Now let's configure Dreamweaver. You can do this by following these steps:
1.
With Dreamweaver open, select the Manage Sites option from the Site menu. The Manage Sites dialog
appears.
2.
Select the VectaCorp site and click Edit. The Site Definition for the VectaCorp dialog appears.
3.
Although your Local info should remain the same, the Remote Info will change to coincide with the
SourceSafe configuration. Select the Remote Info category.
4.
Select the Microsoft Visual SourceSafe option from the Access drop-down menu.
5.
Click the Settings button. The Open Microsoft Visual SourceSafe Database dialog appears.
6.
Within the Database Path text box, enter or browse to the path to the srcsafe.ini file on your server.
In my case, the path to my INI file on the remote computer is C:\Program Files\Microsoft Visual
SourceSafe\Databases\srcsafe.ini.
7.
Enter the VectaCorp project name within the Project text box. This text box should read: $/VectaCorp.
Note
In SourceSafe, the "$/" signifies the root of the database's folder structure, similar in
concept to Window's C:\.
8.
Enter the Username and Password (this is the username and password you created when installing
SourceSafe or, if your network administrator installed SourceSafe, you will need the administrator to
provide it for you) to log in to the SourceSafe database. When you've finished, the configured dialog
will resemble Figure 11.24.
Figure 11.24. Configure access to the SourceSafe database using the Open Microsoft
Visual SourceSafe Database dialog.
9.
Click OK to close the Open Microsoft Visual SourceSafe Database dialog.
10.
Click OK to close the Site Definition for VectaCorp dialog.
11.
Click Done to close the Manage Sites dialog.
Now expand the Files panel, if necessary, by clicking the Expand/Collapse icon. With the window open, click
the Connect icon to open the SourceSafe database in the Remote pane similar to Figure 11.25.
Figure 11.25. The SourceSafe database opens in the Remote Site pane.
[View full size image]
Now you can right-click files and select the Check Out option to check out files exclusively to you.