Adobe Dreamweaver CS3 Unleashed- P19 ppt
Bạn đang xem bản rút gọn của tài liệu. Xem và tải ngay bản đầy đủ của tài liệu tại đây (428.7 KB, 50 trang )
controlled using the Flash Property inspector, shown in Figure 19.2.
Figure 19.2. Flash movie properties can be controlled using the Property inspector.
[View full size image]
The Flash Property inspector outlines the following properties:
Movie Name— Enter a value in this text box to uniquely identify the Flash movie. Just above the text
box, a label appears, indicating the type of element selected as well as the file size.
W and H— Enter numeric values within these text boxes to set the width and height of the Flash
movie (in pixels). Remember that unlike images, Flash movies are inherently vector based. This
means that you can override the default width and height settings in the movie and expect the same
quality.
File— Displays the path to the Flash movie within the defined site.
Edit— Used in roundtrip Flash editing, this button launches the original Flash (FLA/MOV) movie in
Flash.
Reset Size— Click this button to reset the size of the Flash movie back to its originally defined width
and height values as defined within the Flash movie.
Class— When working with CSS, apply a custom class to the Flash movie by choosing the class from
this menu.
Loop— Check this box to force the Flash movie to return to the beginning and play over when it
reaches the end.
Autoplay— Check this box to force the browser to begin playing the Flash movie as soon as the page
loads.
V space and H space— Enter numeric values in these text boxes to set the vertical and horizontal
spacing (in pixels) around the Flash movie.
Quality— Choose an option from this menu to set the quality of anti-aliasing during playback in the
browser. Options include High, Low, Auto High, and Auto Low.
High— Anti-aliasing is turned on. Slows down playback considerably on slower computers.
Low— No anti-aliasing is used in the movie. Choose this option when quick play back is
essential.
Auto High— Animation begins in High quality mode but switches to Low if playback is too slow.
Auto Low— Animation begins in Low quality mode but switches to High if the user's computer is
fast enough.
Scale— Choose an option from this menu to determine how the movie should fit within the constraints
of the width and height specified by the W and H text boxes. Options include Default (shows the entire
movie), No Border, and Exact Fit.
Align— Choose an option from this menu to set the alignment of elements surrounding the Flash
movie.
Bg— Choose a color from the color picker to set the background color of the Flash movie from within
Dreamweaver.
Play— Click this button to play the Flash movie in Dreamweaver. After the movie begins playing, the
Play button becomes a Stop button, allowing you to stop the playback of the animation and return the
movie to its default "gray box" state.
Parameters— Clicking this button launches the Parameters dialog. You can use the Parameters
dialog, discussed in the next section, as a way to dynamically control elements of a Flash movie.
Although most of these options are similar to other audio and video properties, they differ in certain
respects. Experiment with the options to see how each can work best for your particular situation.
Note
Another Adobe media type that we haven't discussed because of page constraints is Shockwave
Director. Represented by the SWD file extension, Shockwave Director files are similar to Flash
movies in that they're inherently vector based—but they use a slightly different plug-in. To insert a
Director media file, choose Insert, Media, Shockwave. All the properties in the Property inspector
outlined in this section also apply to SWD files.
Additional Flash Parameters
For most users, the properties outlined within the Property inspector will suffice. In rare instances, however,
you might decide to modify additional parameters not listed in the Property inspector. In cases such as
these, select the Flash file and click the Parameters button in the Property inspector to launch the
Parameters dialog shown in Figure 19.3.
Figure 19.3. Additional Flash movie properties can be controlled using the Parameters dialog.
As you did with video and audio parameters in Chapter 17, "Incorporating Video and Audio," you can add
Flash parameters to the Parameters list by clicking the Add (+) button. Then enter the name of the
parameter in the Parameter column followed by the value in the Value column. When you finish adding the
new parameter, click OK to close the Parameters dialog and commit the additions. For reference, a complete
list of possible parameters for Flash movies is listed in Table 19.1.
Table 19.1. Supported Flash Parameters
Parameter
Possible Values
Description
salign
L (Left), R (Right), T
(Top), or B (Bottom)
Determines how the movie will align itself to the
surrounding frame when the Scale attribute is set to
Show All. Furthermore, you can use this parameter to
determine which portion of the image is cut off when the
Scale attribute is set to No Border. Possible values
include L, R, T, and B. You can also use these values
together; for instance, you might decide that the left and
top of the movie should be cut off. In this case, you
would specify LT for the value.
swliveconnect
True or False
Use this parameter when working with FSCommands or
JavaScript in your Flash movies. Because Netscape
initializes Java when it is opened, the Flash movie will
attempt to use Java to work with FSCommands or
JavaScript to communicate with the plug-in interface,
LiveConnect. Because not all movies use the
FSCommands or JavaScript (indeed, Adobe is
discouraging Flash developers from using FSCommands in
their Flash movies for security reasons), setting this
parameter to false prevents the Flash movie from trying
to communicate with the LiveConnect plug-in interface.
Chapter 19. Integrating with Flash
IN THIS CHAPTER
Inserting Flash Movies into Dreamweaver Documents
Working with Flash Elements in Dreamweaver
Managing Links in Flash Movies with Dreamweaver
Controlling Flash Movies with Behaviors
Roundtrip Flash Editing
Some of the most feature-rich, interactive, and user-consuming websites on the Internet today use Flash
technology. Did you ever visit a website that loaded a vector-based game, invited you to play, and then
loaded a travel website when you started to play the game? How many sidebar "mini games" have you seen
that invite you to "shoot the paparazzi," "kill the ninja," "punch the monkey," or "shoot the duck"? The fact
remains that Flash is by far the most widely distributed and widely used platform for delivering rich media
over the Web. Whether you're using Flash for movies, games, marketing purposes, or simply to create
stunning animations for your personal or company's website, Flash offers designers and developers total
freedom from restrictive HTML standards and provides a great alternative to static web page development.
In this chapter, you'll discover how to work with Flash movies in Dreamweaver. You'll learn how to embed
Flash movies in your web pages, pass parameters into those movies, and work with Flash elements such as
Image Viewer, Flash buttons, and flash text in Dreamweaver. Finally, we'll round out the chapter by
discussing the process of controlling Flash movies using behaviors as well as working with roundtrip Flash
editing.
As you have done with the rest of the chapters in this book, you can work with the examples in this chapter
by downloading the files from www.dreamweaverunleashed.com. You'll want to save the files for Chapter 19
in an easy-to-find location. I'll place mine in C:\VectaCorp\Chapter19. Also, be sure to update your site
reference so that it points to the newly created folder.
Inserting Flash Movies into Dreamweaver Documents
In keeping with consistency and intuitiveness, inserting Flash movies into a web page is similar to, if not the
same as, inserting images, video, and audio. To insert a Flash movie into a web page, follow these steps:
1.
Open the index.html page included with the files that you've downloaded for this chapter.
2.
Highlight the text Insert Flash Movie Here and press Delete. Keep your cursor in this same cell.
3.
Choose Insert, Media, Flash. The Select File dialog appears.
4.
In the Select File dialog, browse to the Media folder and select the movie.swf file. Click OK (Choose).
Note
Flash movies are typically saved as FLA files in Windows and as MOV files on a Mac. To use a Flash
file in a web page, the FLA/MOV file must be exported from Flash as a Shockwave Flash file (SWF).
The new movie appears in the web page similar to Figure 19.1.
Figure 19.1. The Flash movie, represented by the plug-in icon, appears in the web page.
[View full size image]
Save your work and test the page in the browser by pressing F12 (Option+F12). As long as the Flash plug-in
is installed for the particular browser that you've chosen to preview the page within, the movie plays without
fault in the web page.
Tip
Using the Insert, Media submenu isn't the only way to insert Flash movies into a web page. Other
options include the Media submenu within the Common category of the Insert bar. You can also drag
and drop the file located in the Flash Movie category of the Assets panel or drag it from the Files
panel.
A Flash movie appears in the Document window as a gray box, as do other audio and video elements. Unlike
audio and video elements, however, a Flash movie is easily recognizable in the Document window by the
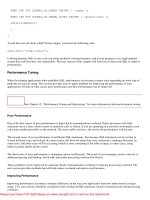
Flash logo centered in the gray box. Also similar to audio and video elements, Flash movie properties can be
controlled using the Flash Property inspector, shown in Figure 19.2.
Figure 19.2. Flash movie properties can be controlled using the Property inspector.
[View full size image]
The Flash Property inspector outlines the following properties:
Movie Name— Enter a value in this text box to uniquely identify the Flash movie. Just above the text
box, a label appears, indicating the type of element selected as well as the file size.
W and H— Enter numeric values within these text boxes to set the width and height of the Flash
movie (in pixels). Remember that unlike images, Flash movies are inherently vector based. This
means that you can override the default width and height settings in the movie and expect the same
quality.
File— Displays the path to the Flash movie within the defined site.
Edit— Used in roundtrip Flash editing, this button launches the original Flash (FLA/MOV) movie in
Flash.
Reset Size— Click this button to reset the size of the Flash movie back to its originally defined width
and height values as defined within the Flash movie.
Class— When working with CSS, apply a custom class to the Flash movie by choosing the class from
this menu.
Loop— Check this box to force the Flash movie to return to the beginning and play over when it
reaches the end.
Autoplay— Check this box to force the browser to begin playing the Flash movie as soon as the page
loads.
V space and H space— Enter numeric values in these text boxes to set the vertical and horizontal
spacing (in pixels) around the Flash movie.
Quality— Choose an option from this menu to set the quality of anti-aliasing during playback in the
browser. Options include High, Low, Auto High, and Auto Low.
High— Anti-aliasing is turned on. Slows down playback considerably on slower computers.
Low— No anti-aliasing is used in the movie. Choose this option when quick play back is
essential.
Auto High— Animation begins in High quality mode but switches to Low if playback is too slow.
Auto Low— Animation begins in Low quality mode but switches to High if the user's computer is
fast enough.
Scale— Choose an option from this menu to determine how the movie should fit within the constraints
of the width and height specified by the W and H text boxes. Options include Default (shows the entire
movie), No Border, and Exact Fit.
Align— Choose an option from this menu to set the alignment of elements surrounding the Flash
movie.
Bg— Choose a color from the color picker to set the background color of the Flash movie from within
Dreamweaver.
Play— Click this button to play the Flash movie in Dreamweaver. After the movie begins playing, the
Play button becomes a Stop button, allowing you to stop the playback of the animation and return the
movie to its default "gray box" state.
Parameters— Clicking this button launches the Parameters dialog. You can use the Parameters
dialog, discussed in the next section, as a way to dynamically control elements of a Flash movie.
Although most of these options are similar to other audio and video properties, they differ in certain
respects. Experiment with the options to see how each can work best for your particular situation.
Note
Another Adobe media type that we haven't discussed because of page constraints is Shockwave
Director. Represented by the SWD file extension, Shockwave Director files are similar to Flash
movies in that they're inherently vector based—but they use a slightly different plug-in. To insert a
Director media file, choose Insert, Media, Shockwave. All the properties in the Property inspector
outlined in this section also apply to SWD files.
Additional Flash Parameters
For most users, the properties outlined within the Property inspector will suffice. In rare instances, however,
you might decide to modify additional parameters not listed in the Property inspector. In cases such as
these, select the Flash file and click the Parameters button in the Property inspector to launch the
Parameters dialog shown in Figure 19.3.
Figure 19.3. Additional Flash movie properties can be controlled using the Parameters dialog.
As you did with video and audio parameters in Chapter 17, "Incorporating Video and Audio," you can add
Flash parameters to the Parameters list by clicking the Add (+) button. Then enter the name of the
parameter in the Parameter column followed by the value in the Value column. When you finish adding the
new parameter, click OK to close the Parameters dialog and commit the additions. For reference, a complete
list of possible parameters for Flash movies is listed in Table 19.1.
Table 19.1. Supported Flash Parameters
Parameter
Possible Values
Description
salign
L (Left), R (Right), T
(Top), or B (Bottom)
Determines how the movie will align itself to the
surrounding frame when the Scale attribute is set to
Show All. Furthermore, you can use this parameter to
determine which portion of the image is cut off when the
Scale attribute is set to No Border. Possible values
include L, R, T, and B. You can also use these values
together; for instance, you might decide that the left and
top of the movie should be cut off. In this case, you
would specify LT for the value.
swliveconnect
True or False
Use this parameter when working with FSCommands or
JavaScript in your Flash movies. Because Netscape
initializes Java when it is opened, the Flash movie will
attempt to use Java to work with FSCommands or
JavaScript to communicate with the plug-in interface,
LiveConnect. Because not all movies use the
FSCommands or JavaScript (indeed, Adobe is
discouraging Flash developers from using FSCommands in
their Flash movies for security reasons), setting this
parameter to false prevents the Flash movie from trying
to communicate with the LiveConnect plug-in interface.
Working with Flash Elements in Dreamweaver
Dreamweaver offers you the capability to author Flash content without using Flash—or even owning it, for
that matter. This capability provides a nice alternative for those who want to use Flash in some areas of
their site but don't want to make the investment and commitment to learning the program. Although the
potential for creating Flash content using the Flash application is extensive, Dreamweaver limits the Flash
content you can create to the following three Flash elements:
Slideshows using the Image Viewer
Flash buttons
Flash text
Let's discuss each.
Using the Image Viewer
Possibly the most feature-rich Flash element included with Dreamweaver is the Image Viewer. The Image
Viewer, which is essentially a Flash-based slideshow utility, allows you to specify a number of JPG images to
display within a contained area. Even better, using a Flash-based navigation widget, you can page through
images complete with preset transitions. Images are dynamically loaded and automatically scaled to fit into
the viewing area, which you can resize. Additionally, you have the ability to customize the background color
and overall title, as well as whether captions appear describing the visible image.
To work with the Image Viewer Flash element in Dreamweaver, follow these steps:
1.
Create a new page by choosing File, New. Select Blank Page, HTML, <none>, and click Create. A new
Document window instance will appear. Immediately save the page as imageviewer.html.
2.
Insert the Image Viewer by choosing Insert, Media, Image Viewer. The Save Flash Element dialog
appears.
3.
Save the Image Viewer Flash element in the Media folder, giving it the name surfpicslideshow.swf.
Click Save. The Image Viewer element appears on the page with the default size of 400 pixels wide by
325 pixels high (see Figure 19.4). Additionally, the Flash Element panel will appear above your Files
panel (see Figure 19.4). From this panel you're able to customize various Image Viewer Parameters
(discussed in the next section).
Figure 19.4. The Image Viewer Flash element is inserted into the document with the
default width of 400 pixels and a height of 325 pixels.
[View full size image]
4.
Save your work.
You're not limited to the 400x325-pixel dimensions. If you want to change the size, select the resize handles
on the ends or corners of the Image Viewer and drag to expand or contract. Alternatively, you may choose
to modify the W and H properties in the Property inspector instead.
Modifying Image Viewer Parameters
In most cases, modifying parameters for Flash movies is completely optional. Not so with the Image Viewer.
At the very least you must specify which images, including their complete paths, the Image Viewer should
display. As you can see in Figure 19.4, the Flash Element panel appears on the right (above the Files panel),
allowing you to configure various Image Viewer properties. Of primary importance is the ImageURLs text
field that lists which images, including their paths, the Image Viewer will display. In all, there are 19
different parameters supported by the Flash Viewer, but the most important of these parameters is the
required ImageURLs parameter.
By default, the ImageURLs parameter includes an array of sample image names as follows:
['img1.jpg', 'img2.jpg', 'img3.jpg']
You'll need to configure these values so that they refer to the images located in the Images folder. To
modify these array values, click the Edit Array Values icon located just to the right of the ImageURLs field
when the field is selected. The Edit ImageURLs Array dialog appears similar to Figure 19.5.
Figure 19.5. The Edit ImageURLs Array dialog allows you to intuitively add images to the
ImageURLs array.
Using the Add (+) button in the dialog, select and browse to add the five JPG images in the Images folder
for your defined site. When you finish, click OK. The ImageURLs array is now configured as follows:
['Assets/surfing_oahu01.jpg',
'Assets/surfing_oahu02.jpg',
'Assets/surfing_oahu03.jpg',
'Assets/surfing_oahu04.jpg',
'Assets/surfing_oahu05.jpg']
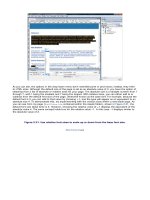
Save your work and test the result in the browser by pressing F12 (Option+F12). As you can see from
Figure 19.6, the images are now populated underneath an intuitive navigation bar.
Figure 19.6. The Image Viewer element renders a navigation bar complete with images you
specify in the ImageURLs parameter in Dreamweaver.
[View full size image]
Try cycling through the images to see the slideshow. You'll probably notice a randomized transition that
appears when one image cycles to the next. Transitions, as well as other properties, can be modified using
the Flash Element Tag Inspector. As mentioned earlier, you can modify the 19 parameters listed in Table
19.2.
Table 19.2. Supported Image Viewer Parameters
Parameter
Attribute
Type
Use
bgColor
Color Picker
Sets the solid color surrounding the image. This option does not
affect the background color.
captionColor
Color Picker
Sets the color of the captions displayed next to each image.
captionFont
Menu List
Sets the font used for the captions.
frameColor
Color Picker
Sets the border color, if a border exists, around the Image Viewer.
frameShow
Menu List
Determines whether a border around the Image Viewer is shown.
frameThickness
Text Field
Sets the size of the border in pixels.
imageCaptions
Array Values
Sets the text captions that accompany each image listed in the
imageURLs property.
imageLinks
Array Values
Sets the links associated with each image listed in the imageURLs
property.
imageLinkTarget
Menu List
Sets the target for the linked files. As with links, acceptable
targets include _blank, _parent, _self, and _top.
imageURLs
Array Values
Lists the URLs of the source files that the Image Viewer will use.
showControls
Menu List
Determines whether the navigation bar is shown. If the navigation
bar is not shown, make sure that you enable the slideAutoPlay
option.
slideAutoPlay
Menu List
Determines whether the slideshow should start automatically.
slideDelay
Text Field
Sets the delay (in seconds) between images during a running
slideshow. The default is 5.
slideLoop
Menu List
Determines whether the slideshow should continuously repeat.
title
Text Field
Sets the overall title for the Image Viewer.
titleColor
Color Picker
Sets the color for the title.
titleFont
Menu List
Sets the font for the title.
titleSize
Text Field
Sets the font size for the title.
transitionsType
Menu List
Determines which transition (if any) is used between images.
Options include None, Blinds, Fade, Fly, Iris, Photo, PixelDissolve,
Rotate, Squeeze, Wipe, Zoom, and Random (default).
Creating Flash Buttons
A second Flash element included with Dreamweaver the Flash button. If you're an experienced Flash
developer, this feature might seem a bit limited because you're using canned Flash graphics that don't offer
much in terms of editing capabilities. However, if you're not an experienced Flash developer and want to
quickly insert slick, premade Flash-based buttons, this feature may be right up your alley.
To insert a Flash button into your web page, follow these steps:
1.
Open index.html if it's not already open.
2.
Remove the Home text link from the first cell in the navigation table.
3.
Keeping the cursor in the cell, choose Insert, Media, Flash Button. The Insert Flash Button dialog
appears (see Figure 19.7).
Figure 19.7. The Insert Flash Button dialog appears.
[View full size image]
4.
Pick a Flash button style from the Style list box. Clicking one of the Flash button styles displays a
preview in the Sample box, giving you an idea as to what the Flash button will look like in the browser.
I'll choose Beveled Rect-Blue.
Note
If you don't find a style you like, click the Get More Styles button in the Insert Flash
Button dialog. A new browser window opens (if you currently have a live Internet
connection) and redirects you to the Dreamweaver Exchange, a web-based repository
for buttons, components, commands, behaviors, and more.
5.
In the Button Text text box, type the word Home. This is the text that the user will see on top of the
button.
6.
You can also choose a font and a font size from the Font menu and Size text box, respectively. The nice
part about working with Flash buttons is that you're not restricted to using the default fonts; you can
choose from any font installed on your computer. Because the font is embedded into the Flash movie,
users do not need to have the font installed on their machines when viewing your movie in the
browser. I'll choose Arial from the list and keep the size at 12 points.
Tip
One of the benefits to using Flash buttons is that you can use your own fonts without
having to worry about whether end users have the particular font installed on their
computers. Because the plug-in does all the work, feel free to experiment, customizing
buttons in this list using font faces installed on your computer.
7.
The Link text box enables you to link the button to a local file or absolute path. Because I know that
this button will link to the home page, I'll enter index.html here.
8.
Use the Target menu to specify where the link should open. As was the case with general links, options
include _blank, _parent, _self (default), and _top. I'll leave the menu blank to default the target to
_self.
9.
The next option, Bg color, allows you to specify a background color for the Flash button. By default, the
background color is white; however, you might want the background color of the button to match the
background color of your document (assuming that you changed it). Because the background color of
my document is white, I'll leave this option as is. Note that you can also open an existing page (with
the intended background color) and use the eyedropper technique to sample that particular color.
10.
Name the SWF file that Dreamweaver will ultimately create for you. Because this is the Home button,
I'll name the file home.swf.
11.
Click OK to commit the modifications. The new Flash button appears on the page at the insertion point,
similar to Figure 19.8.
Figure 19.8. The new Flash button appears on the page and the home.swf file
appears within the File panel.
[View full size image]
12.
Save your work.
Repeat steps 2–11 to replace all the text-based links in the navigation bar with Flash buttons.
If you want to see how the button will behave, you don't have to preview the results in the browser. Click
the Play icon in the Property inspector and roll over the Flash button. If you need to make changes to the
Flash button, double-click it on the page to reopen the Insert Flash Button dialog. Make the necessary edits
and click OK.
Working with Flash Text
As was the case with Flash buttons, you also have the option of adding Flash text directly in Dreamweaver.
Similar to Flash buttons, Dreamweaver can make an SWF file based on text you type into the Insert Flash
Text dialog. What's really nice about Flash text is that it's vector based, so all the lines in the type appear
much smoother than if they were created in an image-editing program. Even better, you have an option of
creating rollovers when working with Flash text. In this case, when the user rolls over the Flash text, it
changes to a color you specify.
To create Flash text in Dreamweaver, follow these steps:
1.
Open the index.html page if it's not already open.
2.
Select the Welcome subheading image and delete it.
3.
Keeping your cursor in the cell, choose Insert, Media, Flash Text. The Insert Flash Text dialog appears
as shown in Figure 19.9.
Figure 19.9. The Insert Flash Text dialog appears.
[View full size image]
4.
In the Text text box, enter the text Welcome.
5.
Similar to the process of formatting text, the Insert Flash Text dialog allows you to customize the font,
size, weight, color, and alignment of the text. Furthermore, if you want to use this text as a hyperlink,
you can customize the Rollover Color of the text. For our purposes, choose the Arial font, change the
size to 20 pixels, click the Bold (B) icon, and enter the hexadecimal value #CC1C0D for the color.
6.
If you are working with hyperlinks, enter a local file or absolute path in the Link text box. Furthermore,
you can also choose a target from the Target menu.
7.
The Bg color option allows you to specify a background color for the Flash text. By default, the
background color is white; however, you may want the background color of the button to match the
background color of your document (assuming that you changed it). Because the background color of
my document is white, I'll leave this option as is.
8.
Name the SWF file that Dreamweaver will ultimately create for you. Because this is the Welcome
subheading image, I'll name the file welcome.swf.
9.
To apply what you've done, click OK. The new Flash-based text appears as the subheading on the page
as shown in Figure 19.10.
Figure 19.10. Enter all values into the Insert Flash Text dialog to configure properties
for the Company Intranet Flash text.
[View full size image]
10.
Save your work.
If you added a rollover state and want to preview it, you can accomplish this right within Dreamweaver.
Highlight the text and, in the Property inspector, click the Play button. When you mouse over the text, you'll
see it switch to the color you specified in the Insert Flash Text dialog.
Note
Although Flash buttons and text are powerful features, I encourage you to use these features only
when they serve a purpose. If you have no other Flash content in your document, don't start by
using one of these options. It doesn't make sense to require the end user to have a plug-in simply to
view a piece of text or a button that otherwise could have been made in a graphics program such as
Fireworks or Photoshop and exported as an image.
From an aesthetics standpoint, I discourage anyone from using Flash buttons on a professional site. I
say this not to downplay or take away from this easy-to-use functionality, but because anyone who is
the least bit familiar with Dreamweaver will be able to pinpoint your recognizable buttons as stock
Dreamweaver Flash creations.
Flash text presents viewing issues (for example, nondesktop browsing devices, such as some cell
phones and PDAs, can't display Flash text) and hides what would otherwise be readable text from
search engines.
Managing Links in Flash Movies with Dreamweaver
A lot of Flash developers rely heavily on Flash movies in their websites. Some use Flash entirely, embedding
the Flash movie within an HTML page in Dreamweaver, whereas others use smaller Flash movies as
interactive pieces in a mostly HTML-based user interface. Some use the catchy animations that Flash can
create to replace an existing navigation menu. In these scenarios, modifying links in the Flash movies can
become a nightmare. Not only do you have to open the original FLA/MOV file within Flash, you have to
modify the link and then reexport the movie as a SWF file to replace the existing movie within the HTML
document. Fortunately, Dreamweaver solves this problem by adding features to its site management
window that aid in working with Flash-based links directly from Dreamweaver.
As you have seen thus far, Dreamweaver prompts you to update links within a site when you move files that
include dependencies in the Files list. Dreamweaver either automatically fixes the broken reference to the
moved file or it prompts you to do so. As nice as that functionality is, it doesn't stop with plain HTML files.
Dreamweaver extends its link management features to include SWF files. What this means is that if files are
moved within your site list—even if the broken references are within an SWF file—Dreamweaver
automatically fixes those links within the movie file.
In certain scenarios, however, you might want to manually fix broken link references in an SWF file. If this is
the case, you can use the Site Map view in the Files panel to modify the links manually. To modify the links
in an SWF file manually, follow these steps:
1.
Expand the Files panel, if necessary, by clicking the Expand/Collapse icon located in the top right of the
icon bar in the Files panel.
2.
Click the Site Map icon, located third from the right in the menu bar at the top of the Files panel. The
Site Map appears.
3.
Locate the SWF file you want to modify. If it contains any links, a plus sign is shown next to its icon.
Click the plus sign to expand the list of links from the SWF file.
4.
To change the link to point to a new file, either drag the point-to-file icon into the new file in the Site
Map or choose the Change Link option from the Site menu. The Select HTML file dialog appears.
5.
Select a new file by navigating to the desired HTML file or by entering the URL manually. Click OK when
you're finished.
The link in your SWF file is now changed.
Controlling Flash Movies with Dreamweaver Behaviors
Chapter 10, "Using Dreamweaver Behaviors," introduced many of the behaviors built in to Dreamweaver;
you learned about several other behaviors in subsequent chapters. The final behavior we've yet to cover is
the Control Shockwave or Flash behavior. Using this behavior, you can easily create HTML-based navigation
options that can play, stop, or rewind the Flash movie in your web page.
To use the Control Shockwave or Flash behavior with a Flash movie, follow these steps:
1.
Create a new page by choosing File, New. Select Blank Page, HTML, <none>, and click Create.
Immediately save your page as flashbehaviors.html.
2.
Insert the movie.swf file into the page by choosing Insert, Media, Flash, browsing to the file, and
clicking OK.
3.
Select the Flash movie on the page and enter a unique name for it in the Name text box in the Property
inspector. I'll call my Flash movie theMovie.
4.
Disable both the Loop and Autoplay options in the Property inspector.
5.
Insert three form object buttons onto the page. When the Add Form Tag dialog appears, choose No.
Change the Action property for each button to None, and label them Play, Stop, and Rewind,
respectively. The result will resemble Figure 19.11.
Figure 19.11. Insert three form buttons onto the page, change their Actions to None,
and label them Play, Stop, and Rewind, respectively.
[View full size image]
6.
Open the Behaviors panel by choosing Window, Behaviors or by pressing Shift+F4.
7.
Select the Play button on the page and choose the Control Shockwave or Flash behavior, available by
clicking the Add (+) button in the Behaviors panel and choosing the behavior from the Deprecated
submenu. The Control Shockwave or Flash dialog appears, similar to Figure 19.12.
Figure 19.12. The Control Shockwave or Flash dialog allows you to set Play, Stop, or
Rewind actions for buttons on the page.
8.
From the Control Shockwave or Flash dialog, select the movie you want to control from the Movie
menu. Because we're working with only one movie on this page, select the Movie "theMovie" option.
9.
Enable the Play option button and click OK. Make sure that the onClick event is associated within the
behavior in the Behaviors panel.
Note
In addition to playing, stopping, and rewinding, you can take the user to a specific frame
number within the Flash movie. To do this, choose the Go to Frame option and type a
numeric value in the provided text box.
10.
Repeat steps 7–9, attaching Stop and Rewind actions to the Stop and Rewind buttons, respectively.
11.
Save your work.
You can test the results in the browser by pressing F12 (Option+F12). The Flash movie appears in the
browser window. Click the Play button to begin playing the movie. Click the Stop and Rewind buttons to test
their functionality as well.
Roundtrip Flash Editing
In the course of this book, you've learned that the Property inspector integrates an Edit button when you're
working with certain file types such as images. When the image is selected, you can click the Edit button to
launch the respective editor and open the original version of the image, allowing you to make edits. When
you finish making the edits, you can click Done to see the results within Dreamweaver. This process, known
as roundtrip editing, is also available for Flash movies. Of course, this feature relies on having Flash installed
on your computer as well has having the original FLA/MOV file present.
To work with roundtrip Flash editing, follow these steps:
1.
Select the movie.swf Flash movie and click the Edit button in the Property inspector.
2.
Dreamweaver opens Flash and attempts to automatically open the selected movie's source FLA/MOV
file. If it can't open the original file automatically, it prompts you for the location of the original file.
3.
After the original movie opens in Flash, the Flash Document window indicates that you're editing a
movie from Dreamweaver. Make your changes to the movie.
4.
When you finish making your edits, click the Done button. Flash saves your changes to the source
FLA/MOV file, updates the SWF file, minimizes Flash, and then changes focus back to Dreamweaver.
Summary
As you have seen, Dreamweaver's integration with sibling programs is unprecedented. Whether you're
working with images directly from within Dreamweaver and editing those images using Fireworks or creating
full-featured animations using Flash and controlling that animation from within Dreamweaver, it's hard to
argue the amazing power that the programs share.
In this chapter, you looked at the interaction between Dreamweaver and Flash. You saw how easy it was to
insert Flash-based media into a web page in Dreamweaver. You also looked at built-in Flash elements such
as the Image Viewer, Flash buttons, and Flash text. Toward the end of the chapter, you saw how behaviors
can control the playing, stopping, and rewinding of a Flash movie directly from your web page.
This chapter officially concludes the "static" portions of web page development. From this point forward,
we'll turn our attention to creating web applications using "dynamic" web application technologies such as
ASP, ASP.NET, PHP, and ColdFusion.
Part V: Dynamic Web Page Development
CHAPTER 20 Introduction to Web Applications
CHAPTER 21 Working with Server-Side Technologies
CHAPTER 22 A Database Primer
CHAPTER 23 A SQL Primer
Chapter 20. Introduction to Web Applications
IN THIS CHAPTER
Client-Side Versus Server-Side Web Development
Web Applications
Client-Side Technologies
Server-Side Technologies
Database Options
The Structured Query Language (SQL)
Working with Data Source Names
The Dynamic Vecta Corp Intranet Application
What is a web application? That's the question I'll try to answer in this chapter. Anyone who has spent any
amount of time with web applications might tell you that they consist of many pieces all working
harmoniously together to facilitate interaction between an end user and a web server. You might have a
website that consists of HTML, CSS, and JavaScript. Additionally, you might have a web server with an
installed server-side technology such as ASP, ASP.NET, ColdFusion, or PHP that responds to requests or
interactions between the website and the web server. Furthermore, you might employ some sort of data-
storage mechanism that takes the form of a database, XML file, or other data source.
The simple fact is that web applications encompass many technologies, languages, platforms, and needs.
For this reason, there's no simple definition for the term web application. Some say that web applications
are like computer-based applications in that they allow you to store, query, and interact with data in and
from a database. That is the traditional and basic definition of a web application; the truth is, web
applications extend well beyond that.
In this chapter, we'll demystify the term web application, discussing terms such as client-side development,
static web page creation, server-side development, databases, and much more. By the end of the chapter,
you should have a firm grasp on what web applications are, what purpose they serve, and more importantly,
how they're implemented within the scope of Dreamweaver. Toward the end of the chapter, we'll introduce
the dynamic portions of the Vecta Corp site, including pages that we'll build for the site, such as an
employee store, a dynamic company directory, and a set of administrative pages.
Client-Side Versus Server-Side Web Development
In the introduction to this chapter, I teased you about what a web application is but stopped short of
actually defining it. Simply put, a web application is a website that contains static and dynamic pages
working together to facilitate interaction between a user and a web server. That clears it all up, right? To
sum up this rather lame attempt at defining web applications, think of what we've done so far. Up to this
point, we've built simple web pages (static ones), pressed F12, and magically the page appeared in the
browser window as it was intended. Nothing special was required from us, we didn't have to install anything
on the computer to get it to work (aside from Dreamweaver), and best of all, we didn't have to manually
write any code in the Code view of the web page. If we were to diagram the process involved for a user
browsing to your static web page (assuming that it was hosted by a web hosting provider rather than by
your computer), the process might resemble what's shown in Figure 20.1.
Figure 20.1. Static web pages follow a simple flow: The user requests the page and the web
server displays it.
Two major components make up static web pages: the client and the web server. The client makes a
request by typing the URL of your website into the address bar of the browser and pressing Enter. At this
point, a request is made to the web server. The web server, recognizing this request, sends HTML back to
the client, whose browser parses the content out of the HTML tags and displays the text, images, and media
(what the original developer of the page intended to be seen) to the user. This process is often referred to
as client-side development because you're using simple client-side technologies such as HTML, CSS, or
JavaScript—technologies meant to be processed by the client browser that require very little, if anything,
from the actual web server.
Dynamic pages, on the other hand, work differently and to a certain extent are a bit more complex in their
implementation. Dynamic pages contain instructions in the form of a scripting language—or, in some cases,
a full-blown object-oriented programming language that gets processed on the web server. Sometimes the
instructions or code is self-contained, and sometimes it's mixed in with HTML code, but ultimately that code
is processed and executed by a web server. If we were to diagram the process involved for a user browsing
to your dynamic web page (assuming that it was hosted by a web-hosting provider rather than by your
computer), it might resemble the process shown in Figure 20.2.
Figure 20.2. Dynamic web pages follow a complex flow: The user interacts with the page and
sends a request to the server; the server processes the request and finally sends a response back
to the client.