Adobe Dreamweaver CS3 Unleashed- P20 ppt
Bạn đang xem bản rút gọn của tài liệu. Xem và tải ngay bản đầy đủ của tài liệu tại đây (443.26 KB, 50 trang )
The Dynamic Vecta Corp Intranet Application
Up to this point, we've used various web pages in the Vecta Corp site as examples of how to work with basic
page formatting techniques, tables, CSS, frames, forms and form objects, behaviors, AP elements, and
more. Up until now, the process has been simple: We create a new page, add some images and text to the
page, format it with tables or divs, and then save it for viewing in the browser. In a real-world scenario,
however, our workflow process would be inadequate and inefficient. Imagine having 500 pages within an
intranet site and trying to perform day-to-day web-maintenance operations. As it relates to our Vecta Corp
example, the process might resemble the following scenario:
Company Events— As a web developer, your job is to manually add and remove company events as
they're announced. After the company event is on the main page, you must also create a dedicated
page for the company event that includes pictures, directions, times, and perhaps a reservation
system that, you guessed it, would be manually updated by you based on email reservations sent to
you.
HelpDesk— The HelpDesk functions as a repository for employee hardware, software, and general
office maintenance problems. In a traditional scenario, you are responsible for fielding emails from
employees with problems and then manually posting information to the website so that the IT
department can view the problems and respond accordingly. Even worse, after the IT department
responds and fixes the problem, they would send you an email so that you could manually remove the
ticket from the site.
Company Directory— As the web developer, your job is to continuously add, modify, and remove
employees from the employee directory page. Given today's volatile marketplace, this in itself could
become a daunting task!
Employee Store— As the web developer, your job also involves manually adding, modifying, and
removing products from the company's employee store. But wait, there's more. You are also
responsible for fielding emails from employees who are interested in a product, collecting cash, giving
the employee the product, and then manually updating a spreadsheet of inventory information.
After reviewing this process, you've probably come to one conclusion: job security! As you can see, these
tasks are enough to keep you busy all day, leaving little time for your talents and skills elsewhere on the
website. Rather than taking a design or development role as it relates to the website, you might be stuck in
maintenance mode, constantly adding, updating, and removing data from the website.
This is where dynamic web pages and web applications come into play. Using a web application containing
numerous dynamic web pages, you could easily streamline your workflow so that it begins to model the
following workflow process:
Company Events— Rather than manually adding, removing, and deleting company events, you tie
the main page of the site to a database. A table within the database could contain the company events
that are in turn fed to an HTML table within the main page. Even better, you can create a second page
that allows Herbert in HR to add, update, and remove company events from the database using a
simple administrative web page.
HelpDesk— Instead of fielding emails from employees who have problems, why not create a two-
page HelpDesk system in which employees can create new HelpDesk tickets? These tickets can be
stored in a table in the database. A second administrative page, accessible by the IT staff, provides a
list of employees with problems (fed in from the database). When the problem has been fixed, the IT
staff member selects from a drop-down menu that changes the status of the HelpDesk ticket from
Open to Closed.
Company Directory— Rather than manually adding, modifying, and removing employees from the
company directory, you can easily create functionality within an administrative page that allows you to
centrally add, modify, and delete employees from a database table. This approach effectively
eliminates the need for manually connecting to the site, opening the HTML page, making changes, and
then re-uploading the site.
Employee Store— By far the most complex part of the Vecta Corp site is the employee store.
Manually trying to add, modify, and remove products as well as collect cash, distribute products, and
update inventories can be an extremely time-consuming process. Instead, add the products to a
database and display those products within a dynamic page. Add shopping cart functionality to the
page that allows users to add and update a shopping cart on their own. When it comes time to check
out, you can easily integrate payment system functionality such as PayPal to automate the process of
collecting money from the employee.
Admin— As the web developer/administrator, you'll want a centralized interface for adding,
modifying, and deleting employees. Additionally, you'll want to centrally add, modify, and remove
product information from your site. This is where the administrative page comes in. By creating a
digital dashboard of sorts, you can easily fulfill these tasks without ever having to connect to your site
within Dreamweaver.
After reviewing this process, you're probably starting to wonder about that job security. The downside to
using dynamic web pages and databases is that you're effectively taken out of some of the processes you've
become accustomed to dealing with. The upside is that you can now focus on building more applications for
your organization. Even better, you can now focus on designing and developing the fun stuff! And though
the initial setup and development time is greater for our web application than for the equivalent static
pages, the benefits down the line far outweigh the time it would take to develop the application. Keep in
mind that Dreamweaver cuts your development time in half. Because you're working with an intuitive visual
editor and not coding by hand, the time needed to create the dynamic Vecta Corp web application in
Dreamweaver will be short.
The next nine chapters of the book involve building the dynamic pages for the Vecta Corp employee store.
As you've seen from the bullet points describing the pages above, our web application has the potential of
becoming a massive undertaking. Since this is the case, we'll focus on the employee store page. I'll outline
how to work with databases in Dreamweaver by establishing a connection to a database, how to create
bindings to the database, and how to work with the many server behaviors in Dreamweaver to build view
catalog page, login functionality, search functionality, and more. By the book's end, you should be able to
take the concepts learned in the next nine chapters and build out the rest of the pages outlined in the
previous bullet points.
Summary
Understanding what a web application is—and how different it is from a static website—is only the first step
in creating one. Making decisions about server-side technologies and databases all comes down to one
thing: what tools are easily available?
If your company has Oracle installed and there are plenty of PHP developers available to build and support
your web application, that's likely the way you'll go. However, if you are running a small company and cost
is an issue, PHP/MySQL, ASP.NET/Access, or ColdFusion/Access might be more prudent.
In the next chapter, you'll take the foundation-level concepts from this chapter to the next level. You'll
actually pick a server-side technology to use, learn how to install it, and then configure it to work with
Dreamweaver and the Vecta Corp application.
Chapter 21. Working with Server-Side Technologies
IN THIS CHAPTER
Working with the IIS Web Server
Working with ASP
Installing and Working with ASP.NET
Installing and Working with ColdFusion
Installing and Working with PHP
Now that you've been formally introduced to the terminology that is server-side web
development—including dynamic web pages, web applications, databases, SQL, and DSNs—you're ready to
move forward into the realm of installation, set up, and configuration for the actual server-side technology
you plan to use.
By now, you should have some sort of idea about the architecture of your organization. Do you have a
Windows server-based operating system such as Windows Server 2000 or 2003, or are you looking at Mac
OS X Server? Are your plans to develop web applications using a development machine running Windows XP
Pro, Vista, or OS X and then upload the finished product to a server when you're finished? Do you want to
minimize installation and configuration? Are you merely a novice who is interested in tinkering with dynamic
web page development? The answers to these questions can help you quickly determine what server-side
technology you plan to use with Dreamweaver. It's important to note that Dreamweaver's functionality for
creating dynamic web pages is nearly identical regardless of server-side technology. And because you won't
be interacting with the code all that much, picking a server-side technology shouldn't be all that difficult;
they all have the same bells and whistles built in to Dreamweaver.
If you haven't made a decision on the server-side technology you want to use, don't worry. In this chapter,
I'll demystify each of your options. I'll provide an overview of the web server we'll be using (IIS) as well as
detail the nuances, installation procedures, and configuration routines (if any) for the four server-side
technologies that we'll cover throughout the rest of the book. By the end of the chapter, you'll have a web
server up and running, a server-side technology installed and configured, and a simple dynamic page
working!
Note
We'll be using IIS as our web server as we work through the examples in the book. This server is not
available for Mac users. However, OS X ships with the Apache web server included, and it is enabled
simply by opening System Preferences, selecting the Sharing preferences pane, and clicking the
Personal Web Sharing check box. You can then install MySQL and PHP, or just install MAMP/Pro
(o/) which installs MySQL and PHP all at once.
Working with the Internet Information Services (IIS) Web Server
In the previous chapter, I made reference to the fact that users interact with web applications through a
series of carefully crafted form objects exposed to the user in the browser window. The user interacts with
the form objects and then typically clicks a button, expecting to see results. What we haven't discussed,
however, is how those results are returned to the user.
In general, servers rely on a piece of software that is crucial in the HTTP request/response process. This
piece of software, the web server, is primarily responsible for managing various websites, FTP sites, a mail
client, and more on our server. Working in conjunction with the server-side technology, the web server is
also responsible for facilitating the handoff between the client's request, the server-side technology used to
handle the request, the collection of the response from the server-side technology, and the subsequent
handoff of the response back to the client browser.
Internet Information Services (IIS) is Microsoft's web server solution and is the primary focus of examples
throughout the rest of the book. IIS comes bundled with most Microsoft server-based operating systems,
including Windows NT 4, Windows 2000 Pro, Server and Advanced Server, Window 2003 Server, Windows
XP Pro, Windows Vista Home Premium, Vista Business, Vista Ultimate, and Vista Enterprise.
Note
Obviously, IIS isn't the only web server on the market. For the sake of simplicity, we'll cover only
one web server—IIS. However, other web servers exist—the open source Apache, Sun's iPlanet,
IBM's WebSphere, and more—that can run just as well on Mac and UNIX environments as they can
on Windows machines.
In some cases, IIS installs when the OS is installed, but in other cases, you must manually walk through the
process of setting it up on your own. More on this later.
Table 21.1 outlines the major Windows operating systems and shows whether the web server comes
preinstalled with the specific operating system.
Table 21.1. Major Windows Systems and IIS Support
OS
Web Server
Preinstalled
Technologies Supported
Win 95, 98, ME, XP Home No
N/A
ColdFusion Only
ColdFusion only
Win XP Pro
IIS 5
No
All
Win NT 4
IIS 4
Yes
All
Win 2000 Pro
IIS 5
No
All
Win 2000 Server
IIS 5
Yes
All
Win 2003
IIS 6
Yes
All
Win Vista Home Premium
IIS 7
Yes
All
Win Vista Business
IIS 7
Yes
All
Win Vista Ultimate
IIS 7
Yes
All
Win Vista Enterprise
IIS 7
Yes
All
If you're not sure whether IIS is preinstalled on your computer, you can use one of these three methods to
find out:
Check for a folder called Inetpub located in the root of your system (typically C:\) drive. If you have
that folder—as well as the wwwroot folder within it—chances are you're fine.
Select Start, Settings, Control Panel, Administrative Tools. If you have a menu item for Internet
Services Manager, IIS is indeed installed.
Navigate to http://localhost in a browser. If you see the IIS Welcome screen, IIS is installed and
running.
If IIS is there, you've got the web server installed. If not, follow the steps in the next section.
Installing IIS
One of the questions in application development is whether IIS has to be installed even if you are not
hosting your own web applications. The answer is yes. Even if you are uploading your web applications using
FTP to your web host provider, installing IIS allows you to view and configure your applications locally
before they are ready for production.
Note
As you've seen, Dreamweaver allows you to define a testing server when you define a site. The site
that you define within IIS (covered later) will become the site you specify in the testing server
category in the Site Definition dialog.
IIS comes with most versions of server-based Windows operating systems, but it's not installed
automatically in all versions, which is why it might not be present on your computer. If you've come to the
conclusion that IIS isn't installed on your computer and you have a compatible operating system similar to
the ones listed in Table 21.1, follow these steps to install it:
1.
Access the Control Panel by choosing Start, Settings, Control Panel.
2.
In the Control Panel, select Add or Remove Programs. In Vista, the menu item is titled Programs and
Features.
3.
Choose Add/Remove Windows Components. In Vista, the menu item is titled Turn Windows Features
On or Off. The list of components becomes visible within a few seconds.
4.
In the list of components, enable the Internet Information Services (IIS) option. If you're using Vista,
you might take the time to expand the Internet Information Services node, expand the World Wide
Web Services node, expand the Application Development Features node, and then enable ASP. This will
guarantee that traditional ASP will work with Vista.
5.
Click Next (Windows may or may not prompt you to insert the original Windows software CD) to install
IIS.
6.
After IIS is installed, close the Add or Remove Programs (Programs and Features) dialog.
You can now check to see whether IIS installed correctly by performing one or all three checkpoints
highlighted in the previous section.
You are now ready to begin hosting web applications. Although we won't cover how to configure IIS for
external use, I will show you how to configure IIS to support local development of ASP, ASP.NET,
ColdFusion, and PHP applications so that you can upload them later to your external web host provider.
Configuring IIS
Although little configuration needs to be done to begin working with IIS, I will use this section to introduce
some basic features and functionality within IIS. Reading this section will help you better troubleshoot
problems that may arise later in development. This section explains the following topics:
Where to keep files on the web server
Using Localhost
How to start and stop the web server
Where to Keep File on the Web Server
Now that you have IIS up and running, let's take a closer look at where the files for your Web applications
are kept on the computer. Up to this point, we've been saving our projects in the
C:\VectaCorp\<chapterfolder> directory. This works fine for static web pages because we're merely
testing the functionality of the pages in the browser. IIS works a bit differently, however. By default, IIS
reads and processes the code in the file from the C:\Inetpub\wwwroot\ folder. If you open this folder and
compare it to the folder tree in IIS, you'll notice some similarities. Although it is not a requirement to keep
applications in this folder, it is generally considered a good repository for storing and managing your server-
side applications.
Note
Technically, your files don't have to be in C:\Inetpub\wwwroot\. You can also create what's called a
virtual directory. A virtual directory is essentially an alias within IIS that points to a folder
somewhere else on your computer. To make things easier, however, we'll work with
C:\Inetpub\wwwroot\ for the rest of the book.
So that we can test how our web server works, let's create a new folder within C:\Inetpub\wwwroot and
add a simple HTML page to the new folder. You can do this on your own by following these steps:
1.
Open Windows Explorer and navigate to the root of C:\Inetpub\wwwroot.
2.
Within wwwroot, create a new folder called VectaCorp.
3.
Open the VectaCorp folder.
4.
Right-click an empty area in the folder and choose New, Text Document from the context menu.
5.
After you select the New Text Document option, you can rename the file. Change the name, including
its extension, to index.html. This action converts the text document to an HTML file.
6.
Right-click the file and choose Open With, Notepad from the context menu. The file will open in
Notepad.
7.
In the document, add the following basic HTML:
<html>
<head>
<title>Sample HTML Page</title>
</head>
<body>
<h1>Hello World</h1>
</body>
</html>
8.
Save the page and close Notepad.
That's it! You've just created your first basic page within the context of the web server. In the next section,
we'll browse to the page using the default name of the web server.
Using Localhost
Now that you have a new file in C:\Inetpub\wwwroot\VectaCorp, your web server has access to it. If
you've been developing static HTML web pages for a long time, habit may drive you to open files directly in
your browser. Dynamic pages can't be opened directly from the browser because your web server needs to
have a crack at the file before it is sent to your browser for display. If the application server doesn't get the
chance to interpret the request coded into a dynamic page, the code behind the dynamic page is never
converted into HTML that your browser can understand.
To repeat: dynamic pages can't be opened directly from the browser. Instead, you'll have to open the
browser and navigate to the web directory using the local web address for your computer, also known as
http://localhost (or by the IP address http://127.0.0.1). More specifically, because the VectaCorp
folder is located in C:\Inetpub\wwwroot\VectaCorp on your computer, you can access it directly from the
browser by typing in the URL http://localhost/VectaCorp. Figure 21.1 shows IIS and the browser side by
side so that you can visualize the point I'm trying to make.
Figure 21.1. http://localhost/VectaCorp is the URL that points to the folder
C:\Inetpub\wwwroot\VectaCorp.
[View full size image]
In this case, the process was simple. Because our default page is essentially an HTML file, nothing is really
required of the web server. Most of the work in this case is handled by the browser. The browser parses the
literal text out of the HTML tags and presents the text Hello World to the user. Because our page contained
only HTML, we could have just as easily opened the page directly in the browser, displaying the same
results. Remember though, that the web server (IIS) is the only piece of software that can access your
server-side code (such as ASP, ASP.NET, PHP, or ColdFusion) directly. For this reason, it's a good idea that
you get into the habit of accessing your dynamic pages directly from
http://localhost/<yourfoldername>. This is how it will be done throughout the rest of the book manually
and via Dreamweaver.
Stopping and Starting IIS
With IIS now up and running, let's now look at how you can start, stop, and restart IIS if the need arises.
For the most part, you'll always want to have IIS running except when you're using certain programs locally
that open ports allowing intruders to compromise the security of your computer. Some programs, such as
peer-to-peer (P2P) file-sharing programs, automatically stop IIS when it launches because of potential
security vulnerabilities.
If you want to stop IIS when it's not being used, follow these steps:
1.
Open IIS by choosing Start, Settings, Control Panel, Administrative Tools, Internet Information
Services. (Now would be a good time to create a shortcut on the desktop for this application.)
2.
With IIS open, select Default Web Site. The Start, Stop, and Restart icons become visible.
3.
Click the Stop option shown in Figure 21.2. The web server is now stopped.
Figure 21.2. Select Stop to stop IIS.
4.
To start IIS again, all you need to do is click the Start icon. IIS will start again.
If you want to restart IIS, you can perform the steps just listed or you can make life easier on yourself by
entering a simple command in the Run dialog. To do this, follow these steps:
1.
Select Start and then choose Run. The Run dialog appears.
2.
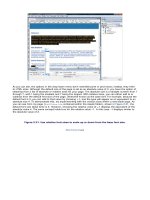
Type iisreset into the text box and click OK. The Command window appears and runs through the
reset routine shown on Figure 21.3.
Figure 21.3. The Command window runs a script that restarts IIS.
[View full size image]
Chapter 21. Working with Server-Side Technologies
IN THIS CHAPTER
Working with the IIS Web Server
Working with ASP
Installing and Working with ASP.NET
Installing and Working with ColdFusion
Installing and Working with PHP
Now that you've been formally introduced to the terminology that is server-side web
development—including dynamic web pages, web applications, databases, SQL, and DSNs—you're ready to
move forward into the realm of installation, set up, and configuration for the actual server-side technology
you plan to use.
By now, you should have some sort of idea about the architecture of your organization. Do you have a
Windows server-based operating system such as Windows Server 2000 or 2003, or are you looking at Mac
OS X Server? Are your plans to develop web applications using a development machine running Windows XP
Pro, Vista, or OS X and then upload the finished product to a server when you're finished? Do you want to
minimize installation and configuration? Are you merely a novice who is interested in tinkering with dynamic
web page development? The answers to these questions can help you quickly determine what server-side
technology you plan to use with Dreamweaver. It's important to note that Dreamweaver's functionality for
creating dynamic web pages is nearly identical regardless of server-side technology. And because you won't
be interacting with the code all that much, picking a server-side technology shouldn't be all that difficult;
they all have the same bells and whistles built in to Dreamweaver.
If you haven't made a decision on the server-side technology you want to use, don't worry. In this chapter,
I'll demystify each of your options. I'll provide an overview of the web server we'll be using (IIS) as well as
detail the nuances, installation procedures, and configuration routines (if any) for the four server-side
technologies that we'll cover throughout the rest of the book. By the end of the chapter, you'll have a web
server up and running, a server-side technology installed and configured, and a simple dynamic page
working!
Note
We'll be using IIS as our web server as we work through the examples in the book. This server is not
available for Mac users. However, OS X ships with the Apache web server included, and it is enabled
simply by opening System Preferences, selecting the Sharing preferences pane, and clicking the
Personal Web Sharing check box. You can then install MySQL and PHP, or just install MAMP/Pro
(o/) which installs MySQL and PHP all at once.
Working with the Internet Information Services (IIS) Web Server
In the previous chapter, I made reference to the fact that users interact with web applications through a
series of carefully crafted form objects exposed to the user in the browser window. The user interacts with
the form objects and then typically clicks a button, expecting to see results. What we haven't discussed,
however, is how those results are returned to the user.
In general, servers rely on a piece of software that is crucial in the HTTP request/response process. This
piece of software, the web server, is primarily responsible for managing various websites, FTP sites, a mail
client, and more on our server. Working in conjunction with the server-side technology, the web server is
also responsible for facilitating the handoff between the client's request, the server-side technology used to
handle the request, the collection of the response from the server-side technology, and the subsequent
handoff of the response back to the client browser.
Internet Information Services (IIS) is Microsoft's web server solution and is the primary focus of examples
throughout the rest of the book. IIS comes bundled with most Microsoft server-based operating systems,
including Windows NT 4, Windows 2000 Pro, Server and Advanced Server, Window 2003 Server, Windows
XP Pro, Windows Vista Home Premium, Vista Business, Vista Ultimate, and Vista Enterprise.
Note
Obviously, IIS isn't the only web server on the market. For the sake of simplicity, we'll cover only
one web server—IIS. However, other web servers exist—the open source Apache, Sun's iPlanet,
IBM's WebSphere, and more—that can run just as well on Mac and UNIX environments as they can
on Windows machines.
In some cases, IIS installs when the OS is installed, but in other cases, you must manually walk through the
process of setting it up on your own. More on this later.
Table 21.1 outlines the major Windows operating systems and shows whether the web server comes
preinstalled with the specific operating system.
Table 21.1. Major Windows Systems and IIS Support
OS
Web Server
Preinstalled
Technologies Supported
Win 95, 98, ME, XP Home No
N/A
ColdFusion Only
ColdFusion only
Win XP Pro
IIS 5
No
All
Win NT 4
IIS 4
Yes
All
Win 2000 Pro
IIS 5
No
All
Win 2000 Server
IIS 5
Yes
All
Win 2003
IIS 6
Yes
All
Win Vista Home Premium
IIS 7
Yes
All
Win Vista Business
IIS 7
Yes
All
Win Vista Ultimate
IIS 7
Yes
All
Win Vista Enterprise
IIS 7
Yes
All
If you're not sure whether IIS is preinstalled on your computer, you can use one of these three methods to
find out:
Check for a folder called Inetpub located in the root of your system (typically C:\) drive. If you have
that folder—as well as the wwwroot folder within it—chances are you're fine.
Select Start, Settings, Control Panel, Administrative Tools. If you have a menu item for Internet
Services Manager, IIS is indeed installed.
Navigate to http://localhost in a browser. If you see the IIS Welcome screen, IIS is installed and
running.
If IIS is there, you've got the web server installed. If not, follow the steps in the next section.
Installing IIS
One of the questions in application development is whether IIS has to be installed even if you are not
hosting your own web applications. The answer is yes. Even if you are uploading your web applications using
FTP to your web host provider, installing IIS allows you to view and configure your applications locally
before they are ready for production.
Note
As you've seen, Dreamweaver allows you to define a testing server when you define a site. The site
that you define within IIS (covered later) will become the site you specify in the testing server
category in the Site Definition dialog.
IIS comes with most versions of server-based Windows operating systems, but it's not installed
automatically in all versions, which is why it might not be present on your computer. If you've come to the
conclusion that IIS isn't installed on your computer and you have a compatible operating system similar to
the ones listed in Table 21.1, follow these steps to install it:
1.
Access the Control Panel by choosing Start, Settings, Control Panel.
2.
In the Control Panel, select Add or Remove Programs. In Vista, the menu item is titled Programs and
Features.
3.
Choose Add/Remove Windows Components. In Vista, the menu item is titled Turn Windows Features
On or Off. The list of components becomes visible within a few seconds.
4.
In the list of components, enable the Internet Information Services (IIS) option. If you're using Vista,
you might take the time to expand the Internet Information Services node, expand the World Wide
Web Services node, expand the Application Development Features node, and then enable ASP. This will
guarantee that traditional ASP will work with Vista.
5.
Click Next (Windows may or may not prompt you to insert the original Windows software CD) to install
IIS.
6.
After IIS is installed, close the Add or Remove Programs (Programs and Features) dialog.
You can now check to see whether IIS installed correctly by performing one or all three checkpoints
highlighted in the previous section.
You are now ready to begin hosting web applications. Although we won't cover how to configure IIS for
external use, I will show you how to configure IIS to support local development of ASP, ASP.NET,
ColdFusion, and PHP applications so that you can upload them later to your external web host provider.
Configuring IIS
Although little configuration needs to be done to begin working with IIS, I will use this section to introduce
some basic features and functionality within IIS. Reading this section will help you better troubleshoot
problems that may arise later in development. This section explains the following topics:
Where to keep files on the web server
Using Localhost
How to start and stop the web server
Where to Keep File on the Web Server
Now that you have IIS up and running, let's take a closer look at where the files for your Web applications
are kept on the computer. Up to this point, we've been saving our projects in the
C:\VectaCorp\<chapterfolder> directory. This works fine for static web pages because we're merely
testing the functionality of the pages in the browser. IIS works a bit differently, however. By default, IIS
reads and processes the code in the file from the C:\Inetpub\wwwroot\ folder. If you open this folder and
compare it to the folder tree in IIS, you'll notice some similarities. Although it is not a requirement to keep
applications in this folder, it is generally considered a good repository for storing and managing your server-
side applications.
Note
Technically, your files don't have to be in C:\Inetpub\wwwroot\. You can also create what's called a
virtual directory. A virtual directory is essentially an alias within IIS that points to a folder
somewhere else on your computer. To make things easier, however, we'll work with
C:\Inetpub\wwwroot\ for the rest of the book.
So that we can test how our web server works, let's create a new folder within C:\Inetpub\wwwroot and
add a simple HTML page to the new folder. You can do this on your own by following these steps:
1.
Open Windows Explorer and navigate to the root of C:\Inetpub\wwwroot.
2.
Within wwwroot, create a new folder called VectaCorp.
3.
Open the VectaCorp folder.
4.
Right-click an empty area in the folder and choose New, Text Document from the context menu.
5.
After you select the New Text Document option, you can rename the file. Change the name, including
its extension, to index.html. This action converts the text document to an HTML file.
6.
Right-click the file and choose Open With, Notepad from the context menu. The file will open in
Notepad.
7.
In the document, add the following basic HTML:
<html>
<head>
<title>Sample HTML Page</title>
</head>
<body>
<h1>Hello World</h1>
</body>
</html>
8.
Save the page and close Notepad.
That's it! You've just created your first basic page within the context of the web server. In the next section,
we'll browse to the page using the default name of the web server.
Using Localhost
Now that you have a new file in C:\Inetpub\wwwroot\VectaCorp, your web server has access to it. If
you've been developing static HTML web pages for a long time, habit may drive you to open files directly in
your browser. Dynamic pages can't be opened directly from the browser because your web server needs to
have a crack at the file before it is sent to your browser for display. If the application server doesn't get the
chance to interpret the request coded into a dynamic page, the code behind the dynamic page is never
converted into HTML that your browser can understand.
To repeat: dynamic pages can't be opened directly from the browser. Instead, you'll have to open the
browser and navigate to the web directory using the local web address for your computer, also known as
http://localhost (or by the IP address http://127.0.0.1). More specifically, because the VectaCorp
folder is located in C:\Inetpub\wwwroot\VectaCorp on your computer, you can access it directly from the
browser by typing in the URL http://localhost/VectaCorp. Figure 21.1 shows IIS and the browser side by
side so that you can visualize the point I'm trying to make.
Figure 21.1. http://localhost/VectaCorp is the URL that points to the folder
C:\Inetpub\wwwroot\VectaCorp.
[View full size image]
In this case, the process was simple. Because our default page is essentially an HTML file, nothing is really
required of the web server. Most of the work in this case is handled by the browser. The browser parses the
literal text out of the HTML tags and presents the text Hello World to the user. Because our page contained
only HTML, we could have just as easily opened the page directly in the browser, displaying the same
results. Remember though, that the web server (IIS) is the only piece of software that can access your
server-side code (such as ASP, ASP.NET, PHP, or ColdFusion) directly. For this reason, it's a good idea that
you get into the habit of accessing your dynamic pages directly from
http://localhost/<yourfoldername>. This is how it will be done throughout the rest of the book manually
and via Dreamweaver.
Stopping and Starting IIS
With IIS now up and running, let's now look at how you can start, stop, and restart IIS if the need arises.
For the most part, you'll always want to have IIS running except when you're using certain programs locally
that open ports allowing intruders to compromise the security of your computer. Some programs, such as
peer-to-peer (P2P) file-sharing programs, automatically stop IIS when it launches because of potential
security vulnerabilities.
If you want to stop IIS when it's not being used, follow these steps:
1.
Open IIS by choosing Start, Settings, Control Panel, Administrative Tools, Internet Information
Services. (Now would be a good time to create a shortcut on the desktop for this application.)
2.
With IIS open, select Default Web Site. The Start, Stop, and Restart icons become visible.
3.
Click the Stop option shown in Figure 21.2. The web server is now stopped.
Figure 21.2. Select Stop to stop IIS.
4.
To start IIS again, all you need to do is click the Start icon. IIS will start again.
If you want to restart IIS, you can perform the steps just listed or you can make life easier on yourself by
entering a simple command in the Run dialog. To do this, follow these steps:
1.
Select Start and then choose Run. The Run dialog appears.
2.
Type iisreset into the text box and click OK. The Command window appears and runs through the
reset routine shown on Figure 21.3.
Figure 21.3. The Command window runs a script that restarts IIS.
[View full size image]
Working with ASP
Quite possibly the simplest technology to use in conjunction with Dreamweaver dynamic web page
development is ASP. ASP, or Active Server Pages, is a Microsoft-developed web-scripting language that took
the web development world by storm when it was introduced in the mid 1990s. ASP is easy to understand
and easy to use—and setup is a breeze because the required files are preinstalled on virtually all Windows
servers.
Like many other server-side technologies, ASP enables you to embed special instructions in HTML pages that
can do a variety of tasks, such as connect to a database, perform looping instructions, conditionally test for
certain values, send emails, read from and write to the file system, and more. Because ASP runs natively on
Microsoft's IIS web server, installing ASP generally means installing IIS. If IIS is up and running, chances
are, so is ASP. It's no wonder that the majority of users who create dynamic web pages in Dreamweaver still
use traditional ASP as their server-side technology of choice; if you have IIS installed (which most people
who are building dynamic web pages do), there's little or no setup and nothing to install.
Creating a Simple ASP Page
Let's walk through the process of creating a simple ASP page. Not only will this process help familiarize you
with the technology, but you'll also get a decent understanding of how IIS handles the processing of a
dynamic ASP page. To create a simple ASP page, follow these steps:
1.
Create a new folder in C:\Inetpub\wwwroot called VectaCorpASP.
2.
Open Notepad (we'll get to Dreamweaver later).
3.
In the document, add the following code:
<html>
<head>
<title>Sample ASP Page</title>
</head>
<body>
<h1>This is plain text</h1>
<h1><%= "This is ASP writing text to the browser dynamically" %></h1>
</body>
</html>
4.
Save your work as sample.asp in the new folder named C:\Inetpub\wwwroot\VectaCorpASP.
Tip
If you plan to try out numerous server-side technologies, it's beneficial to create the folder with the
VectaCorp name followed by the three-letter server-side technology you plan to use. This convention
prevents you from continuously having to redefine the site for every server-side technology.
To test your work, open the browser and type the http://localhost/VectaCorpASP/sample.asp URL into
the address bar. As you can see from Figure 21.4, two lines of text appear in the browser.
Figure 21.4. Two lines of text appear in the browser.
[View full size image]
Although this result may not seem all that awe inspiring, think again: You've just created your first dynamic
web page using ASP. Look at the code again and see if you can pick apart the dynamic portions of the page.
For the most part, 8 of the 9 lines of code on the page are plain old HTML that IIS does nothing with. It
simply lets the browser parse the HTML tags and presents the text inside them to the user. Line 7, however,
works a bit differently:
<h1><%= "This is ASP writing text to the browser dynamically" %></h1>
In this case, we use what's called a code render block to dynamically display the text This is ASP writing text
to the browser dynamically within a <h1> HTML tag. IIS, recognizing that this code render block exists,
intercepts the request and calls for help from the asp.dll located in the C:\Windows\system32\inetsrv folder.
The asp.dll processes the request and takes the code render block to mean "Print out the text This is ASP
writing text to the browser dynamically" on the page. This response is sent back to IIS and ultimately back
to the browser, formatted using the <h1> tag. Although the process may seem complex, it happens so fast
that a user rarely knows that a dynamic page is even being used.
See how easy that was? In this example, we manually wrote ASP code. The beauty in using Dreamweaver is
that you don't have to. Dreamweaver writes all the necessary code for you. More on this later. For now, let's
focus on getting our project configured so that we can use ASP to create dynamic VectaCorp pages.
Configuring VectaCorp to Run Under ASP
Up to this point, we've been working primarily from C:\VectaCorp\<chapterfolder>. From now on, we'll
work from C:\Inetpub\wwwroot\VectaCorpASP (assuming that you're using ASP). Because this is the case,
we need to reconfigure the site definition to point to the new folder we've created. Furthermore, we need to
configure the Testing Server category in the Site Definition window to provide Dreamweaver with
information specific to the technology you plan to use for the defined site. To configure VectaCorp to run
under ASP, follow these steps:
1.
If you haven't downloaded the files for this chapter, do so now. Open the folder for Chapter 21, copy
the contents of the folder, and paste them into the newly created VectaCorpASP folder in
C:\Inetpub\wwwroot. Now you have all the images, a template, and an index.asp page to get you
started. Specifically, after you've copied the files over, you should have Images, a Template folder that
includes the main template for the site, a CSS file, an index.asp page, and the sample.asp page that
you built in the previous section.
2.
Open Dreamweaver if you haven't already done so and choose the Manage Sites option from the Site
menu.
3.
Select the existing VectaCorp site from the list and click Edit. The Site Definition for VectaCorp dialog
appears.
4.
In the Site Name text box, rename the site from VectaCorp to VectaCorpASP.
5.
Browse to the C:\Inetpub\wwwroot\VectaCorpASP\ folder within the Local Root Folder field. Leave
everything else as is. The result is shown in Figure 21.5.
Figure 21.5. Rename the site definition and set the local root folder to point to the
C:\Inetpub\wwwroot\VectaCorpASP\ folder.
[View full size image]
6.
Switch to the Testing Server category.
7.
Select the ASP VBScript option from the Server model menu.
8.
Choose the Local/Network option from the Access menu. New properties become available that allow
you to configure the location of the remote folder as well as the URL prefix for the remote folder.
9.
Browse to the same C:\Inetpub\wwwroot\VectaCorpASP\ path in the Remote Folder text box. In most
cases, this value is prepopulated when you select the Local/Network option from the Access menu.
Note
When working with web applications, the ideal scenario is that you'll have a development
machine, a production machine (server), and a testing server. Realistically, not everyone
can afford another server just for testing purposes. Most of us will rely on the
development machine to function as a testing server as well. For this reason, we'll leave
the testing server path as is. If you do have a dedicated testing server, you'd probably
still choose the Local/Network option from the Access tab; however, rather than finding
the machine locally, you'd browse to it on the network.
10.
Now enter the URL to our VectaCorp site in the URL Prefix text box. This value should read
http://localhost/vectacorpasp/. Remember that localhost, like every other domain name
(yahoo.com, google.com, and so on) is a URL that is accessible from a browser. Rather than accessing
the site from a server miles away, the browser knows that localhost (and the IP address 127.0.0.1
associated with it) is the URL for the local instance of IIS (your computer). It doesn't have to look too
far for your files. When you finish configuring this screen, the result will look similar to Figure 21.6.
Figure 21.6. Configure the Testing Server category.
[View full size image]
11.
Click OK to close the Site Definition for VectaCorpASP window.
12.
Click Done to close the Manage Sites dialog.
You're now ready to begin building dynamic VectaCorp pages using Dreamweaver and ASP!
Using ASP in Dreamweaver
Depending on the server technology you decide to use, features (as they relate to the specific server
technology) within the Dreamweaver interface will change. For the most part, however, you can bank on the
fact that the following features will always be available in Dreamweaver when you're working with any
server-side technology:
The Insert bar— A visual representation of objects available in the Insert menu, the Data category in
the Insert bar (shown in Figure 21.7), allows you to visually insert various types of dynamic objects
onto your page.
Figure 21.7. Use the Insert bar as a visual tool for inserting dynamic objects on your page.
[View full size image]
The Insert menu— Use the Data Objects and ASP Objects submenus in the Insert menu to insert
both generic data objects as well as ASP-specific objects.
The Application panel— Split into four tabs—Databases, Bindings, Server Behaviors, and
Components—the Application panel provides the means for connecting to and accessing database
data, binding that data to elements on the page, and accessing the various application objects that
were also available from the Insert menu. When working with dynamic pages in Dreamweaver, you
should always have this panel open. The Server Behaviors tab of the panel is shown with more detail
in Figure 21.8.
Figure 21.8. Use the Application panel when working with databases, binding database data
to your dynamic pages, and working with various application objects.
Note
Although the Components panel is available as an option, it is inactive under the ASP server
model. It is available only under the ASP.NET and ColdFusion server models.
The Tag Chooser— If you want to make fine-tuned changes in your ASP code, you can always choose
specific tags from the Tag Chooser, shown in Figure 21.9. When you choose an option from the Tag
Chooser (available by choosing Insert, Tag), the Properties dialog for the particular tag opens,
allowing you to further customize attributes of the tag.