Building XNA 2.0 Games- P10 pptx
Bạn đang xem bản rút gọn của tài liệu. Xem và tải ngay bản đầy đủ của tài liệu tại đây (391.04 KB, 30 trang )
258
CHAPTER 9
■ SCRIPTING, AI, AND DEPTH (AND DEATH)
If you don’t want to flip back but need a really quick refresher, it goes like this: commands are
declared and run in Script and parsed in ScriptLine.
First, let’s declare our new commands in our enumeration:
PlaySound,
Ethereal,
Solid,
Speed,
HP,
DeathCheck,
IfDyingGoto,
KillMe,
AI
We need to parse the new script commands in ScriptLine:
case "ethereal":
command = Commands.Ethereal;
break;
case "solid":
command = Commands.Solid;
break;
case "speed":
command = Commands.Speed;
iParam = Convert.ToInt32(split[1]);
break;
case "hp":
command = Commands.HP;
iParam = Convert.ToInt32(split[1]);
break;
case "deathcheck":
command = Commands.DeathCheck;
break;
case "ifdyinggoto":
command = Commands.IfDyingGoto;
iParam = Convert.ToInt32(split[1]);
break;
case "killme":
command = Commands.KillMe;
break;
case "ai":
command = Commands.AI;
sParam = split[1];
break;
Back in Script, we can run the new character script commands. We’ll implement AI next.
CHAPTER 9 ■ SCRIPTING, AI, AND DEPTH (AND DEATH)
259
case Commands.Ethereal:
character.Ethereal = true;
break;
case Commands.Solid:
character.Ethereal = false;
break;
case Commands.Speed:
character.Speed = (float)line.IParam;
break;
case Commands.HP:
character.HP = character.MHP = line.IParam;
break;
case Commands.DeathCheck:
if (character.HP < 0)
{
character.KillMe();
}
break;
case Commands.IfDyingGoto:
if (character.HP < 0)
{
character.SetFrame(line.IParam);
done = true;
}
break;
case Commands.KillMe:
character.KillMe();
break;
case Commands.AI:
switch (line.SParam)
{
case "zombie":
character.Ai = new Zombie();
break;
default:
character.Ai = new Zombie();
break;
}
break;
Adding AI
We’re calling it AI for artificial intelligence, but make no mistake—there will be absolutely
nothing intelligent about our AI class. We’re basically going to define a list of simple behaviors
(chase and attack, evade, stand still, and so on) in a base AI class, and then create monster-
specific classes that will decide which behaviors to use and when.
260
CHAPTER 9
■ SCRIPTING, AI, AND DEPTH (AND DEATH)
Making artificial intelligence that looks and feels real is what is important. It doesn’t matter
how we do it, as long as the player believes that the zombies act like real zombies. As an inde-
pendent game developer, you should start to realize that the quick and hackish way is often
enough, and that you do not need a strong core set of AI algorithms just to make a small game.
We’ll call the current behavior a “job,” holding the value in the job field for a duration of
jobFrame. We’ll keep track of who we’re chasing or fleeing with the targ field—this will allow us
to have friendly nonplayable characters (NPCs) in an all-out side-scrolling zombie war, should
it come down to it.
public class AI
{
public const int JOB_IDLE = 0;
public const int JOB_MELEE_CHASE = 1;
public const int JOB_SHOOT_CHASE = 2;
public const int JOB_AVOID = 3;
protected int job = JOB_IDLE;
protected int targ = -1;
protected float jobFrame = 0f;
protected Character me;
In our Update() function, we’ll take the array of characters, ID of the character we’re
controlling, and map (it will be nice to know our surroundings, but we won’t be implementing
that just yet). We start off by setting all of our character’s keys to false, and then decrement our
jobFrame and call DoJob() to . . . well . . . do our job.
public virtual void Update(Character[] c, int Id, Map map)
{
me = c[Id];
me.KeyLeft = false;
me.KeyRight = false;
me.KeyUp = false;
me.KeyDown = false;
me.KeyAttack = false;
me.KeySecondary = false;
me.KeyJump = false;
jobFrame -= Game1.FrameTime;
DoJob(c, Id);
}
In DoJob(), we do some case-by-case behavior.
protected void DoJob(Character[] c, int Id)
CHAPTER 9 ■ SCRIPTING, AI, AND DEPTH (AND DEATH)
261
{
switch (job)
{
case JOB_IDLE:
//do nothing!
break;
For all sorts of chasing and avoiding, we make sure we have a valid (greater than –1) target.
If we don’t, we call FindTarg() and get a new one. We also use ChaseTarg() and FaceTarg(),
which return false if they’re still working at getting our character within range and facing the
correct direction.
case JOB_MELEE_CHASE:
if (targ > -1)
{
if (!ChaseTarg(c, 50f))
{
if (!FaceTarg(c))
{
me. KeyAttack = true;
}
}
}
else
targ = FindTarg(c);
break;
case JOB_AVOID:
if (targ > -1)
{
AvoidTarg(c, 500f);
}
else
targ = FindTarg(c);
break;
case JOB_SHOOT_CHASE:
if (targ > -1)
{
if (!ChaseTarg(c, 150f))
{
if (!FaceTarg(c))
{
me.KeySecondary = true;
}
}
}
262
CHAPTER 9
■ SCRIPTING, AI, AND DEPTH (AND DEATH)
else
targ = FindTarg(c);
break;
}
In this neat little clause at the end, we determine if the character is just running left or right
(not attacking). If this is the case, we check to see if there are any friends in the way. If there are,
we stop moving. This way, a chasing zombie next to an idle zombie will not keep walking into
the guy, which would look kind of silly.
if (!me.KeyAttack && !me.KeySecondary)
{
if (me.KeyLeft)
{
if (FriendInWay(c, Id, CharDir.Left))
me.KeyLeft = false;
}
if (me.KeyRight)
{
if (FriendInWay(c, Id, CharDir.Right))
me.KeyRight = false;
}
}
}
All of our helper functions are up next. Basically, they do a lot of spatial comparisons; the
code should really speak for itself.
protected int FindTarg(Character[] c)
{
int closest = -1;
float d = 0f;
for (int i = 0; i < c.Length; i++)
{
if (i != me.Id)
{
if (c[i] != null)
{
if (c[i].Team != me.Team)
{
float newD = (me.Location –
c[i].Location).Length();
if (closest == -1 || newD < d)
CHAPTER 9 ■ SCRIPTING, AI, AND DEPTH (AND DEATH)
263
{
d = newD;
closest = i;
}
}
}
}
}
return closest;
}
private bool FriendInWay(Character[] c, int Id, CharDir face)
{
for (int i = 0; i < c.Length; i++)
{
if (i != Id && c[i] != null)
{
if (me.Team == c[i].Team)
{
if (me.Location.Y > c[i].Location.Y - 100f &&
me.Location.Y < c[i].Location.Y + 10f)
{
if (face == CharDir.Right)
{
if (c[i].Location.X > me.Location.X &&
c[i].Location.X < me.Location.X + 70f)
return true;
}
else
{
if (c[i].Location.X < me.Location.X &&
c[i].Location.X > me.Location.X - 70f)
return true;
}
}
}
}
}
return false;
}
ChaseTarg(), AvoidTarg(), and FaceTarg() all return true if the character is in the wrong
position, meaning the character is still attempting to chase, avoid, or face its target. When we
call these methods, we end up doing what we need to be doing when in the correct position
(typically attacking) if everything returns false. We thought this way was intuitive, but if you
would prefer to word it differently, go for it!
264
CHAPTER 9
■ SCRIPTING, AI, AND DEPTH (AND DEATH)
protected bool ChaseTarg(Character[] c, float distance)
{
if (me.Location.X > c[targ].Location.X + distance)
{
me.KeyLeft = true;
return true;
}
else if (me.Location.X < c[targ].Location.X - distance)
{
me.KeyRight = true;
return true;
}
return false;
}
protected bool AvoidTarg(Character[] c, float distance)
{
if (me.Location.X < c[targ].Location.X + distance)
{
me.KeyRight = true;
return true;
}
else if (me.Location.X > c[targ].Location.X - distance)
{
me.KeyLeft = true;
return true;
}
return false;
}
protected bool FaceTarg(Character[] c)
{
if (me.Location.X > c[targ].Location.X && me.face ==
CharDir.Right)
{
me.KeyLeft = true;
return true;
}
else if (me.Location.X < c[targ].Location.X && me.face ==
CharDir.Left)
{
me.KeyRight = true;
return true;
}
return false;
}
}
CHAPTER 9 ■ SCRIPTING, AI, AND DEPTH (AND DEATH)
265
That does it for our AI class for now. We can easily add new behaviors as we create new and
more complex monsters—for instance, a boss character that throws axes when its prey is at a
certain distance.
Our Zombie class, which will extend the AI base class, is much simpler:
class Zombie : AI
{
public override void Update(Character[] c, int Id, Map map)
{
me = c[Id];
if (jobFrame < 0f)
{
float r = Rand.GetRandomFloat(0f, 1f);
if (r < 0.6f)
{
job = JOB_MELEE_CHASE;
jobFrame = Rand.GetRandomFloat(2f, 4f);
targ = FindTarg(c);
}
else if (r < 0.8f)
{
job = JOB_AVOID;
jobFrame = Rand.GetRandomFloat(1f, 2f);
targ = FindTarg(c);
}
else
{
job = JOB_IDLE;
jobFrame = Rand.GetRandomFloat(.5f, 1f);
}
}
base.Update(c, ID, map);
}
}
The zombie will chase our character, avoid our character, or stand still. This is not exactly
groundbreaking behavior, but then again, it’s just a zombie.
Dealing Damage
We need to add some functionality to HitManager.CheckHit(). We now have ethereal charac-
ters that we can’t hit, as well as dying characters that we can’t hit either. In our big series of
conditions for checking hit collisions, let’s add another if clause to test for both:
for (int i = 0; i < c.Length; i++)
{
if (i != p.Owner)
266
CHAPTER 9
■ SCRIPTING, AI, AND DEPTH (AND DEATH)
{
if (c[i] != null)
{
if (c[i].DyingFrame < 0f &&
!c[i].Ethereal)
{
if (c[i].InHitBounds(p.Location))
Thus far, our HitManager.CheckHit() method doesn’t actually cause any damage—it just
checks for successful hits, creates blood splashes, and sets animations. Let’s create a field called
hVal that will determine our hit damage. We’ll give hVal a value based on what type of hit it is
and then deduct the final damage at the end. If we want to add difficulty levels later, we can scale
hVal based on those, too. Also, we’re adding a case for TRIG_ZOMBIE_HIT, our newest hit type.
float hVal = 1f;
if (typeof(Bullet).Equals(p.GetType()))
{
if (!r)
{
hVal *= 4f;
}
}
if (typeof(Hit).Equals(p.GetType()))
{
switch (p.GetFlag())
{
case Character.TRIG_ZOMBIE_HIT:
hVal *= 5f;
pMan.MakeBloodSplash(p.Location,
new Vector2(50f * tX, 100f));
break;
case Character.TRIG_WRENCH_DIAG_DOWN:
hVal *= 5f;
case Character.TRIG_WRENCH_UPPERCUT:
hVal *= 15f;
}
}
}
c[i].HP -= (int)hVal;
CHAPTER 9 ■ SCRIPTING, AI, AND DEPTH (AND DEATH)
267
if (c[i].HP < 0)
{
if (c[i].AnimName == "hit")
c[i].SetAnim("diehit");
}
At the end, if our animation had been set to hit, we set it to diehit if the character should
be dead. If our character doesn’t have a diehit animation, we’ll just end up using the regular
hit animation.
On that note, we also need to employ our dieland animation. We set our enemy animation
to hitland in the Character.Land() method. Let’s have it set to dieland if the character should
be dead:
case "jhit":
case "jmid":
case "jfall":
SetAnim("hitland");
if (HP < 0)
SetAnim("dieland");
break;
In our dieland and diehit animations, we use the killme command, which calls the
KillMe() method:
public void KillMe()
{
if (DyingFrame < 0f)
{
DyingFrame = 0f;
}
}
When we want to add some character building and depth, we could add a few lines in
KillMe() to create coins, health, and so on, as necessary. For now, we can just leave it at setting
DyingFrame to 0, which signals that our character is dead.
Lastly, let’s kill off our characters from Game1.Update(). After updating our characters,
we’ll check their dying status—if dyingFrame is greater than 1, we kill them.
character[i].Update(map, pManager, character);
if (character[i].dyingFrame > 1f)
{
character[i] = null;
}
That should do it. We’ve created some blood-related triggers; created zombie death
animations; created and implemented new script commands; and added health, death, and AI
to characters. Let’s run it. We can kill our zombies now! Our zombie head splatter is shown in
Figure 9-5.
268
CHAPTER 9
■ SCRIPTING, AI, AND DEPTH (AND DEATH)
Figure 9-5. Zombie head splatter
Map Scripting
At this point, you should be gaining an appreciation for the power of scripting. If we were to
hard-code the type of stuff we can do with scripting, we would have a very, very messy bunch
of classes on our hands. One of James’s older games, Zombie Smashers X2, used a modular
character system, but hard-coded all animation, sounds, and triggers. It was a terrible mess
and had only one character format, with good reason.
Map scripting presents a similar situation, but the question lies in balance between the
map format and editor and the script functionality. For instance, say we wanted to let some
maps have fog. We could handle that in two ways:
• Add a Fog check box to our editor. In saving the map, we would write the fog value: true
or false.
• Create a fog command for our map scripting language. We would add a line in our map
script initialization routine to turn on fog.
Both methods have pros and cons. We like putting as much into the scripting language as
possible, but the drawback of this is it’s easy to forget commands and make syntactical errors.
On the other hand, the drawback of incorporating new map functionality into the map format
is that it requires interface changes (possibly major). So, if the file format isn’t planned for it (as
ours isn’t), we would need to load and save every last map using the new format if we make a
big change mid development.
Because this section is titled “Map Scripting,” we’re going to choose the script function-
ality road. Let’s get coding! We’ll start by making a script editor in MapEditor.
CHAPTER 9 ■ SCRIPTING, AI, AND DEPTH (AND DEATH)
269
Adding a Script Editor in the Map Editor
Let’s declare some new fields at the class level of MapEditor. First, we’ll declare a new draw type
in our DrawingMode enumeration. Right now, we can draw in select mode, collision map mode,
or ledge mode. Let’s add script draw mode. We’ll also add a text editing mode for script editing
and some fields to specify the scroll value of our script and whether any script lines are selected,
as well as some highlighting colors for some simple syntax highlighting.
int scriptScroll;
int selScript = -1;
const int COLOR_NONE = 0;
const int COLOR_YELLOW = 1;
const int COLOR_GREEN = 2;
In Draw(), we add some functionality to draw our script when we’re in script draw mode.
switch (drawType)
{
case DrawingMode.Script:
layerName = "script";
break;
}
if (text.DrawClickText(5, 25, "draw: " + layerName,
mosX, mosY, mouseClick))
drawType = (DrawingMode)(((int)drawType + 1) % 4);
if (drawType == DrawingMode.Script)
{
Draw a translucent black background behind our script.
spriteBatch.Begin(SpriteBlendMode.AlphaBlend);
spriteBatch.Draw(nullTex, new Rectangle(400, 20, 400, 565),
new Color(new Vector4(0f, 0f, 0f, .62f)));
spriteBatch.End();
Next, we’ll iterate through all visible script lines, drawing and handling selection.
for (int i = scriptScroll; i < scriptScroll + 28; i++)
{
if (selScript == i)
{
text.Color = Color.White;
text.DrawText(405, 25 + (i - scriptScroll) * 20,
i.ToString() + ": " + map.Scripts[i] + "*");
}
270
CHAPTER 9
■ SCRIPTING, AI, AND DEPTH (AND DEATH)
else
{
if (text.DrawClickText(405, 25 + (i - scriptScroll) * 20,
i.ToString() + ": " + map.Scripts[i],
mosX, mosY, mouseClick))
{
selScript = i;
editMode = EditingMode.Script;
}
}
Now we take care of syntax highlighting. Normally, that would mean we would need to
edit our text drawing class to allow some sort of color-designating markup, but here we can
cheat a bit. Because we’re drawing left-aligned text, we can draw the entire string in white, then
draw the string up to the highlighted command in the highlighted color, and then draw the
number over that in white. Like so many other techniques we use in these editors, it’s ugly but
gets the job done.
if (map.Scripts[i].Length > 0)
{
String[] split = map.Scripts[i].Split(' ');
The GetCommandColor() method will compare our commands against some strings we’ll
give it.
int c = GetCommandColor(split[0]);
if (c > COLOR_NONE)
{
switch(c)
{
case COLOR_GREEN:
text.Color = Color.Lime;
break;
case COLOR_YELLOW:
text.Color = Color.Yellow;
break;
}
text.DrawText(405, 25 + (i - scriptScroll) * 20,
i.ToString() + ": " + split[0]);
}
}
text.Color = Color.White;
text.DrawText(405, 25 + (i - scriptScroll) * 20,
i.ToString() + ": ");
}
Lastly, we’ll draw some scroll buttons.
CHAPTER 9 ■ SCRIPTING, AI, AND DEPTH (AND DEATH)
271
bool mouseDown = (Mouse.GetState().LeftButton == ButtonState.Pressed);
if (DrawButton(770, 20, 1, mosX, mosY, mouseDown) &&
scriptScroll > 0)
scriptScroll ;
if (DrawButton(770, 550, 2, mosX, mosY, mouseDown) &&
scriptScroll < map.Scripts.Length - 28)
scriptScroll++;
}
Implementing Map Script Commands
Let’s use the GetCommandColor() method to talk about some of the script commands we’ll be
implementing:
private int GetCommandColor(String s)
{
switch (s)
{
case "fog":
case "monster":
case "makebucket":
case "addbucket":
case "ifnotbucketgoto":
case "wait":
case "setflag":
case "iftruegoto":
case "iffalsegoto":
case "setglobalflag":
case "ifglobaltruegoto":
case "ifglobalfalsegoto":
case "stop":
return COLOR_GREEN;
case "tag":
return COLOR_YELLOW;
}
return COLOR_NONE;
}
Map script commands are about the same as character script commands. The only func-
tional difference will be that we’ll allow ourselves more than one parameter per command—a
few things would be impossible otherwise. Here’s a brief explanation of what we’ve got so far:
272
CHAPTER 9
■ SCRIPTING, AI, AND DEPTH (AND DEATH)
fog: Turns map fog on.
monster type x y name: Creates a monster of type type at location x, y with the name name.
A character name is a string identifier that will set a map flag when the character dies. A flag
is a list of strings that the map system uses to keep track of things. For instance, we can spawn
two zombies named z1 and z2, and then end up in a loop that checks whether flags z1 and
z2 have been set. Flags exist on different scopes. Local flags are reset every time a map is
loaded. Global flags are reset every time the user starts a new level, but are persistent other-
wise (a player can move from one map screen to another and global flags will not be reset).
makebucket size: Creates a bucket of size size. A bucket is basically a list of monsters that
will “empty” itself into the game as long as the screen monster population is less than size.
We can test to see if a bucket is empty.
addbucket type x y: Adds a monster of type type to the bucket. The monster will spawn at
location x, y.
ifnotbucketgoto tag: If the bucket is not empty, goes to tag. Tags are like goto labels. We
always start with tag init.
wait ticks: Pauses the script for ticks ticks.
setflag flag: Sets the local map flag flag.
iftruegoto flag tag: If local flag flag is set, goes to tag tag.
iffalsegoto flag tag: If local flag flag is not set, goes to tag tag.
setglobalflag
flag: Sets the global map flag flag. As noted, unlike local flags, global flags
are persistent throughout the whole level. A good application of this would be to use plain-
old (local) map flags to keep track of who you’ve killed within a room, setting a global
roomcleared flag once all baddies are cleared. Then when the player reenters the room,
we’ll see the roomcleared global flag and won’t try to make them clear the room again.
ifglobaltruegoto flag tag: If global flag flag is set, goes to tag tag.
ifglobalfalsegoto flag tag: If global flag flag is not set, goes to tag tag.
stop: Stops reading the script.
tag tag: Sets a goto destination.
A simple script could look like this:
tag init
fog
ifglobaltruegoto roomclear cleartag
monster zombie 200 100 z1
monster zombie 300 100 z2
tag waitz1
wait 5
CHAPTER 9 ■ SCRIPTING, AI, AND DEPTH (AND DEATH)
273
iffalsegoto z1 waitz1
iffalsegoto z2 waitz1
makebucket 3
addbucket zombie 300 100
addbucket zombie 400 100
addbucket zombie 500 100
addbucket zombie 600 100
addbucket zombie 700 100
tag waitb
wait 5
ifnotbucketgoto waitb
setglobalflag roomclear
tag cleartag
stop
It should be easy enough to decipher what’s going on in this script based on the command
definitions and the basic intention of this game. The script starts at the init tag, turns on fog,
goes to the last line, and stops if the roomclear global flag has been set. Otherwise, it creates two
monsters, loops until they are dead, creates a monster bucket full of zombies, loops until they
are dead, then sets the roomclear global flag and stops. If the player kills everything in the room,
leaves, and comes back, there won’t be any zombies spawning.
Notice the wait statements. When we set up the script-running method in ZombieSmashers,
we’ll have it keep running the script in a while loop until it hits a wait or a stop. We can put in
a failsafe (to cry foul, for instance, if we’ve read more than 1000 lines of script in one go), but we
may as well get into the practice of putting wait statements within loops now.
Updating the MapEditor Code
To better punch in map coordinates, let’s add some functionality to Update() that lets us just
click in the map to add an x, y coordinate to the selected script line:
if (drawType == DrawingMode.Ledges)
{
}
else if (drawType == DrawingMode.Script)
{
if (selScript > -1)
{
if (mosX < 400)
map.Scripts[selScript] += (" " +
((int)((float)mosX + scroll.X / 2f)).ToString() + " " +
((int)((float)mosY + scroll.Y / 2f)).ToString());
}
}
274
CHAPTER 9
■ SCRIPTING, AI, AND DEPTH (AND DEATH)
The next section we’ll update is PressKey(). Our text-editing capacity is fairly rudimentary,
but we’re going to make it slightly less rudimentary with the introduction of multiline editing.
When the user hits Enter, we need to increment the selected script line and push all lines below
that down one. When the user tries to press Backspace on an empty line, we decrement the
selected line and pull all lines below that up.
private void PressKey(Keys key)
{
String t = "";
switch (editMode)
{
case EditingMode.Path:
t = map.path;
break;
case EditingMode.Script:
if (selScript < 0)
return;
t = map.Scripts[selScript];
break;
default:
return;
}
We’ll keep track of whether we’ve successfully deleted a line with the delLine field. This
way, we won’t end up overwriting the previous line with a blank string when we delete a line.
We’re using the ScriptDelLine() and ScriptEnter() methods to delete lines or carriage
returns. These methods return true if successful; false otherwise (for instance, if we try hitting
Enter while we’re at the last line).
bool delLine = false;
if (key == Keys.Back)
{
if (t.Length > 0)
t = t.Substring(0, t.Length - 1);
else if (editMode == EditingMode.Script)
{
delLine = ScriptDelLine();
}
}
else if (key == Keys.Enter)
{
if (editingText == EditingMode.Script)
{
if (ScriptEnter())
{
t = "";
}
}
CHAPTER 9 ■ SCRIPTING, AI, AND DEPTH (AND DEATH)
275
else
editingText = EditingMode.None;
}
else
{
t = (t + (char)key).ToLower();
}
If delLine is true, we’ll decrement the selected script line. Otherwise, we’ll rewrite the
temp string back to our editing string.
if (!delLine)
{
switch (editMode)
{
case EditingMode.Path:
map.path = t;
break;
case EditingMode.Script:
map.Scripts[selScript] = t;
break;
}
}
else
selScript ;
}
Our ScriptEnter() and ScriptDelLine() methods are as follows:
private bool ScriptEnter()
{
if (selScript >= map.Scripts.Length - 1)
return false;
for (int i = map.Scripts.Length - 1; i > selScript; i )
map.Scripts[i] = map.Scripts[i - 1];
selScript++;
return true;
}
private bool ScriptDelLine()
{
if (selScript <= 0)
return false;
for (int i = selScript; i < map.Scripts.Length - 1; i++)
map.Scripts[i] = map.Scripts[i + 1];
return true;
}
276
CHAPTER 9
■ SCRIPTING, AI, AND DEPTH (AND DEATH)
We need to modify the Map class to include the script array, as well as to load and save the
new format. At the class level, we’ll declare the script as follows:
public String[] Scripts = new String[128];
At the end of our Write() method, add this:
for (int i = 0; i < Scripts.Length; i++)
file.Write(Scripts[i]);
At the end of Read(), add this:
for (int i = 0; i < Scripts.Length; i++)
Scripts[i] = file.ReadString();
The tricky bit is dealing with already saved maps. At this point in development, we have
only one map, map.zdx. To convert the map to the new format, we change only the Write()
method, load the map, save it with the new format, and then change the Read() method. If we
had changed both methods, we would get an error while loading the map.
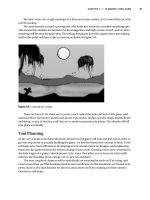
Figure 9-6 shows our script editor in action.
Figure 9-6. Script editor
CHAPTER 9 ■ SCRIPTING, AI, AND DEPTH (AND DEATH)
277
In Figure 9-6, we’re using the following script:
tag init
fog
wait 100
monster zombie 100 100 z1
wait 100
monster zombie 200 100 z2
tag waitz
wait 5
iffalsegoto z1 waitz
iffalsegoto z2 waitz
makebucket 3
addbucket zombie 200 100
addbucket zombie 300 100
addbucket zombie 400 100
addbucket zombie 500 100
addbucket zombie 600 100
addbucket zombie 700 100
addbucket zombie 800 100
tag waitb
wait 5
ifnotbucketgoto waitb
stop
Now we can set up our script processor and reader in the game.
Implementing Map Scripting in the Game
Now we can add some classes to our game to process and run the script. We’ll use a similar
system to what we used with the character scripting: a MapScriptLine class to process and
contain the script lines, and a MapScript class to manage and run the script. We will also use a
new enumeration for our commands.
enum MapCommands
{
Fog = 0,
Monster,
MakeBucket,
AddBucket,
IfNotBucketGoto,
Wait,
278
CHAPTER 9
■ SCRIPTING, AI, AND DEPTH (AND DEATH)
SetFlag,
IfTrueGoto,
IfFalseGoto,
SetGlobalFlag,
IfGlobalTrueGoto,
IfGlobalFalseGoto,
Stop,
Tag
}
public class MapScript
{
Map map;
public MapScriptLine[] Lines;
All of our map script command constants follow. We’ll be using these when we process our
map script line strings in MapScriptLine. We’ll keep track of which line of script we’re currently
reading with curLine.
int curLine;
float waiting;
public bool IsReading;
public MapFlags Flags;
Our constructor will take a reference from the map that is using it, create a new MapFlags
object of size 32, and create an array of 128 script lines. The MapFlags constructor we’ll create
will just take the size of the string array to create.
public MapScript(Map _map)
{
map = _map;
Flags = new MapFlags(32);
Lines = new MapScriptLine[128];
}
DoScript() is the big method we use to run any and all script commands. If the script is
waiting, it will count down the waiting value a bit; otherwise, it will continuously run line after
line of script until it’s told to stop.
public void DoScript(Character[] c)
{
if (waiting > 0f)
{
waiting -= Game1.FrameTime;
}
else
{
bool done = false;
while (!done)
CHAPTER 9 ■ SCRIPTING, AI, AND DEPTH (AND DEATH)
279
{
curLine++;
if (Lines[curLine] != null)
{
Our case-by-case script-running functionality follows.
switch (scriptLine[curLine].Command)
{
case MapCommands.Fog:
map.fog = true;
break;
When a MapScriptLine parses a command, it will split the command into a string array
called sParam. Also, for certain types of commands, it will convert what we intend to be vectors
(that is, x y coordinates) into a Vector2 called vParam, and integers into iParam.
For our monster command, we use vParam for the spawn location, sParam[1] for the monster
type, and sParam[4] for the monster name.
case MapCommands.Monster:
for (int i = 0; i < c.Length; i++)
{
if (c[i] == null)
{
c[i] = new Character(
Lines[curLine].VParam,
Game1.CharDefs
[GetMonsterFromString
(Lines[curLine]
.SParam[1])],
i,
Character.TEAM_BAD_GUYS);
if (Lines[curLine]
.SParam.Length > 4)
c[i].Name = Lines[curLine]
.SParam[4];
break;
}
}
break;
case MapCommands.MakeBucket:
map.Bucket = new
Bucket(Lines[curLine].IParam);
break;
280
CHAPTER 9
■ SCRIPTING, AI, AND DEPTH (AND DEATH)
case MapCommands.AddBucket:
map.bucket.AddItem
(Lines[curLine].VParam,
GetMonsterFromString
(Lines[curLine].SParam[1]));
break;
case MapCommands.IfNotBucketGoto:
if (map.bucket.IsEmpty)
GotoTag(Lines[curLine].SParam[1]);
break;
When we run a wait command, we’ll set done to true. This means there won’t be any more
script processing until the waiting value isn’t greater than zero.
case MapCommands.Wait:
waiting =
(float)Lines[curLine].IParam / 100f;
done = true;
break;
Our MapFlags setting and evaluating is fairly straightforward. Remember that these are
local scope map flags, which will be reset whenever a player enters a new map segment.
case MapCommands.SetFlag:
Flags.SetFlag(Lines[curLine].SParam[1]);
break;
case MapCommands.IfTrueGoto:
if(Flags.GetFlag
(Lines[curLine].SParam[1]))
GotoTag(Lines[curLine].SParam[2]);
break;
case MapCommands.IfFalseGoto:
if (!Flags.GetFlag
(Lines[curLine].SParam[1]))
GotoTag(Lines[curLine].SParam[2]);
break;
We’ll declare a MapFlags object called globalFlags in map and use that for our global flag
setting and evaluation. When the player leaves one map segment and enters another (we’ll
implement this later), the global map flags will remain on, but the local map flags will all be
reset.
case MapCommands.SetGlobalFlag:
map.GlobalFlags.SetFlag
(Lines[curLine].SParam[1]);
break;
CHAPTER 9 ■ SCRIPTING, AI, AND DEPTH (AND DEATH)
281
case MapCommands.IfGlobalTrueGoto:
if (map.GlobalFlags.GetFlag
(Lines[curLine].SParam[1]))
GotoTag(Lines[curLine].SParam[2]);
break;
case MapCommands.IfGlobalFalseGoto:
if (!map.GlobalFlags.GetFlag
(Lines[curLine].SParam[1]))
GotoTag(Lines[curLine].SParam[2]);
break;
case MapCommands.Stop:
IsReading = false;
done = true;
break;
case MapCommands.Tag:
//
break;
}
}
}
}
}
Our GotoTag() method tries to go to the tag we give it. It returns false if it can’t find the tag.
public bool GotoTag(String tag)
{
for (int i = 0; i < Lines.Length; i++)
{
if (Lines[i] != null)
{
if (Lines[i].Command == MapCommands.Tag)
{
if (Lines[i].SParam[1] == tag)
{
curLine = i;
return true;
}
}
}
}
return false;
}
We’ll just do a case-by-case check for monster type strings in GetMonsterFromString(). We
have only one monster so far. We’ll use this method for any addbucket and monster commands,
which refer to monsters by string names.
282
CHAPTER 9
■ SCRIPTING, AI, AND DEPTH (AND DEATH)
public static int GetMonsterFromString(String m)
{
switch (m)
{
case "zombie":
return CharacterDefinitions.Zombie;
}
return CharacterDefinitions.Zombie;
}
}
Our MapScriptLine class does all of the parsing. The script line that is parsed is split into a
string array called sParam, and integers and vectors are converted into iParam and vParam, where
necessary.
class MapScriptLine
{
public MapCommands Command;
public int IParam;
public Vector2 VParam;
public string[] SParam;
public MapScriptLine(string line)
{
if (line.Length < 1)
return;
SParam = line.Split(' ');
switch (SParam[0])
{
case "fog":
Command = MapCommands.Fog;
break;
case "monster":
Command = MapCommands.Monster;
VParam = new Vector2(
Convert.ToSingle(SParam[2]),
Convert.ToSingle(SParam[3])
);
break;
case "makebucket":
Command = MapCommands.MakeBucket;
IParam = Convert.ToInt32(SParam[1]);
break;