Understanding Adobe Photoshop CS4- P12 pot
Bạn đang xem bản rút gọn của tài liệu. Xem và tải ngay bản đầy đủ của tài liệu tại đây (1.62 MB, 30 trang )
318
Chapter 16 Printing, PDF, and Specialized Output
because the fi le can be stored at print resolution with embedded
vector fi les and high-quality output options.
Compression Options for Adobe PDF
When you choose to save artwork as a Photoshop PDF, you are
presented with the Save Adobe PDF dialog box. You can choose
to compress text and line art as well as down-
sample bitmap images. Depending on the chosen
settings, you can signifi cantly reduce the size of a
PDF fi le with little or no loss of detail. Let’s open
the Save Adobe PDF dialog box.
1. Open the image Ch16_Parrots.tif from the
Chapter 16 folder.
2. Choose File > Save As.
3. From the Format drop-down menu choose
Photoshop PDF.
4. Target the Desktop for saving, and then click
Save to open the Save Adobe PDF dialog box.
5. A warning dialog box opens to caution you
that the settings you choose in the Save
Adobe PDF dialog box will override settings
in the Save As dialog box. Click OK to dis-
miss the warning.
6. In the Save Adobe PDF dialog box, you can
choose an Adobe PDF Preset. This is a fast
way to specify that the newly generated PDF
fi le is intended for commercial printing or to
be distributed via email. You can also choose
to Preserve Photoshop Editing Capabilities
to save layers and text editability for future
changes. At this point, you can click Save
PDF to generate the fi le right away or keep
modifying the settings for special purposes.
PDF Essentials
319
You can choose to create a PDF that matches the most widely used standards for print publishing. There are
three different types of PDF/X formats:
• PDF/X-1a (2001 and 2003): PDF/X-1a is an industry-recognized standard for graphic exchange. Choosing
PDF/X-1a requires all fonts to be embedded and for the appropriate PDF bounding boxes to be specifi ed.
PDF/X-compliant fi les must contain necessary information describing the condition for which they were pre-
pared to be printed. PDF/X-1a compliant fi les can be opened in Acrobat 4.0 and Acrobat Reader 4.0 and later.
• PDF/X-3 (2002 and 2003): The main difference in this newer version of PDF is that it allows for the use of
color management. Additionally, it supports device-independent color as well as CMYK and spot colors. Also,
ICC color profi les can be used to specify color data later on in the workfl ow. PDF/X-3 compliant fi les can be
opened in Acrobat 4.0 and Acrobat Reader 4.0 and later.
• PDF/X-4 (2008): The newest format of PDF is designed to support newer features like printing artwork with
live transparency and layers. This format is designed to work within the existing Adobe PDF Print Engine. The
major benefi t is that PDF/X-4 jobs can print without fl attening artwork or converting the fi le to PostScript.
For more information on PDF/X, see www.adobe.com/designcenter/creativesuite/articles/cs3ip_pdfx.pdf.
ADOBE PDF STANDARDS
Compression
The Compression area of the Save Adobe PDF
dialog box offers several options for reducing
fi le size. You do not need to downsample, but
you might want to if you want to better match
the output resolution of a particular printer or to
reduce fi le transfer times.
The chosen interpolation method determines
how pixels are deleted:
•
Average Downsampling: This method
averages the pixels in a sample area and
replaces the entire area with the average
pixel color.
•
Subsampling: This method chooses a pixel in the center of a
sample area and replaces the entire area with that color.
•
Bicubic Downsampling: This method uses a weighted aver-
age to determine pixel color. It generally yields better results
than Average Downsampling. This is the slowest but most ac-
curate method.
320
Chapter 16 Printing, PDF, and Specialized Output
The Compression setting offers three compression methods:
•
ZIP: This works well for images with large areas of single col-
ors or repeating patterns.
•
JPEG: This is suitable for grayscale or color images. JPEG
compression eliminates data, so it usually results in much
smaller fi le sizes than ZIP compression.
•
JPEG2000: This is the new international standard for im-
age data compression. Like JPEG compression, JPEG2000
compression is suitable for grayscale or color images. It also
provides additional advantages, such as progressive display.
The Image Quality setting determines how much compression is
applied. The settings will vary based on the compression method
chosen, but they are clearly labeled.
You can select the convert 16 Bit/Channel Image to 8 Bits/Chan-
nel check box if you’re working with a 16-bit image. This can
signifi cantly reduce fi le size but is not a good option if you’re creat-
ing a PDF for professional printing. This option is grayed out if the
image you are working with is already in 8-bit mode.
Output
The most common way to create accurate color when creating
a PDF is to stick with the PDF/X standard. However, you can
choose to modify settings in this area and embed color profi les. Be
sure to check with your printer or service bureau regarding color
profi le settings.
Security
The PDF format supports several different secu-
rity options, which can be useful to protect the
document from unauthorized viewers or to pre-
serve copyright by blocking copying or printing
functions. Here are some of the most important
security options:
•
Require a password to open the docu-
ment: The viewer must enter a password to
view the PDF document.
Specialized File Formats
321
•
Use a password to restrict printing, editing, and other
tasks: Several options can be placed on the document. You
can restrict printing and block modifi cations to the page. This
is a good idea if you are posting a PDF for review purposes but
do not want people to be able to print the fi le.
It is important to note that the security in PDF fi les is very strong
but can be breached. These security options are useful and work
well for most users. You’ll also fi nd additional options about al-
lowing copying of text or access to screen readers for the visually
impaired that you can modify.
Summary
The Summary area provides a single pane view of all the settings
you have used. This is a quick way to verify the options you’ve
enabled.
When you’re fi nished, you can click Save PDF to create the PDF
fi le. You can also click Save Preset if you want to save the settings
you’ve modifi ed for future PDF creation.
Specialized File Formats
Photoshop is a feature-rich and truly enjoyable program, but it is
frequently not the end of the road for a designer or artist. Most of-
ten, professionals (and even hobbyists) will need to save their fi les
for use in other software packages and environments. Whether it’s
a JPEG for a Web site, an EPS for a professional printer, or a PICT
fi le for video editing, Photoshop can create it. In fact, Photoshop
supports more than 20 fi le formats by default. Additional formats
used by cameras or other software packages can be added via
plug-ins.
On the Photoshop installation disc you’ll fi nd more plug-ins to
install. You can install additional fi le formats by navigating to
<Photoshop Application folder> > Plug-Ins > File Formats. To access
special formats, choose File > Save As and select a fi le type from
the Format list. Not all formats will work with every color space or
image type, but each has a special purpose. Let’s explore some of
the most common formats you’ll encounter.
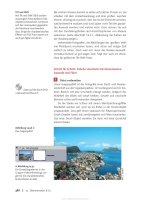
From the Save As dialog box, you can
select from several fi le formats. Certain
formats may be unavailable due to bit
depth or image mode.
322
Chapter 16 Printing, PDF, and Specialized Output
Photoshop (.psd)
Layers 8-bit 16-bit 32-bit
Bitmap Grayscale Duotone Indexed Color
RGB CMYK Lab Multichannel
*Not all color spaces work in 16- and 32-bit modes.
Photoshop format is the default fi le format. This format supports
all Photoshop’s features. It’s a good idea to save your design fi les
in this format for maximum editability. Additionally, many other
software packages recognize Photoshop layers.
CompuServe GIF (.gif)
Layers 8-bit 16-bit 32-bit
Bitmap Grayscale Duotone Indexed Color
RGB CMYK Lab Multichannel
The online service provider CompuServe origi-
nally developed the Graphics Interchange Format
(GIF). This format displays 8-bit or indexed-color
graphics and images in HTML documents on
the Internet. You’ll hear the fi le called both “giff”
and “jiff”; both are acceptable. GIFs use a color
table (with no more than 256 colors total, not per
channel) to represent the image. This can lead
to a small fi le size but also banding in the image.
If you need transparency in a Web graphic, GIF
is one of two choices (the other is PNG). There
are also animated GIFs, which are GIF frames
displayed one after the other to create animation.
Unless you need transparency or animation, JPEG
is a better option for Web delivery.
Photoshop EPS (.eps)
Layers 8-bit 16-bit 32-bit
Bitmap Grayscale Duotone Indexed Color
RGB CMYK Lab
Multichannel
NOTE
Many Formats to Choose from
If you need to explore additional
formats, you’ll fi nd further informa-
tion in the Photoshop Help menu.
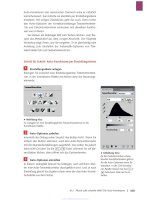
Compare a JPEG (left) and a GIF (right). Notice how the GIF
uses fewer colors. This format can reduce fi le size but often
creates banding or color shifts.
Specialized File Formats
323
The Encapsulated PostScript (EPS) language
fi le format can contain both vector and bitmap
graphics. It is nearly universal and is supported
by virtually all graphics, illustration, and page-
layout programs. EPS format is used to transfer
PostScript artwork between applications. When
you open an EPS fi le that contains vector graph-
ics, Photoshop rasterizes the image.
JPEG (.jpg)
Layers 8-bit 16-bit 32-bit
Bitmap Grayscale Duotone Indexed Color
RGB CMYK Lab Multichannel
The Joint Photographic Experts Group ( JPEG) format is most
often used to display continuous-tone images (such as photos) on
the Internet. Most digital cameras use JPEG because it provides
excellent compression; the maximum setting provides comparable
image quality to much larger fi le formats like TIFF. Occasionally,
the print industry (especially newspapers) will use JPEGs.
Notice the difference in fi le size savings between the two formats. The JPEG
(even at maximum quality) is almost four times smaller. File savings make JPEG
a popular format for digital cameras and the newspaper industry.
The JPEG format supports RGB, CMYK, and Grayscale color
modes but does not support alpha channels. JPEG is a lossy com-
pression, which means that some data is discarded during com-
pression of the image. JPEGs should not be used as an archive or
production fi le format. You should generally only save JPEG fi les
You can embed an image preview into an EPS fi le, which makes
previewing your image easier in a page-layout program.
Do you need spot color chan-
nels for special printing jobs?
Then you’d better stick to
these fi le formats:
• Photoshop
• JPEG2000
• Large Document Format
• Photoshop PDF
• Photoshop Raw
(not Camera Raw)
• TIFF
• Photoshop DCS 2.0
FORMATS THAT
SUPPORT SPOT COLOR
CHANNELS
324
Chapter 16 Printing, PDF, and Specialized Output
once, because resaving continues to discard data and lower image
quality. If you have acquired an image as a JPEG in your camera,
be sure to save the edited document as a PSD or layered TIFF fi le.
If you are using JPEG as a source format, be sure to set the digital
camera to Maximum quality. The best way to create JPEGs for the
Internet is with the Save For Web command (discussed in depth at
the end of this chapter).
Large Document Format (.psb)
Layers 8-bit 16-bit 32-bit
Bitmap Grayscale Duotone Indexed Color
RGB CMYK Lab Multichannel
There is normally a 2 GB fi le size limit in older versions of Pho-
toshop and most other computer applications. To respond to the
need for larger fi le sizes, Adobe launched the Large Document
Format (PSB). It supports documents up to 300,000 pixels in any
dimension (up to 100 inches at 300 ppi). All Photoshop features,
such as layers, effects, and fi lters, are supported.
Additionally, 32-bits-per-channel images can be saved as PSB fi les.
It’s important to remember that fi les saved in the PSB format can be
opened only in Photoshop CS or Photoshop CS2. Other applications
and earlier versions of Photoshop cannot open documents saved in
PSB format. Also, to save a document as a PSB fi le, the Enable Large
Document Format option must be enabled in your Preferences.
Photoshop PDF (.pdf)
Layers 8-bit 16-bit 32-bit
Bitmap Grayscale Duotone Indexed Color
RGB CMYK Lab
Multichannel
The Portable Document Format is a cross-platform, cross-applica-
tion fi le format. PDF fi les are designed to accurately display and
preserve fonts, page layouts, and both vector and bitmap graphics.
You can also transfer Photoshop’s annotation notes (both text and
audio) into a PDF.
TIP
Large Document Format
Doesn’t Automatically Mean
Larger Files
When comparing a fi le saved as a
standard .psd fi le versus the large
format .psb fi le, the two fi le sizes
are virtually identical. Using the
Large Document Format does not
increase fi le size, it just allows a
larger-sized fi le to be saved.
Specialized File Formats
325
The Photoshop PDF format is the only PDF that Photoshop can save,
and it’s a hybrid. It supports layers and other Photoshop features
but does not support all PDF features. You do have several choices,
though, in the Save Adobe PDF dialog box (including password and
permissions). You do not need to fl atten an image to save it as a PDF
fi le. This fi le can then be transferred to coworkers or clients for review
and comment using Adobe Acrobat or viewed using the free Adobe
Reader. This is an excellent format for review purposes.
PICT File (.pct)
Layers 8-bit 16-bit 32-bit
Bitmap Grayscale Duotone Indexed Color
RGB
CMYK Lab Multichannel
The Macintosh Picture format is widely used by video editors
who initially grew up on Macintosh-based editing systems. Its
popularity can be traced back to many software packages, which
historically required graphics to be in the PICT format. The PICT
format is very effective at compressing large areas of solid color.
This compression results in a huge fi le savings for alpha channels,
which are mostly black or white. On the Mac platform, you have
choices of additional JPEG compression. Avoid these because they
cause import problems on PCs, and the fi le-size savings are not
worth the quality loss.
PNG (.png)
Layers 8-bit 16-bit 32-bit
Bitmap Grayscale Duotone Indexed Color
RGB
CMYK Lab Multichannel
The Portable Network Graphics format provides lossless compres-
sion. It is increasingly common on the Internet, but not all brows-
ers support it. The PNG format was created to be a patent-free
alternative to GIF. Its major advantage is the PNG-24 fi le, which
allows for 24-bit images (8 bits per channel) and embedded trans-
parency. It is technically superior to GIF.
Layered fi les are very impor-
tant for the fl exibility they
offer for future changes. Not
all fi le formats store layers, so
be sure to keep a copy of your
layered image by saving to
one of these fi le formats:
• Photoshop
• Large Document Format
• Photoshop PDF
• TIFF
FORMATS THAT
SUPPORT LAYERS
326
Chapter 16 Printing, PDF, and Specialized Output
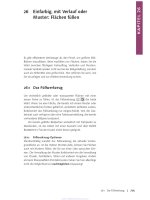
The fi le on the left is a PNG-24. Notice how the transparency is handled perfectly (even
in the soft glowing areas). On the right is a GIF, which is an 8-bit image. Transparency
is not handled as cleanly, and you’ll notice a white edge outside of the glow.
Targa (.tga)
Layers 8-bit 16-bit 32-bit
Bitmap
Grayscale Duotone Indexed Color
RGB
CMYK Lab Multichannel
The Targa format was originally designed for use on systems us-
ing the Truevision video board. The name is in fact an acronym
meaning Truevision Advanced Raster Graphics Adapter. The
Targa format predates Photoshop. It is a common format in the
video industry (because it supports alpha channels), especially for
PC users.
Do you need embedded
transparency for use in mul-
timedia, video, or animation
programs? Then you might
want to stick with fi le formats
that support alpha channels.
Be sure to check the manual
of your software program to
see which of the following
formats are compatible:
• Photoshop
• BMP
• ElectricImage
• Genuine Fractals
• JPEG2000
• Large Document Format
• Photoshop PDF
• Photoshop 2.0
• Photoshop Raw
• PICT File
• PICT Resource
• Pixar
• SGI RGB
• Targa
• TIFF
FORMATS THAT SUPPORT
ALPHA CHANNELS
Specialized File Formats
327
TIFF (.tif)
Layers 8-bit 16-bit 32-bit
Bitmap Grayscale Duotone Indexed Color
RGB CMYK Lab
Multichannel
The Tagged-Image File Format is one of the most common and
fl exible formats available. It is widely used to exchange fi les be-
tween applications and computer platforms, and has a long legacy
of compatibility. Older programs capped TIFF fi les at 2 GB, but
starting with Photoshop CS, this barrier was changed to 4 GB.
One benefi t of TIFF is that it acts as a layered fi le within Photo-
shop but is treated as a fl attened fi le by other applications. Ad-
ditionally, TIFF is one of the few formats to work in a bit depth of
8, 16, or 32 bits per channel. High dynamic range images can be
saved as 32-bits-per-channel TIFF fi les.
Adobe Digital Negative (.dng)
Layers 8-bit 16-bit 32-bit
Bitmap Grayscale Duotone Indexed Color
RGB CMYK Lab Multichannel
There are several competing raw fi le formats for digital cam-
eras (most are proprietary to a particular manufacturer.) Adobe
released the Adobe Digital Negative (DNG) fi le format to unify
things. The concern is that proprietary formats will become
obsolete more quickly due to company changes. Adobe hopes the
DNG format will be the open-standard model. The specs for this
format are available to camera and software manufacturers, and
Adobe has had relative success getting others to adopt it. For more
information, visit www.adobe.com/dng.
The DNG format offers a unifi ed solution for camera raw images.
In Photoshop you can only save a DNG fi le from the Adobe Cam-
era Raw dialog box.
In the File Compatibility preferences
you can modify how layered TIFFs
are handled.
NOTE
Photoshop CS4 Import and
Export File Formats
Adobe Photoshop offers great
fl exibility in reading and writing
specialized fi le formats. These
diverse formats are useful to
specialized industries like printing,
Web, and video production.
To learn more, open the fi le
Ch16_File_Formats.pdf on the CD.
328
Chapter 16 Printing, PDF, and Specialized Output
Specialized Processes
Creating fi les for special uses often requires special processing. The
techniques discussed in this section are fairly elaborate, so the short
overviews are meant for a clearer understanding of possibilities. The
creation of specialized formats for the Internet, professional print-
ing, or video requires a mastery of several interconnected skills.
Let’s take a quick look at converting to special purpose fi les.
Save For Web & Devices
Preparing images for the Web or mobile devices is all about com-
promise. You must learn to balance appearance with fi le size. If a
Web page takes too long to load, people will leave—which defeats
the purpose of running the site. Fortunately, Photoshop provides
a powerful command for compressing images and previewing the
results: the Save For Web command.
Let’s give the Save For Web & Devices command a try.
1. Open the fi le Ch16_Surfboards.tif from the Chapter 16 folder
on the CD.
2. Choose File > Save For Web & Devices.
VIDEO
TRAINING
Save For Web & Devices
53
Specialized Processes
329
3. The Save For Web dialog box offers several important options
for optimization and preview:
•
Toolbox: If you can’t see the entire image, you can use the
Zoom tool to make the image more visible. Additionally,
you can use the Hand tool (or hold down the spacebar) to
drag and navigate around the image. Alternatively, you
can click the Zoom Level menu in the lower-left corner and
choose a magnifi cation level.
•
Optimization tabs: By clicking the four tabs at the top, you
can choose to view the Original image, an Optimized view,
2-Up for two versions of the image side by side, or 4-Up for
four versions of the image side by side. Being able to com-
pare optimized images helps you choose the right format
and compression settings. For this image, choose 2-Up.
•
Image Optimization Info: The area
below each image in the Save For Web
dialog box gives you optimization infor-
mation. You can see the current optimiza-
tion applied, the projected fi le size, and
the estimated download time based on a selected modem
connection speed. Choose the JPEG High preset, and you’ll
notice that the fi le has been reduced from 17.3M to 659.9K
(a signifi cant savings). However, the download time is 120
seconds on a 56K modem (you can right-click the time to
choose another speed).
4. You need to further reduce the fi le size for
Internet delivery. The fi rst area to tackle is
the actual image size in pixels. In the Image
Size fi eld you’ll see that the image is almost
2,000 pixels wide (which is much wider than a typical Web
page that can be displayed on typical monitors). Type in a
Height of 600 pixels, so the image can integrate easily into
the Web page (even with a screen resolution of 1024 x 768, a
height of 600 would allow the image to display without scroll-
ing up and down). Press the Tab key to exit the fi le and apply
the resize value.
5. The fi le size has been signifi cantly reduced, but it’s hard to see
the effects of the compression. Set the image magnifi cation
view to 100%.
330
Chapter 16 Printing, PDF, and Specialized Output
6. Change the amount of Compression by either
changing the preset (from High to Medium,
for example) or adjusting the Quality amount.
You can manually enter a number or click to
access a slider (you will need to release the
slider for the image to refresh). Try a setting
of 45 to see the results. The image is now at
just over 26K, which is more than a 99.9% re-
duction in fi le size and a fundamental change
for Web delivery.
7. Toward the lower-right corner you have the
ability to choose to preview the image in a
Web browser. If you don’t see your browser of
choice, just choose Edit List, and then choose
Find All to add all Web browsers on your
computer.
8. Click Save to specify a location for the saved fi le. Choose your
desktop and click Save in the new dialog box to process the
image and save a compressed Web-ready version. The origi-
nal fi le will remain untouched, and its resolution and quality
will be identical to its state when you launched the Save For
Web command.
9. Experiment with other fi le formats such as GIF and PNG to
see their benefi ts and limitations.
Convert to CMYK
While CMYK conversion is an everyday process for many users,
several authors and trainers have developed some useful tech-
niques. What I offer here is a proper workfl ow that will work for
most users, on most images, in most environments. I encourage
you to continue to explore prepress production through further
reading. CMYK conversion can be a very tricky process, and it
is essential that you have access to the color profi le used by your
output device. Additionally, be sure to discuss the process with
your service bureau that will do the professional printing. With all
of these caveats said, let’s take a look at the process.
1. Check your color management settings by choosing
Edit > Color Settings or by pressing Shift+Command+K/
Shift+Ctrl+K. Choose North America General Purpose 2.
VIDEO
TRAINING
Converting CMYK Images
54
Specialized Processes
331
2. Open the fi le Ch16_Parrots.tif from the
Chapter 16 folder.
3. Choose View > Gamut Warning or press
Shift+Command+Y/Shift+Ctrl+Y. Areas that
are too bright or saturated for CMYK print-
ing will be highlighted in gray. This is because
the RGB space can represent a wider ranger
of visible colors based on the additive method
of color. CMYK printing instead uses the sub-
tractive model, and it has a narrower range.
4. Select the Sponge tool (O) from the Toolbox.
Adjust the brush to a large size with soft edges.
Set the fl ow to a lower value such as 20% and
the mode to Desaturate. Deselect the Vibrance
option to have greater impact on the saturated
color areas. These settings will gently soak up
the color in the oversaturated areas.
5. Carefully paint over the oversaturated areas with the Sponge
tool. It may take multiple strokes, but you’ll see the gamut
warning go away as you reduce the oversaturated areas. Re-
peat for other problem areas in the photo.
6. When all of the gamut warning has been removed, choose
Image > Mode > CMYK. There should be no visible color
shifting. By taking the time to manually touch up the out of
gamut areas, you’ll get a better CMYK conversion without any
posterized edges or color clipping.
7. Save the image in a print-ready format such as TIFF.
Add an Alpha Channel
You explored saving selections as channels much
earlier in the book (Chapter 5, “Selection Tools
and Techniques”). The alpha channel can be used
to store transparency information, and it is par-
ticularly useful for video and multimedia users. In
Photoshop’s Actions panel, you’ll fi nd the Video
actions that I co-wrote with Daniel Brown. These
can speed up certain tasks for a video workfl ow.
Two of these actions can create an alpha channel
for multilayered graphics with transparency.
332
Chapter 16 Printing, PDF, and Specialized Output
1. Open the fi le Ch16_Video_Logo.psd from the
Chapter 16 folder. A dialog box warning you
about Pixel Aspect Ratio preview appears;
click OK to dismiss it.
2. Make sure the Logo layer is selected in the
Layers panel.
3. Call up the Actions panel and load the Video
Actions by clicking the submenu. Choose the
Video Actions set.
4. Choose the Create Alpha Channels from Vis-
ible Layers action. You must see Photoshop’s
transparency grid for it to work.
5. Click the Play Selection button to run the ac-
tion. A dialog box appears with instructions.
Read it and click Continue. A new alpha
channel is added to the document.
6. Choose File > Save As and save the fi le as a
PICT, TIFF, or Targa fi le, and then choose
to embed the transparency by including the
alpha channel.
There are many other issues related to creat-
ing graphics for use in video. I invite you to
check out my reference site and podcast at
www.PhotoshopForVideo.com.
Specialized Processes
333
Include a Clipping Path
If you are preparing an image to import into a page layout pro-
gram (such as Adobe InDesign or QuarkXPress), you may want
to embed a clipping path. The clipping path embeds the transpar-
ency information into the fi le.
It’s important to note that paths are vector based; therefore, they
have hard edges (and do not preserve softness or a feathered edge).
Features like a drop shadow cannot be preserved when creating a
clipping path (but can often be added in the page layout program).
An alternative to clipping paths is to use an alpha channel (which
can include a feathered edge).
Photoshop offers a few ways to create accurate clipping paths; let’s
explore the easiest. Photoshop has a built-in wizard to help you
create clipping paths.
1. Open the fi le Ch16_Clipping_Path.psd from
the Chapter 16 folder.
2. Choose Selection > Load Selection, and then
click OK to use the default properties. Photo-
shop loads a selection based on the transpar-
ency in the document.
3. Switch to the Paths panel and click the Make
work path from selection icon.
4. Double-click on the work path to open the
Save Path dialog box. Name the path Logo
Edge and click OK.
334
Chapter 16 Printing, PDF, and Specialized Output
5. Click the Paths panel submenu and choose
Clipping Path.
6. Select the new path Logo Edge from the Path
pop-up menu.
7. Leave the fl atness value empty to print the
image using the printer’s default value.
8. Convert the fi le to CMYK by choosing
Image > Mode > CMYK.
9. Choose File > Save As and store the fi le as
a Photoshop EPS, DCS, or PDF format for
PostScript printing or as a TIFF for use in
Adobe InDesign or QuarkXPress.
End of the Road
Have you reached the end of the road? Hardly.
Photoshop contains a wealth of tools. But you
have now gained a fi rm foundation of knowledge.
Many more techniques and specialized uses
are worth exploring. And there is a wealth of
Photoshop Web sites and books available to
further your knowledge. A great place to
start is at this book’s Web site Raster|Vector
at www.RasterVector.com. You should also
explore the National Association of Photoshop
Professionals; be sure to check out its Web site
at www.PhotoshopUser.com. Photoshop will
be a core tool as you grow into other software
applications. Continue to expand your
Photoshop knowledge and the investment
in time will pay back greatly.
The path’s name appears outlined when
it is being used as a clipping path.
For additional hands-on practice, download these ten bonus
exercises. You will fi nd these exercises well suited for exploring
the many features of Photoshop. Each exercise provides source
images and general instructions to guide you in approaching the
project. The exercises should be undertaken after you have com-
pleted the book’s chapters.
To download the exercises, visit www.peachpit.com/
understandingphotoshop and follow the steps to create a login and
password to access them.
Exercise #1
Digital Painting
A popular technique is to turn a photo into a
more painting-like image. There is no one-click
answer, but a little experimentation can go a
long way.
Exercise #2
Creating a Collage
Multiple images can be combined into a new
composite image. This can be done for experi-
mental or artistic purposes as well as to create an
advertisement or cover image.
Exercise #3
Designing Speaker Support
Creating a custom background or series of back-
grounds is important when designing a custom
electronic portfolio. It also allows a designer
to create a custom look for a client to use with
Microsoft PowerPoint or Apple Keynote.
Bonus
Exercises
336
Bonus Exercises
Exercise #4
Designing a Magazine Cover
Designing a magazine cover is an excellent
exercise to practice with type and layout. Precise
positioning of elements as well as creative use
of color and design are important to capture the
audience’s attention.
Exercise #5
Preparing Images for the Internet
Properly sizing and compressing images for the
Internet is an essential skill. Finding the right bal-
ance of compression and image size is important
to ensure that the end user can quickly download
the images, yet still have them look good.
Exercise #6
Designing a CD/DVD Label
Whether you’re creating a music CD for a band
or a DVD label for a client, a professional-looking
label is important. Use of text and effects are
important to create a readable yet compelling
design.
Bonus Exercises
337
Exercise #7
Creating a DVD Menu
Designing a DVD menu is an important task. More and more proj-
ects are being distributed on DVD, and it is the most quickly ad-
opted format in consumer technology history. There’s a lot of ways
a DVD menu can go (and it will depend on the DVD-authoring
software used). But a lot of design work can happen in Photoshop,
which allows design options to be fully explored.
Exercise #8
Artistic Reinterpretations of a Photo
Working with a single image and processing several ways is an
excellent way to explore the power of fi lters. By creating unique
looks through fi lter combinations, blending modes, and image
adjustments, great design options can be created.
Exercise #9
CD/DVD Package
In this project, you’ll create a label for a DVD or CD using an
Amaray-style case. A template for printing is provided from a DVD
replicator (each replication facility usually uses a custom template).
The design will include text and photos, and a completed sample im-
age is provided for reference.
Exercise #10
Preparing Images for CMYK Printing
Preparing images for CMYK printing requires special process-
ing. Certain bright, saturated colors cannot be printed using the
CMYK process. These out of gamut colors need to be reduced and
brought into range.
Index
A
Accented Edges fi lter, 257
actions, 22–23, 281–289
creating, 285–288, 290
F-key assignments, 281
saving, 289
sharing, 289
third-party, 284–285
Actions panel, 22–23, 282–283
Add Noise fi lter, 263
Adjustment Layers, 132, 154
Black & White, 168–169
Photo Filter, 171–172
Adjustments panel, 18, 154
Adobe Bridge, 31, 304–310
Adobe Color Picker, 80–83
Adobe Kuler, 81–82
Adobe Output Module, 305–310
Adobe Studio Exchange, 239, 284, 289, 299
alignment
of images, 194
of layers, 133–134
of text, 221
alpha channels
adding to graphics, 331–332
fi le formats supporting, 326
saved selections as, 68, 74
Angled Strokes fi lter, 257
anti-aliasing, 56, 220
Application bar, 12–13
Art History Brush tool, 99–100
Artistic fi lters, 250–253
aspect ratio, 195
Auto-Align Layers command, 140–141
Auto-Blend Layers command, 141
Automate commands, 281, 289–298
Adobe Bridge and, 304–310
Batch, 289, 291–293
Conditional Mode Change, 296
Create Droplet, 294–295
Crop and Straighten Photos, 295–296
Fit Image, 297
Merge to HDR, 297–298
Photomerge, 297
Average fi lter, 254
B
Background Eraser tool, 106
backup copies, 30
Bas Relief fi lter, 271
baseline shift, 218
Batch command, 289, 291–293
Batch Rename command, 304–305
Bayer fi lter, 26
Bevel and Emboss effect, 231–233
Bicubic interpolation, 41
Bilinear interpolation, 41
Billingsley, Fred C., 2
bit depth, 10, 243
Bitmap mode, 8
Black & White adjustment layer, 168–169
black point, 155, 158
blending modes, 143–152
cycling through, 146
examples of using, 147–152
explained, 143–144
Fade command and, 247–248
fl at images and, 148–149
keyboard shortcuts for, 152
layers and, 127
list of, 144–145
painting tools and, 101
practice with, 144, 146–147
rubber stamp effect and, 151
rules for using, 147
selections and, 75
shadowed images and, 150
Blur fi lters, 254–256
Blur tool, 123, 190
blurring images, 204–205
BMP fi le format, 8
Border command, 62
Box Blur fi lter, 254
Bridge application, 31, 304–310
Brightness/Contrast command
color correction and, 178
Levels adjustment vs., 155
Brown, Russell, 299
Brush Stroke fi lters, 257–258
Brush tool, 93–94
Index
339
brushes, 86–93
Color Dynamics, 91
creating custom, 86
dual brush option, 91
Other Dynamics, 92
presets for, 86–87
Scattering options, 90
Shape Dynamics, 88–89
Texture options, 90
tip shape, 87–88
Brushes panel, 85–93
brush presets, 86–87
keyboard shortcuts, 93
Burn tool, 192
C
Calculations command
Layer Masks created with, 119–120
selections created with, 74–77
Camera Raw dialog box, 29–30, 176
cameras. See digital cameras
Canvas Size command, 43–44
CDs, importing from, 34–35
Chalk & Charcoal fi lter, 271
channels, 16–17, 71. See also alpha channels
Layer Masks and, 116–117
selections and, 68, 72–74
spot color, 82–83, 323
Channels panel, 16–17
Character panel, 23–24, 214–220
anti-alias menu, 220
baseline shift, 218
font settings, 214–215
horizontal scale, 217
kerning adjustments, 216
language selection menu, 220
leading adjustments, 215
text color, 218
tracking adjustments, 217
type enhancement buttons, 219
vertical scale, 217
Charcoal fi lter, 271
Chrome fi lter, 271
Clipping Masks, 128
clipping paths, 333–334
Clone Stamp tool, 183–184
cloning
perspective, 205–207
retouching by, 183–184
Clouds fi lter, 268
CMYK Color mode, 6, 162
conversion to, 330–331
fi lters and, 242–243
printers and, 314
color
oversaturated, 197
spot, 82–83
text, 218
Color Balance command, 166
color cast, 158–159
color combinations, 164
color controls, 18
color correction, 153–180
Auto buttons, 157, 169
Black & White command, 168–169
Brightness/Contrast command, 178
Color Balance command, 166
color cast issues and, 158–159
Curves command, 161–162
duotone effect and, 169
Equalize command, 177–178
Exposure command, 174–176
fi ltering and, 243
general advice about, 153–154
Gradient Map and, 170
Hue/Saturation command, 163–165
Invert command, 177, 178
Levels command, 155–160
manual adjustments, 159–160
Match Color command, 167–168
Photo Filters and, 171–172
Posterize command, 180
primary image adjustments, 154–166
problematic adjustments, 177, 178–180
Replace Color command, 179
Selective Color command, 179
Shadows/Highlights command, 172–173
tinting process and, 165
Variations command, 180
Color Dynamics, 91
Color Halftone fi lter, 266
Color Libraries, 80–81
color management, 316, 317
color modes. See image modes
color options, 80–85
Adobe Color Picker, 80–83
Color panel, 18–19, 84–85
Eyedropper tool, 83–84
Kuler panel, 81–82
Swatches panel, 19, 85
Color Overlay effect, 234
Color panel, 18–19, 84–85
Color Picker, 80–83
Color Range command
color correction and, 179
Layer Masks created with, 118–119
selecting colors with, 63–64, 95
Color Replacement tool, 94–95
color separation, 312
340
Index
Colored Pencil fi lter, 250
commands. See also specifi c commands
Automate, 281, 289–298
printing, 314–317
selection, 61–62
compact fl ash cards, 2
compression
JPEG, 27–28
PDF, 318–320
compression artifacts, 28
Conditional Mode Change command, 296
contact sheets, 305, 306–307
Conté Crayon fi lter, 272
content-aware scaling, 201
Contour settings, 232
Contract command, 62
control points, 161, 162
Cooling Filters, 171
copyright issues, 37
Craquelure fi lter, 277
Create Droplet command, 294–295
Creative/Advanced controls, 18
Crop and Straighten Photos command, 34,
295–296
Crop tool, 44–48, 195
cropping images
aspect ratio adjustments, 195
keyboard shortcuts for, 44
nondestructive cropping, 46–47
perspective cropping, 47–48
power crop for, 45–46
steps in process of, 44–45
straightening and, 34, 295–296
Crosshatch fi lter, 257
Crystallize fi lter, 266
Curves command
color correction using, 161–162
Levels command vs., 156, 161–162
Curves Editor, 162
custom brushes, 86
Custom fi lter, 279
Custom Shape tool, 107
custom shapes, 108
Cutout fi lter, 250
D
Dark Strokes fi lter, 257
De-Interlace fi lter, 278
descreening images, 34
Deselect command, 61
desktop printers, 313–314
Despeckle fi lter, 264
destructive editing, 154
Difference Clouds fi lter, 268
Diffuse fi lter, 274
Diffuse Glow fi lter, 259
digital cameras, 25–31
image formats, 27–30
resolution/size issues, 40
technology of, 25–27
transferring images from, 30–31
Direct Selection tool, 70
Displace fi lter, 259–260
Distort fi lters, 259–263
distorting images, 50
distributing layers, 134
DNG fi le format, 30, 327
docking panels, 24
Dodge tool, 192
downsampling, 40
dpi (dots per inch), 3
drawing tools, 79, 106–110
choosing colors in, 80–85
Shape tools as, 107–110
vector graphics and, 106–107
Drop Shadow effect, 228–229
droplets, 294–295
drum scanners, 32
Dry Brush fi lter, 250
dual brush option, 91
Duotone mode, 7
duotones, 7, 169, 235
Dust & Scratches fi lter, 264
DVDs, importing from, 34–35
dye sublimation printers, 313
E
Ellipse tool, 107
Elliptical Marquee tool, 54
Emboss fi lter, 275
EPS fi le format, 322–323
Equalize command, 177–178
Eraser tools, 106
events, 303
Expand command, 62
Export Layers To Files script, 302
Exposure command, 174–176
HDR images and, 174–175
Raw images and, 176
Extrude fi lter, 275
Eyedropper tool, 83–84
F
Facet fi lter, 266
Fade command, 248–249
faded historical photos, 198
fair-use doctrine, 37
Feather command, 62, 248
Index
341
feathered selections, 56, 248
Fibers fi lter, 269
fi le formats
converting, 292
specialized, 321–327
fi lenaming compatibility, 292
Fill Layers, 131
Film Grain fi lter, 251
fi lm/slide scanners, 32
Filter Gallery, 244–245, 246
fi lters, 241–280
Artistic, 250–253
Blur, 254–256
Brush Stroke, 257–258
Distort, 259–263
Fade command and, 248–249
interfaces for, 243–245
keyboard shortcuts for, 249
Noise, 263–265
overview of, 241–242
Pixelate, 266–267
preparing to use, 242–243
Render, 268–269
Sharpen, 270
Sketch, 271–274
Smart, 245, 246–247
Stylize, 274–276
Texture, 277–278
third-party, 242
tips for using, 247–249
Video, 278–279
Find Edges fi lter, 275
Fit Image command, 297
fl at images, 148–149
fl atbed scanners, 31–32
Flatten Layer Effects/Masks scripts, 301
fl attening images, 137–138
fl ipping layers, 50
fonts, 210–212, 214–215. See also type
families of, 212, 214
management of, 226
principles for choosing, 210
serif vs. sans serif, 211
size of, 215
styles of, 214–215
Web sites on, 214, 215
weight of, 212
x-height of, 211
Fragment fi lter, 267
Free Transform command, 48–50
blending modes and, 151
modifying text with, 222–223
Smart Objects and, 51
Fresco fi lter, 251
G
gamuts, 6, 193
Gaussian Blur fi lter, 255
GIF fi le format, 322
Glass fi lter, 260
Glowing Edges fi lter, 275
Gradient Editor, 101–103
Gradient Map, 105, 170
Gradient Overlay effect, 234
Gradient tool, 103–105
gradients, 101–105
explained, 101
Fill Layers and, 131
fi xing skies using, 104–105
Layer Masks and, 115–116
methods for building, 104
options for modifying, 104
solid vs. noise, 102–103
grain
adding to images, 203
removing from images, 202
Grain fi lter, 277
Graphic Pen fi lter, 272
grayscale conversion, 168–169
Grayscale mode, 7
grouping layers, 135
Grow command, 61
H
Halftone Pattern fi lter, 272
halftones, 5, 313
HDR images, 174–175, 297–298
Healing Brush tool, 185–186
hiding panels, 19
High Pass fi lter, 280
highlights
adding soft, 233
adjusting, 172–173
histogram, 21, 155
Histogram panel, 21, 155
historical photos, 182, 198
History Brush tool, 96–98
History panel, 22, 96–98, 99
History States, 96, 99
horizontal scale, 217
Hue/Saturation command, 163–165
color combinations and, 164
tinting photos with, 165
hyphenating text, 222
342
Index
I
image fi les
digital camera, 25–31
fair-use doctrine, 37
imported from CD/DVD, 34–35
public domain, 36
scanned, 31–34
stock photo, 35–36
image modes, 5–9
Bitmap, 8
CMYK Color, 6
Duotone, 7
Grayscale, 7
Indexed Color, 8
Lab Color, 9
Multichannel, 9
RGB Color, 6
Image Processor command, 299–300
Image Size command, 42–43
indenting text, 221
Indexed Color mode, 8
Info panel, 21–22
Ink Outlines fi lter, 258
inkjet printers, 313
Inner Glow effect, 230–231
Inner Shadow effect, 230
interface, 11–24, 96–98, 99
Actions panel, 22–23
Adjustments panel, 18
Application bar, 12–13
Channels panel, 16–17
Character panel, 23–24
Color panel, 18–19
Filter Gallery, 244–245
Histogram panel, 21
History panel, 22
Info panel, 21–22
Layers panel, 16
Masks panel, 18
Navigator panel, 20
Options bar, 16
Paragraph panel, 24
Paths panel, 17
Styles panel, 20
Swatches panel, 19
Tools panel, 13–15
Workspaces, 23
interpolated resolution, 4
interpolation methods, 40–41
Inverse command, 61
Invert command, 177, 178
J
JPEG fi le format, 27–28, 323–324
Jump command, 131
K
kerning, 216
keyboard shortcuts
for blending modes, 152
for Brushes panel, 93
for cropping images, 44
for fi lters, 249
for reordering layers, 130
for Swatches panel, 85
for tools, 13–14
for Vanishing Point plug-in, 208
Knoll, John, 79, 241
Kuler panel, 81–82
L
Lab Color mode, 9
language settings, 220
Large Document Format, 324
laser printers, 313
Lasso tools, 57–58
Layer Comps, 142, 301–302
Layer Masks, 111–124
adding, 112–113
advice on using, 124
Blur and Smudge tools, 123
Calculations command, 119–120
channels and, 116–117
Color Range command, 118–119
content adjustments, 123–124
deleting, 114
disabling, 113
gradients and, 115–116
Masks panel and, 121–122
Maximum and Minimum fi lters, 122–123
refi ning, 121–124
Smart Filters and, 247
vector-based, 114–115
Layer Styles, 20, 128, 227–240
adding, 228
Bevel and Emboss effect, 231–233
Color Overlay effect, 234
Contour settings, 232
creating your own, 239
Drop Shadow effect, 228–229
duotones created with, 235
explained, 227
Gradient Overlay effect, 234
Inner Shadow effect, 230
multiple layers and, 234