The preparation and use of compost - Part 3 pptx
Bạn đang xem bản rút gọn của tài liệu. Xem và tải ngay bản đầy đủ của tài liệu tại đây (291.89 KB, 18 trang )
The preparation and use of compost 22
5 Methods to make compost
There are many ways of making compost. In this chapter different
methods are given. We have gratefully made use of materials of
HDRA and KIOF in order to be able to present many different meth-
ods of compost making in this Chapter.
Taking into account the factors mentioned before, such as availability
of organic materials and weather conditions, a choice can be made
from these methods.
In the long run everyone must work out a method to suit oneself. We
advise you to experiment and find the method that suits best to your
situation. Of course you can always contact Agromisa, HDRA or
KIOF ask for specific information. The addresses are given in the sec-
tion Useful Addresses.
5.1 Indore method
The Indore Method is much used for composting in layers.
Building the heap
The basis of the heap should consist of twigs and cane shoots. The
following successive layers are piled on top of this:
? a layer of about 10 cm tough organic material which is difficult to
decompose;
? a layer of about 10 cm fresh organic material which decomposes
easily;
? a layer of 2 cm animal manure, compost or slurry from a biogas
tank.
? a thin layer of soil; the soil should be collected come from the top
layer (top 10 cm) of clean (moist) soil (e.g. from under trees). This
ensures that the right micro-organisms are brought into the heap.
Methods to make compost 23
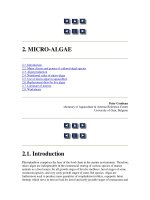
This sequence of layers is repeated until the heap has reached a final
height of 1.5 to 2 meters. In this way the heap is composed of many
layers. Building the heap should be done quickly, preferably within a
week. See figure 5.
Figure 5: Example of an Indore compost heap
Turning over
During decomposition the heap has to be turned over regularly, in or-
der that it remains well aerated and all the material is converted into
compost.
The first turning over of the heap should be done after 2 to 3 weeks.
The heap is broken down and built up again next to the old heap. The
layers are mixed and the heap is, as it were, turned upside down and
inside out. Again, a foundation of coarse plant material is made first.
Then the drier and outer, less decomposed part of the old heap is
placed in the central part of the new heap. The drier material will have
to be watered before the heap can be built up further. This core is cov-
ered with the rest of the material. The original layered structure is lost.
The preparation and use of compost 24
The second turning over takes place after 3 weeks and it may even be
necessary to turn the heap over again for a third time. Repeat the
moisture test and the temperature test a few days after each turning
over operation.
Time for decomposition
Decomposition is complete if the plant material has changed into an
unrecognizable crumbly, dark mass. Twigs and thick stems do not de-
compose completely and can still be seen. Under favourable condi-
tions, the decomposition process in the Indore Method takes 3 months,
but under adverse conditions it may take longer than 6 months.
Some substances, such as human urine and wood ash promote the
growth of the micro-organisms. A small amount of these in the heap is
sufficient to accelerate their growth. If the process has to be speeded
up spread some urine or wood ash over the thin layers of soil, but only
in small quantities; too much ash kills the micro-organisms. Urine,
diluted with water 1:4 is sprinkled over the heap, using a watering can.
The Indore Method usually gives good results.
The advantages of this method are:
? the process can be kept under control and runs smoothly, because
the heap is turned regularly;
? compost is produced in a short time.
Disadvantages of this method are:
? it requires much water;
? it is very labour intensive.
5.2 Bangalore method
The Bangalore Method is another popular composting method. The
heap is constructed in a similar way to the Indore Method. Here too, a
compost heap of several layers is set up in a week’s time.
It differs from the Indore Method as follows:
Methods to make compost 25
A few days after completion of the heap, it is completely covered with
mud or grass sods, thus closing it off from outside air. Decomposition
of organic material continues, but now other types of micro-organisms
keep the process going. These micro-organisms decompose the mate-
rial much more slowly. Therefore, it takes longer before compost is
formed than in the Indore Method, although the quality of the compost
is about the same.
The major advantages of the Bangalore Method are:
? a saving of water;
? it requires less labour, because the heap is not turned over during
the decomposition process.
Disadvantages of the Bangalore Method are:
? more disease germs and weed seeds survive due to the temperature
during decomposition;
? the decomposition process is more difficult to control because the
heap has to be kept continually covered;
? it is a less suitable method for those with little or no experience in
composting.
5.3 Heating process or block method
This method resembles the Bangalore Method. However the treatment
is different and it can be used to compost large quantities of organic
material.
A continuous heap system
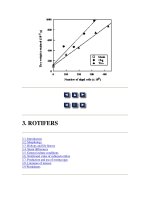
The Heating Process Method is based on a continuous heap system.
That is to say, new heaps of organic material are being made all the
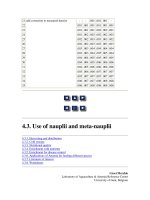
time, piled up and treated in the following manner (See also figure 6):
On the first day a heap is made of all available material. This heap has
a ground surface area of 1 x 1 meter minimum and 3 x 3 meter maxi-
mum and a height of about 1 meter.
The preparation and use of compost 26
Leave the heap to stand for two days.
Within the heap decomposition starts on its
own accord. After these 2 days (Figure 6:
day 3), the air is forced out of the heap by
trampling over it. The heap is deprived of
so much air that an almost comparable
situation occurs as in the covered heap of
the Bangalore Method.
On day 4 a new heap is built on top of the
first heap. This new heap cuts the first heap
off completely from the outside air.
In the Heating Process Method a new heap
is made every day. In fact, on the second
and third day a new heap is made next to
the first one. On the fourth day a heap is
built on top of the first one. It follows that
on day 5 a new heap is put on to the second
one. The procedure is clarified in figure 6.
And so on.
Advantages:
? it is a simple method for large quantities
of organic material;
? it is a continuous method.
Disadvantages:
? only suitable for large quantities of mate-
rial;
? requires much labour and material;
? more chance that disease germs and weed
seeds survive the decomposition process
at lower temperatures;
? the process is more difficult to check;
? requires much experience and insight in composting.
Figure 6: The healing
process or Block
Method (Source:
HDRA)
Methods to make compost 27
5.4 Pit composting
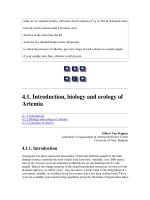
Figure 7: Process of pit composting
This method involves making compost in pits that have been dug in
the ground. The best depth for a pit varies according to local soil con-
ditions and the depth of the water table. A typical pit would measure
1.5 to 2m wide, 50cm deep and any length. The pit can be lined with a
thin layer of clay to reduce water loss. Often, several trenches are dug
next to each other, to allow turning from one pit into the next.
Material should be placed in the pit in layers as described below. For a
larger pit measuring 2m wide, 2m long and 1 m high, 1 to 1.5 litres of
water should be poured on before applying the layer of soil, which
seals the pit.
The layering is as follows:
1 10 cm of material, which is difficult to decompose (twigs, stalks)
2 10 cm of material which is easy to decompose (green and fresh)
3 2 cm of animal manure (if available)
4 A thin layer of soil from the surface of arable land to obtain the
micro-organisms needed for the composting process
5 Repeat these layers until the heap reaches 1 to 1.5m high
6 Cover with grass or leaves (such as banana leaves) to prevent
water loss.
The preparation and use of compost 28
After 2 to 3 weeks, all the contents of the pit should be turned over
into the second pit and 2 to 3 weeks later this should be turned into the
third pit. As the decomposing material from pit 1 is turned into pit 2,
new material, which is ready for composting, can be put into pit 1,
thus creating a process of continual compost making.
Advantages:
Pit composting is quick, easy and cheap as it does not require invest-
ment in materials. It needs less water so it is useful for dry areas.
Disadvantage:
It is more difficult to follow of the decomposition process than with an
above ground heap.
5.5 Trench composting
Trench composting is similar to pit composting except that plants are
grown directly onto the trench as opposed to taking the compost out of
the pit and spreading it on land. A trench should first be dug. The size
depends on how much material you have available and how many
plants you are planting in the trench. The width can range from 50cm
to several meters, the depth lm or less and it can be any length. It
should then be filled as follows:
1 10cm of material which is difficult to decompose (stalks or crop
residues)
2 10cm of material which is easy to decompose (fruit and vegeta-
ble scraps)
3 Add 2cm of animal manure (if available)
4 A thin layer of soil from the surface of arable land to obtain the
micro-organisms needed for the composting process
5 Repeat these layers until the pile is about 50cm above the ground
6 Cover with soil, grass or leaves (such as banana leaves) to pre-
vent water and nutrient loss and leave to settle for about one
month before planting.
Methods to make compost 29
Advantages:
Trench composting is especially useful against termite attack as most
species live above ground level.
5.6 Basket composting
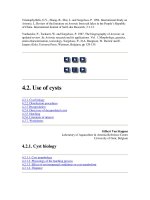
Figure 8: Baskets with compost and seedlings planted around
them (HDRA)
If materials for composting are in short supply, you can still make
good use of them by using the basket method of composting. It is es-
pecially useful for food production in home gardens. The method is as
follows:
1 Dig circular holes 60 cm in diameter and 60 cm deep
2 Line the bottom with material which is difficult to decompose
(twigs, stalks)
3 Add 8 cm of animal manure
4 Add 15 cm of green vegetation (young leaves that have a high
water content)
5 Add 0.5 cm of ash
6 Repeat steps 3 to 5 until the hole is full
7 Cover with grass or leaves to prevent water and nutrient loss
8 Using thin sticks and weaving them together, mark the circular
outline of the pit with a round ‘basket’, 10cm in height.
The preparation and use of compost 30
Seeds or seedlings can then be planted around the basket structure.
The plants will make use of the nutrients in the compost.
If you build more compost baskets in your garden, place them in dif-
ferent areas every time so that the whole garden becomes more fertile.
Advantages:
Basket composting makes good use of nutrients for a small kitchen
garden. This method is also good for using up small quantities of
waste.
5.7 Boma composting
Figure 9: A boma with bedding for composting (Source: Muller-
Samann & Kotschi, 1994)
When a farmer keeps animals, there is usually, a boma (enclosure
where the animals are kept all the time or only at night) on the farm.
In order to keep the animals clean, bedding is put in the boma.
It as advisable to add enough new bedding once a week, so that all
urine is soaked up. Any type of dry organic material can be used as
bedding. It can be maize stalks, weeds, dry grass or leaves, sawdust,
etc.
Methods to make compost 31
A mixture of materials is best. Bedding soaks up urine and droppings,
which are very rich plant food, and prevents losses through leaching
or drying out of manure. The farmer who puts new bedding regularly
will make plenty of high quality compost.
Well-mixed manure can be taken out either every day or once a week.
If taken out daily, the mixture should be put in a pile and a small
amount of soil spread on top each day. This can be continued until
there is enough material to build a boma compost.
KIOF has described the following method for making boma compost:
Each time manure is taken out of the boma, it should be composted
immediately. Sheep, goat, rabbit and chicken manure are all rich ma-
nure. Because the bedding is plant material, there is no need to add
more greens. It is practical to make the compost next to the boma to
save effort moving the manure and used bedding.
Figure 10: A boma and compost site (Source: KIOF and HDRA)
1 Like on the drawing, a trench of 30 cm in depth is dug out behind
the boma (A). The soil is put next to the trench. The bottom of the
trench is loosened and a layer of dry vegetation is put on the bot-
tom.
2 Then a layer of about 10 cm manure and bedding is thrown out of
the boma into the trench.
3 This is covered by about 5 cm of soil.
The preparation and use of compost 32
4 Again a layer of about 10 cm manure is added and again covered by
soil. This goes on until the compost pile is completed.
5 In the dry season the manure will need watering. During the rains
the manure will be very wet. When this is the case, keep the pile
low (about one meter). Dry manure can be piled about one-and-a-
half meters high.
6 When finished, the whole pile is covered with soil and finally with
grass, maize stalks or banana leaves to prevent drying up.
7 Make sure you use sticks to control the temperature because boma
manure becomes very hot. Add water as soon as the stick feels dry
or becomes white.
8 After two or three weeks the pile is turned into the second trench
(B) and after two or three more weeks it is turned into the third
trench (C).
9 The compost is stored until planting time, in a big, covered pile next
to the third trench (D).
Note: If a boma has no roof the manure becomes wet during the rain.
To avoid leaching, all manure should be taken out as often as possible
and immediately composted and covered. Remember, compost should
be moist, not wet.
Composting specific materials 33
6 Composting specific materials
Composting a mixture of organic wastes makes decomposition easier
and produces a more balanced end product. Sometimes there is a large
quantity of one type of material and there is little chance of this being
mixed with other materials. However if dealt with properly these ma-
terials can make good compost.
6.1 Composting water plants
Waterweeds can be a considerable
problem in lakes and waterways,
which are becoming more and more
unbalanced and disturbed. Such prob-
lems often arise when the surface wa-
ter becomes enriched with nutrients
and the introduction of exotic plants,
the water hyacinth, Eichnornia cras-
sipes, for instance.
Controlling these waterweeds with
herbicides is harmful to the environ-
ment, expensive, and a waste! Indeed,
they can become a valuable soil im-
prover if composted as follows:
1 Harvest waterweeds and spread
them out for a few days along the
water’s edge to dry, until the weight has about halved.
2 A compost heap can be made, using the wilted plants, soil, ash,
animal manure and household waste (kitchen scraps).
3 Use the Indore method (Section 5.1) of composting by placing
twigs at the bottom and building up the different layers to form a
heap. This will help prevent the heap from being too wet.
Figure 11: Water Hyacinth
The preparation and use of compost 34
4 Turn over the heap regularly; every two weeks.
Compost made with water hyacinth only, may in some cases reduce
yields. Test the compost in small amounts before applying to a crop.
6.2 Composting seaweed
Figure 12: An adult Giant Kelp (Macrocystis) plant
Seaweed has been used as a fertilizer since long. For those farmers
who are close to the sea, it can be very useful. Many species are
known and it is found in most seas.
Seaweed is a potential fertilizer, which is literally waiting to be
‘picked up’. It contains many trace elements and growth regulating
substances, which are highly beneficial to crops.
Removing the salt
The main requirement when composting seaweed is to remove most of
the salt. This can be done simply: In the rainy season seaweed is col-
lected seaweed and spread out or put in small heaps. After some time
the rain washes out the salt.
Composting specific materials 35
Direct use of seaweed as a fertilizer
The simplest method of application of seaweed as a fertilizer starts
with the drying of the seaweed, after which it is ground. The powder
thus obtained can be used directly as a fertilizer.
Composting
The other fertilizer application of seaweed is composting. If the sea-
weed is wet then it should be mixed with a large amount of dry mate-
rial such as straw. Dried seaweed can be used in a normal compost
heap. Generally the decomposition of seaweed is very quick.
To summarize, for farmers along the coast, seaweed is a potential
source of manure. The seaweed will always have to be de-salted first.
Seaweed can bring about a reasonable yield increase, but is not a
wonder cure. The working of growth regulating substances is again
very dependent on the soil type to which these are applied.
6.3 Composting coffee pulp
Figure 13: Elevated compost heap (Source: HDRA)
In coffee producing areas, large quantities of coffee pulp are a prob-
lem. The fermenting piles give off unpleasant smells; breed flies and
pollute waterways. Coffee pulp is a good fertilizer as it is rich in or-
ganic matter, nitrogen and potassium. Some growers spread the heavy
The preparation and use of compost 36
wet pulp on their coffee plantations but there can be problems with
transport and spreading and this can lead to smells and plant growth
problems.
It is much better to compost the material first so that it can be used
more effectively.
Good aeration
This dense material needs good aeration so a number of above-ground,
elevated heaps should be constructed. These elevated heaps need to be
roofed or covered to stop too much water from entering the compost
heap. The elevated floor can be made of bamboo poles mounted on
bricks or stones.
Before composting, the pulp needs to be drained and loaded into the
pits to a height of about one meter. Vegetable waste can be mixed in if
available as well as some soil or compost. This is to obtain the right
micro-organisms that decompose the waste. The heap should be turned
every 4 to 6 weeks and the compost should be ready in 4 to 6 months.
6.4 Composting domestic waste
Domestic waste includes any kind of decomposable household waste
such as kitchen scraps, paper, sweepings or wood ash. It should not
include meat or slaughter wastes. These attract vermin and insects and
give an unpleasant smell. Neither should it include excreta from hu-
mans, cats or dogs as these contain toxins, which can be harmful if not
composted properly (see section on human waste composting). It is
also better not to use too much of the same type of material.
Remember that the composition of domestic waste is culturally and
regionally defined. In Asia, in particular, composting of household
waste is an old technique.
Composting in a heap
Most domestic waste is produced in small quantities, but at regular
intervals. It is advisable not to put small amounts on the heap every
day, but to save it before putting it on the compost heap.
Composting specific materials 37
As a guideline: add a new layer when you have enough material to
make a layer of about 30 cm thick. Extra material could also be col-
lected to add to the heap, but this costs time and energy. Because the
amount of organic waste available is often small, only a small com-
post heap can be made.
Since most domestic waste has little structure (such as food remains
and wood ash) it is likely that aeration will be poor. Therefore, when
composting domestic refuse, considerable attention has to be given to
ventilation of the heap. See section 4.3 and 4.6 - subsection on air
channels.
Composting in a barrel
In Mali at the institute IPR/IFRA (address in the section Useful Ad-
dresses) a method has been developed to make compost from domes-
tic waste in a barrel.
Using barrels might make it easier and more hygienic to practice com-
posting near the house. The barrel also regulates the air, humidity and
temperature during composting.
? Preparing the barrel
Paint the inside of the barrel to prevent it from rusting.
Make three holes (1 cm in diameter) around the top third and the
bottom third of the barrel, at a distance of 52 cm from each other.
Make another hole of 1 cm in the base of the barrel. Through this
bottom hole the liquid from the decomposing organic matter can
seep from the barrel. If it stayed in the barrel the material at the bot-
tom will start to rot, which causes a bad smell and not good com-
post.
Remove the top; it is used as a lid for regulating the composting
process when the barrel is filled. As the organic materials decom-
The preparation and use of compost 38
pose, it will shrink in size, and the lid
will slide down and close the barrel.
Make an opening about 20 cm above
the base of the barrel, 65 cm high
and 20 cm wide, so that you can
check on how the composting is pro-
gressing. You should normally keep
this opening covered. Place the barrel
on a tripod stand of 25 cm high, so
that you can put a vessel underneath
to catch any fermented liquid.
? Method of making compost
It is best to work with two or three
barrels: the first can be used for an
initial compost, which is sieved and put in the second barrel for fur-
ther composting. The third barrel is used to store ready-to-use com-
post. There is no need to make holes in the second and third barrels.
Any organic matter can be used to make compost in the barrels, es-
pecially domestic waste. Cut the organic matter into small pieces
before putting it into the barrel and mix the different materials. If
you have enough material, you can fill the barrel in one go other-
wise you can fill the barrel slowly.
An improvement to the process is to collect the liquid that seeps
from the barrel through the bottom hole and add it again to the de-
composing organic matter in the barrel. In this way the loss of nu-
trients is diminished to a minimum.
? Filling the barrel in one go
If you fill the barrel in one go, the humidity of the mixture in the
barrel will stay more or less constant. Air will enter through the
holes in the barrel. After 4 or 5 days you can turn the mixture into
the second barrel, in which it will stay for 8 to 10 days. After that
Figure 14: Barrel adjusted
for compost making
Composting specific materials 39
period the compost will probably be ready. Of course the time for
the composting process depends on the climate (temperature).
The IPR/IFRA has developed a recipe using the method described above.
Compost the following materials:
52 kg of sawdust
1.7 kg of poultry manure
2.5 kg of natural Tilemsi phosphate
800 ml of urine.
After 45 days the composting should be well advanced.
? Filling the barrel slowly
If you fill the barrel slowly, you have to count the number of days
for the process from the time when the barrel was filled to the top.
Then after 4 to 5 days the mixture is sieved. The fine material can
be put into the second barrel. The large pieces and any not yet de-
composed material is put back in the first barrel, which you can fill
up again slowly.
6.5 Composting human waste or sewage
Composting human waste or sewage is a useful way to dispose of it
and it is a good source of nutrients for plants. There are however a
number of problems in dealing with human waste or sewage. Diseases
can spread through handling the waste and through the consumption
of the crops grown on this composted human waste.
It is very important to use appropriate methods when dealing with it
and to have previous experience of the composting process.
The mentioned problems should not prevent the use of human waste
or sewage in a compost heap. In this book we do not explain in detail
how to compost human waste. If you want to experiment, we refer you
to the books mentioned in the section ‘Further Reading’. You also can
write for more information to either Agromisa’s Question and Answer
Service or the HDRA Overseas Advisory Section (See the section
‘Useful Addresses).