Adobe GoLive 6.0- P4 pdf
Bạn đang xem bản rút gọn của tài liệu. Xem và tải ngay bản đầy đủ của tài liệu tại đây (1.35 MB, 30 trang )
85
ADOBE GOLIVE 6.0
Classroom in a Book
Using the Objects palette
The Objects palette contains several sets of related icons, organized according to general
tasks that you perform when building and maintaining a Web site. You use the Basic or
default set of icons to add objects, such as layout grids, layout text boxes, floating boxes,
tables, and images, to your pages. Other sets make it easy for you to add smart objects,
create forms, add meta information, lay out frames, add dynamic content, add generic
site objects, add reusable site objects, and create site design diagrams.
Across the top of the Objects palette are several buttons, which you click to display the
different sets. Now you’ll learn how to view the names of buttons in the Objects palette.
1 To expand the Objects palette, click the Objects palette tab.
To collapse a document window, site window, or graphical site view window into a tab, drag its title bar to the bottom of
the screen. (In Windows, first maximize the application window.) You can also click its Minimize button (Windows) or
Control-click its title bar (Mac OS other than OS X).
To expand one of these windows, click its Restore button (Windows) or click the tab at the bottom of the screen
(Mac OS).
To collapse a palette into a tab, select the palette’s name and drag it to
the left side, right side, top, or bottom of the screen. To expand the pal-
ette, click the tab on the edge of the screen. To separate the palette from
the screen edge, drag the tab out to the center of the screen or into a pal-
ette group.
To view the palette menu when a collapsed palette is expanded, right-
click (Windows) or Control-click (Mac OS) the tab.
If your work area is limited, you can keep the site window collapsed and still connect files to placeholders on
the page using the Point and Shoot button in the Inspector. Drag from the Point and Shoot button to the site
window, and continue to hold down the mouse button. The site window expands, and you can drag to the
desired file in the window.
LESSON 2
86
Getting to Know the Work Area
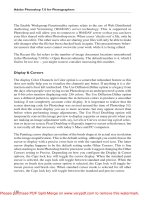
2 To view the name of a button in the Objects palette, position the pointer on top of it.
The name of the button appears below it as a tooltip. Notice that the Basic button ( ) is
highlighted, indicating that its set of icons appears in the palette.
To change the set of icons that appear in the palette, you click a button in the Objects
palette or choose the name of the desired set from the Objects palette menu.
Note: At its default size, the Objects palette may have too many buttons to display along the
top of the palette. To view hidden buttons, click the arrow in the upper right or upper left of
the palette.
Now you’ll learn how to view the names of icons in the Objects palette.
3 To view the name of an icon, position the pointer on top of it. The name of the icon
appears at the bottom of the palette.
If the names of the icons don’t appear at the bottom of the palette, drag the palette away
from the edge of the screen and then collapse it again.
Viewing name of button Viewing name of icon
To add an object to your page, you drag the icon from the Objects palette to the document
window or double-click the icon. Now you’ll use the Objects palette to add an image
placeholder to the home page. You’ll use this placeholder to add a company logo.
4 If it isn’t already open, open the home page (index.html) by double-clicking its
filename in the Files tab of the site window.
87
ADOBE GOLIVE 6.0
Classroom in a Book
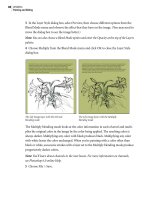
5 Drag the Image icon from the Basic set of the Objects palette to the blank space in the
upper left corner of the home page.
Dragging Image icon to document window
Now you’ll use the toolbar to precisely position the image placeholder on the layout grid.
You can also reposition a placeholder on a layout grid by dragging it.
6 Make sure that the image placeholder is selected. On the toolbar, make sure that 0 is
entered in the Horizontal Position text box and in the Vertical Position text box. If you
need to apply an entry, press Enter or Return, or change the focus by clicking inside the
document window.
Entering values on toolbar
7 Click the Objects palette tab to collapse the palette.
Next you’ll use the Inspector to link the image placeholder to the first_strike_logo.gif file
located in the site’s media folder.
LESSON 2
88
Getting to Know the Work Area
Using the Inspector
The Inspector is a context-sensitive palette with contents that change depending on your
selection in the work area. You use the Inspector to set attributes for text and objects on
your page, files and site assets in the site window, styles in a cascading style sheet, and
more. The name of the Inspector is based on your selection. For example, when you select
a table on your page, the Inspector changes to the Table Inspector and displays options
for setting table attributes.
Now you’ll use the Inspector to link the image placeholder on the home page to the
first_strike_logo.gif file.
1 In the document window, make sure that the image placeholder is selected. Then click
the Inspector tab to expand the palette.
Because you have the image placeholder selected, the Inspector changes to the Image
Inspector with the Basic tab selected. Notice that the word Image appears at the bottom
of the Inspector, indicating the name of the Inspector.
2 In the site window, make sure that the media folder is open and that the
first_strike_logo.gif file is visible in the window.
3 If necessary, reselect the image placeholder in the document window, and drag from
the Point and Shoot button ( ) in the Basic tab of the Inspector to the
first_strike_logo.gif file in the Files tab of the site window.
Dragging from Point and Shoot button to image file in site window
89
ADOBE GOLIVE 6.0
Classroom in a Book
When the link has been successfully created, the image appears on the page and the path
to the file (/media/first_strike_logo.gif) appears in the Source text box in the Image
Inspector. It’s important to understand that the type of link you just created is a resource
link that references an image file as opposed to a navigation link the user clicks to go to a
new location (such as another page in the site). For information on creating navigation
links, see Lesson 5, “Creating Navigational Links.”
4 Click the Inspector tab to collapse the palette.
Next you’ll save the index.html file using a context menu.
Using context menus
GoLive contains several context-sensitive menus that display commands relating to the
active window or selection. You use context menus as a quick way to choose commonly
used commands. Now you’ll use a context menu to save the changes you’ve made to the
home page.
1 To display a context menu, position the pointer over the active window or selection—
in this case, the page icon ( ) in the upper left corner of the document window.
2 Then do one of the following:
• In Windows, click with the right mouse button.
• In Mac OS, hold down Control and click with the mouse button.
3 In the context menu that appears, choose Save or Save As to save the page.
Using context menu to save page
LESSON 2
90
Getting to Know the Work Area
Setting GoLive preferences
You can change most of the program settings using the Preferences dialog box, giving you
control over the way GoLive looks and behaves.
In this section you’ll learn about two important preferences that control how GoLive
behaves when it launches and where files are stored when they’re removed from the site.
1 Choose Edit > Preferences.
The Preferences dialog box appears with General preferences shown by default. (If
General preferences don’t appear, click General in the left pane of the dialog box.) Using
the General preferences, you can specify how GoLive behaves when it launches so that
GoLive shows an introductory screen, creates a new page, or does nothing.
Changing how GoLive behaves at launch
To see more General preferences, click the symbol next to General in the left pane of the
dialog box, and select a name from the list that appears below it. Now you’ll display the
Site preferences, which you use to specify where files are stored when they’re removed.
91
ADOBE GOLIVE 6.0
Classroom in a Book
2 Click Site in the left pane of the dialog box. Notice the setting in the right pane of the
dialog box that specifies for files to be removed to the site trash (instead of the system
trash).
Use this option to have site files removed to site trash.
3 Click Cancel to close the Preferences dialog box without making any changes.
When files are removed to the site trash, they’re stored in the Site Trash folder in the
Extras tab of the site window. Unlike the system trash, the site trash makes it easy for you
to store unwanted files temporarily and retrieve them later as needed.
Previewing in GoLive
You can preview your Web pages directly in GoLive. In Layout Preview, you can test
navigation links, play QuickTime movies, and view animated GIFs and any other plug-in
media items that GoLive supports. Now you’ll preview the home page in GoLive.
1 In the document window, click the Preview tab ( ) to view the document
in the Layout Preview.
The Layout Preview displays an approximation of what your page looks like when it’s
finally published on the Web.
2 Test the navigation links on the home page and on the other pages of the site.
LESSON 2
92
Getting to Know the Work Area
You can also view a browser simulation of your page in the Layout Editor by choosing the
profile of a specific browser in the View palette, which you’ll do now.
3 Click the Layout tab to return the document view to the Layout Editor.
4 Click the View palette tab to expand the palette.
5 In the View palette, choose “Explorer 5 Mac” from the Profile menu to see how your
page appears in Microsoft Internet Explorer 5 for Mac OS. Try the different menu options
and observe how your page changes in the preview. Be sure you can see some of the text
on the page, other than in a graphic.
Choosing option from Profile menu
6 When you have finished, click the View palette tab to collapse the palette.
93
ADOBE GOLIVE 6.0
Classroom in a Book
Previewing in a Web browser
In addition to previewing your page in GoLive, you should always preview it using a
variety of browsers, browser versions, and platforms. You’ll need to use browsers to
determine potential browser differences and to preview items for which GoLive doesn’t
provide native support.
Now you’ll preview the home page in a Web browser.
1 Do one of the following:
• If you selected a single browser in the Browsers preferences as described in “Previewing
a Web page” on page 35, click the Show in Browser button on the toolbar. When a single
browser is selected, the button appears as the program icon of the selected browser.
• If you selected multiple browsers in the Browsers preferences, click on the Show in
Browser button to launch all selected browsers. Alternatively hold down the mouse
button on the triangle to the right of the Show in Browser button, and then drag to the
desired browser from the pop-up menu. When two or more types of browsers are selected
in the Preferences (such as Netscape and Explorer), the button appears as a generic
browser icon.
2 When you have finished viewing the site, exit or quit your browser.
It’s good practice to always save your pages before previewing them. In addition, always
use GoLive to bring up the preview in a browser (using the Show in Browser button, for
example), so that any changes you’ve made to the pages appear in the browser. (If you
don’t launch the browser from GoLive, an older version of the page may be cached in the
browser memory.)
Now you’ll learn a quick way to get information on using GoLive.
LESSON 2
94
Getting to Know the Work Area
Using Hints
Hints are brief, informative descriptions of icons on the toolbars, document window, and
Objects palette. Hints appear in the Hints palette, which also provides links to related
topics in the online Help. Now you’ll try using the Hints palette.
1 To display the Hints palette, choose Window > Hints.
2 Position the pointer over an icon on the toolbar, document window, or Objects palette.
The contents of the Hints palette changes to provide a description of the icon.
Hints palette
3 Click one of the links to a related topic to display the topic in the online Help.
4 When you have finished using the online Help, close it and exit or quit your browser.
95
ADOBE GOLIVE 6.0
Classroom in a Book
Review questions
1 How do you open an existing Web site in GoLive?
2 How do you display a graphical view of a site?
3 What’s the recommended way to set up your work area in GoLive?
4 How do you both collapse and expand a palette?
5 What’s a custom workspace? How do you implement one?
6 What palette do you use to add an image placeholder to your page? What palette do
you use to link an image placeholder to an image file?
7 What’s the recommended way to preview a site or page that you’ve created in
GoLive?
8 What are Hints, and how can you display them?
Review answers
1 To open an existing Web site in GoLive, choose File > Open, select the file (with the
.site extension) in the site’s project folder, and click Open.
2 To display a graphical view of a site, click the Navigation View button ( ) on the
toolbar or choose Site > View > Navigation.
3 It’s recommended that you set up your work area by placing the document window at
the top, the site window at the bottom, and commonly used palettes collapsed on the right
side of the screen.
4 To collapse a palette into a tab, drag the palette’s name tab to the left side, right side,
top, or bottom of the screen. To expand a palette, click the tab at the edge of the screen.
5 You can arrange and save the positions of palettes on the screen as a custom workspace,
which you implement to save time and effort on different projects. To save a custom
workspace, choose Window > Workspace > Save Workspace. To implement a custom
workspace, choose its name from the Window > Workspace menu.
6 You use the Basic set of the Objects palette to add an image placeholder to your page
and the Inspector to link the placeholder to an image file.
LESSON 2
96
Getting to Know the Work Area
7 In addition to previewing your site or page in GoLive, you should always preview it
using a variety of browsers, browser versions, and platforms. You’ll need to use browsers
to determine potential browser differences and to preview items for which GoLive doesn’t
provide native support.
8 Hints are brief descriptions of GoLive icons. Hints appear in the Hints palette, which
you display by choosing Window > Hints.
3 Designing Web Pages
Adobe GoLive provides you with a variety
of tools for laying out your Web pages,
including tables, layout grids, floating
boxes, and frame sets. It also provides you
with several ways to quickly add objects
and apply colors frequently used in your
Web site, saving you both time and effort.
In this lesson, you’ll explore the various
tools for page layout as you work on the
design of three Web pages.
LESSON 3
100
Designing Web Pages
About this lesson
In this lesson, you’ll learn how to do the following:
• Create a new Web site and add files to it.
• Create a component that stores frequently used page content, such as a navigation bar,
and add the component to each page in a site.
• Use a layout grid to precisely place text, images, and other objects on a page.
• Add Web-formatted images to a page using a variety of methods.
• Align, distribute, and move multiple objects on a layout grid.
• Add a background image, keywords, comments, and a date and time stamp to a page.
• Add text to a page using layout text boxes on a layout grid, and copy and paste text into
a table.
• Create a custom color palette that stores frequently used site colors, and apply the colors
to pages in a site.
• Extract color from an image or other element on the screen, and add it to a custom
color palette.
• Use floating boxes to place overlapping objects on a page.
• Edit a component’s source file to have GoLive automatically update each page that
contains it.
This lesson takes approximately 60 minutes to complete.
If needed, copy the Lessons/Lesson03/ folder onto your hard drive. As you work on this
lesson, you’ll overwrite the start files. If you need to restore the start files, copy them from
the Adobe GoLive 6.0 Classroom in a Book CD.
Note: Windows users need to unlock the lesson files before using them. For more information,
see “Copying the Classroom in a Book files” on page 3.
101
ADOBE GOLIVE 6.0
Classroom in a Book
Getting started
In this lesson, you’ll review and build on the skills you learned in Lessons 1 and 2. You’ll
create a new Web site for the fictional company called Gage Vintage Guitars and work on
the design of three Web pages for the site. You’ll learn more about how to lay out pages
using tables, layout grids, and floating boxes. You’ll also learn more about reusable site
objects (components, library objects, stationery pages, and page templates) that can save
you both time and effort. In addition, you’ll learn how to add a background image,
keywords, comments, and a date and time stamp to a Web page.
First you’ll view the finished pages in your Web browser. Currently the pages don’t contain
any navigation links, so you’ll need to open each page individually. You’ll add navigational
links to these pages in Lesson 5, “Creating Navigational Links.”
1 Start your Web browser.
2 In your Web browser, open the index.html file in Lessons/Lesson03/03End/gage
folder/gage/.
LESSON 3
102
Designing Web Pages
3 Open the appraise.html file in Lessons/Lesson03/03End/gage folder/gage/pages/.
4 Open the hottest.html file in Lessons/Lesson03/03End/gage folder/gage/pages/.
5 When you have finished viewing the pages, close them and exit or quit your browser.
Creating a new Web site
You’ll begin this lesson by creating a new Web site for Gage Vintage Guitars. You’ll create
a blank, single-user site.
1 Start Adobe GoLive.
By default, an introductory screen appears prompting you to create a new Web page,
create a new site, or open an existing file.
Note: You can set preferences for the introductory screen to not appear when you start GoLive.
If the introductory screen doesn’t appear, choose File > New Site to display the GoLive Site
Wizard, and go to step 3.
2 Click New Site to display the GoLive Site Wizard.
3 Make sure that Single User is selected, and click Next.
For simplicity all the lessons in this book are set up as single-user sites. However, whether
you are a single user or working with a team, you may want to consider creating a
workgroup site to take advantage of Adobe Web Workgroup Server features, which let you
create different file versions, compare versions, and revert to previous file versions. To
create a workgroup site, you first need to log on to the workgroup server (see the Adobe
GoLive 6.0 online Help for more information).
4 Make sure that Blank Site is selected, and click Next.
5 In the Site Name text box, enter gage as the name of the new site. Make sure that
Create Project Folder is selected so that GoLive creates a site project folder for you, and
click Next.
6 Click Browse, and then use the dialog box to select the Lesson03 folder, located in the
Lessons folder on your hard drive, and click OK (Windows) or Choose (Mac OS).
103
ADOBE GOLIVE 6.0
Classroom in a Book
7 Click Finish in the Site Wizard.
Creating new site
GoLive creates a site project folder named gage folder within the Lesson03 folder. This
folder contains a site project file (gage.site) to manage the site contents; a root folder
(gage), which by default contains a blank home page called index.html; a data folder
(gage.data) where you store different types of reusable site objects and other resources;
and a settings folder (gage.settings) where GoLive stores settings you make in the site
window and the Site Settings dialog box.
LESSON 3
104
Designing Web Pages
The site window appears with the Files tab selected. The Files tab displays the contents of
the site’s root folder. Remember, all of the folders and files displayed in the site window
reflect actual folders and files on your hard disk.
Now you’re ready to add files to the site.
About GoLive workgroup sites
GoLive workgroup sites are simply GoLive sites that are stored on the Adobe Web Workgroup Server instead
of the file system of your computer. The Workgroup Server acts as a repository for sites being developed rather
than as a typical Web server. Though stored on the Workgroup Server, workgroup sites have the same struc-
ture as regular single-user sites and appear the same in the site window when you open them. However, spe-
cial workgroup features of GoLive are activated when you open a workgroup site. These features let you track
who’s doing what in the workgroup—which files in the site are available for editing, which are being worked
on by others, and what’s left to do for each file.
Files in a workgroup site—pages, images, style sheets, or any other components of the site—have to be checked
out before you can edit them. Once a file is checked out, others in the workgroup who have the site open can
see in their site window that the file is temporarily locked and unavailable for editing. They also know who
has the file checked out, and when it was checked out. The file still appears in the site window, and it can still
be opened, but in read-only form.
–From the Adobe GoLive 6.0 online Help.
105
ADOBE GOLIVE 6.0
Classroom in a Book
Adding files to the Web site
You can add Web pages, media files, and other resource files to an existing Web site. To
add files from other locations to your site, it’s recommended that you use the GoLive
Import command or drag the files into the Files tab of the site window. With either of
these methods, GoLive copies the files to the site without removing the original files.
Now you’ll import a folder of image files into the site.
1 If it isn’t already selected, select the site window. Also, make sure that the Files tab of
the site window is selected.
2 Choose File > Import > Files to Site.
3 Select the images folder in Lessons/Lesson03/03Start/. Click Add Folder or Add, and
then click Done.
Importing images folder to site
The images folder is copied to the site’s root folder and appears in the Files tab of the site
window.
Note: You can also drag folders and files from another location into the Files tab of the site
window. Using a system tool (such as Windows Explorer or the Mac OS Finder), simply select
the desired folder or files, and drag them to the site window.
4 In the site window, click the symbol next to the images folder to display the folder’s
contents.
LESSON 3
106
Designing Web Pages
The images folder contains several Web-formatted images in GIF that are ready to be
added to pages.
Now you’ll add a new folder to the site for storing additional pages.
5 Choose Site > New > Folder.
A new folder is added to the site’s root folder and appears in the Files tab of the site
window. Now you’ll rename the folder.
6 Type pages to rename the folder, and click in the blank space outside the folder to
deselect it.
Note: To apply text or a value that you’ve entered in GoLive, you need to press Enter or
Return, or change the focus by clicking elsewhere in the work area. Keep this in mind
whenever you’re working in GoLive.
Now you’ll import an existing page to the site. Later in this lesson, you’ll update the design
of the page.
7 Make sure that no folders are selected in the site window, and choose File > Import >
Files to Site. (If you accidentally import a file while a folder is selected in the site window,
the file will be imported to that folder rather than being imported at the root level.)
The Import Files to Site command isn’t available unless the Files tab in the site window
is active.
8 Select the file appraise.html in Lessons/Lesson03/03Start/. Click Add, and then
click Done.
107
ADOBE GOLIVE 6.0
Classroom in a Book
9 In the Copy Files dialog box, click OK to copy the file and update the site.
The appraise.html file is added to the site’s root folder and appears in the Files tab of the
site window. Now you’ll move the appraise.html file to the pages folder.
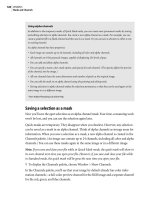
10 In the site window, select the appraise.html file, and drag it to the pages folder. Click
OK in the Move Files dialog box.
11 Click the symbol next to the pages folder in the site window to display the folder’s
contents.
Displaying folder’s contents
Now that you have finished adding files to the site, you can begin designing its pages.
You’ll start by creating a component for a navigation bar that you’ll later add to each page
in the site.
LESSON 3
108
Designing Web Pages
Creating a component to be used as a navigation bar
A component is an HTML source file that stores text and objects, such as a navigation
bar, that you want to add to multiple pages in a site. When a component is added to a
page, it’s added as a single object and remains linked to its source file. To update a
component, you simply update its source file to have GoLive automatically update all
pages containing it.
At the top of each page in the Gage Vintage Guitars site, you’ll place the company logo and
a navigation bar for the site. Instead of creating this page content multiple times, you’ll
create it once and save it as a component that you can quickly add to each page. Now you’ll
create a new page that you’ll store as a component. You store components in the Compo-
nents folder, located in the site’s data folder.
1 To display the right pane of the site window, click the double-headed arrow ( ) in the
lower right corner of the window.
The right pane of the site window appears with the Extras tab selected. The Extras tab
displays the contents of the site’s data folder, which includes the Components folder.
2 Place the site window at the bottom of your work area, so that the window is visible
when you create a new page. To move a window, drag its title bar.
3 Choose Window > Objects, or click the tab if the Objects palette is collapsed.
For more information on working with palettes, see “Creating a custom workspace” on
page 80. For detailed information on using the Objects palette, see “Using the Objects
palette” on page 85.
109
ADOBE GOLIVE 6.0
Classroom in a Book
4 In the Objects palette, click the Site button ( )to display the Site set of icons in the
palette. (You can also choose Site from the Objects palette menu.)
5 Drag the Generic Page icon from the Site set in the Objects palette and drop it on the
Components folder in the Extras tab of the site window.
Adding new page to site’s Components folder
A new page, untitled.html, is added to the Components folder and appears in the Extras
tab of the site window.
6 Enter navbar.html to rename the file.
Note: To add a new page to a site, you can also choose File > New Page. If you use this method,
make sure that you save the page to the appropriate folder on your hard drive.
Now you’ll open the navbar.html file.
7 Double-click the navbar.html file to open it.
The navbar.html file opens in the Layout Editor of the document window.
Note that the default window size for new pages is 619. You’ll use this default size in this
lesson.
Now you’ll change the title of the page. Page titles, together with keywords, are used by
Internet search engines and browsers to identify content in your pages.
8 Select the default page title (Welcome to Adobe GoLive 6) next to the Page icon ( ) in
the upper left corner of the document window.
9 Enter Navigation Bar as the new title.
LESSON 3
110
Designing Web Pages
10 Choose File > Save.
Changing page title
You can check that a file is saved as a component by opening the Site Extras set ( ) of the
Objects palette, and choosing Components from the pop-up menu at the bottom of the
palette. Your navbar.html file should now be saved in the Site Extras set, ready to be added to
any page.
Now you’ll begin designing the component by adding a layout grid to the page.
Adding a layout grid
GoLive layout grids make it easy for you to create table-based designs in your pages.
Instead of setting up multiple table cells, you can add a single layout grid to a page and
position objects anywhere on the grid with 1-pixel accuracy. You can easily add text to a
grid by dragging a layout text box onto the grid and entering text into the layout text box.
1 Click the navbar.html window to make it active.
111
ADOBE GOLIVE 6.0
Classroom in a Book
2 Drag the Layout Grid icon from the Basic set ( ) in the Objects palette to the page.
(You can also double-click the Layout Grid icon to place a layout grid at the insertion
point on the page.)
A layout grid is added to the page. Now you’ll specify a width for the layout grid.
3 Choose Window > Inspector to open the Inspector, or click the tab if the Inspector is
collapsed.
4 In the Layout Grid Inspector, enter 600 for Width. Press Enter or Return.
To resize a layout grid, you can also select it and drag one of its handles.
Now that you’ve added a layout grid to the page, you can add objects, such as images, to it.