Complete Guide to the Nikon D200- P22 pot
Bạn đang xem bản rút gọn của tài liệu. Xem và tải ngay bản đầy đủ của tài liệu tại đây (2.6 MB, 30 trang )
V1.03
Thom Hogan’s Complete Guide to the Nikon D200 Page 631
Several things are important here:
• Be careful of the Delete option. I think it’s generally wiser
and safer to reformat cards to remove files.
• You’ll want Rotate ON. If you’ve set rotation ON in the
camera, make sure it’s set to ON here, too.
• IPTC data should be added. If you’re selling your photos
or sharing them with others, both these items should
probably be checked, as it allows for additional
identifying information to automatically be copied to the
IPTC fields. (Nikon promises a more complete IPTC
implementation in future versions of View.)
The Creator tab allows you to specify which programs are
used for certain actions within View (normally, View assigns
Capture as the image editor, so if you use Photoshop CS you’ll
want to change that).
One nice aspect of Nikon View is that it allows you to rename
files and add IPTC information during the transfer (something I
generally recommend; see “File Names and Folders” on page
<
H163>):
1. Click on the Change button on the Nikon Transfer
dialog.
V1.03
Thom Hogan’s Complete Guide to the Nikon D200 Page 632
2. In the dialog that appears, fill out the File
Destination and Naming options.
3. If you want to change the file names during transfer
(highly recommended), click the Change radio button
and then the Change button under the File naming
section and select your options.
V1.03
Thom Hogan’s Complete Guide to the Nikon D200 Page 633
4. Click the OK button when you’re done and you’ll be
returned to the File Destination and Naming dialog.
5. Perform the same actions for the folder name (e.g.
change the destination folder as desired).
6. Click on the big yellow Transfer button to start the
transfer.
If you asked to Start Nikon Browser in the Transfer window,
when the transfer completes you’ll be taken to the Browser
window, where you can then view, print, and rotate your
images (if you still need to):
V1.03
Thom Hogan’s Complete Guide to the Nikon D200 Page 634
In the Browser window, you can only perform a few actions
(the icon bar gives you quick access to them). At the top,
you’ll see a bar labeled Shooting Data. Click on the > at the
left edge to reveal this information (or hide it). The data
shown is for the currently selected image (highlighted with a
selection rectangle around it).
V1.03
Thom Hogan’s Complete Guide to the Nikon D200 Page 635
By default, the left of the main window is a standard
hierarchical file browser. In the two sample windows
immediately above, the first one has the file browser showing,
the second doesn’t. If for some reason you don’t see the file
browser window, choose Show Folder Tree from the
Navigation submenu on the View menu. This allows you to
navigate amongst all the folders of images you’ve created
(assuming you’ve been following my workflow suggestions,
you’ll have a well-labeled folder for every shoot).
Finally, Nikon View has a rudimentary image viewer in it.
Double-click on an image thumbnail to invoke it:
V1.03
Thom Hogan’s Complete Guide to the Nikon D200 Page 636
When you doubleclick on
an image thumbnail, you
get the Nikon Viewer
window. The icons at the
top allow you to zoom in
or out and a few other
basic options. If you want
to manipulate the image
in any way, you need
Capture, Bibble,
Photoshop CS, Photoshop
CS2, Photoshop Elements,
or another image editing
program.
Things you can do with Nikon View:
• Batch rename images. Select the images to be renamed,
and then select Rename Automatically from the File
menu.
• Search for a file. Curiously, one of the attributes Nikon
allows you to search with is the Scene exposure mode.
Sigh. The more interesting ability is to search by filename
(which, of course, is one of the reasons why I want you to
give files meaningful names in the first place). Select Show
Search Control on the Navigation submenu on the View
menu.
• Create a slide show. Select the images you want to show
(you don’t have to show everything in a folder). Select
Slideshow from the Tools menu. Select your options
from the slideshow dialog that appears. To hide the option
dialog, press Shift+Tab together.
• Email images or a contact sheet of images to a friend.
Select the images you want to email. Select Email from
the Tools menu. Select your options from the dialog that
appears. Usually you’ll let Nikon View resize the images
to a smaller size for emailing (it’s not proper etiquette to
send large files to someone unless they’re expecting
them—most email services have storage limits for email,
V1.03
Thom Hogan’s Complete Guide to the Nikon D200 Page 637
and a handful of 1MB images can quickly fill their
mailbox and prevent other mail from being received
F
154
).
• Export images to a Web site. Select the images you want
to create a Web page for. Select Export as HTML Files
from the Tools menu. This brings up the first of three
dialogs you need to fill out:
This first dialog is about the overall style of Web page that
will be created. Here you set the size, style, and number
of images per page (plus a title for the page).
154
Proper etiquette, even for someone you know, would be to ask before sending and
tell them what size the images will be. Better still would be to use a public posting
service, such as pbase (
) and simply email the URL to the
recipient. Since we’re on the subject, I should warn you that my email has very
aggressive filters on it. If you want me to look at an image, post a modest sized
version of it on a public posting service that doesn’t require an account to enter, and
send me the URL via email.
V1.03
Thom Hogan’s Complete Guide to the Nikon D200 Page 638
The second dialog defines what information appears with
each image (filename, date, capture data, etc.).
The final dialog tells View where to create the new HTML
pages. It’s usually safest to save to a new subfolder so that
everything for a set is grouped together in the same place
rather than mixed with the rest of your Web pages.
• Invoke an image editor. Select an image (or images).
Choose Edit from the File menu to invoke the editor
entered in Preferences. Choose Edit using other
program from the File menu and point to the editor you
V1.03
Thom Hogan’s Complete Guide to the Nikon D200 Page 639
wish to use if you want to use something more
sophisticated.
Note: What’s the difference between Nikon Editor and Nikon
Capture Editor? Well, the first is free and comes with Nikon
View. It contains basic controls only (you can change white
balance and exposure for NEF files, for example). Nikon
Capture Editor is part of Nikon Capture and is a very
sophisticated image editing program. Nikon Editor (the free
one) isn’t enough for serious post-processing work. If you’re
trying to conserve cash, Adobe Photoshop Elements would
be the logical choice to use instead.
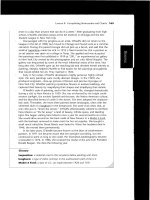
Earlier in the book I discussed IPTC information (see “IPTC”
on page <
H161>). Nikon View allows you to append basic
camera information into the IPTC fields, which I discussed
above, but it also allows you to add both simple and complex
IPTC captioning information. Select IPTC Information from
the File menu and you’ll get the “simple” dialog:
For most uses, this is probably enough (note that I’ve added
several of my keywords here, which is how I search for
V1.03
Thom Hogan’s Complete Guide to the Nikon D200 Page 640
images later). But if you want to get the full spectrum of fields
you can enter, click the Detail button and you’ll get this
screen:
If you’re entering IPTC information for a group of images and
most of the information is the same for each photo, note that
you can “save” and “load” information. For this Death Valley
shoot, I saved all the items except for the Caption, loaded
them for all the images then went through and wrote captions
for each. Other programs exist that do a better job of this than
Nikon View, but View isn’t a slouch, either. A lot of people
overlook the many features that are hidden underneath View’s
simple interface, and this is one of them.
V1.03
Thom Hogan’s Complete Guide to the Nikon D200 Page 641
Before we move on to Nikon Capture, let’s take a quick look
at the free Nikon Editor just mentioned (I’ll use a D70 image
here, but the D200 is also supported just fine).
Above is a screen shot from a single image opened from
Nikon View. I’ve expanded everything that can be expanded,
so this is it folks—everything you can do is here to be seen.
At the left is a standard tool palette, with icons for save, open,
copy image adjustments, paste image adjustments, zoom,
rotate, crop, move (using hand cursor), open in Photoshop,
and redeye elimination, amongst others. If you can’t figure out
what is what, each tool’s name is revealed if you have your
cursor hover over it.
Tip: Cropping usually trips up newcomers to Nikon’s software.
You select the crop tool (rectangular marquee) and then
select the area of the image you want to keep. The image
area outside the selected rectangle darkens to show that it
isn’t part of the final image. To change the crop, grab the
side or corner and drag it to a new position (or drag the
middle of the crop to a new position). The real sticking
point is: how do you cancel the crop? Press Command-D
V1.03
Thom Hogan’s Complete Guide to the Nikon D200 Page 642
(or select Select Entire Image from the Image menu, or
double-click outside the crop area). It really is that easy. But
it usually stops newcomers dead in their tracks, as it doesn’t
quite work the way other image editing software does.
The main image window is in the middle, and I’ve opened the
Shooting Data display above it. (This image was taken at the
sand dunes in Death Valley National Park at a workshop, by
the way.)
On the right is a tool palette with four basic areas of control (if
the individual controls aren’t showing, click on the arrow just
to the left of the palette name to open it). Here’s the full extent
of the imaging tools:
• Auto Contrast (Off, With color change, With no color
change). This is basically Nikon’s attempt to provide an
Auto Levels type of control. While I never use it, it does
sometimes make for some very interesting effects if you
select With Color Change. This is a control worth
exploring, but unlike Photoshop’s automatic controls, it
doesn’t find the “right” solution very often.
• Sharpening (Off, Low, Medium, High). Your standard
Unsharp mask control. Note that the image may already
have been sharpened and this would be adding
sharpening. Since you don’t have any control over the
parameters used, I’d tend to avoid this control if possible.
• Effect (None, Black and White, Sepia). A quick way to
make a monochrome image out of a color one. It appears
that Nikon simply throws away the color information
rather than optimize the conversion, but this control is fast
and easy and quickly lets you see the basic shell of how
the image will look in black and white. For more
sophisticated ways of generating black and white, see
H The Sepia setting is
decent, though.
• Image Size (enter a new size). Allows you to scale the
image to a smaller or larger size. Nikon’s resizing abilities
have always been overlooked by most people. They
V1.03
Thom Hogan’s Complete Guide to the Nikon D200 Page 643
actually produce quite decent results (from well done
original images) at up to about 2x. In general when
downsizing, try to stay in divisible-by-two or by-four sizes,
though.
• Red Eye Correction (Automatic, Click on eyes).
Works only with 8-bit JPEG images, but allows either
automatic or quasi-automatic removal of red-eye.
Generally, Click on Eyes is my usual choice here. This
works better than the in-camera Red-Eye Reduction
options, and is about as fast and convenient as red-eye
correction gets.
• Brightness. Changes the overall brightness of the output
image (not to be confused with exposure compensation,
which changes the underlying data). I’m not a fan of using
a crude, overall control like this to fix image defects.
• Contrast. Changes the overall contrast of the image.
Again, this isn’t the method I’d use to fix image defects.
• Red. Varies the amount of red in the image.
• Green. Varies the amount of green in the image.
• Blue. Varies the amount of blue in the image. Using RGB
channels to control color shifts is a bit like using a sledge
hammer to move a wall stud. Very crude, plus you’ll need
to understand how the colors interact to form the full
spectrum of colors.
• Exposure Compensation. Allows after-the-fact exposure
modification for NEF images. Note that you aren’t really
changing the exposure, but the underlying linearity curve
for the data. Blown highlights are not recoverable.
However, you can recover a missed exposure by as much
as –2 stops or +1 stops with relative ease
F
155
.
• White Balance (Unchanged, Auto, Incandescent,
Direct Sunlight, Standard Fluorescent, High Color
Rendering Fluorescent, Shade, Cloudy, Flash).
Allows after-the-fact white balance modification for NEF
155
The actual range is -2 to +2, but beyond +1 there are objectionable side effects.
V1.03
Thom Hogan’s Complete Guide to the Nikon D200 Page 644
images. Note that you have no fine tuning control, only a
basic set of choices. Still, this is often enough to correct
color temperature issues to a tolerable choice.
Overall, Nikon Editor is simple, a bit crude, but has just
enough capability to make it work in a pinch if need be. If
Nikon would only add the Levels/Curves adjustment from the
Capture Editor, Nikon Editor would be usable for a lot of
simple work. As it stands, though, you’re going to want
something else. One such something is Nikon Capture, which
we’ll deal with next.
Nikon Capture
Nikon Capture provides support for critical viewing and
image manipulation of D200 NEF (and JPEG) format files.
Capture is now at version 4.4, and all examples and menu
descriptions here assume that version (it’s the first version that
supports the D200; so if you have Capture that you used with
a previous Nikon DSLR, make sure you have version 4.4 or
later).
Nikon has a free 30-day trial version of Capture that you can
download from the Nikon Web sites. I strongly suggest that
you load this into your computer and try it. While Capture is a
bit different in user interface than most software you’re used
to, it’s easy to learn and it has features you won’t find in other
products.
While I think Nikon should have provided Capture with the
camera—Nikon’s software is much more mature than the
competitor’s, so it’s a potential selling point—the program has
undergone considerable revision and refinement over the past
few years, which I’m sure wouldn’t have happened without
the added revenue.
Capture has two primary roles:
• Converts NEF files into usable images (JPEG, TIFF, direct
Photoshop transfer).
• Provides direct control and setting of the camera.
V1.03
Thom Hogan’s Complete Guide to the Nikon D200 Page 645
Plenty of competitors exist for the first function (see “NEF
Converters” on page <
H692>”), though Capture holds its own
against all comers. What is unique in Capture, other than a
few manipulation tools, is the second function: not only can
you take pictures from the computer, but you can make
settings from the computer, as well. Hidden amongst that
ability is another: you can save camera settings files and load
them into the camera with a couple of clicks. For cameras
that are shared, this is a godsend. But even for the rest of us, it
gives us the ability to save and name a few common camera
configurations and get them back without having to thread
through every control of the camera.
So I’ll repeat: take a look at Capture. I’ll bet that most of you
will find that there’s something there that is useful and worth
the money.
Controlling the Camera
Once Nikon Capture is running with a camera connected to
the computer, choose Show Nikon Capture Camera
Control from the Tools menu and you’ll see a display that
looks like this:
Things to note in the window that appears:
V1.03
Thom Hogan’s Complete Guide to the Nikon D200 Page 646
• The top line will tell if your camera is correctly
connected. If it isn’t, you’ll see:
• The camera control area in the middle is a tabbed dialog;
some camera settings are accessed on specific tabs.
• The black bar with green indicators is a representation of
what you’d see at the bottom of the camera viewfinder.
• The buttons at the bottom of the window are the
equivalent to the shutter release.
The camera will also have PC displayed in its top LCD where
the frame counter normally is.
At this point, you can make camera settings or take a picture.
Note: If you have the WT-3 and D200 properly configured with
your computer’s wireless network, you can also perform all
the Capture functions wirelessly. This includes taking
pictures remotely, a very useful attribute for studio shooters.
Taking Pictures with Capture
Taking pictures works one of two ways:
• Control the settings and press the shutter release on the
camera. The image is automatically transferred to the
computer if Nikon Capture is active and the computer and
camera are connected properly. No image is stored on the
CompactFlash card. (Make sure to save the image on the
computer where you can find it!) You control the transfer
situation by clicking on the Download Options button.
Note: The Enable controls on the camera body option must be
checked for this to work.
• Use Nikon Capture Camera Control to set the camera
options and virtually press the shutter release. Again, the
V1.03
Thom Hogan’s Complete Guide to the Nikon D200 Page 647
image is automatically transferred to the computer and no
data is stored on the CompactFlash card in the camera.
While most camera controls are available remotely on the
computer, the Power switch, Focus Mode Selector lever,
and Depth of Field Preview button can only be
manipulated directly on the camera. Other limitations you
need to be aware of:
• You can’t use the self-timer.
• You can’t autofocus without the D200 taking a
picture.
Not all error messages that may appear in the D200
viewfinder and color LCD are duplicated in Nikon
Capture’s simulated LCD panel and viewfinder
information display. For example, the flash-ready light
does not appear after exposure when the flash fires at full
strength.
• Use a combination of camera and computer control and
release. Make settings on the computer and press the
camera’s shutter release, or make settings on the camera
and click the shooting buttons on the computer.
Note: The Enable controls on the camera body option must be
checked for this to work.
Note: If the default settings are used, the D200 operates for 15
minutes before it goes into a standby mode. Note, however,
that when the camera goes inactive when connected to
Nikon Capture, it cannot be reactivated from the PC; you
must press a camera control to wake up the D200.
Two “shooting” functions of Capture are often overlooked by
new users. First, Capture can batch process NEF images as
they’re taken (i.e. high quality images can have image
processing manipulations applied as they are taken). This is
the way I shoot 16-bit TIFF with the camera, for instance.
To set up a batch session, select Live Batch from the
Camera menu:
V1.03
Thom Hogan’s Complete Guide to the Nikon D200 Page 648
Note that you’re given essentially three things to set:
• How the batch is processed. Applying the settings from
the camera is the same as leaving these settings in the
Unchanged state in Advanced Raw section of the
Capture Editor. The camera’s sharpening and other
optimization settings will be applied by Capture before
saving the image. More interesting is to use either the
current settings you’ve set up in Capture, or a set of
previously saved Capture settings. For example, I often
process with some slight changes made in the LCH tool,
especially when I’m shooting under fluorescent lighting
conditions. If you’re working in a studio with the D200
tethered or wirelessly connected, take a test picture under
your lighting, then spend some time in Capture figuring
out the exact settings you want to use. Save these, and
then use the Apply settings in option to have them
applied to every image in your actual session.
• Where the files get saved and how. The Destination box
allows you to pick the folder to save your files in, the
filename format to use, and the final save format. You’ll
note that I’ve picked 16-bit TIFF in my example; often
when shooting for a client, that’s what they want as final
output anyway, so that’s what I give them.
• Whether you save an additional copy of the file without
processing. Generally, I recommend this, just in case you
mess up the batch settings or decide afterwards that those
V1.03
Thom Hogan’s Complete Guide to the Nikon D200 Page 649
weren’t exactly the settings you wanted. This gives you a
fallback at the expense of disk space. Be careful, though:
you usually want to save these to a different folder that is
carefully named as an archive so that you don’t confuse
which image is which, or accidentally overwrite images.
The other interesting aspect of picture taking that Capture
enables is an additional form of time lapse photography (see
“Interval Shooting” on page <
H345> for the usual method).
Select Time Lapse Photography from the Camera menu.
This brings up a dialog that allows you to set the controls
necessary for this style of photography:
Note the Live Batch option: that’s the first overlooked
shooting option I mentioned back for an encore; be sure to set
the Live Batch dialog first.
Note: The D200’s built-in Interval function is limited to 999 shots;
Capture’s Time Lapse Photography function is limited to
9999 shots.
Making Settings with Capture
As already noted, you can make camera settings with Capture
Control. Let’s step through the primary screens and make a
few comments as we go:
V1.03
Thom Hogan’s Complete Guide to the Nikon D200 Page 650
While we’re mostly interested in setting up our D200, note
the Download Options button. If you’re not using the Live
Batch function, you’ll want to click on this button to set up
where the pictures taken while the camera is connected to the
computer will go
F
156
.
156
Personally, I think Nikon blew the interface design here, probably because features
got added over time to the basic program. It seems to me that the AF and Shoot,
Shoot, Download Options, Live Batch, and Time Lapse Photography options
are all related, and probably ought to have been grouped in some way. It seems to
me that there should be status, settings, and control panels, with the settings having
tabs.
V1.03
Thom Hogan’s Complete Guide to the Nikon D200 Page 651
The second tab has a virtual Direction pad at the top to
control the AF sensor area (click the arrow buttons). The
actively chosen sensor (or group of sensors as in the example
shown) is shown to the right of the virtual Direction pad. This
screen also does an interesting thing and throws in one of the
Custom Settings, Auto ISO (and yes, this does interact with
the Custom Settings dialog that we’ll get to later).
V1.03
Thom Hogan’s Complete Guide to the Nikon D200 Page 652
The Storage tab is a bit misnamed (remember, you can
override how the image is stored with Live Batch). It really
should be named Quality/Size.
The Mechanical tab let’s you set the remaining AF and
shooting options. Again we have some interaction with the
Custom Settings (the Continuous Low frame advance speed).
Note the battery level monitor!
V1.03
Thom Hogan’s Complete Guide to the Nikon D200 Page 653
The final tab contains the settings on the SHOOTING MENU
that impact the image look, plus the addition of High ISO NR
and Long exposure Noise Reduction, as well as the option
of being able to edit any User-defined Custom Curve tone
compensation value you set (see “Custom Curves” on page
<
H554>).
We’re not done yet, though. Select Custom Settings from
the Camera menu and we get yet another dialog (instead of
using tabs to navigate, it uses a pop-up menu to move
between the groups of custom settings):
Custom Settings are rather involved on a D200, and so is the
interface. First, note that you can edit individual banks of
settings (the pop-up menu in the upper left corner). Second,
V1.03
Thom Hogan’s Complete Guide to the Nikon D200 Page 654
you have to pick one of the six areas of settings (a through f)
in the pop-up immediately below the bank pop-up. The Prev.
and Next buttons at the bottom also take you between the six
areas.
Some users may find these dialogs easier to use to set the
camera than the scrolling Custom Settings menus on the
camera, mainly because the names are expanded and more
easily deciphered.
Now comes the payoff for all these dialogs you have to
navigate—you can save and load all these settings in one
action:
1. Make all your settings (that’s potentially 24 dialogs
worth of mousing and clicking [multiple banks,
remember?]).
2. Select Save Camera Settings from the Settings
menu and fill out the standard Save dialog that
appears.
3. Later, when you want to reset the camera that way,
select Load Camera Settings from the Settings
menu and navigate the standard Open dialog that
appears to the file you saved in Step 2.
Note: Apparently the Custom Settings saved and loaded this way
are custom to an individual camera. You can’t save the
settings from one camera and load them onto another. Pity.
Tip: Before Step 2, make sure that you’ve set and named all four
Shooting Banks on the camera. Then you’ll be able to save
both the Shooting Banks and Custom Settings in one file.
I don’t know about you, but this feature has a big payoff for
me. I use my cameras in a few standard ways, but in between
I’m always fiddling with settings to test things for books or to
answer a reader’s question about something. Yet I know that I
can restore my Thom Landscape D200 settings with a
couple of clicks and have my camera set as I want it for
nature photography.
V1.03
Thom Hogan’s Complete Guide to the Nikon D200 Page 655
Manipulating Images
You may use the combination of PictureProject or Nikon
View plus Nikon Capture to perform basic file management
tasks and to post-process images.
Nikon Capture uses Nikon View’s Browser Window for image
browsing (see “Nikon View” on page <
H628>). The primary
advantage is that when you select a NEF image in the Browser
Window and choose to Edit it, you get a Nikon Capture
Editor window:
While this may look the same as a full preview in Nikon
View, it isn’t. You can open and use two tool palettes, which
allow you to perform additional actions: