The Art of Poser and Photoshop- P11 docx
Bạn đang xem bản rút gọn của tài liệu. Xem và tải ngay bản đầy đủ của tài liệu tại đây (3.81 MB, 30 trang )
The Art of Poser and Photoshop: The Official Guide288
Figure 6.3 Texture display for the head Figure 6.4 Texture display for the body
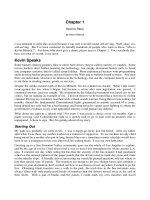
Figure 6.5
Preview of the
texture on the
head and body
Chapter 6 ■ Image Based Lighting in Poser Pro 289
Figure 6.6 Parameter dials for the
eyes
Figure 6.7 Parameter dials for the
jaw
Figure 6.8 Parameter dials for the
lips
Figure 6.9
Render the
character to see
the final tex-
ture
5. Now let’s add a backdrop to the character. The image that you’re about to import
is a backdrop that was created for the purposes of this tutorial. It is taken from the
scene in Photoshop that you will create later in this tutorial. Oftentimes, it’s a good
idea to do a quick render of the 3D model and construct the basic scene so you can
see how the colors and lighting intensity will look so that you can import the JPEG
image back into Poser to be used as the IBL light source. So, access the Advanced
texture panel. With the Open GL preview setting open in front of you, click on the
background located anywhere behind your 3D character. This will automatically
bring up the background’s Advanced texture environment, as shown in Figure 6.10.
You’re going to use a photographic image for the background. Go to the tutori-
als/ch6 folder and open the backdrop.jpg file, as shown in Figure 6.11. Apply this
as the image source for the background’s Color channel. Doing so will automati-
cally apply the image to the backdrop to be previewed in the Open GL environ-
ment. See Figure 6.12.
The Art of Poser and Photoshop: The Official Guide290
Figure 6.10 Display of the Advanced texture panel Figure 6.11 Display of backdrop.jpg
Understanding How Image Based Lighting Works
To get a better understanding of how the IBL environment works, let’s apply it to a sim-
ple primitive—a cylinder. Access your Primitives library and bring the cylinder shape
into the 3D Open GL environment. When asked, make sure that you save the scene
that you have just created. You should see something similar to Figure 6.13.
1. Make sure that the lights in the background (designated as Light 1 and Light 3) are
turned off. You can do this by accessing the Parameters panel for each light source
and making sure that the On check box is deselected. For Light 2, however, make
sure that the check box for On is selected. Then do a render (Ctrl+R/Command+R)
to see how this single light affects the object. Figure 6.14 shows the result.
2. The previous step shows the result of the directional light source. It produces a
strong shadow on the opposite side of the cylinder. Take a look at the light’s
Properties panel and notice the Ambient Occlusion check box on the left side (see
Figure 6.15). Select this check box and do another render. Notice that the shadow
details have become more intense and they are most noticeable along the floor in
front of the lighted side of the cylinder. Ambient Occlusion gives more detail to
those areas that create shadow details between objects. In this example, it creates
more intense detail between the cylinder and the ground plane.
3. You’re going to apply IBL lighting using the same lighting setup that is used in
Figures 6.14 and 6.15. Figure 6.16 shows the lighting style for this primitive.
Chapter 6 ■ Image Based Lighting in Poser Pro 291
Figure 6.12
Display of the
Open GL pre-
view and the
Advanced
texture panel
The Art of Poser and Photoshop: The Official Guide292
Figure 6.13
Primitive cylin-
der placed into
the scene
Figure 6.14
View of the
render with
only Light 2
active
Remember that the two darkened light nodes on either side of the lighting ball are
inactive. The only light source that is active is the one that is designated with the
color white in the upper left. With the active light selected, go to the Advanced tex-
ture panel and apply the ivy landscape.jpg file to the light source’s Color channel.
See Figure 6.17.
4. Now, create a render of the scene with the digital image applied to the IBL light-
ing setup. The results are shown in Figure 6.18.
Chapter 6 ■ Image Based Lighting in Poser Pro 293
Figure 6.15
Turn on the
Ambient
Occlusion
option
Figure 6.16
View of the
lighting setup
The Art of Poser and Photoshop: The Official Guide294
Figure 6.17
Apply ivy land-
scape.jpg to the
Color channel
Figure 6.18
Render the IBL
lighting scene
5. What you are viewing is the object that is lit by the colors in the digital image.
Because the intensity of the image is fairly low, the intensity of the lighting shown
in the render is also low. Also note that the object is mostly greenish in hue. This
of course is a result of the green that dominates the digital file. Increase the light-
ing intensity so that you can see how the object is affected as you increase the light
source. See Figure 6.19.
Chapter 6 ■ Image Based Lighting in Poser Pro 295
Figure 6.19
Increase the
intensity of the
light source
6. To get a better idea how colors and values from a digital image affect your scene
when render through the IBL lighting engine, let’s use another image and view the
results. Access your tutorials/ch6 folder again and open the sunset.jpg file, as shown
in Figure 6.20. Apply it as the IBL light source. Figure 6.21 shows the final render.
The Art of Poser and Photoshop: The Official Guide296
Figure 6.20
Render the IBL
lighting scene
using
sunset.jpg
Figure 6.21
View of the
final render
using
sunset.jpg as
the IBL light
source
Applying IBL to a More Practical Image
Now it’s time to go back to the original concept scene that you are creating. With the
background in place and with the character in the 3D scene, you’re ready to apply IBL
based on the backdrop.
1. Close the current file and open the one that was saved with the textured character.
You should see the character with the backdrop.jpg file as the backdrop for the
scene. With the Properties panel for Light 2 open next to the preview, do a render
of the first three lighting types (Spot, Infinite, and Point). Spot light allows you to
control the angle of the light source. This type of light source is very close to what
is used in the theatre, where you can control the diameter and the intensity of the
light source. The Infinite light resembles sunlight; light is emitted from a distant
location in the same manner that the sun emits light onto the earth. Finally, the
Point light resembles a light bulb emitting light in a multi-directional pattern.
Figures 6.22, 6.23, and 6.24 show examples of each lighting style on the character.
2. Now, apply the backdrop.jpg image as the source for the IBL lighting. See Figure
6.25.
Chapter 6 ■ Image Based Lighting in Poser Pro 297
Figure 6.22
View of the
Spot light
properties
The Art of Poser and Photoshop: The Official Guide298
Figure 6.23
View of the
Infinite light
properties
Figure 6.24
View of the
Point light
properties
3. Make sure that your light properties resemble what you see in Figure 6.26. Also,
make sure that the Depths Map Shadows option box is checked. Note that your
light properties have a Shadow Blur Radius of 18. This option controls the edge
feathering of the shadow detail. The higher the number, the softer the shadow; the
lower the number, the sharper the edge. Render your scene.
4. Let’s experiment a little more and apply a setting of 1.0 to the Shadow Blur Radius
option, as shown in Figure 6.27. Press Ctrl+R/Command+R and take a look at the
final render. Note that the outer edge of the shadow detail across the front of the
body appears sharper and less diffused.
5. Next, set the Shadow Blur Radius option to a value of 20.0 and the Shadow Min
Bias to 0. Do another render. You will notice a fairly strong application of the
shadow to the chest region, which has a strongly feathered edge. See Figure 6.28.
Figure 6.29 shows the effects of Shadow Min Bias when you set it to 4.0. Figure
6.30 shows the effects of Shadow Min Bias when you set it to 1.5.
6. Check the Ambient Occlusion check box and set it to 0.7; do a render. Notice in
Figure 6.31 that the shadow detail where the body parts meet is more intense.
Chapter 6 ■ Image Based Lighting in Poser Pro 299
Figure 6.25
The
backdrop.jpg
file is applied as
the IBL light-
ing source
The Art of Poser and Photoshop: The Official Guide300
Figure 6.26
View of the
Light 2
Properties
panel
Figure 6.27
Apply 1.0 to
the Shadow
Blur Radius
option
Chapter 6 ■ Image Based Lighting in Poser Pro 301
Figure 6.28
Apply 0 to the
Shadow Min
Bias option
Figure 6.29
Apply 4.0 to
Shadow Min
Bias
The Art of Poser and Photoshop: The Official Guide302
Figure 6.30
Apply 1.5 to
Shadow Min
Bias
Figure 6.31
Set the
Ambient
Occlusion
option to 0.7
7. Now set the strength of the Ambient Occlusion to 1.7 and do a render. Note that
the shadow detail is more aggressive and dominating in the chest area, as shown in
Figure 6.32. In essence, any areas that possess shadow detail will spread outward as
you increase the Ambient Occlusion setting.
Chapter 6 ■ Image Based Lighting in Poser Pro 303
Figure 6.32
Set the
Ambient
Occlusion
option to 1.7
8. Under the Shadows check box, select Raytracing. Set the Shadow Blur Radius
option to 0. Raytracing is another form of rendering where the software renders the
light rays that are closest to the center of the lens first and then works its way out-
ward. As you can see in Figure 6.33, there is a more linear distinction between the
highlights and the shadow regions falling on the 3D object. Increase the Shadow
Blur Radius to 20. Figure 6.34 shows how the softer edges are rendered in the
Raytracing mode.
9. Experiment with the settings. When you achieve a result you like best, render it to
the resolution of the document you will be working in within Photoshop, as shown
in Figures 6.35 through 6.37.
The Art of Poser and Photoshop: The Official Guide304
Figure 6.33
Render the
scene in
Raytracing
mode
Figure 6.34
Set the Shadow
Blur Radius
option to 20
Chapter 6 ■ Image Based Lighting in Poser Pro 305
Figure 6.35 Select Render Dimensions from the
Render panel menu
Figure 6.36 Set the render’s dimension and resolution
to fit your Photoshop document
Figure 6.37
Example of the
final render
Creating the Landscape in CS4
1. Preview the images in Bridge (choose Ctrl+Alt+Shift+O/Command+Option+
Shift+O and navigate to the tutorials/ch6 folder). Select horizon_01.jpg through
horizon_08.jpg, as shown in Figure 6.38.
The Art of Poser and Photoshop: The Official Guide306
Figure 6.38
Select hori-
zon_01.jpg
through hori-
zon_08.jpg
2. In Bridge, go to Tools/Photoshop/Photomerge. You’ll see the Photomerge dialog
box displaying the list of the images that you selected, as shown in Figure 6.39. For
now, select Auto from the Layout section and then click OK.
Figure 6.39
View of the
Photomerge
dialog box
3. When the merge is complete, use the transform tools to get close to what you see
in Figure 6.40. Save this image to a folder on your hard drive; you’ll come back to
this file later in the tutorial.
Chapter 6 ■ Image Based Lighting in Poser Pro 307
Figure 6.40 Final view of the Photomerge image
4. Create a new document with the dimensions of 8×10.5 inches and a resolution of
300 pixels per inch. Inside this document, place the character inside a layer group
called “figure.” In the scene that you’re going to create, the character will be the pri-
mary compositional element. You are going to compose it so that the roots will
ascend from the ground and appear to attach themselves to the figure, thus becom-
ing an integrated, singular form. Let’s start by giving the lower-left leg a tree-like
appearance.
5. Now, open the tree trunk 02.jpg file. Use the Lasso tool to select a portion of the
trunk large enough to cover the length of lower left leg. Copy (Ctrl+C/
Command+V) and paste (Ctrl+V/Command+V) the trunk into the file with your
character. Place this image into a layer group above the figure layer group. Name
the new group “foreground roots” and position the bark detail over the left shin, as
shown in Figure 6.41. All the detail within the foreground roots will now be placed
into this layer group.
6. Make this layer a smart object. (Right-click on the blank area located on the right
side of the thumbnail. This will bring up a submenu. From the choices, simply
choose Convert to Smart Object.) You’ll use a layer mask to restrict the detail to the
shape of the leg. Since you want to restrict this detail to the outline of the object,
you need to create a selection in the shape of the figure. Go to the figure layer group
and select the Poser character. Hold down your Control/Command key and click
on the thumbnail. Photoshop automatically creates a selection based on the shape
of the pixels that exists on the transparent layer. Go back to the tree-bark texture
layer and give it a layer mask by clicking on the third icon from the left on the bot-
tom of your Layer palette. As you can see in Figure 6.42, Photoshop has created a
mask based on this selection. Any areas within the borders will result in white and
any areas outside the borders will result in black, thus revealing the content within
the selection.
7. Next, open the tree trunk 03.jpg file, as shown in Figure 6.43. Use the Transform
tools to restrict the shape so that the trunk appears to be integrated with the char-
acter’s foot. Make this shape a smart object and attach a layer mask to shape the
detail to the outline of the foot, just as you did in the previous step. Use your
Wacom pen and pad to assist you with this effort. See Figure 6.44.
8. Once again open the tree trunk 01.jpg file, as shown in Figure 6.45. Use the same
steps from the last two examples to transform and shape the roots to the inside por-
tion of the heel. Use the layer mask to assist you with this task. Try to get some-
thing similar to Figure 6.46.
The Art of Poser and Photoshop: The Official Guide308
Figure 6.41
Position the
bark detail over
the left shin
Chapter 6 ■ Image Based Lighting in Poser Pro 309
Figure 6.42 Form the bark detail to the shape of the left shin Figure 6.43 View of the tree trunk 03.jpg file
Figure 6.44
Position the
bark detail over
the left foot
The Art of Poser and Photoshop: The Official Guide310
Figure 6.45
View of the
tree trunk
01.jpg file
Figure 6.46
Use the layer
mask to isolate
the tree trunk
01.jpg image to
the inside por-
tion of the
character’s
lower leg
9. Moving on, duplicate this layer again and resize it (Ctrl+T/Command+T). Use your
layer mask to shape the roots onto the other leg. The Warp tool (choose Edit >
Transform > Warp) will assist you in this step greatly. There are no absolute rules
as to the final look of the roots flowing up the leg, so use your imagination and
whatever Transform tools necessary to help you achieve the final result. At any rate,
use Figures 6.47 and 6.48 as a guide.
10. Continue to add detail to the left shin. Add more tree bark from the tree trunk
03.jpg file located in the tutorials/ch6 folder. See Figure 6.49.
11. At this point, it’s still obvious that a single texture has been applied to the leg. If
you really want to give this image some unpredictability, which adds excitement to
the composition, you should continue to add other details that have a slightly dif-
ferent look. You’re going to work with another tree bark texture that has more vari-
ety. In the tutorials folder, open the tree trunk 04.jpg file and place it over the left
leg (see Figure 6.50). Don’t forget to make it a smart object in the event that you
would like to go back to its original form. Use the Free Transform tool (Ctrl+T/
Command+T) to alter the shape so that it has an elongated and thin root texture.
Chapter 6 ■ Image Based Lighting in Poser Pro 311
Figure 6.47
Duplicate the
tree trunk
01.jpg file to
attach to the
opposite leg
The Art of Poser and Photoshop: The Official Guide312
Figure 6.48
Continue to
add more detail
to the opposite
leg
Figure 6.49
Continue to
add more detail
from the tree
trunk 03.jpg
file to the left
shin