The Black Art of Xbox Mods- P6 doc
Bạn đang xem bản rút gọn của tài liệu. Xem và tải ngay bản đầy đủ của tài liệu tại đây (1.31 MB, 30 trang )
136
CHAPTER
7
The
Xenium
Operating
System
You
can install a new hard drive in your Xbox with 300GB
or
more
storage-and
the Xbox will
probably handle any size
of
IDE drive that
is
likely to come
out
in the near future. The only
restriction
is
that the drive must be
of
the ATA-100/133 (IDE) variety; Xbox doesn't support the
latest Serial
ATA
(SATA)
drives because
it
just has an older IDE cable. I suppose you could use
some sort
of
IDE-to-SATA adapter. hmm, that's an interesting idea.
Rather than explain how to upgrade the hard drive at this point, I'll postpone that discussion for
a complete chapter on the subject because the hard drive upgrade requires more in-depth expla-
nation than this chapter
was
meant to get into. Refer to Chapter
12,
"Upgrading the Xbox Hard
Drive,"
for a complete tutorial on how to install a new hard drive in your Xbox. Wait until you see
what a new hard drive makes possible-especially when you're running Xbox Media Center (see
Chapter
10,
"Xbox Media Center")!
Copy
Partition
The Disk Tools menu in the Xenium O/S (see Figure 7.10) includes a handy feature
that
will copy
one entire partition
of
a hard drive to another
drive:
Copy Partition.
That
is
an important point:
the procedure doesn't let you just copy one partition to another; it
is
used to copy a whole parti-
tion from one drive to another drive.
You
may want to do this if you have a drive prepared for
your Xbox,
but
you need to copy over a partition. Just be careful when using this feature because
(obviously) the destination partition
is
completely replaced. This feature doesn't just copy
ftIes;
it
replaces the destination partition entirely. I will discuss this feature again in Chapter
12.
FIGURE
7.10
The
Copy
Partition
option.
Select the Copy Partition
menu
option to bring up the next screen, shown in Figure 7.11. This
screen lets you choose the source partition that you wish to
copy.
The
Xenium
O/S
Main
Menu
137
FIGURE
7.11
Selecting the source
partition.
After you select a source partition, you will get a confirmation screen (shown
in
Figure 7.12)
that
warns you
of
the result
of
the copy operation.
FIGURE
7.12
The
warning
confirmation
screen verifies
that
you
want
to
proceed.
If
you select
Yes,
you will then see the screen shown in Figure 7.13, asking whether you would like
to format the destination partition before performing the copy operation.
You
would want to do
this, for instance, if the partition doesn't already exist
on
the second hard drive. The copy process
will begin immediately after you choose
Yes
or
No to the format question.
138
CHAPTER
7
The
Xenium
Operating
System
FIGURE
7.13
You
can choose whether
you
want to format the destination partition.
Format
Partition
Sometime you may need to format a specific partition
on
your old or new hard drive, such
as
if
the partition becomes corrupted due to disk errors (the Xbox doesn't have a disk check feature,
after all!) or ifyou have been using the partition for a long time, copying
and
deleting files for
months or even years, and the
files
have become fragmented. Xenium
0/5
has
no
hard drive
defragger, so the best way to overcome a fragmented partition
is
to make a backup copy
of
all
the
fues, format it, and then copy the files back.
You
can copy the
files
to your PC using FTP
or
5MB,
format the partition,
and
then copy the files back. I wouldn't
think
this
is
at all necessary unless
you do a
lot
of
file
transfers because the Xbox
hard
drive
is
primarily a read-only drive; after you
load it up, the Xbox only reads the
ftles
(to play music, games,
and
so on).
To
format a partition, first select the Format Partition option from the Disk Tools menu,
as
shown
in Figure 7.14.
Next, you'll be asked for the partition that you wish to format (see Figure 7.15). The Xenium
0/5
scans the local drive for
an
existing partition to format,
but
generally, the Xbox uses only seven
partitions: C,
E,
F,
G,
X,
Y,
and
Z.
The Dashboard uses the first four partitions, where savegames
and so on are stored. In particular, partition C
is
the place where you will install a new Dashboard
(covered in the next chapter). Partition E
is
the main "work partition"
of
the Xbox, where
savegames and music soundtracks are stored.
If
yOLl
install a larger hard drive, you'll
see
a parti-
tion
F.
Partition G
is
not
as
common
but
is
an option ifyou have a very large hard drive
and
want
it split into two parts. Partitions
X,
Y,
and Z are used for game caches to speed up loading
of
game
levels; a game has the option
of
copying large portions
of
content from the disc to one
of
these
cache partitions for better game play.
The
Xenium
O/S
Main
Menu
139
FIGURE
7.14
Selecting
the
Format
Partition
option.
FIGURE
7.15
Choosing
a
partition
to
be
formatted.
After you choose the partition, you'll be asked on which hard drive the partition
is
located.
You
can format any partition
on
the
primary
or secondarydrive, thanks to the screen shown in Figure
7.16.
If
you are confused, this basically means
that
the Xenium
0/5
supports
two hard drives.
You
can remove the DVD-ROM drive and replace it with a second hard drive! (More
on
that in
Chapter 12.)
Next, you'll see the confirmation screen shown in Figure 7.17, allowing you to change
your
mind
about the format process.
If
you wish to proceed, select
Yes.
140
CHAPTER
7
The
Xenium
Operating
System
FIGURE
7.16
Selecting the hard drive to use (the
Xenium
0/5
supports
two!).
FIGURE
7.17
Final
confirmation before the partition
is
formatted.
EEprom
Tools
Figure 7.18 shows the
EEprom
Tools item selected
on
the
main
menu,
which brings
up
the
EEprom Tools
menu
(shown in Figure 7.19). This
handy
little screen gives you the basic settings
of
your Xbox, including the revision
range,
video standard (NTSC
or
PAL), DVD region
(l
to 6),
and
game region (US/CAN,
JAP,
or
EUR/AUS). The Xbox version item will tell you only
if
your
The
Xenium
O/S
Main Menu 141
Xbox revision
is
1.0,
1.1
to 1.5, or 1.6, without any details about specifically which version it
is
in
the
1.1
to
1.5
range (it's difficult to tell in software).
FIGURE
7.18
The EEprom Tools
menu
item.
FIGURE
7.19
The EEprom Tools
menu.
You
can also change the video standard, DVD region, and game region from this menu. For
instance, suppose you live
in
the United States and have an Xbox 1.3 that you are selling to some-
one in Europe (without a
mod
chip). That person will not be able to use the Xbox unless the DVD
142
CHAPTER
7
The
Xenium
Operating
System
region and game region values are changed.
You
might open up an Xbox store and sell the same
basic Xbox unit internationally! (However,
as
you saw in the preceding chapter, this wouldn't be
very practical for the
1.6
if you had to solder in a mod chip just to change the region settings.)
Backing Up
the
Xbox EEprom
The Xenium O/S has a very helpful feature that allows you to make a backup
of
the Xbox EEprom
containing
all
of
the configuration settings
of
the Xbox. Why would you ever want to do this?
Although this feature might
not
seem very important, it can save your Xbox from being stuck
with unusable settings that might have been set from the Microsoft Dashboard. Because the
Xenium O/S accesses the Xbox EEprom directly and can
mal<e
changes to it, you can correct mis-
takes in the DVD or game region codes.
As
a precaution, you should make a backup
of
the
EEprom only when you have a stable Xbox that
is
configured properly because the process
is
meant to restore a
good
backup in the event
of
a system error.
Be
sure you do
not
perform a
backup immediately after making changes to the Xbox until it has been thoroughly tested.
To
perform the backup procedure, highlight the Backup EEprom
menu
item, shown in Figure
7.20, and then select
it.
The Xenium O/S will immediately perform the backup process,
as
shown
in Figure 7.21.
FIGURE
7.20
The Backup EEprom
menu
item.
If an error occurs with the EEprom backup, Xenium O/S will notify you; otherwise, you should
see
the message shown in Figure 7.22.
The
Xenium
OjS
Main
Menu
143
FIGURE
7.21
Backing
up
the
Xbox
EEprom chip.
FIGURE
7.22
The EEprom
backup
process was successful.
Restoring
the
Xbox
EEprom
You
would want to restore the Xbox EEprom ifyour Xbox has a configuration problem
that
you
cannot solve from the Microsoft Dashboard (or any other replacement dash). This will restore
the
EEprom to the configuration state
of
the Xbox at the time
of
the last backup. Highlight the
Restore EEprom menu item and select it,
as
shown in Figure 7.23.
144
CHAPTER
7
The
Xenium
Operating
System
Selecting the Restore EEprom choice
brings up a dialog box that asks you
to verify
the
Xbox revision (see
Figure 7.24). Ifthe revision
is
correct
(in
other
words, you have
not
changed the motherboard since the
last backup), you can proceed by
selecting the button.
If
you still want to overwrite the cur-
rent EEprom with the image stored
in the Xenium memory, go ahead
and choose
Yes;
otherwise, choose
No,
as
shown in Figure 7.25.
CAUTION
If
you used the Xenium
chip
on a 1.6 Xbox,
for
instance, then inserted
it
into
a 1.3 Xbox, and
accidentally restored the EEprom,
that
could ren-
der
the Xbox unusable.
So
be
careful
not
to
per-
form
a restore unless you are absolutely sure
it
is
the
right
EEprom
memory
image, and
don't
do
this
frivolously-only
when necessary.
If
the
power
were
to
go
out
during
an
EEprom restora-
tion,
your
Xbox
BIOS
would
be
ruined (which
is
repairable
if
you have a
mod
chip
installed,
but
problematic nevertheless).
FIGURE
7.23
The Restore EEprom menu item.
Settings
Figure 7.26 shows the Settings
menu
item selected on the main menu. Selecting this item will
bring up the Settings
menu,
as shown
in
Figure 7.27. This
menu
has
five
options: Xenium
Settings, Network Settings, FTP Settings, Telnet Settings, and 5MB Settings.
The
Xenium
O/S
Main
Menu
145
FIGURE
7.24
Confirming the
Xbox
revision before writing to the EEprom.
FIGURE
7.25
Final
confirmation on the
EEprom
write procedure.
Xenium
Settings
First, select the
Xenium
Settings
option
to
bring
up
the
Xenium
Settings
menu,
shown
in Figure
7.28.
This
menu
has a single
option
for setting
Instant
Boot
either
on
or
off.
If
you have selected
a default item
in
the
Launch
menu,
this setting will allow
that
launch
item
to
automatically
launch
when
you
power
up
the
Xbox.
146
CHAPTER
7
The
Xenium
Operating
System
FIGURE
7.26
The Settings menu item.
FIGURE
7.27
The Settings menu.
Network
Settings
Selecting the Network Settings option brings up the Network Settings menu,
as
shown in Figure
7.29. This
menu
lets you change the settings used by Xenium O/S to configure the Xbox LAN con-
nection.
The
Xenium
O/S
Main
Menu
147
FIGURE
7.28
The Xenium Settings menu.
FIGURE
7.29
The
Network
Settings menu.
If
you have a router with a built-in Dynamic Host Control Protocol, (DHCP) service, you can
configure Xenium
0/5
to use Dynamic
IP.
I prefer the Static
IP
option
because then the IP address
of
the Xbox will always be the same, which
is
convenient when you need to connect to it to trans-
fer
files
via
FTP.
However, you may want to connect to your Xbox using 5MB,
in
which case you
can just browse the Xbox file system with Windows Explorer (or whatever file browser you are
using with your PC's
0/5).
I tend to use FTP more often because my Xbox
is
running
EvolutionX
148
CHAPTER
7
The
Xenium
Operating
System
(which does
not
have an
5MB
server, unfortunately),
so
I usually have a static
IP,
but
browsing
the
file
system
is
definitely more convenient when using Xenium
0/5.
Note also that the network settings used by Xenium
0/5
need
not
match the network settings in
a Dashboard such
as
EvolutionX because, unlike a PC
0/5,
the Xenium
0/5
doesn't keep
on
run-
ning "in the background" when a Dashboard
is
running. Xenium
0/5
is
a multi-threaded
0/5,
but
it does not continue running when another program (such
as
EvolutionX)
is
run. One nice
thing about
5MB
is
that you can just connect to your Xbox using the server share name (such
as
"xbox") instead
of
needing to know the
IP
address.
Any time you want to make a change to the network settings and have it take effect immediately,
just use the Restart Network option. This choice will cause Xenium
0/5
to completely restart all
networking services (including the
IP
stack, network drivers,
FTP,
and
5MB
server), just like your
PC does when it boots
up
(see Figure 7.30).
FIGURE
7.30
Restarting the network connection
in
Xenium
0/5.
The other network settings should match the settings
of
your router
or
the PC that you are con-
necting
to,
including the IP prefix (l92.168.0.x
is
standard) and subnet mask (255.255.255.0
is
standard). The gateway
is
important ifyou are using a router with a broadband connection to the
Internet, in which case, the gateway should
be
the
IP
address
of
your router.
You
normally don't
need to change the DNS setting unless you are using a shared Internetconnection without DHCP.
If you don't have a router, you will have
to
set up your PC for a direct connection to the Xbox
using two network interface cards (NICs). This
is
a cheesy way to do it,
so
why
not
just buy a hub
for $10 or, better yet, a cheap router for
$25?
You'll want to share your Internet connection with
your Xbox anyway,
so
the cost
of
a
router
is
money well spent.
Of
course, if you don't have a broad-
band Internet connection, I would
still recommend a router because it
will have DHCP, and configuring it
is
generally much easier than setting up
networking
on
your
Pc.
The
Xenium
O/S
Main
Menu
149
NOTE
Because this isn't a
networking
book, I'll
just
refer
you
to
a
primer
for
more
information
on
setting up a
PC
LAN. A
good
primer
is
How
Networks
Work,
7th
Edition,
by
Frank Derfler
Jr.
and
Les
Freed (Sams
Publishing,
ISBN:
0789732327).
The important thing
is
to get your PC and Xbox
on
the same
LAN
one
way
or
the other: That can
be with a router (very easy), hub (easy), or dual NICs (hard!). Ifyou have
no
DHCP service, you
need to set the IP address
of
your PC and Xbox manually, using the same prefix.
Two
good exam-
ples include 192.168.0.1
and
192.168.0.2.
FTP
Settings
From the main Settings menu, choose FTP Settings to bring
up
the FTP configuration screen,
shown in Figure 7.31.
FIGURE
7.31
Xenium
0/5
includes
an
FTP
server.
The only options here allow you to enable/disable the FTP server
and
set the username
and
pass-
word
of
the FTP server.
If
you have enabled the FTP server, it
is
running
already, and you can con-
nect to your Xbox using your favorite FTP client.
For the sake
of
simplicity, I will just use Internet Explorer to connect to my Xbox to test the FTP
server.
By
all
means, you should use your favorite FTP client instead
if
you wish.
150
CHAPTER
7
The
Xenium
Operating
System
If
you have 5MB enabled, you can connect to your Xbox by typing the name specified in the 5MB
settings
(xbox
is
default); otherwise, you'll need to enter the IP address for your Xbox (such
as
192.168.0.2).
It
is
helpful to enable
5MB
for
this purpose (more on 5MB settings shortly).
You
can select Run from the Start
menu
in Windows
or
open a new Internet Explorer window. In
the Location field, enter
ftp:
II
xbox I to connect to your Xbox via
FTP.
Internet Explorer will
try
to connect, but you'll need to specify the username and password to complete the connection
(you can also specify the username and password in the URL, such
as:
ftp:l/xbox:xbox@xbox/).
So,
right-click the blank screen in Internet Explorer (as shown in Figure 7.32)
and
select Login
As.
Then type xbox in
both
the Username and Password fields to connect.
You
will then see the
Xbox
file
system,
as
shown in Figure 7.33.
E!le
5.drt
:ii~
fSlvrnltes
tools
tielp
2B6ck
•
iJ
-,\Search
:~Foldels
Agdress
I~
flp:(Jxboxl
dQ!2!.l
•
I
-
-,
::J
~Go
jLlnk<
"I
Name
51ze
1
Modified
xbox
Server:
xboJ:
US~1
I'lame:
Anonyrnous
~1~~L.h~r~
to
learn
about
brO' vsing
FTP
sit~.
Done
User:
Anonymous
@locelintrMet
FIGURE
7.32
Connecting
to
the
Xbox
via
FTP
(using
Internet
Explorer).
c
12/27{2OO3IZ:(lJAI"
12/2712oo312:00A(oI
12/27/2003 12:00
AM
12lZ7!2003l2:OQA/>,
12/27/200312:00"101
12!17!2003lZ:QJAlll
IZ!27/2003lZ:0JAl>1
1/1(20021Z:00AIol
1~127JZ:003
1:':0)
AM
12/27/2OO312:(()"'"
12/2712003
l2:0J
AM
t:!27/ZOO)
12:00At>1
Si:e T
F'kfolder
FdeFoidel
Fik!Fo!def
FdeFolder
Folefolde1
FlIefQldel
Fl.""""
3."018
CoriopatlonSettlOQS
75216
XIlEFM
l6.::!MB ;':1FFiIl!
1i.8MB
X1FFe
1.87/·16 XBfFiIe
"
: JAudlo
Ubxlup
='.lfonts
,jstkl
:.Jlr¥lerS
:.J7bo1d~~.165enoi:lO
:JxodMh
EJ~o(.n
,"
~.~J
to~;yn~bfows~FTP
~evo.d!lsh.Ybe
~ltes.
~ABo,BooI.~tf
~Xbo~,)tf
~~bo(dMh.,be
Se.~:·bo
U~r
r~!I/TIe:
'00'
[je
~
'i teW
FlVOfltes 1001:;!:1etJ
,:
ad;
~
iJ
4:\5eorch
C2JFt'Idels
~
AdO:
ess
l-4J
ft
p:/Mo</Cf
FIGURE
7.33
Browsing
the
Xbox
file system
via
FTP.
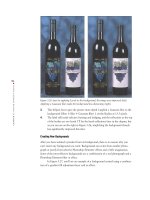
Once in, you can use the familiar cut-and-paste or copy-and-paste operations to transfer files
to
and from your Xbox
and
Pc.
Be
careful here because you can still delete
fIles
on
your Xbox using
FTP!
You
don't want to accidentally delete the Microsoft Dashboard because you won't be able
The
Xenium
0/5
Main
Menu
151
to use the dash any longer
and
will have to somehow get a copy
of
the correct dash from someone
else to replace it.
Be
careful!
Telnet
Settings
You
can connect to your Xbox via Telnet because Xenium O/S includes a Telnet server. Telnet
is
mainly used
during
the development
of
Xenium O/S, so the Telnet
commands
are limited.
The
Telnet Settings screen
is
shown in Figure 7.34.
FIGURE
7.34
The Telnet Settings screen.
Basically, you see the same
options
here that you saw
in
the FTP Settings screen, with the ability
to enable/disable the Telnet server
and
set the username
and
password.
The
Telnet server runs in
the Xenium O/S by default, so you can use your favorite Telnet client to connect to
your
Xbox,
or
just use the
command
prompt
in
Windows,
as
shown
in
Figure 7.35.
FIGURE
7.35
Connecting
to
your
Xbox
via
Telnet.
152
CHAPTER
7
The
Xenium
Operating
System
Open a command prompt (by choosing Start, Run and typing cmd), and then type
telnet
to start
the Microsoft Telnet client. From there, type
open followed by the IP address
of
your Xbox to con-
nect; then type in the username
and
password (usually xbox for both). Once connected, you can
type
help
to get a list
of
commands,
as
shown in Figure 7.36.
FIGURE
7.36
Displaying the commands
in
the Xenium Telnet server.
5MB
Settings
The
5MB
server provided
by
the Xenium O/S
is
awesome. This
is
the preferred method
of
access-
ing the
me
system
of
your Xbox for transferring
files
back and forth.
It
is
treated just like another
PC on your network! For this reason alone, the Xenium
is
an excellent mod chip to choose, espe-
cially for a beginner who
is
new to madding.
Let's
go
over the configuration
of
5MB
so
you can connect to it from your
Pc.
I am using
Windows 2000,
but
the same rules apply to later versions
of
Windows,
as
well
as
to other systems.
First, highlight and then select the
5MB
Settings option on the Settings menu,
as
shown in
Figure 7.37.
You
will be presented with the 5MB Settings menu, shown in Figure 7.38. From here, you can
completely configure the file-sharing settings
of
your Xbox (via the Xenium O/S).
You
can set the share path, username, password, workgroup name, and even the server name for
your Xbox. Although these options may be needed for some systems, you can leave them all at
their defaults when your PC
is
running a modern version
of
Windows.
You
may be asked for the
username and password the first time you connect to your Xbox,
but
the settings are usually
retained for the next access.
Of
course, the most important setting
is
to enable the
5MB
Server
itself,
so
make sure it
is
set to On.
After you have made any necessary changes to the
file
sharing settings, you can then connect to
your Xbox from your
Pc.
The easiest
way
to
do this
is
to use Windows Explorer (with the
Location toolbar visible).
Type \
\xbox
for the location and press Enter.
The
Xenium
O/S
Main
Menu
153
FIGURE
7.37
The
5MB
Settings
option.
FIGURE
7.38
The
5MB
Settings menu.
The Xbox workgroup should appear with a single computer called "Xbox"
on
the Xbox network.
If
yOLl
would rather have the Xbox be
part
of
your own workgroup, you can change the work-
group used by the Xenium
OIS
from the 5MB Settings
menu
(by choosing Set Server
Workgroup).
To
connect to
the
Xbox, you can also choose Start, Run,
and
type \
\xbox
to open a
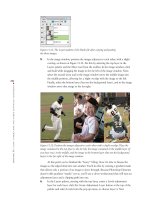
new Windows Explorer window to access your Xbox (see Figure 7.39).
Check it out!
At
this point, your PC thinks it
is
connected to another PC
on
the
LAN
and
will let
you copy, delete, and yes, even
edit
files
right on the Xbox
hard
drive!
You
can also
see
the
154
CHAPTER
7
The
Xenium
Operating
System
capacities
of
the Xbox hard drive partitions. Figure 7.40 shows the
C:
drive
on
my Xbox (note that
your Xbox
file
system may
not
have the same
files
on
it).
Ere
Edt
l'iew
F§.VOfites
looIs
t!elp
'-'Bod.
•
.£J
oaS.
ch
FoId
'
j
A<lO'
sl~\\>bo'l
~\e(t
an
item
to
VIeW
Its
description,
c ".,.
Xbox
System
Partition
Xbo:t
Data
PattiUon
:<box
Extl!!nded
Partition
Xbox
Extended
p."titlon
2
Xbox
cache
Partition
1
XboxC~hePaltitlonZ
).'boxC~Pafbtion3
~c
~E
3:
;)x
3;
~
\J
::::3
Xbox
FoIde<s
x
.il
De~'op
:3
"ly Docments
g'.lyComputer
-
~
NyNetWO'I.~e$
oJ
EntI'e~twod
.1'
"\Qosoft
Windows
NetWOtI
S.1
Harbout
-
i.:3.
>:box
•
~xbox
t~
ComPlJter!i
Near
"'Ie
~
Recycle
Bn
rti
Internet
Explorer
7ob,ect(s)
FIGURE
7.39
Accessing
the
Xbox file system
from
Windows Explorer.
E~
~dlt
~~
fAVOfilM
1oo1s
t:ieb
,; B4d.
-
iJ
aSc¥ch
!.DFoIdefs
~
~.;
;)<
f)
:Jill-
",""MS
1.)\\>2><'\c
• Thlsfoldef
IS
online.
Ilm/Z0034:2'5Pf1
12/27/Z.003-4::,'6Pf'1
1~Z7!ZOOJ4:ZEP'"
12[27fZ003't:ZEPN
1~7/ZOO3-4:ZfPM
1'l/27/Z0034::EPf"1
J?(Z71:ooJ4:Z'HM
I/J!Z002.
5:00
A,"1
1l/27/ZlXll-1:Z'6""1
l?/27/Z003-4:Zf;PN
Ilf27f2003-4:2JlPM
J2{17/200J-4:ZtiPN
S."
T
""""'"
Fl.""",
F'efokler
Fl.""",
Fl.""'"
""""'"
""""'"
41:8
C«'bpabon
5eUP1s
7S:!18
XliEFIi&
16,669
faXTF
Fk
15,~481.8
kTff*
1,91618
)(6fFje
J
OF"~~:X!lr·1I
OUWd:I78I·11
-
c
:J:.uio
:J
-2.llorts
-~91'\
JIIMlers
J
.\boxdWdxa.l8Se.dX)
Select.
",ltemto_1ts0IY 0(lbcn
.
Jr~
!}evm:.n
~evo~lbsh.,be
~l:BoxBooLxtI
~>b:l'(.>.lf
~Iboxd~.)(be
,""'
1JOesI.1OP
.
:ll
Oocullef"u
• gl1yCCll'I"(IU.t1
-a/>1yl~WOfIPbr:es
•
,;
ErbeUetwcwl
-
-I
tkrosclt wtidows
tletwO'l
'n~blu
-
"',
,
-~
·
.)!i
•
;;IE
·
.)F
•
;;IG
·
.)x
Jv
·
.),
•
i.:I(CIfI"CIl.M~Ue·"'t~
~
Pt<ydeBn
Int~net.&PoI~
~o!lIIso:
~
~
~
12ob'ect.{s)
33,7"'D
alloc~lrXf~-
FIGURE
7.40
Browsing the file system
of
the Xbox.
A word
of
caution:
Be
very, very careful what you do to the
fIles
on
your Xbox hard drive using
Windows Explorer. It's
all
too easy to ruin the default Microsoft Dashboard and render the Xbox
unusable with anything other than an alternate dash (unless you somehow restore the files). The
danger here
is
that you can delete
files
on
the Xbox hard drive at will! Don't ever leave your Xbox
file
system exposed if anyone else has access
to
your PC, and better yet, never leave the Xbox run-
ning if you aren't
around
because a simple mistake can wipe entire folders off the Xbox drive.
"With
great power comes great responsibility
»
The
Xenium
O/S
Main Menu 155
Of
course, the Xbox
doesn't
care
whether
you use it
as
a file server! I
recommend
creating a new
folder if you
want
to store files
on
your
Xbox.
Imagine
that
you have secret files
that
you
don't
want
anyone to find.
Wouldn't
it be cool
to
hide
them
on
your
Xbox instead
of
on
your
PC? This
is
exactly what we're going
to
do
in
Chapter
10
when
I
show
you
how
to
copy
your
favorite
music
and
videos to
the
Xbox
hard
drive
to
turn
it
into
a media server for
the
entertainment
center
in
your
living room.
Reboot
The
Reboot item
on
the
main
menu
(shown
in
Figure 7.41)
performs
the
simple
task
of
reboot-
ing
your
Xbox back into
the
Xenium
0/5
once again.
FIGURE
7.41
The Reboot menu item.
Recovery
The
Recovery item
on
the
main
menu
(shown in Figure 7.42) allows
you
to
restore
the
Xenium
BIOS to the default settings in the
event
of
a royal system screwup.
For
this
to
work,
you
must
flip
the "emergency recovery switch"
on
the
Xenium
before selecting this
menu
item
to invoke recov-
ery
mode.
You
may
also use Recovery to
upgrade
the
Xenium
OS, which will
be
out
of
beta
and
in full release
form
by the
time
you
read this.
Power
Off
The
Power
Off
item
on
the
main
menu
(shown in Figure 7.43)
simply
shuts
off
the Xbox.
156
CHAPTER
7
The
Xenium
Operating
System
FIGURE
7.42
The Recovery
menu
item.
FIGURE
7.43
The Power
Off
menu
item.
Summary
This chapter provided an overview
of
the Xenium O/S
that
is
built into the Xenium
mod
chip.
This O/S runs when you turn on the power
of
your Xbox after the Xenium
mod
chip has been
installed. In this chapter, you learned about the features
of
the Xenium O/S and learned how to
connect to your Xbox from your PC
to
transfer
files.
I will discuss this topic and more in the next
chapter on installing a new Dashboard.
EvolutionX
Dashboard
This
chapter explains
how
to
install and use the pop-
ular EvolutionX Dashboard. A Dashboard
is
a
front
end
for
the Xbox, a graphical user interface
similar
to
KDE,
Gnome,
OS
X,
and
Windows.
In
other
words,
EvolutionX gives the user
control
over
the
computer
system.
In
the case
of
EvolutionX,
it
gives you more
control
over
your
Xbox than
is
available
with
the
Microsoft Dashboard, and
it
provides services
that
work
only
when a
mod
chip has been installed.
You
will
learn
how
to
install the latest EvolutionX
BIOS
and
Dashboard and configure the Xenium O/S (or the O/S
for
your
mod chip,
if
different)
to
automatically
run
EvolutionX when
you
turn
on
your
Xbox.
What
Is
EvolutionX?
If
you have never heard
of
EvolutionX before (which
is
very
possible because it
is
not
a widely advertised product), you
may be wondering what EvolutionX
is,
why you might need
it, and what it can do. So, let's discuss what EvolutionX can
do for a minute before getting into the details
of
installing
and
using it.
EvolutionX (which was recently renamed to just EvoX)
is
a
replacement for the Microsoft Dashboard (the familiar
green interface that comes up when you
turn
on your Xbox
without a disc
in
the DVD-ROM drive). Whereas the
Here are the key points
covered in
this
chapter:
• What
is
EvolutionX?
• Installing EvolutionX
• Creating
a'custom
BIOS
• Using the EvolutionX
Dashboard
• Creating
your
own
EvolutionX sk
158
CHAPTER
8 EvolutionX Dashboard
Microsoft Dashboard can do little more than set the date and manage savegame files, a replace-
ment such
as
EvoX
is
more like a complete operating system for your Xbox, above and beyond
the
mod
chip O/S.
You
might recall that you mainly use the Xenium O/S (covered in the preced-
ing chapter) to build a modded Xbox system by instaJling new BIOS images, creating launch
items, installing and formatting new hard drives, and so on.
EvoX,
on
the other hand,
is
all about
the software.
There are two parts
to
EvoX:
the
EvoX
Dash, and
EvoX
BIOS. At its core, EvoX Dash
is
basically
just a launchpad itself for
running
other
programs-which
is,
after all, the sole purpose
of
an
operating system, to
run
other programs. No O/S
is
expected to have a full suite
of
applications
and utilities built in, despite the feature bloat
of
modern systems. Figure
8.1
shows the start screen
of
EvoX.
FIGURE
8.1
The
EvoX
Dash.
Installing
the
EvoX
BIOS
and
Dash
Perhaps the most seemingly difficult aspect
of
modding your Xbox
is
installing a new Dashboard.
But after reading the preceding chapter on using the Xenium O/S, you will surely agree with
me
that it
is
an easy task to access the Xbox
flie
system, and therefore, it
is
possible to copy new files
to the Xbox hard drive. I'll show you how to install the
EvoX
Dashboard shortly,
but
before you
do that, your Xbox
will
need a new BIOS (also known
as
firmware).
Why?
The firmware provides
the low-level hardware services such
as
task-switching and memory management that make it
possible to write Xbox software using the XDK rather than low-level assembly language (as
is
the
case with the Nintendo Game
Boy
Advance, which runs binary programs with a
boot
loader built
CAUTION
You
will
find
the
usual
"militant
hostility"
from
the Xbox
community
that
you
find
in the open
source
community,
so
my
advice
is
that
you
never
ask
for
help unless
it
is
on a
forum
and
just
keep
looking
for
a BitTorrent
link
that
will
lead
you
to
the
EvoX
package. Why
is
this
so?
It
is
a
form
of
self-preservation, since
much
of
this
soft-
ware was
compiled
with
Microsoft's
XDK
without
a license, so the
distribution
of
this
software
is
illegal.
"
Installing
The
EvoX BIOS
and
Dash
159
in, so to speak). Without the firmware acting
as
an
0/5
core, an Xbox
programmer
would have
to write all the low-level hardware interface code.
Acquiring
EvoX
EvoX
has a somewhat mysterious
history
and
is
something
of
an
orphan, with a lack
of
formal owner-
ship (it was created and
is
still main-
tained
by "Team EvoX"). I
am
unable to direct you to a specific
website where you may
download
either the EvoX BIOS
or
Dash.
However, the creators
of
EvoX, who
are named only by alias, maintain an
informational
website at
o.
Note
that you will
not
find EvoX at this site, only documentation.
What I can suggest, in
order
to acquire
EvoX,
is
that you download BitTorrent from http://bit-
torrent.com and then find an Xbox fan website
that
hosts torrents where you will be able to get a
copy
of
EvoX
from
another
peer (which
is
how BitTorrent works, as a peer-to-peer file-sharing
system).
What you are looking for
is
twofold: Remember, a dashboard replacement
must
include both the
BIOS image and the Dashboard program. First, you need the EvoX BIOS image
file.
At the time
of
this writing, the latest version
is
MS,
but
the M7
is
probably a better choice because it can be
customized (see the section "Creating a Custom BIOS" later
in
this chapter for details).
The second part you need
is
the EvoX Dash. Usually, this will come with two files: evoxdash. xbe
and evox.
ini.
You
may also notice two folders called SKIN and TRAINERS (which are optional).
Installing
the
EvoX
Dashboard
The only practical
way
to install EvoX
is
to use a
LAN
connection, as described in the preceding
chapter.
Really,
ifyou
don't
have a network to be able to transfer files between your Xbox and PC,
you will be severely limited by what you can do with your
modded
Xbox anyway, so it's a neces-
sity.
You
can use a hub
or
a router,
both
of
which are as inexpensive (and essential) as the
mod
chip itself.
Installation
of
EvoX
is
simple when you have the
files
ready to be installed. First, connect to your
Xbox using FTP
or
5MB (per the preceding chapter).
Then
copy
evoxdash.
xbe and evox.
ini-
as
well
as
the SKIN and TRAINERS folders if you
wish-to
the
C:
partition
on
the Xbox hard drive.
160
CHAPTER
8 EvolutionX Dashboard
Just copy the files to the root folder
of
the
C:
partition. (Don't
put
EvoX
inside a subfolder
because the BIOS expects the Dashboard to be located in the root
of
C:.)
While you are at it, copy the
M8.
BIN
file
(the
BIOS
inlage) to the same location
so
you can install
it from the Xenium
0/5
as
a launch item later.
Believe it
or
not, that
is
all there
is
to installing the
EvoX
Dash, so you're all done
as
far
as
that
goes, although you'll want to read the next section to learn how to customize EvoX by modifying
the evox.
ini
file.
Installing
the
EvoX BIOS
Okay, you've copied the
EvoX
fUes
to your Xbox hard drive
by
one method
or
another, including
the
M8.BIN
(or some as-yet-unknown new version
of
the BIOS). Next, you need to add a new
launch item to the Xenium
0/5
via the Launch menu. The
file
system on the Xbox
hard
drive
should look something like Figure
8.2.
E~e
Edit:
'fjew
F~vont:es
10015
l::ielp
,"Baok •
iJ
ase",oh
~Fold",
J
~
1:1.;
)<
:r)
.ffij.
,Agd,
I;)
\\,bo,\C
.d.RJ~
•
::oJ
~Go
_ll:~-
':1
Xbox
System
PartitIOn
+
This
folder
IS
Online.
o
Free:
321
'Yle
Seled
an
Item
to
IeW
Its
description.
12/27/2003
'1:25
PM
12/27/2003
'1:26
PM
12/27/200301:26
prl'1
12/27/200301:26
PM
12/27/2003
'1:26
prl'1
12/27/2003
'1:26
PM
12/27/20034:26
PM
9/2.5/2004
11
:40
AM
1212711003
'1:26
pr"
7/6/202-1
7:22
PM
7/6/20247:22
PM
12/27/20034:26
Pf>l
12/27/20034:26
PM
12/27/20034:26
PM
Mocbfied
Size
Tyoe
File
Folder
Fde
Folder
f~e
Folder
Flte
Folder
F~e
Folder
F~e
folde.
Fde
Folder
"t
B
conflQuraUonSeltinQs
752
1'8
XBE
File
256
1,8
BIr.!
File
256
1:8
BIN
File
16,669 fB
XTF
File
15,248
r.a
XTF
FIle
1,9161:B
>''BE
Fde
UAudio
, :JbacLup
:Jfont~
JShn
JTr~lnefs
:J
xbo,(daclidata.16~.!Idoo
:Jxod<!lsh
_
:EJevo~,inl
~evoXdMh.xbe
~m8,bln
~m8_16.bln
~
XBox
Bool"xtf
~>:box,),.tf
~)'boxda$h')'be
.:J
.
Capacity:
'199
t·m
o
Used:
178
filS
~
i.,:'J
C
14
ob~d(s)
3-I.2MB
FIGURE
8.2
The EvoX
BIOS
and Dash files have been copied
to
the
Xbox hard
drive.
You'll notice two BIN
files
in the
file
list:
M8.BIN
and
M8_16.BIN.
If
you own a revision
1.6
and
have successfully installed a
mod
chip in it, you'll want to use the
M8_16.
BIN
file,
which was cre-
ated specifically for that new revision (1.6
is
somewhat different than older versions,
as
you have
learned).
You
do
not
want
to
install a standard M8.
BIN
BIOS in your Xbox 1.6,
so
if
you aren't
absolutely sure which version
of
the BIOS you have, chances are it
is
not for the 1.6, and you need
to find the correct one for your Xbox.
All
other revisions will use the standard M8.
BIN.
If
your Xbox
is
running,
turn
it off by pressing the power button. Then, bring up the Xenium
0/5
bypressing the eject button. (Pressing the eject button brings up the
0/5
regardless
of
any default
launch item that
is
configured to
run
automatically after the power
button
is
pressed.) Next, open
the Launch menu,
as
shown in Figure 8.3.