adobe flash cs5 on demand part 21 pdf
Bạn đang xem bản rút gọn của tài liệu. Xem và tải ngay bản đầy đủ của tài liệu tại đây (547.92 KB, 7 trang )
ptg
124 Chapter 3
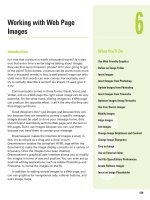
The Perspective Angle affects the size and view of 3D movie clips on
the Stage. It’s like zooming in and out with a camera lens, which
changes the angle of view through the lens. When you increase the
angle, 3D objects appear closer to the viewer. When you decrease the
angle, 3D objects appear further away. The default angle is 55 degrees
of view, which is like a normal camera lens. You can adjust the value
from 1 degree to 180 degrees. You can control only one viewpoint, or
camera. Each Flash file has only one Perspective Angle.
Changing the
Perspective Angle
in 3D Space
Change Perspective Angle in
3D Space
Select the 3D movie clip instance
on the Stage that you want to
change.
Click the Window menu, and then
click Properties to open the
Property Inspector.
Enter a new value in the
Perspective Angle box or drag the
hot text to change the value in the
Property Inspector.
3
2
1
Did You Know?
You can automatically change the
appearance 3D objects when you
change the size of the Stage.
Click the
Modify menu, click Document, select
or clear the Adjust 3D Perspective
Angle to preserve current stage pro-
jection check box, and then click OK.
2
3
1
From the Library of Wow! eBook
ptg
Chapter 3 Creating Graphics 125
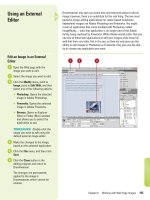
Vanishing Point gives you the ability to move 3D movie clips and still
maintain the same visual perspective of the original. Vanishing Point
controls the orientation of the z-axis of 3D movie clips on the Stage. As
you move the z-axis, 3D movie clips recede towards the Vanishing
Point, which you can adjust to create the appearance you want. Each
Flash file has only one Vanishing Point. If you move the Vanishing Point
back to the default position in center of the Stage, you can use the
Reset button in the Property Inspector.
Adjusting the
Vanishing Point
in 3D Space
Adjust the Vanishing Point in
3D Space
Select the 3D movie clip instance
on the Stage that you want to
change.
Click the Window menu, and then
click Properties to open the
Property Inspector.
Enter an x- and y-axis value in the
Vanishing Point boxes or drag the
hot text to change the value in the
Property Inspector.
As you drag the hot text, guides
indicating the location of the
Vanishing Point appears on the
Stage.
To move the Van is hing Poin t bac k
to the center of the Stage, click
the Reset button in the Property
Inspector.
4
3
2
1
2
3
4
1
From the Library of Wow! eBook
ptg
126 Chapter 3
Cutting and Pasting
Graphics Between
Layers
Paste Objects Between Layers
Create or open a document with
several layers.
Select one or more objects on the
Stage.
Flash selects the object’s layer in
the Timeline.
Click the Edit menu, and then click
Cut or Copy.
Select a destination layer in the
Timeline.
Click the Edit menu, and then click
Paste In Center.
Flash pastes the objects on the
Stage in the middle of the active
layer.
5
4
3
2
1
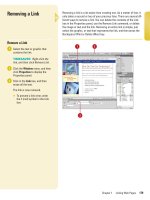
Unless you lock or hide layers, or lock objects, the graphics on all lay-
ers are available for editing. You can select objects on one or more lay-
ers, cut or copy them, and then paste them all into a single layer. Flash
can have only one layer active at a time. When you create and paste
graphics, Flash places them on the active layer of a document. You can
paste objects in two different ways: Paste In Center and Paste In Place.
Paste In Center puts objects in the center of the open Flash window,
which might not be the Stage. If you want to paste to the center of the
Stage, you need to center the Stage in the open window. Paste In
Place puts objects at the same location it had been when you cut or
copied it.
2
1
4
Shape pasted on
layer 2 in the center.
Did You Know?
You can use the area around the Stage
to store graphics and other objects.
Flash allows you to use the area
around the Stage, called the
Pasteboard, to store items for use later
without having them appear on the
Stage when you play the movie (SWF)
file.
From the Library of Wow! eBook
ptg
Chapter 3 Creating Graphics 127
Use the Paste In Place
Command Between Layers
Create or open a document with
several layers.
Select one or more objects on the
Stage.
Flash selects the object’s layer in
the Timeline.
Click the Edit menu, and then click
Cut or Copy.
Select a destination layer in the
Timeline.
Click the Edit menu, and then click
Paste In Place.
Flash pastes the objects into their
original locations on the Stage.
5
4
3
2
1
4
Shape pasted on
layer 2 in place.
1
2
From the Library of Wow! eBook
ptg
128 Chapter 3
Working with
Graphics on Different
Layers
Edit Object on Inactive Layers
Create or open a document with
several layers.
Click the Selection tool on the
Tool s pan el .
Select an object on the Stage.
Flash selects the object’s layer in
the Timeline.
Click a blank area of the Stage.
Flash deselects the object but
keeps the active layer.
Make changes to another object in
another layer (inactive layer)
without actually selecting the
object. You can do any of the
following:
◆ Drag an object’s outline to
reshape it.
◆ Select a tool on the Tools panel,
such as the Paint Bucket tool,
and use it to modify the object.
Flash modifies the object in the
inactive layer. The active layer
didn’t change. Flash changes
active layers only if you select an
object.
5
4
3
2
1
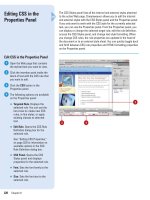
When you select an object on the Stage, Flash selects the object’s
layer in the Timeline. The reverse is also true. When you select a layer
in the Timeline, Flash selects all the objects for that layer on the Stage.
As you work with objects on different layers, it helps to know how
selections work. Unless you lock or hide layers, or lock objects, the
objects on all layers, either active or inactive, are available for editing.
You can activate a layer and edit objects on inactive layers.
2
Layer 1 active
3
4
Layer 1 still active
5
1
From the Library of Wow! eBook
ptg
Chapter 3 Creating Graphics 129
Distributing Graphics
to Layers
Place Selected Objects on
Separate Layers
Create or open a document with
several objects on a single layer.
Select all the objects on a single
layer you want to distribute to
separate layers.
TIMESAVER
Click the Edit
menu, and then click Select All or
press
A
+A (Mac) or Ctrl+A (Win).
Click the Modify menu, point to
Timeline, and then click Distribute
To Layers.
TIMESAVER
Press
A
+Shift+D
(Mac) or Ctrl+Shift+D (Win) to
distribute to layers.
Flash creates a layer for each
object. New layers appear at the
bottom of the Timeline in the order
in which you originally placed
them on the Stage. Each object is
placed in the same location on the
Stage (like the Paste In Place
command).
3
2
1
If you have several objects on a single layer, and need to move them
onto separate layers, you can use Cut and Paste in place for each
object or you can save time by using the Distribute to Layers command.
The Distribute to Layers commands puts each object (shapes, groups,
and symbols) in a selection on a separate layer; any unselected objects
remain on their original layer. This command comes in handy when you
want to create a motion tweening animation, which requires objects to
be on individual layers.
2
Shape on layer 5
Text on la ye r 3
Shape on layer 4
Text on la ye r 2
See Also
See Chapter 8, “Animating with Motion
Tweening” on page 237 for information
on using motion tweening.
1
From the Library of Wow! eBook
ptg
130 Chapter 3
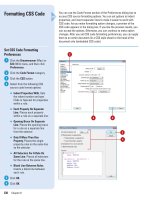
The Drawing category on the Preferences dialog box contains a num-
ber of drawing settings that control the sensitivity and behavior of
Flash's drawing tools. Make changes to the tolerance levels for
smoothing or straightening, set the sensitivity for line and shape recog-
nition, or fine-tune snapping. You can exercise greater control over
your drawing or allow Flash to perform corrections and adjustments as
you draw. You can customize the way you use Pen tools, draw connect-
ing lines and smooth curves, and recognize lines and shapes.
Changing Drawing
Settings
Change the Drawing Settings
Click the Flash (Mac) or Edit (Win)
menu, and then click Preferences.
Click the Drawing category.
Specify the drawing option you
want:
◆ Pen Tool options. Select check
boxes to show pen preview,
solid points, and precise
cursors.
◆ Connect Lines. Determines how
close the ends of any two lines
need to be before Flash
connects them. It controls when
a line is converted into a
perfectly straight line.
◆ Smooth Curves. Determines the
amount of smoothing applied to
a drawn line. The lower the
smoothing applied, the closer
the line appears to what you
have drawn.
◆ Recognize Lines. Defines how
straight a line drawn with the
Pencil tool must be before it’s
converted into a perfectly
straight line.
◆ Recognize Shapes. Sets how
precise simple geometric
shapes must be drawn before
they are detected as shapes.
◆ Click Accuracy. Determines how
near to a shape the pointer must
be before it’s recognized.
◆ IK Bone Tool. Automatically sets
the transformation point.
Click OK.
4
3
2
1
2
3
4
From the Library of Wow! eBook