adobe flash cs5 on demand part 25 docx
Bạn đang xem bản rút gọn của tài liệu. Xem và tải ngay bản đầy đủ của tài liệu tại đây (598 KB, 6 trang )
ptg
148 Chapter 4
Graphic symbols can be used for static images and for animations that
are in sync with the main Timeline. There are three instance options
available to them: Loop, Play Once, and Single Frame. Set the instance
to Loop if you want the symbol's Timeline to play continuously. Play
Once plays the Timeline of a graphic symbol once and then stops.
Single frame sets the instance to display as a single frame contained in
the graphic symbol's Timeline. Unlike movie clip symbols, an animation
contained in a graphic symbol can be seen in the main Timeline without
having to export the Flash movie. However, any ActionScript and
sounds that have been included in a graphic symbol's Timeline will not
work.
Using Graphic
Symbols
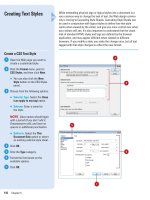
Create a Graphic Symbol
Click the Insert menu, and then
click New Symbol.
TIMESAVER
Press
A
+F8
(Mac) or Ctrl+F8 (Win) to create a
new symbol.
Type in a name for the symbol.
Click the Typ e list arrow, and then
click Graphic.
Click OK.
Flash enters a symbol editing
mode that contains an empty
Timeline for that symbol.
4
3
2
1
3
2
4
Did You Know?
Graphic symbol animations are synced
up to the main Timeline.
For example,
if the animation in the graphic symbol
spans 10 frames, the instance in the
main Timeline must also span 10
frames if the entire animation is to be
seen.
From the Library of Wow! eBook
ptg
Chapter 4 Working with Groups, Symbols, and Instances 149
Change the Options for Graphic
Symbol Instances
Select a graphic symbol instance
on the Stage.
Click the list arrow in the Property
Inspector, and then select from the
following graphic options:
◆ Loop. The Timeline in the
graphic symbol will loop
continuously.
◆ Play Once. The Timeline in the
graphic symbol will play once
and stop. If there is no
animation in the symbol or if
there is only artwork on one
frame, it will be treated as a
static graphic.
◆ Single Frame. Sets the instance
to a single frame in the Timeline
of the master symbol. When
this is selected, the graphic
symbol is treated as a static
graphic.
2
1
2
Options for graphic
symbol instances
Converting a Graphic to a Symbol
In addition to creating a new symbol and adding a graphic, you can
also convert an existing graphic to a symbol. Select the vector
graphic on the Stage, click the Modify menu, and then click Convert
To Sym bo l. In t he Co nv er t to Sy mb ol d ia lo g box , en te r a nam e (th at
you’ll refer to in an ActionScript), and then click the Graphic option
as the type. The registration grid within the symbol bounding box dis-
plays a small black square to indicate the registration point for the
graphic.
For Your Information
From the Library of Wow! eBook
ptg
150 Chapter 4
Use buttons to add interactivity to your movie. Button symbols have
their own four-frame Timeline. The first three frames define the states
of the button: up, over, and down. The first frame is the Up state, which
is the appearance of the button when in its normal, non-active state.
The second frame is the Over state, which is triggered when the user
places their mouse over the button. The third frame is the Down state,
which appears when the user presses the button with their mouse. The
fourth frame—which is invisible outside of the symbol editing mode—
defines the active area. This is the area that the user must place their
mouse over to activate the other states of the button. You can assign
actions, such as sound or animation, to instances of buttons that tell
Flash what to do when the button is clicked.
Using Button Symbols
Create a Button
Click the Insert menu, and then
click New Symbol.
TIMESAVER
Press
A
+F8
(Mac) or Ctrl+F8 (Win) to create a
new symbol.
Type in a name for the symbol.
Click the Typ e list arrow, and then
click Button.
Click OK.
Place artwork in the keyframe of
the first frame.
This represents the button's Up
state, its normal, inactive state.
Click the Insert menu, point to
Timeline, and then click Keyframe
to add a keyframe in the second
frame (the Over state).
TIMESAVER
Press F6 to
quickly add a keyframe and press
F7 to add a blank keyframe.
6
5
4
3
2
1
3
4
5
2
From the Library of Wow! eBook
ptg
Chapter 4 Working with Groups, Symbols, and Instances 151
Change the artwork or add new
artwork in this frame.
Click the Insert menu, point to
Timeline, and then click Keyframe
to add a keyframe in the third
frame (the Down state).
Alter the artwork or add new
artwork in this frame.
Click the Insert menu, point to
Timeline, and then click Keyframe
to add a keyframe in the fourth
frame (the active area).
Add a simple graphic (a rectangle
or oval, for example) to define the
active area.
To assig n a sound to a st at e of t he
button, select the state’s frame in
the Timeline, open the Property
Inspector, and then:
◆ Select a sound from the Sound
list arrow menu.
◆ Select an event from the
Synchronization list arrow
menu.
Click the Control menu, point to
Test Movie, and then click Test.
TIMESAVER
Press
A
+Return
(Mac) or Ctrl+Enter (Win) to test it.
13
12
11
10
9
8
7
7 9 11
See Also
See “Enabling and Disabling Buttons”
on page 152 for information on turning
buttons on and off.
Adding Animation to a Button
There are several ways to add animation to a button. First, you can
place an instance of the button symbol on the Stage and assign
actions to it, not to frames in the button’s Timeline. Another way is to
create a button using a movie clip symbol or a button component. You
can create more complex animation with the movie clip button. The
downside is that file size increases. The button component provides
more pre-built button types, such as PushButton and RadioButton,
and customizable features. See Chapter 18, “Adding and Modifying
Components” on page 427 for information on components and using
button components.
For Your Information
From the Library of Wow! eBook
ptg
152 Chapter 4
Flash allows you to test your buttons within the development environ-
ment without having to export the movie. You can test the behavior of
simple buttons by toggling the Enable Simple Buttons feature on and
off. When buttons are enabled, you can't select them or enter their
symbol editing mode normally. Disable this feature if you need to enter
the symbol mode. You can quickly see how the different states of your
button behave without having to export the whole flash movie. Any
ActionScript applied to the button will be ignored.
Enabling and
Disabling Buttons
Enable and Disable Buttons
Place a button on the Stage.
Click the Control menu, and then
click Enable Simple Buttons to
enable the button.
TIMESAVER
Press Ctrl+Alt+B
(Win) or Option+
A
+B (Mac) to
toggle the enabling and disabling
of simple buttons.
Place the mouse over the button to
test the Over state.
Press down on the button to test
the Down state.
To disab le t he b ut to n, cli ck the
Control menu, and then click
Disable Simple Buttons.
5
4
3
2
1
The Up state is the
button’s normal,
inactive state.
The Over state is
active when the
mouse pointer
passes over it.
The Down state
is active when
the mouse
pointer presses
down on it.
3
4
2
See Also
See “Using Button Symbols” on page
150-151 for information on creating a
button.
Did You Know?
Regardless of whether buttons are
enabled or disabled, they will be func-
tional when you export your movie.
The Enable Simple Buttons command
is only relevant to the Flash develop-
ment environment.
From the Library of Wow! eBook
ptg
Chapter 4 Working with Groups, Symbols, and Instances 153
Buttons do not require graphics to be placed in the hit state frames (the
first three frames). As long as the active area contains a shape, the
button will be invisible but will be functional and ActionScript can be
applied to it. The active area is the fourth frame in the button symbol
Timeline. An instance of an invisible button appears as a transparent
blue shape in the main Timeline, but it will not be visible in the exported
movie.
Creating Invisible
Buttons
Create an Invisible Button
Click the Insert menu, and then
click New Symbol.
TIMESAVER
Press
A
+F8
(Mac) or Ctrl+F8 (Win) to create a
new symbol.
Click the Typ e list arrow, and then
click Button.
Click OK.
Click the Insert menu, point to
Timeline, and then click Keyframe
to add a keyframe in the fourth
frame (the active area).
TIMESAVER
Press F6 to create
a keyframe.
Add a simple graphic (a rectangle
or oval, for example) to define the
active area.
Make sure the first three frames
remain empty.
Return to the main Timeline.
Drag the invisible button from the
Library to the Stage.
Invisible buttons appear as
transparent blue shapes but are
invisible in the final export.
8
7
6
5
4
3
2
1
4
The first three frames of the
button remain empty.
8
An invisible button appears as a
transparent blue square in the
Flash development environment.
2
3
From the Library of Wow! eBook