adobe flash cs5 on demand part 34 pdf
Bạn đang xem bản rút gọn của tài liệu. Xem và tải ngay bản đầy đủ của tài liệu tại đây (604.63 KB, 5 trang )
ptg
206 Chapter 6
Flash allows you to import multiple files simultaneously to save time.
This is useful if you have many files to import. You can select multiple,
non-sequential files in the Import dialog box. Choose to import to the
Library or to the Stage directly. When you import to the Stage, the file is
stored in the Library and a copy is placed on the Stage so you can
begin editing it immediately. If you attempt to import a series of files
that are numbered sequentially, Flash detects this and produces a dia-
log box to handle this. When sequential images are imported, they will
appear in separate frames by order of the number in their file name.
This is extremely useful for image sequences where a series of images
forms an animation.
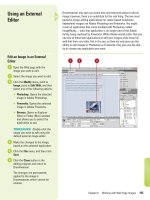
Importing
Multiple Files
Import Multiple Files or a
Sequence of Files
Click the File menu, point to
Import, and then click Import To
Stage or Import To Library.
Click the Show popup (Mac) or
Files Of Types list arrow (Win),
and then select the format of the
file you want to import.
Navigate to the drive or folder
where the file is located.
Select the first file you want to
import.
To im port multiple files, hold down
the A (Mac) or Ctrl (Win) key and
click additional files to select
them.
Click Import (Mac) or Open (Win).
For a sequence of files, Flash
detects that this image is part of a
sequence and asks whether you
want to import all of them at once.
Click Yes.
The numbered files are imported
and placed on separate sequential
keyframes on the selected layer in
the Timeline.
7
6
5
4
3
2
1
5
Multiple files imported
appear stacked on top
of each other. Press
down and drag with
your mouse to reveal
images underneath.
4
Each imported image appears on a
separate frame sequentially.
6
3
2
From the Library of Wow! eBook
ptg
Chapter 6 Importing Graphics 207
You can paste a bitmap image from other image editing programs, such
as Adobe Photoshop or Adobe Fireworks. Simply use the standard
copying procedure in the program of your choice to place the bitmap
into the clipboard, which is where the operating system dynamically
stores information you copy, and then paste it into Flash directly on the
Stage. Copying images from other programs works well for bitmaps.
However, results are unpredictable when pasting vector graphics from
other programs. Often they become corrupted when they are copied to
the clipboard, depending upon the origin program or the operating sys-
tem. It is best to use the Import command to import vector graphics into
Flash.
Copying Images from
Other Programs
Paste from the Clipboard
Copy the image to the clipboard in
an image-editing program.
Launch or switch to Flash, and
then open the Flash document in
which you want to paste an image
from the clipboard.
Select an unlocked layer or
keyframe.
Click the Edit menu, and then click
Paste in Center or Paste in Place.
TIMESAVER
Press
A
+V
(Mac) or Ctrl+V (Win) to quickly
paste in center from the clipboard;
press
A
+Shift+V (Mac) or
Ctrl+Shift V (Win) to quickly paste
in place from the clipboard.
4
3
2
1
3
Image is pasted
onto the Stage
and placed in the
Library.
From the Library of Wow! eBook
ptg
208 Chapter 6
You can edit a bitmap in its native program, such as Photoshop CS5 or
Fireworks 3, or some other image editing tool. Once it is re-saved or
updated to the hard drive, Flash automatically updates the bitmap back
when you return to Flash (New!). If an image is moved to another loca-
tion, you can manually update it. In addition, you can import another
image to replace the bitmap in the Library. In either case, every copy of
the bitmap used in the Flash movie (including bitmap fills) will update
with these changes. This is a convenient way to make global changes
to bitmap art included in your project.
Editing Bitmaps in an
Outside Editor
Update an Image Edited Outside
of Flash
Import a bitmap into Flash.
Open the Library panel.
Right-click (Win) or Control-click
(Mac) the bitmap’s icon, and then
click Edit with Photoshop CS5 or
Edit with Fireworks 3.
◆ For other imaging programs,
click Edit With, select an
image-editing program, and
then click OK.
In the image-editing program,
modify the bitmap, click the File
menu, and then click Save or
Update, and then return to Flash.
The bitmap is automatically
updated in Flash.
To ma nually update an image or
relink to a different location, right-
click (Win) or Control-click the
icon in the Library panel, click the
Properties, click Update, and then
click OK.
5
4
3
2
1
5
Larger preview of the bitmap
3
2
From the Library of Wow! eBook
ptg
Chapter 6 Importing Graphics 209
Replace a Bitmap
Open the Library panel, and then
select the bitmap from the item
list.
Click the Properties icon in the
bottom of the panel or double-click
the bitmap file in the list.
Click Import.
Navigate to the replacement file
on your hard drive.
Select the replacement file.
Click Import (Mac) or Open (Win).
Change the name and any other
options you want.
Click OK.
8
7
6
5
4
3
2
1
3
6
Image is replaced with new imported image. All copies
used in the Flash movie update to this new image.
5
8
4
Did You Know?
Flash preserves the path when you
import a bitmap.
When you import a
bitmap into Flash, the path to that
image is preserved in the Bitmap
Properties. If you have moved the
image to another directory on your
hard drive and you want to update the
file in the Library with the new
changes, navigate to it by using the
Import button in the Bitmap Properties
window.
From the Library of Wow! eBook
ptg
210 Chapter 6
When you export a Flash movie, you can decide how much color infor-
mation to include in each exported bitmap. This is called compression.
The more compression you apply, the less color information is included
and the lower the size and quality of the image. Lossy compression
reduces the file size by removing color information, while lossless com-
pression reduces the file size (not as much) without removing informa-
tion. You can choose to set a global compression for all bitmap files
used in a Flash movie or you can set a separate compression for each
image. As with all image compression, file size needs to be weighed
against image quality. It is always best to experiment until you get the
results you want.
Setting Bitmap
Compression
Set Compression for a Bitmap
Open the Library panel.
Select the bitmap from the Library
item list in which you want to set
compression.
Click the Properties icon in the
bottom of the panel or double-click
the bitmap file in the list.
Select the Allow Smoothing check
box to anti-alias the edges of the
image, making it appear smoother.
Click the Compression popup, and
then select from the following
options:
◆ Lossless (PNG/GIF).
Compresses the image without
losing any information; remains
in its highest quality.
◆ Photo (JPEG). You can choose
to use the compression
information contained by
selecting the Use Document
Default Quality check box. By
deselecting this feature you
can set the level of JPEG
compression applied to the
bitmap. The values are 1-100.
The higher the number, the less
compression applied,
producing a higher quality
image.
Click OK.
6
5
4
3
2
1
2
3
6
5
4
Thumbnail
preview
Click to test
and preview
the image in
thumbnail.
1
From the Library of Wow! eBook