Mysql your visual blueprint for creating open source databases- P5 ppt
Bạn đang xem bản rút gọn của tài liệu. Xem và tải ngay bản đầy đủ của tài liệu tại đây (636.54 KB, 20 trang )
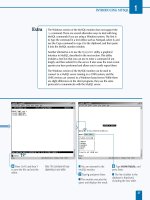
‹ Type ALTER TABLE links
and press Enter.
■ The MySQL monitor
prompts for the next line.
› Type CHANGE url link
VARCHAR(255); and press
Enter.
■ MySQL now changes the
name of the column.
ˇ Type DESCRIBE links; and
press Enter.
■ This displays the column
list again. Note that the new
name is now listed for the
link column.
MODIFY TABLES
3
If you change the column order using ALTER TABLE, it may create potential
problems with applications that were built to work with the table. For example,
suppose an application used the following command to add a record to a table:
Example:
INSERT INTO links
VALUES("Netscape",
" />"Netscape Corp.");
This command adds a row to the table, specifying values for each of the three
columns. While this command will work with the current version of the links
table, it does not specify the columns for the insert and thus relies on the
current column order. If you have changed the column order using the
CHANGE or ADD COLUMN features of ALTER TABLE, the INSERT command
will fail, or worse, may insert incorrect data into the table.
Applications that retrieve data without using column names can run into the
same problem. While the best practice is to specify column names in all
queries, you can avoid these potential issues if you avoid changing the order
of table columns.
If your applications do use column names, of course, a renamed column
could cause an error. Keep both of these issues in mind any time you modify
a working table.
See Chapter 4 for more information about the INSERT command in MySQL.
67
516922 Ch03.F 9/26/02 11:32 AM Page 67
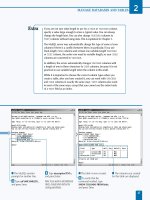
Note: This example uses the testdb
database and the links table. See
Chapter 1 or the CD-ROM if you
have not created them.
⁄ From the MySQL monitor,
type
USE testdb; and press
Enter.
■ The database is now
selected.
¤ Type ALTER TABLE links
and press Enter.
■ The MySQL monitor
prompts for the next line.
‹ Type CHANGE description
description VARCHAR(200);
and press Enter.
■ The column's type is now
changed.
W
hile it is important to choose each column's type
and attributes carefully when creating a table,
you can change a column's type using ALTER
TABLE. The basic syntax for this is similar to renaming a
table, using the CHANGE keyword. For example, the
following command changes the description field in the
links table to a VARCHAR(200) column:
ALTER TABLE links CHANGE
description description VARCHAR(200);
To avoid renaming the table when using CHANGE, specify
the same name for the old and new names. You can also
specify any attributes of the column you want to change
with the CHANGE keyword. For example, you can specify the
NULL or NOT NULL attributes or specify a default value
using the DEFAULT keyword. Include these items after the
column definition.
You can alternately use the MODIFY keyword, which allows
changing a column type but not renaming it. The MODIFY
keyword is supported only in MySQL 3.22 and later. The
following example makes another change to the description
column using MODIFY:
ALTER TABLE links
MODIFY description VARCHAR(150);
When you change a column's type, MySQL makes an effort
to preserve the data in existing rows as much as possible
and convert it to the new type. If you change a table's type
to a type that stores less data — for example, changing a
TEXT column to a VARCHAR column — the values will be
truncated to fit in the new size. Changing the column's type
back to its original type will not restore the data.
As when creating a table or adding a column, the MySQL
server may not allow some changes. If the table currently
has one or more variable-length fields, you cannot change a
column's type to a fixed-length CHAR field. Conversely, if
the existing fields are fixed-length, you cannot change one
to a variable-length field unless you make the same change
to all columns.
CHANGE A COLUMN TYPE
MySQL
68
CHANGE A COLUMN TYPE
516922 Ch03.F 9/26/02 11:32 AM Page 68
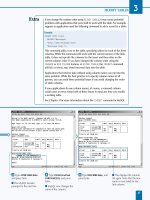
› Type ALTER TABLE links
and press Enter.
ˇ Type MODIFY description
VARCHAR(150);
and press
Enter.
■ This changes the column
type again.
Note: If
MODIFY
does not work,
you may be using a version of
MySQL prior to version 3.22.
Á Type DESCRIBE links; and
press Enter.
■ The column list for the
table is displayed, including
the modified description
column.
MODIFY TABLES
3
69
When you want to make one change to a column in a table, often you will find that
other changes are required. For example, suppose you want to make the title field of
the links table into a primary key. The following ALTER TABLE command tries to add
the primary key:
Example:
ALTER TABLE links
ADD PRIMARY KEY (title);
If you attempt to use this command, however, MySQL will display an error message
because you cannot make a column a primary key unless it has the NOT NULL attribute.
To add the primary key, you must first use CHANGE or MODIFY to add this attribute to the
column's definition.
You can change the attributes and add the primary key within the same ALTER TABLE
statement, as long as the ADD PRIMARY KEY command appears last, after the NOT
NULL attribute has been set. The following example correctly adds the primary key:
Example:
ALTER TABLE links
CHANGE title title VARCHAR(100) NOT NULL,
ADD PRIMARY KEY(title);
516922 Ch03.F 9/26/02 11:32 AM Page 69
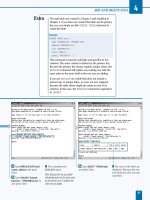
Note: This example uses the address
table in the testdb database, created
in Chapter 1. The country column
was added in the section “Add a
Column to a Table,” earlier in this
chapter.
⁄ From the MySQL monitor,
type
USE testdb; and press
Enter.
■ The database is now
selected.
¤ Type ALTER TABLE address
and press Enter.
■ The MySQL monitor
prompts for the next line.
‹ Type DROP COLUMN
country; and press Enter.
■ The column is now deleted
from the table.
I
f you no longer need a column in a table, you can use
ALTER TABLE with the DROP COLUMN keywords to
delete the column from the table. For example, the
following command deletes the country column from the
address table:
ALTER TABLE address DROP COLUMN country;
This command removes the column from the table
definition, and removes any data stored in the column
in the existing rows of the table. As with other DROP
commands, there is no warning or confirmation before
the data is lost, so be sure you do not inadvertently delete
a column that contains important data.
The word COLUMN is optional. You can simply use DROP and
the column name to drop a column. You can combine DROP
with other ALTER TABLE commands within the same
query by separating the commands with commas. For
example, this command drops the country column and adds
a test column:
ALTER TABLE address DROP COLUMN country,
ADD COLUMN test INTEGER(5);
If you drop a column that is used as an index or a primary
key on the table, the indexing information is also deleted.
If the index is based on multiple columns, it is not deleted
until all of the columns associated with the index have been
dropped from the table.
If you attempt to drop a column and the table only has one
column, MySQL will return an error because a table must
have at least one column. You can delete the table entirely
using the DROP TABLE command, explained in Chapter 2.
DELETE A COLUMN
MySQL
70
DELETE A COLUMN
516922 Ch03.F 9/26/02 11:32 AM Page 70
› Type ALTER TABLE address
and press Enter.
ˇ Type DROP COLUMN
custnum; and press Enter.
■ This deletes another
column.
Note: The country and custnum
columns were added earlier in this
chapter.
Á Type SHOW COLUMNS
FROM address; and press
Enter.
■ The list of columns is
displayed, without the
dropped column.
MODIFY TABLES
3
71
When you use most variations of the ALTER
TABLE command, the MySQL server actually
performs the alterations in several steps. It first
creates a new table with a copy of the existing
table's data. Next, the changes you specified in
your query are made to the new table. Finally,
the original table is deleted and the new one is
renamed to the old name.
Clients are able to read data from the table
during the alteration process, but no data
can be written to the table until the process is
completed. Because alterations may take a while
on large tables and consume a large amount of
the server's CPU and memory resources, it is best
to alter tables while few clients are using them.
Because ALTER TABLE copies the table, you can
use it to sort a table's data. To do this, use the
ORDER BY keywords:
Example:
ALTER TABLE address ORDER BY name;
While you usually do not need to manually sort a
table in this way, it can improve performance with a
large table that will not be modified frequently. The
sorting process can take a long time on a large
table.
516922 Ch03.F 9/26/02 11:32 AM Page 71
Note: These examples use the
address table in the testdb database.
The indexes and primary key were
added earlier in this chapter.
⁄ From the MySQL monitor,
type
USE testdb; and press
Enter.
■ The database is now
selected.
¤ Type SHOW INDEX FROM
address;
and press Enter.
■ The list of indexes is
displayed.
‹ Type ALTER TABLE address
DROP INDEX stateindex; and
press Enter.
■ The index is deleted.
› Type ALTER TABLE address
DROP INDEX key1; and press
Enter.
■ This deletes the unique
index.
Y
ou can remove an index or a primary key from a
table with the ALTER TABLE command. This may be
useful if you are adding a new key, or if you no longer
require an index — if you do not frequently search on a
column, having an index on the column may decrease
rather than increase the MySQL server's speed.
To remove an index or a unique index, use the DROP
INDEX keywords and specify the name of the index to
delete. While the index name, by default, is the same as the
column name it indexes, you may have specified a different
name for the index when it was created. For example, the
following command removes the stateindex index you
added earlier in this chapter from the address table:
ALTER TABLE address DROP INDEX stateindex;
Because this command requires the index name rather than
the column name, you can use the SHOW INDEX command
to determine the name of the index if you are not sure. If
you did not specify an index name when the index was
created, it will have the same name as the column it
indexes. The following command lists the indexes for the
address table:
SHOW INDEX FROM address;
When you drop an index, only the indexing information is
deleted. No data in any column is affected, and you can
re-create the index using another ALTER TABLE command
at any time.
You can also delete a primary key using ALTER TABLE.To
do this, use the DROP PRIMARY KEY keywords. Because
there can be only one primary key, an index name is not
required. This command removes the primary key from the
address table:
ALTER TABLE address DROP PRIMARY KEY;
DELETE AN INDEX OR PRIMARY KEY
MySQL
72
DELETE AN INDEX
516922 Ch03.F 9/26/02 11:32 AM Page 72
Note: The testdb database should
already be selected.
⁄ Type ALTER TABLE address
DROP PRIMARY KEY;
and
press Enter.
■ The primary key is
removed.
¤ Type SHOW INDEX FROM
address; and press Enter.
■ Because the index and
primary key have been
removed, the list is now
empty.
MODIFY TABLES
3
73
DELETE A PRIMARY KEY
If you are removing an index or primary key, you often need to add a
new index or primary key. You can perform both of these actions with
a single ALTER TABLE command. The following example removes
the index and primary key from the address table and then adds a
new auto-increment column and sets it as the new primary key.
Example:
ALTER TABLE address
DROP INDEX stateindex,
DROP PRIMARY KEY,
ADD COLUMN num INT UNSIGNED AUTO_INCREMENT,
ADD PRIMARY KEY (num);
When you use multiple operations with ALTER TABLE, they are
performed in order. This example will only work if the existing
primary key is dropped before the last line of the command where
the new one is added.
You can combine any of the available clauses for ALTER TABLE
in this way. However, it is often more practical to use separate
statements. If you make the changes in separate statements, you
can check the table and verify that the operation worked before
continuing with further changes.
516922 Ch03.F 9/26/02 11:32 AM Page 73
Note: The instructions for creating
the MailList table are in Chapter 2
and on the CD-ROM.
⁄ From the MySQL monitor,
type
USE testdb; and press
Enter.
■ The database is now
selected.
¤ Type ALTER TABLE MailList
and press Enter.
■ The MySQL monitor
prompts for the next line.
‹ Type RENAME TO mail;
and press Enter.
■ The table is now renamed.
Y
ou can use the ALTER TABLE command in MySQL
to rename an existing table. To rename a table,
specify the old name and the new name with the
RENAME TO keywords. For example, the following
command renames the MailList table to simply mail:
ALTER TABLE MailList
RENAME TO mail;
When choosing a new name for the table, follow the same
rules you follow when you create a table. Be sure that the
new table name does not conflict with an existing table in
the same database.
Renaming a table is virtually instantaneous. Once the table
has been renamed, you need to use the new name
whenever you refer to it, and any applications that use the
table should be updated to use the new name.
Unlike other ALTER TABLE queries, the MySQL server
does not create a temporary copy of the table when
renaming a table. Instead, the data files for the table in the
file system are simply renamed. This is much faster than
copying the table, and is unaffected by the amount of data
stored in the table.
MySQL 3.23 and later also support the RENAME TABLE
command for the same purpose. The following example
renames the MailList table to mail using RENAME TABLE:
RENAME TABLE MailList TO mail;
There is no difference in the way a table is renamed using
RENAME TABLE or ALTER TABLE, so you can use the
command of your choice if your MySQL server supports
both. If you are unsure which version of MySQL you are
using, simply use ALTER TABLE.
RENAME A TABLE
74
RENAME A TABLE
MySQL
516922 Ch03.F 9/26/02 11:32 AM Page 74
Note: This example uses the testdb
database. Instructions for creating it
are in Chapter 1 and on the CD-ROM.
⁄ Type USE testdb; and
press Enter.
■ The database is now
selected.
¤ Type CREATE TABLE temp (
and press Enter.
‹ Type field1 VARCHAR(5),
field2 INT ); and press Enter.
■ This creates the temp table
as a default MyISAM table.
› Type ALTER TABLE temp
TYPE=Heap; and press Enter.
■ The table is converted to a
Heap table.
ˇ Type SHOW TABLE STATUS;
and press Enter.
■ The list of tables and
details is displayed, verifying
that the table type has
changed.
75
Y
ou can use ALTER TABLE to change the options
used when the table was created, including the table
type. If you do not specify a type when a table is
created, MySQL uses the default type, MyISAM.
Along with MyISAM, MySQL supports several alternate table
types. These include ISAM, the older format used to support
legacy data; Heap tables, which are stored in memory and
use a hashed index; and BDB and InnoDB tables, high-
performance types that support transactions for increased
reliability. Chapter 2 explains these table types in more detail.
To change a table type, use ALTER TABLE with the TYPE=
option. You do not need to know the original table type to
do this. For example, the following command changes the
type of a table called temp to Heap:
ALTER TABLE temp TYPE=Heap;
You can change a table's type to any of the types supported
by your particular MySQL server installation. Keep in mind
that the BDB and InnoDB table types are only supported if
you have installed the MySQL-Max package or explicitly
included them when compiling MySQL from source.
You can also use ALTER TABLE with other table options.
Table options allow you to specify various settings for the
table, such as MAX_ROWS and MIN_ROWS to define the
expected maximum and minimum numbers of rows,
AUTO_INCREMENT to set the next value to be used in an
auto-increment column, and COMMENT to specify a
comment or description of the table. The various table
options are listed in Chapter 2.
You can change table options with ALTER TABLE using the
same keywords you use when creating a table. For example,
you can use the COMMENT keyword to add a comment to a
table, replacing any comment specified when the table was
created:
ALTER TABLE temp COMMENT="This is the new
comment.";
CHANGE A TABLE TYPE
CHANGE A TABLE TYPE
MODIFY TABLES
3
516922 Ch03.F 9/26/02 11:32 AM Page 75
MySQL
76
A
fter you create a database and one or more tables to
store data, you can use the INSERT and REPLACE
commands in MySQL to add rows of data to the
table. After a table contains data, you can use the DELETE
command to delete a row, a group of rows, or the entire
table.
USING INSERT AND DELETE QUERIES
MySQL
Specify Column Names
You can optionally specify one or more column names
and provide values for those columns only. If you do
not specify column names, you must provide values for
all columns in the correct order.
Example:
INSERT INTO address (name, state)
VALUES ("Jane Doe", "CA");
Using LOW_PRIORITY
You can optionally specify the LOW_PRIORITY keyword
with INSERT. If this is specified, MySQL will wait until
no clients are reading from the table before inserting
the record. This prevents other clients from being
delayed when the table is locked. The MySQL client
waits until the INSERT has completed before returning.
Using DELAYED
The DELAYED option is similar to LOW_PRIORITY.
When you specify this keyword, the MySQL client
returns immediately, but the server holds the row and
inserts it when no clients are reading from the table.
Copy Data Between Tables
You can use SELECT with INSERT to select one or
more columns of data in one or more rows of an
existing table to copy to the destination table. The
SELECT clause can specify column names and the table
to take data from. You can also use an optional WHERE
clause to specify one or more conditions that each row
must match in order to be copied.
Example:
INSERT INTO mail (name, address)
SELECT name, address FROM address;
ADD DATA WITH INSERT
The REPLACE command is identical to INSERT
with the exception that if you add a row that
duplicates the value of an existing row in a unique
index or primary key column, the existing row is
deleted and replaced with the new row.
Example:
REPLACE INTO mail (name, address)
VALUES ("John Doe", "33 Birch Street");
REPLACE DATA WITH REPLACE
76
The INSERT command in MySQL adds one or more
records to an existing table. To insert data, use INSERT
INTO tablename and specify the values for each
column of the table. The keyword INTO is optional.
Example:
INSERT INTO address
VALUES ("John Smith", "321 Elm Street",
"Chicago", "IL", 0
516922 Ch04.F 9/26/02 11:33 AM Page 76
77
77
Using the WHERE Clause
You can add the WHERE clause to a DELETE query to
select a single row or group of rows to be deleted.
WHERE can be followed by a condition that matches
a value in any of the fields of the table.
MySQL displays the number of deleted rows after a
DELETE query when the WHERE clause is completed.
This is the only way to determine whether rows were
successfully deleted. MySQL does not display an error
message if the WHERE clause matches no rows.
Using LIMIT
You can optionally use the LIMIT clause with a DELETE
query to limit the number of rows to be deleted. This
serves two purposes: first, if you are unsure how many
rows will be matched by a WHERE clause, using a LIMIT
clause will ensure that a large number of rows cannot
be deleted by mistake.
Second, it limits the amount of time a table is locked
during the DELETE process. You can minimize the
slowdown caused by a DELETE query by using a LIMIT
clause and repeating the DELETE command until all of
the desired rows have been deleted.
Example:
DELETE FROM address
WHERE state = "CA" LIMIT 10;
Using ORDER BY
In MySQL 4.0 and later, you can use the ORDER BY
clause along with LIMIT in a DELETE query. This allows
you to control not only how many rows are deleted, but
which rows are chosen. Rows are deleted in alphabetical
or numeric order based on the value of the column you
select.
You can optionally follow the ORDER BY clause with
the keyword ASC to delete rows in ascending order,
the default, or DESC to delete in descending order.
Example:
DELETE FROM address
ORDER BY name ASC LIMIT 10;
Using TRUNCATE
The TRUNCATE query is identical to DELETE except that
it does not allow a WHERE clause. It deletes all of the
table's records without confirmation. When you delete
all rows using TRUNCATE or DELETE, MySQL actually
deletes the entire table and then creates a new, empty
table. This improves speed, but there is no way to
determine the number of rows that were deleted by
the query.
Example:
TRUNCATE TABLE address;
DELETE DATA FROM TABLES
ADD AND DELETE DATA
4
You can use the DELETE command in MySQL to delete
one or more rows of data from a table. The simplest
version of a DELETE query deletes all of the rows from a
table. Be cautious because this command erases the
entire table.
Example:
DELETE FROM address;
516922 Ch04.F 9/26/02 11:33 AM Page 77
Note: This example uses the address
table in the testdb database. See
Chapter 1 or the CD-ROM to create
them if necessary.
⁄ From the MySQL monitor,
type
USE testdb; and press
Enter.
■ The database is now
selected.
¤ Type INSERT INTO address
and press Enter.
■ The MySQL monitor
prompts for the next line.
‹ Type VALUES ("John
Smith", "321 Elm Street", and
press Enter.
■ The MySQL monitor
prompts for the next line.
A
fter you create a table in a MySQL database, you
can begin adding data to the table. The primary way
to add rows of data to a table is with the INSERT
query. To add a row, you specify the values for all of the
row's columns:
INSERT INTO address
VALUES ("John Smith", "321 Elm Street",
"Chicago", "IL", 0);
Within the VALUES section of the INSERT query, you
specify a value for each of the columns of the table. Values
for text fields should be enclosed within single or double
quotes. Values for numeric fields can simply be included
as a number. The entire list of values should be enclosed
within parentheses.
With this form of the INSERT query, you need to specify
the values for each of the fields in the order they are
defined in the table's definition. If you are unsure of the
order, you can use one of these two equivalent commands
to list the fields:
DESCRIBE tablename;
SHOW COLUMNS FROM tablename;
As with other SQL queries that work with tables, you
should first use the USE command to select the database
that contains the table you will be working with. You can
insert one row into the table with each INSERT query.
You can add data with INSERT from the MySQL monitor's
command line or from an application that works with
MySQL. One common solution for data entry is to use
a Web form linked to a program written in PHP, Perl, or
another language to validate and insert the data.
ADD A ROW TO A TABLE
MySQL
78
ADD A ROW TO A TABLE
516922 Ch04.F 9/26/02 11:33 AM Page 78
› Type "Chicago", "IL", 0);
and press Enter.
■ This completes the
INSERT query. The row
is added to the table.
ˇ Type SELECT * FROM
address; and press Enter.
■ This SELECT query
displays the contents of the
table. Verify that the new row
was added.
ADD AND DELETE DATA
4
79
As another example of the INSERT query in MySQL, you can add a row of data to the employee table
you created in Chapter 2. The fields of this table are defined with the following CREATE TABLE query:
Example:
CREATE TABLE employee (
FirstName CHAR(50),
LastName CHAR(50),
Salary DECIMAL(8,2),
HireDate DATE,
Department INT );
To add a row to this table, you can specify values for the fields in the same order they were specified
when the table was created. When using this type of INSERT command, be sure to specify a value for
every column of the table.
Example:
INSERT INTO employee VALUES (
"Sue", "Johnson", "30000",
"2002/05/11", 21);
516922 Ch04.F 9/26/02 11:33 AM Page 79
Note: This example uses the address
table in the testdb database.
⁄ From the MySQL monitor,
type
USE testdb; and press
Enter.
■ The database is now
selected.
¤ Type INSERT INTO
ADDRESS and press Enter.
■ The MySQL monitor
prompts for the next line.
‹ Type (name, address) and
press Enter.
■ You are prompted for the
next line.
› Type VALUES ("John Doe",
"1445 West 10th Ave."); and
press Enter.
■ This completes the
INSERT query. The row is
added to the table.
I
n a table with a large number of fields, you may find it
cumbersome to specify values for each of the columns
in order. Fortunately, you can use an alternate INSERT
query syntax to insert a row and specify values for
whichever columns you choose, in the order you specify.
To insert a row and specify the columns to add, list the
column names in parentheses before the list of values. For
example, this query inserts a row into the address table and
specifies values for the name and address columns only:
INSERT INTO address
(name, address)
VALUES ("John Doe", "1445 West 10th Ave.");
In this form of the INSERT query, you need to use the
correct column names to match the table's definition, but
you do not need to specify values for all columns or in any
particular order. The row added to the table will contain
the columns and values you specified. It will also include
default values for any columns your INSERT query did not
include.
This type of INSERT query has the advantage of being
simpler when you are not specifying values for all fields.
Another advantage is that if you later change the definition
of the table and add columns or change the column order,
the same INSERT query will still work as long as the
columns you include in the query have not changed.
If you specify a column name that is not defined in the table,
MySQL will return an Unknown column error message. If
you are unsure of the exact column names, use DESCRIBE
tablename to display a list.
SPECIFY COLUMNS FOR A NEW ROW
MySQL
80
SPECIFY COLUMNS FOR A NEW ROW
516922 Ch04.F 9/26/02 11:33 AM Page 80
Note: This example uses the address
table in the testdb database.
⁄ From the MySQL monitor,
type
USE testdb; and press
Enter.
■ The database is now
selected.
¤ Type INSERT
LOW_PRIORITY INTO address
and press Enter.
■ The MySQL monitor
prompts for the next line.
‹ Type VALUES ("Jane Smith",
"321 Elm Street", and press
Enter.
■ You are prompted for the
next line.
› Type "Chicago", "IL", 0);
and press Enter.
■ This completes the
INSERT query. The client
waits until the table is free
before inserting the data.
SPECIFY INSERT PRIORITY
81
W
ith some MySQL table types, an INSERT query
that adds data to the table will lock the table, and
the table cannot be read by other clients during
the processing of INSERT. You can optionally specify the
LOW_PRIORITY keyword in an INSERT query to allow
clients to continue to read the table:
INSERT LOW_PRIORITY INTO address
VALUES ("Jane Smith", "321 Elm Street",
"Chicago", "IL", 0);
When you specify LOW_PRIORITY, your client waits until
no clients are reading from the table before inserting the
row. In a busy table, this may take some time.
A similar option is provided with the DELAYED keyword.
When you specify DELAYED, your client returns immediately
as if the insert were successful. The server then holds the
request until no clients are reading from the table, and then
inserts the row. This provides a faster alternative, but
there is no immediate way to confirm that the insert was
successful.
INSERT DELAYED INTO address (name, address)
VALUES("Susan Jones", "112 West 5th");
The LOW_PRIORITY and DELAYED options perform similar
functions and cannot both be used in the same INSERT
query. By default, neither option is enabled.
With MySQL's default MyISAM table type, LOW_PRIORITY
and DELAYED are usually unnecessary because this table
type supports concurrent inserts: You can insert a row while
other clients are reading data from the table. These options
are mostly useful for tables using the older ISAM format.
Because an INSERT operation is usually fast on a table with
few users, these options are unnecessary in this case and
may slow down the process of inserting rows.
SPECIFY INSERT PRIORITY
ADD AND DELETE DATA
4
516922 Ch04.F 9/26/02 11:33 AM Page 81
Note: This example uses the links
table in the testdb database. See the
Extra section if you have not created
this table.
⁄ From the MySQL monitor,
type
USE testdb; and press
Enter.
■ The database is now
selected.
¤ Type INSERT INTO links
(title, link, num) and press
Enter.
■ The MySQL monitor
prompts for the next line.
‹ Type VALUES ("Yahoo",
"
NULL); and press Enter.
■ This completes the
INSERT query. The row is
added to the table.
A
s another usage of INSERT queries, you can use
INSERT to work with a table that includes an
auto-increment column. Auto-increment columns
are integer columns created with the AUTO_INCREMENT
attribute. They are automatically filled with a unique
numeric value when you create a row.
To insert a row in a table with an auto-increment column,
simply use a zero or NULL as the value for that column. For
example, this INSERT query adds a row to the links table
you created in Chapter 2. It includes values for the title and
link fields as well as the auto-increment num field.
INSERT INTO links (title, link, num)
VALUES ("Yahoo", "
NULL);
Because NULL is specified as the value for the num column,
a new value is stored in the column. The MySQL server keeps
track of the largest number used in the column so far, and
adds one to that number to create the value for a new row.
Because the default value for an auto-increment column is
the next numeric value, you can also specify no value for the
column. It will still be assigned a unique value.
If you specify an integer value greater than zero for the auto-
increment column, this value will be used instead of the
next value in order. However, because an auto-increment
column must be defined as a unique index or primary key,
the INSERT query does not work if you specify a value that
already exists in the table. If the INSERT is successful, the
value you specified is used as the new starting point for the
automatic numbering.
USING AUTO-INCREMENT COLUMNS
MySQL
82
USING AUTO-INCREMENT COLUMNS
516922 Ch04.F 9/26/02 11:33 AM Page 82
› Type INSERT INTO links
(title, link) and press Enter.
■ You are prompted for the
next line.
ˇ Type VALUES ("Microsoft",
"
and press Enter.
■ This completes another
INSERT query. A row is
added to the table.
Note: Although no value was
specified for the num column this
time, it is still filled with the next
auto-increment value.
Á Type SELECT * FROM links;
and press Enter.
■ This displays the data in
the links table, including the
two rows you added.
ADD AND DELETE DATA
4
The links table was created in Chapter 2, and the num field was
added in Chapter 3. If you have not created this table, you can
use the following MySQL command to create it now, including
the auto-increment num field.
Example:
CREATE TABLE links (
title VARCHAR(100),
url VARCHAR(255),
description TEXT,
num INT AUTO_INCREMENT PRIMARY KEY);
You can find out the next value for a table's auto-increment column
with the SHOW TABLE STATUS command in the MySQL monitor.
This command lists all of the tables in the current database and
various details about each table. The auto-increment column lists
the next auto-increment value for each table.
While sequential numbers are used for the auto-increment column
when you add rows to the table, the values of all of the existing
rows are not necessarily continuous. If you delete rows, MySQL
does not re-use the auto-increment values from the deleted rows.
Thus, do not assume that the next auto-increment value indicates
the number of existing rows.
83
516922 Ch04.F 9/26/02 11:33 AM Page 83
Note: This example uses the address
table in the testdb database. See
Chapter 1 or the CD-ROM to create
them.
⁄ From the MySQL monitor,
type
USE testdb; and press
Enter.
■ The database is now
selected.
¤ Type INSERT INTO address
(name, updatetime) and press
Enter.
■ You are prompted for the
next line.
‹ Type VALUES ("Albert
Einstein", NULL); and press
Enter.
■ This completes the
INSERT query. The row is
added to the table.
T
imestamp columns store a date and time to the exact
second. If a table includes a timestamp column, it will
usually be updated with the current time and date
when you add a row using INSERT. Only the first timestamp
column in a table is automatically updated.
To add a row and ensure that the timestamp column is
updated, specify the NULL value for the timestamp column.
This example inserts a row into the address table and
updates the timestamp in the updatetime column:
INSERT INTO address (name, updatetime)
VALUES ("Albert Einstein", NULL);
The NULL value updates the timestamp column with the
current date and time. Unlike auto-increment columns, you
cannot use zero to force an update. Timestamp columns
can actually contain a zero value, so use NULL when you
want to update the timestamp.
Because the first timestamp column is updated by default,
you do not need to specify a value at all. The following
example will also add a row to the address table and
update the timestamp:
INSERT INTO address (name, address)
VALUES ("Mae West", "333 Cedar St.");
If you are updating a timestamp column other than the first
one in a table, you must explicitly set it to NULL to store the
current date and time. If for some reason you want to use a
different value in a timestamp, you can override it by
specifying a date and time value:
INSERT INTO address (name, updatetime)
VALUES ("Mark Twain", "20050510123000");
As with other columns that store dates and times, the value
you assign to a timestamp column should include the year,
month, date, hours, minutes, and seconds values in order.
You can also specify a date without a time, and zero values
will be used for the time portion of the timestamp.
USING TIMESTAMP COLUMNS
MySQL
84
USING TIMESTAMP COLUMNS
516922 Ch04.F 9/26/02 11:33 AM Page 84
› Type INSERT INTO address
(name, address) and press
Enter.
■ You are prompted for the
next line.
ˇ Type VALUES ("Mae West",
"333 Cedar St."); and press
Enter.
■ This completes the
INSERT query to add a
second row to the table.
Á Type SELECT * FROM
address; and press Enter.
■ This displays all of the
table's rows, including the
two you added.
Note: Both rows should show the
date and time when you typed the
INSERT
commands in the
timestamp field.
ADD AND DELETE DATA
4
85
The UPDATE query in MySQL, discussed further in Chapter 5, updates
one or more rows of a table with new information. When you update
a row, MySQL automatically sets the first timestamp column of the row
to the current date and time, even if you did not specify a value for that
column. For example, this command updates a row with a new address:
Example:
UPDATE address
SET address="123 Oak Street"
WHERE name = "Albert Einstein";
When this command is executed, the updatetime field for that row will
be set to the current date and time. While this is usually a useful feature,
there are times when you will want to update a row without changing
the timestamp column. To do this, you can specify that the column
should keep its old value by specifying the column name as the value.
Example:
UPDATE address
SET address="123 Oak Street",
updatetime=updatetime
WHERE name = "Albert Einstein";
As with new table rows, if you want to update a timestamp column that
is not the first one in the table, you need to explicitly assign the NULL
value to the column.
516922 Ch04.F 9/26/02 11:33 AM Page 85
Note: This example uses the mail
table in the testdb database. If you
have not created this table, see the
instructions in the Extra section.
⁄ From the MySQL monitor,
type
USE testdb; and press
Enter.
■ This selects the database.
¤ Type INSERT INTO mail
(name, address, city) and press
Enter.
■ You are prompted for the
next line.
‹ Type VALUES ("Samuel
Johnson", "19 East 5th", "New
York"); and press Enter.
■ This completes the
INSERT query. The row is
added to the table.
A
long with INSERT, MySQL also includes a REPLACE
command. Like INSERT, REPLACE adds a new row
to a table. The difference is that when you add a row
with INSERT that has the same value as an existing row for
a unique index or primary key column, an error is returned.
If you add a row with REPLACE, it replaces the existing row.
If there is no existing row, REPLACE works just like INSERT.
For example, the following query adds a new row to the
mail table using REPLACE:
REPLACE INTO mail (name, address)
VALUES ("Samuel Johnson", "3394 Willow
Ave.");
In this example, the name field is the table's primary key. If
the table has an existing row with the same name specified
here, the existing row will be deleted before the new row is
added.
Do not be tempted to use REPLACE when you want to
update information in a row. While the command above will
replace the old record with the new one, it does not specify
values for all of the table's columns. Any existing data in the
unspecified columns will be lost, because the old row is
deleted entirely before the new one is inserted. You can use
the UPDATE command, discussed in Chapter 5, to update
one or more columns of a row without erasing existing data.
When you execute a REPLACE query using the MySQL
monitor, it displays the number of rows affected by the
query. This number will be one if the new row did not
replace an existing row, or two if the old row was deleted
and the new row was added.
REPLACE AN EXISTING ROW
MySQL
86
REPLACE AN EXISTING ROW
516922 Ch04.F 9/26/02 11:33 AM Page 86